If you are using Google Forms to capture leads for your Travel Company, you can easily bring those leads into the Sembark Dashboard using API Integration and Google App Scripts.
This is a step-by-step guide on how to connect your Google Forms with your Sembark Dashboard.
Requirements
Before you proceed, please check if your meet the following requirements.
- Sembark Travel CRM Account.
- A Google Form (existing or new one)
- Access Token generated from Sembark Travel CRM.
Integration Setup
Now, lets connect your Google Form with your Sembark Dashboard. To Automate and extend Google products and services, we can use Google Apps Script. These are custom programs / scripts which we can run when some events happen (form submitted etc.) inside google services. To create a custom script for our google form, we will follow the step below.
1. Set up Google Apps Script
-
Open your Google Form.
-
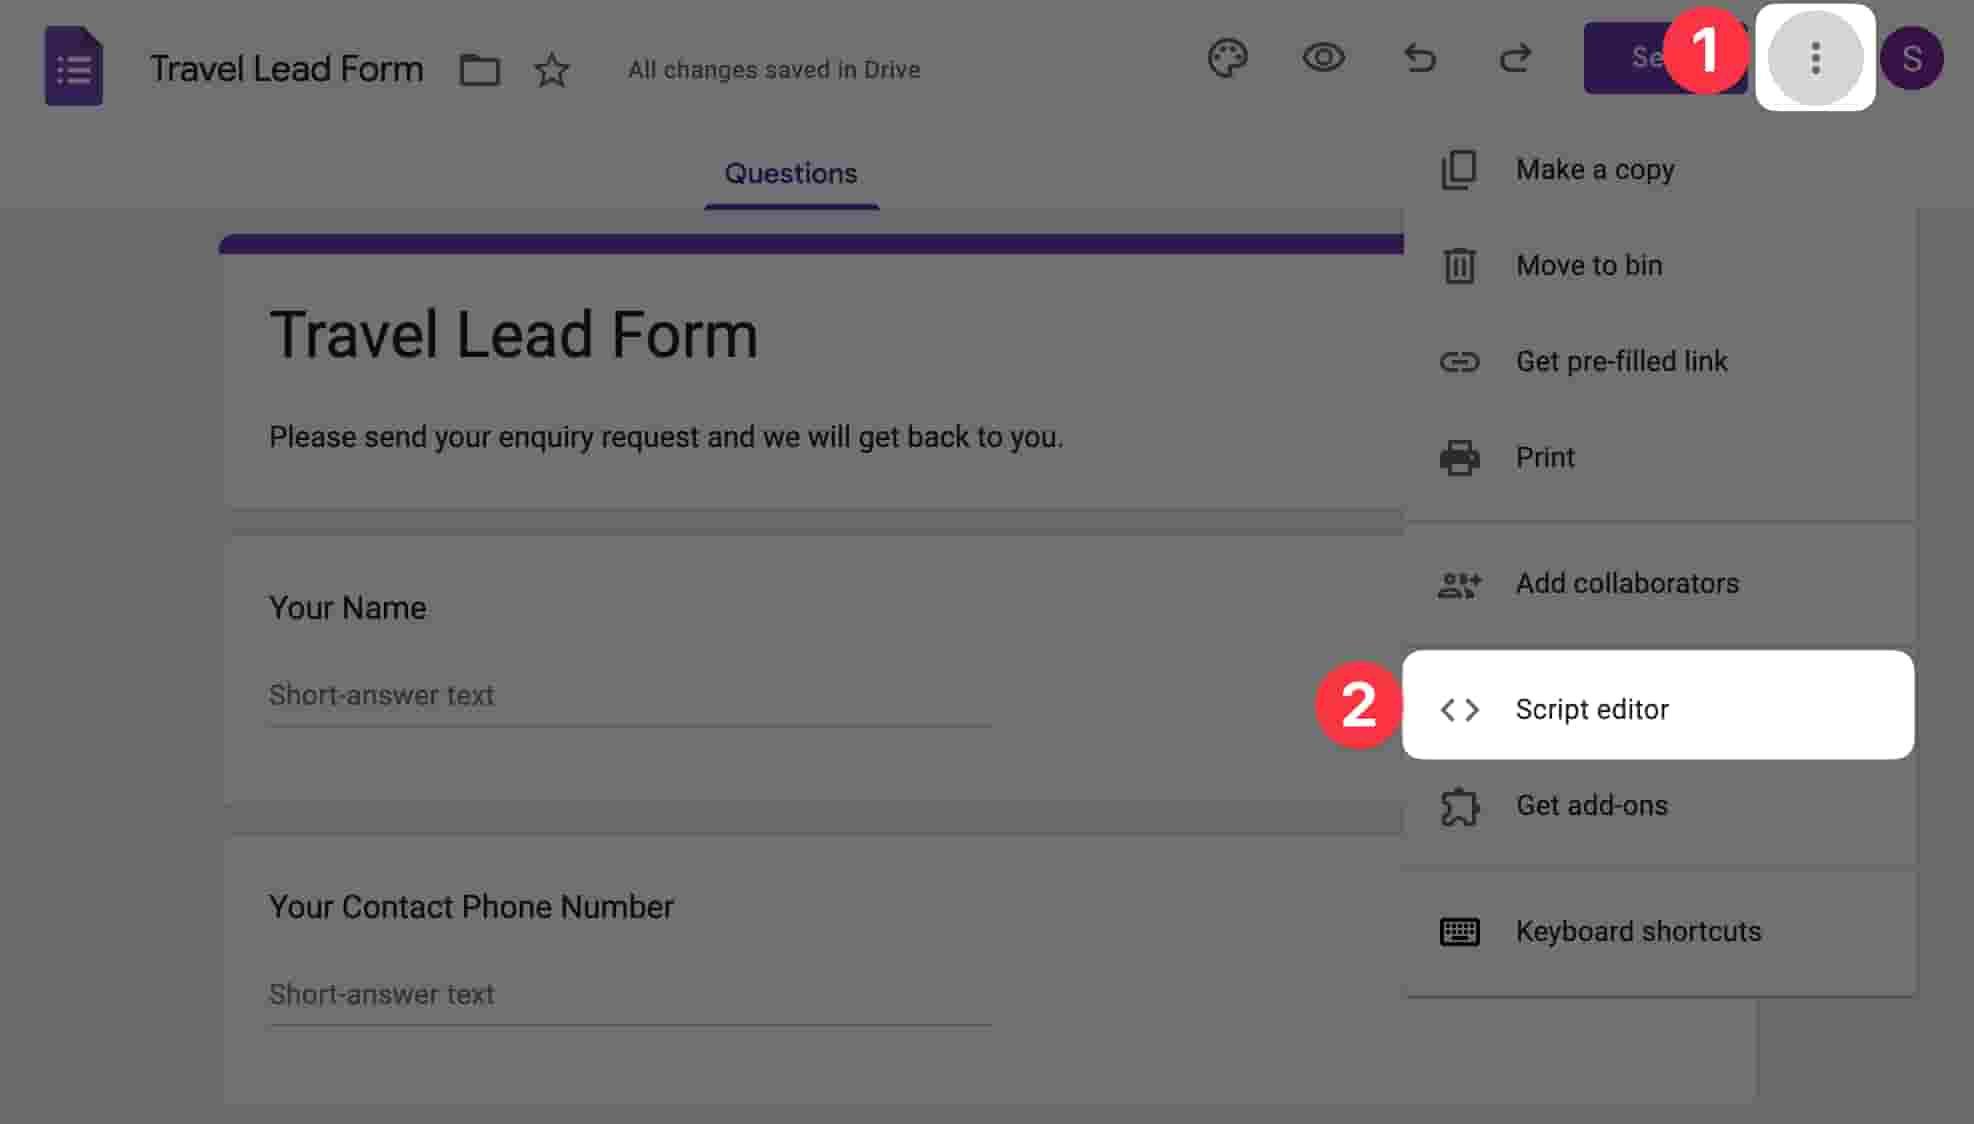
Click on the three vertical dots (More) in the top right corner.
-
Select “Script editor”. This will open a new window with the Apps Script editor.

2. Write the Apps Script code
On the next page, you should see the page that looks something like the image shown below.

This is where we will write our custom script code. But first, we will give our script a name. You can give any name of your choice. For this example, we will use Sembark API Script.
Next, we will copy the code mentioned below to the code editor.
function onSubmit(e) {
  // Get the form response
  var itemResponses = e.response.getItemResponses();
  var data = {};
  for (var i = 0; i < itemResponses.length; i++) {
    var itemResponse = itemResponses[i];
    var question = itemResponse.getItem().getTitle();
    var response = itemResponse.getResponse();
    data[question] = response;
  }

  // TODO 1: Map the questions
  // map the questions to sembark field mapping
  var questionToFieldMapping = {
    "Your Name": "name",
    "Your Contact Phone Number": "phone_number",
    "Any Specific Requirements": "comments",
  };

  Object.keys(questionToFieldMapping).forEach(function (formField) {
    var sembarkField = questionToFieldMapping[formField];
    data[sembarkField] = data[formField];
    delete data[formField];
  });

  // Set the API endpoint URL and Access Token
  var apiUrl = "https://api.sembark.com/integrations/v1/trip-plan-requests";
  // TODO 2: Update the access token
  var accessToken = "ACCESS_TOKEN";

  // Set the options for the HTTP request
  var options = {
    method: "post",
    contentType: "application/json",
    payload: JSON.stringify(data),
    headers: {
      Authorization: "Bearer " + accessToken, // Add the Authorization header
      Accept: "application/json",
    },
  };

  // Send the HTTP request
  try {
    var response = UrlFetchApp.fetch(apiUrl, options);
    Logger.log(response.getContentText());
  } catch (error) {
    Logger.log(error);
  }
}
Now we will make following changes in the code above which will depend on your Google Form questions and Sembark Account.
In the TODO 1 (mentioned in the code above), we will map your questions from Google Forms with the Sembark API fields. Sembark’s Leads API accepts data in a particular format as shown below.
type data = {
  name: string; // Guest/Customer Name
  phone_number: number; // Guest/Customer Contact Details
  comments: string; // Any specific requirements and custom messages
};
For a full list of accepted fields, please visit the full documentation of the leads api. But this list of fields might differ from the questions of your Google Forms. To ensure that the Sembark APIs correctly collect the data, we will have to map these questions to Sembark API fields.
Suppose we have following questions in our Google Form:
- Your Full Name
- Your Contact Phone Number
- Any Specific Requirements
But Sembark’s Leads API doesn’t understand these questions. So we will do the following mapping
- Your Full Name => mapped with =>
name - Your Contact Phone Number => mapped with =>
phone_number - Any Specific Requirements => mapped with =>
comments
In your custom Google Form, you might have your custom questions. In that case, please map the questions accordingly. If you find yourself in a situation where there are no appropriate fields to map to, you can simply omit the mapping and Sembark will auto capture those questions as they are.
Once we have mapped our questions, in the TODO 2, we will update the access token which you have generated from your Sembark Dashboard. If not, please follow the documentation on how to generate API access token. Once these steps are completed, save the script from the tool bar or by pressing ctrl+s on Windows/Linux OS or cmd+s on MacOS. You should see label Saved to Drive in the top navigation.
3. Set up the trigger
Now that we have written the script, we want to run (trigger) it when we receive a new form submission. To do that, we will follow the steps given below.
-
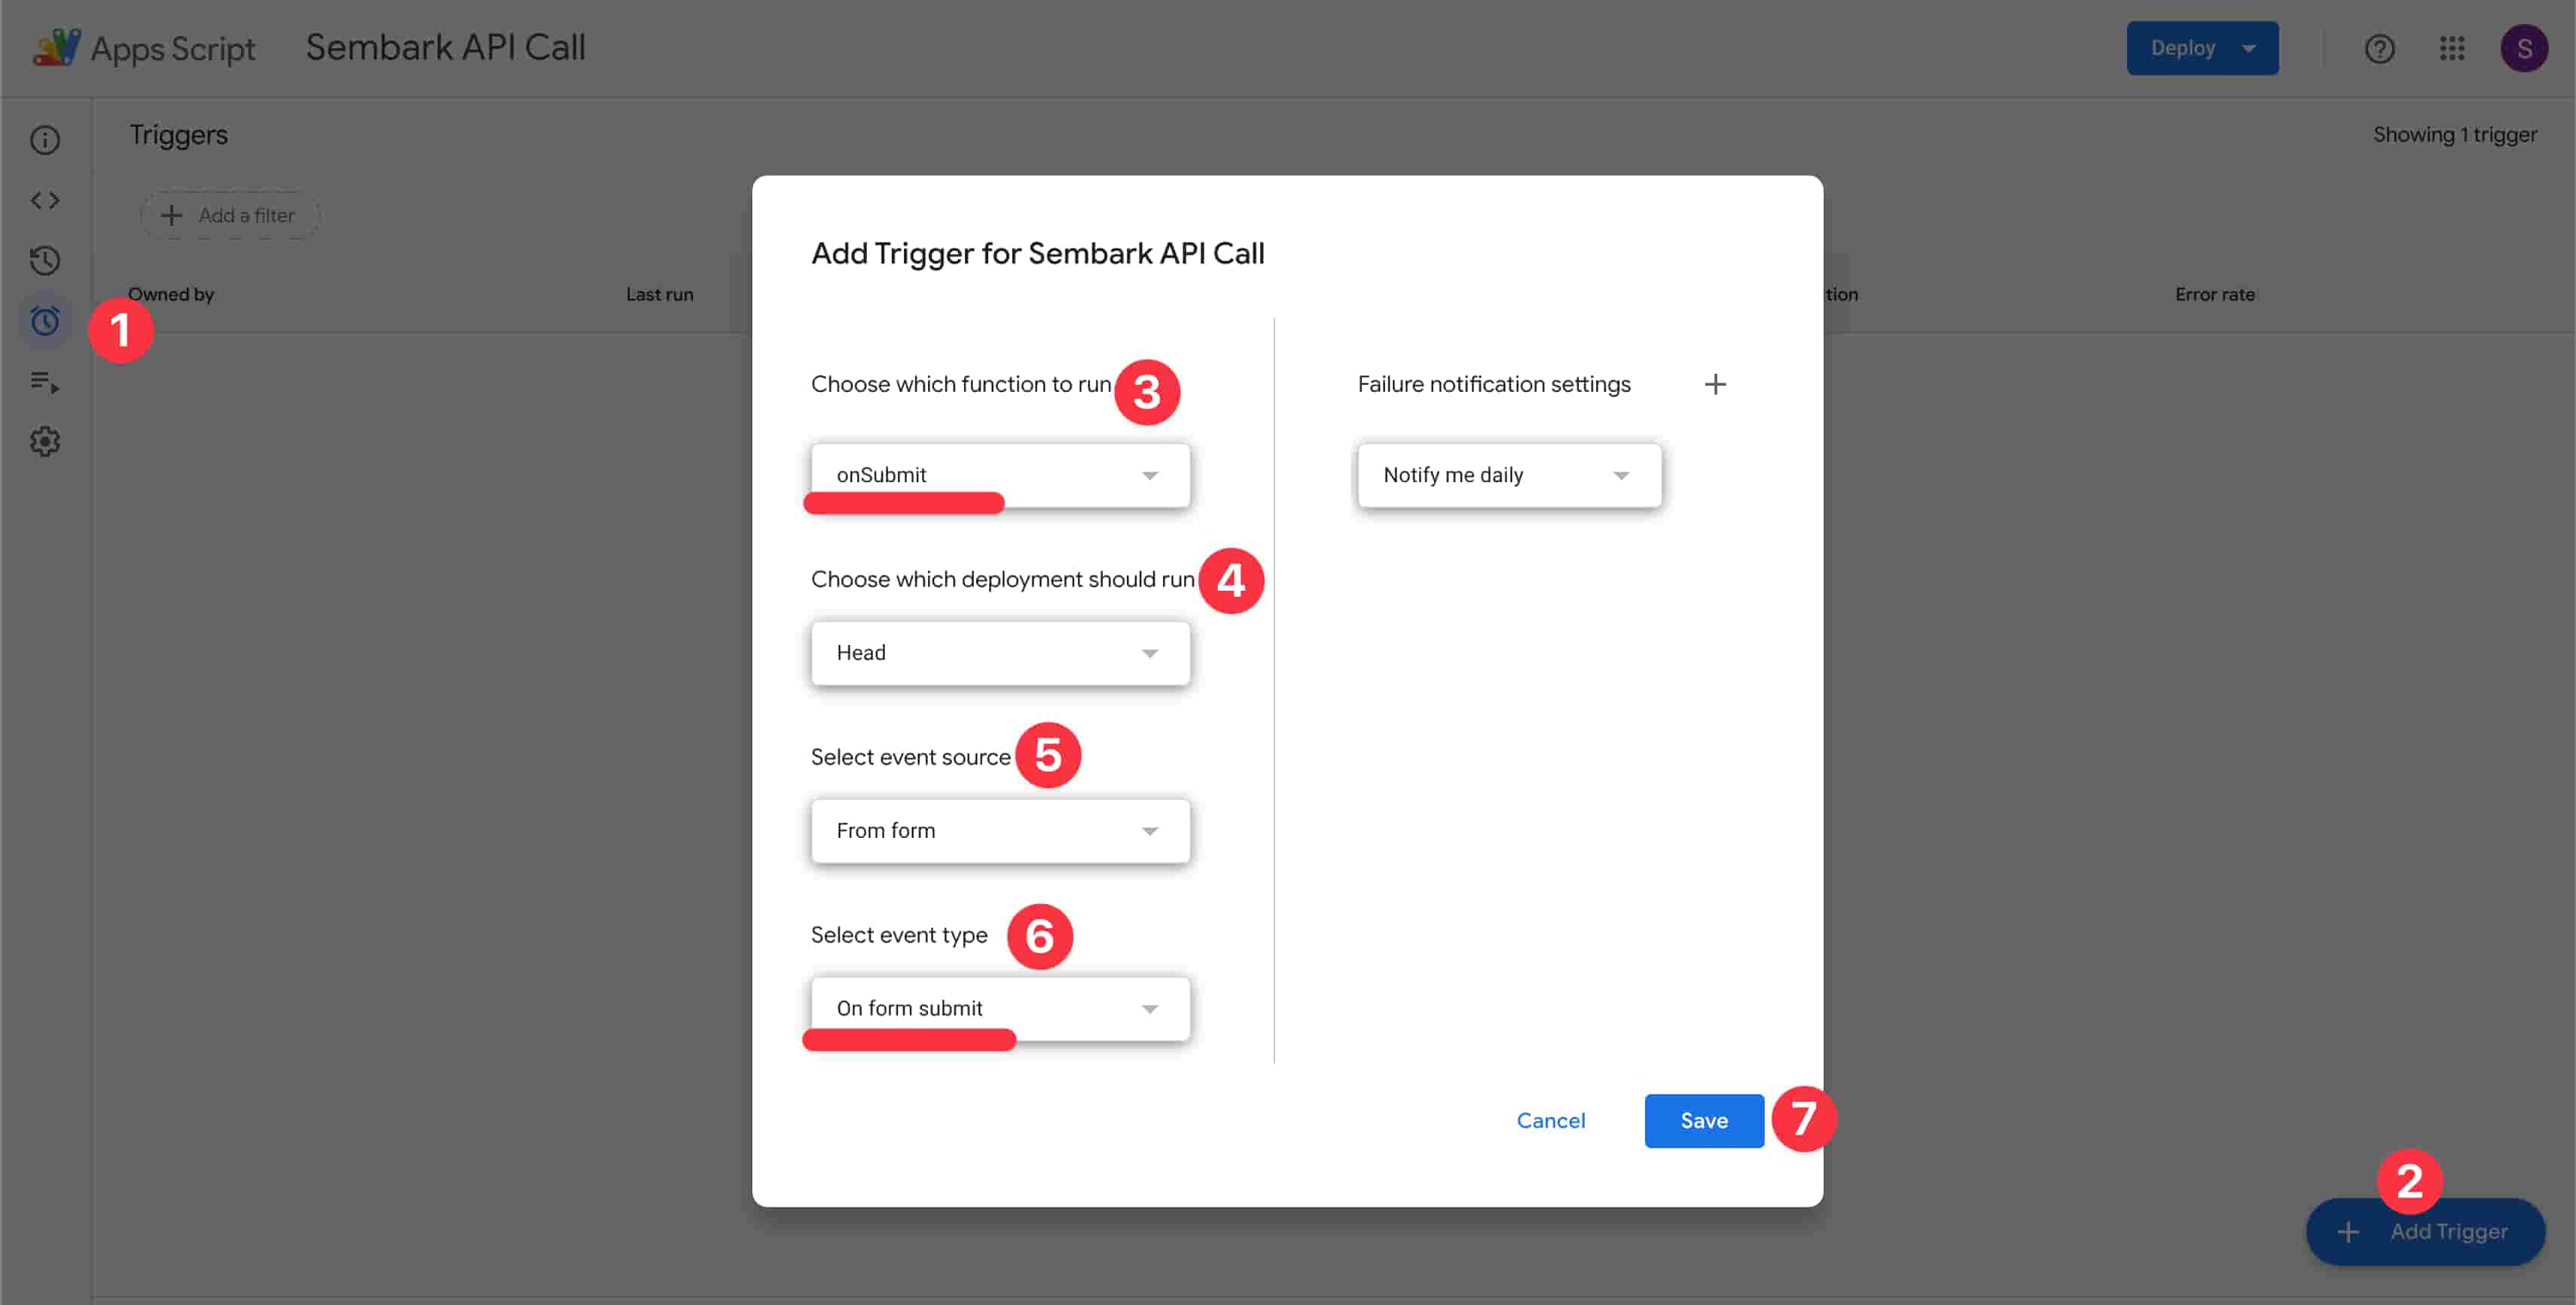
In the Apps Script editor, click on the clock icon (Triggers).
-
Click on ”+ Add Trigger”.
-
Configure the trigger as follows:
- Choose which function to run:
onSubmit - Choose which deployment should run:
Head - Select event source:
From form - Select event type:
On form submit
- Choose which function to run:
-
Click “Save”. You’ll need to authorize the script to access your Google Form.Incase popups are blocked, click on the top location bar and allow the popup.

This completes the integration between Google Form and the Sembark Dashboard.
Test Integration
To test the integration, simply fill your Google Form with test data and check the Sembark Dashboard.
Troubleshooting
If you are not receiving leads in your Sembark Dashboard, you should check the following step to debug the problem.
1. Execution Logs
The first step is to check the execution logs of the scripts. You should see a success/completed status in the executions.
- If you don’t see any logs at all, then the trigger is not properly setup. Please read this guide again for on how to setup the trigger.
- If you see a failed status, you should recheck the access token to ensure that the token in valid. On Sembark Dashboard, under the respective integration, you should see a the `last used on` field to check if the token was used or not. If not, the token in your script is incorrect.
If you need more help, please recheck the above steps or contact our support channel for your organization.