You can now archive cab types which are incorrect or no-longer used. Now you can attach billing details to your business and B2B trip sources. You can also attach the addresses to specific destination(s) to use destination-wise contact/billing addresses. This release also includes some other improvements and bug fixes in your sales and operations flow. Let go through them.
Cab Types Module
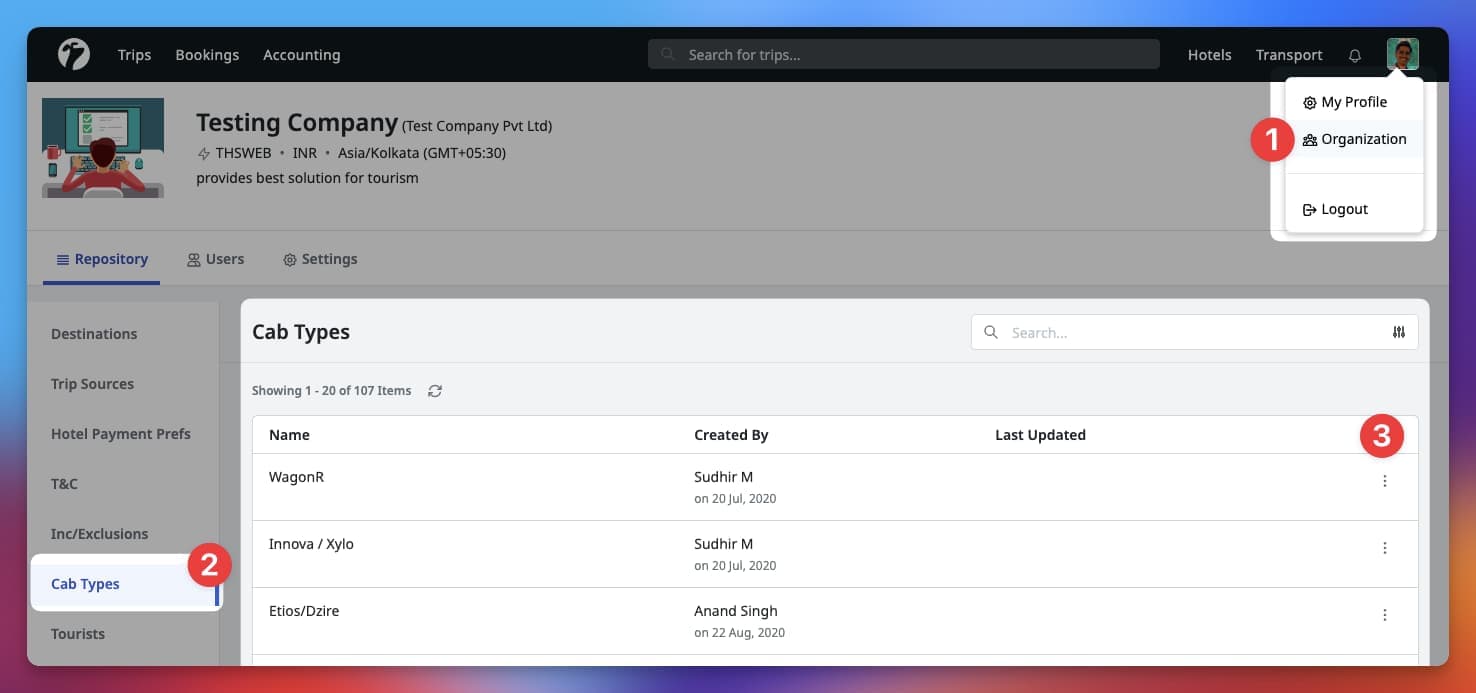
To give you clear visibility and management capabilities, we are introducing Cab Types Management module which you can access from your Organization > Repository . With this, you can view all different cab types used by your sales team in quotes. You can also archive cab types which are no-longer used or are duplicates.

Destination Wise Addresses
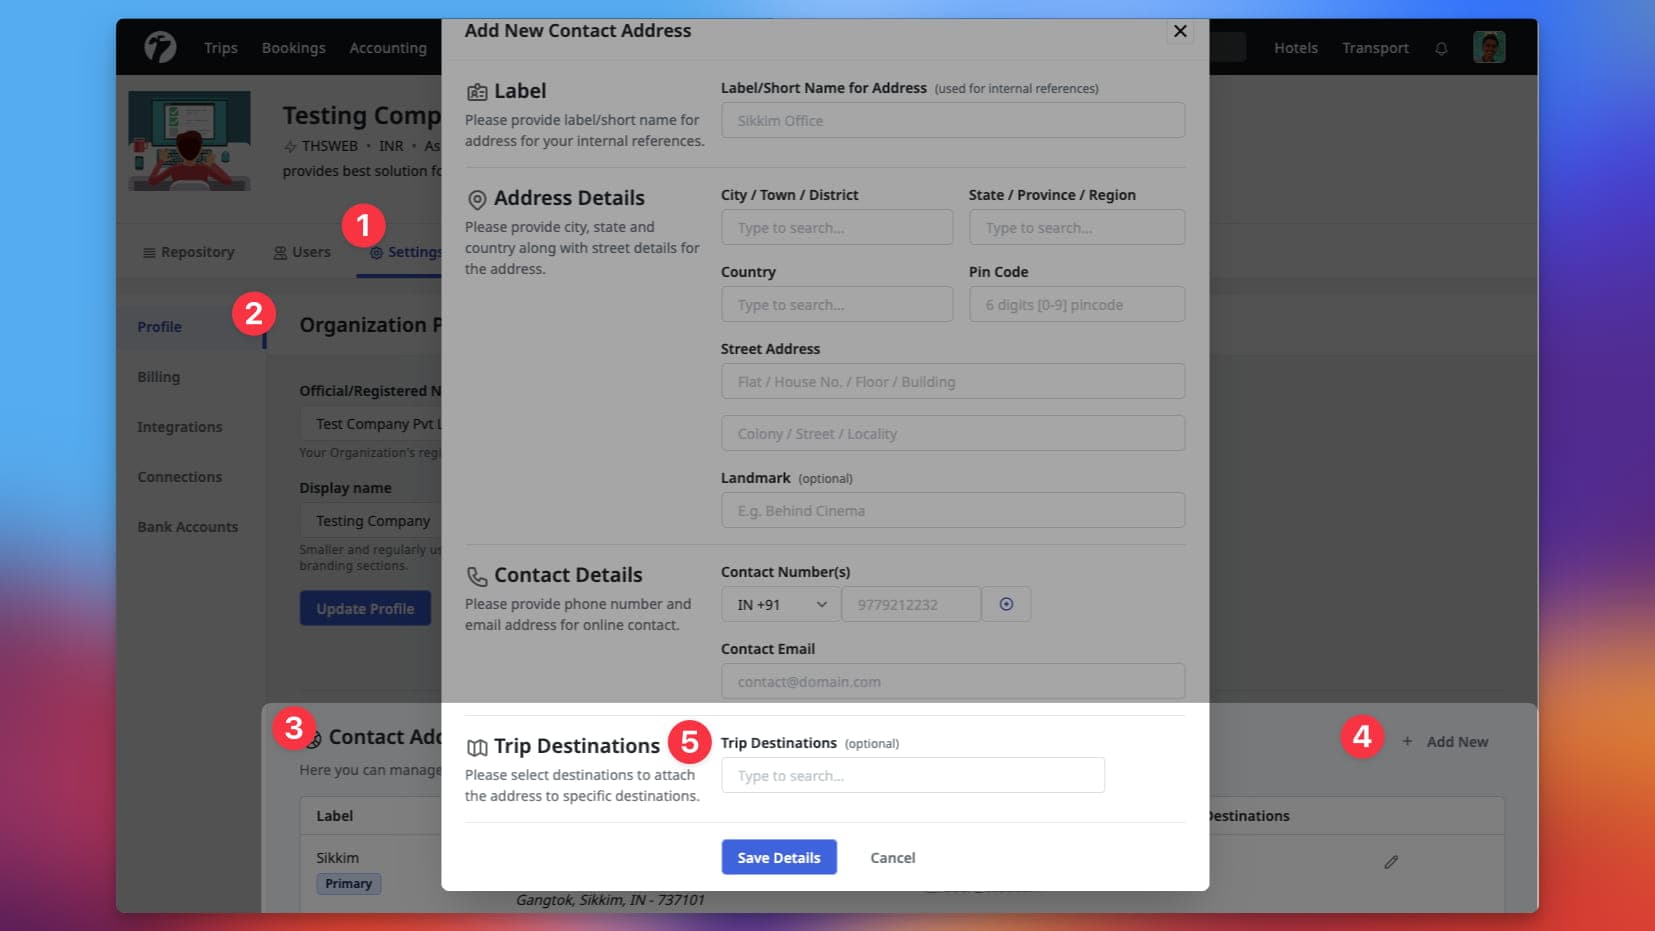
Along with your Primary Address(es), you can now add new Addresses (contact/billing) and set Trip Destination(s) to it which will allow you to use different address based on the Trip Destination.
Primary Addresses
Primary addresses are your default addresses which software will use when a Trip Destination is not explicitly assigned an Address. When adding address(es) in your Organization, the first address MUST a primary address and MUST NOT be associated with any Trip Destination.
Destination Wise Address
Only When Required
You should associate Trip Destination(s) to an Address if and only if the Trip Destination need to use a different address than your Primary Address.
Before creating destination wise address(es), you MUST a primary address. Your first Address (Contact and Billing) will be your primary address and you MUST NOT associated it with any Trip Destination. After creating a primary address, you can add new address(es) and select Trip Destinations to use the address(es) for specific destination only.

Billing Addresses
You can now add your Billing Addresses in your Organization’s settings page. This addresses will be used in places where you want to share your billing details with buyers and suppliers. In current workflow, these addresses are used in Hotel Booking Email to include the billing instructions.
Breaking Change
If you are already sharing your Billing Details in the Hotel Booking Email using the older method, you must add a Billing Address. This booking email will only use details from the your Billing Address.
Add Billing Address
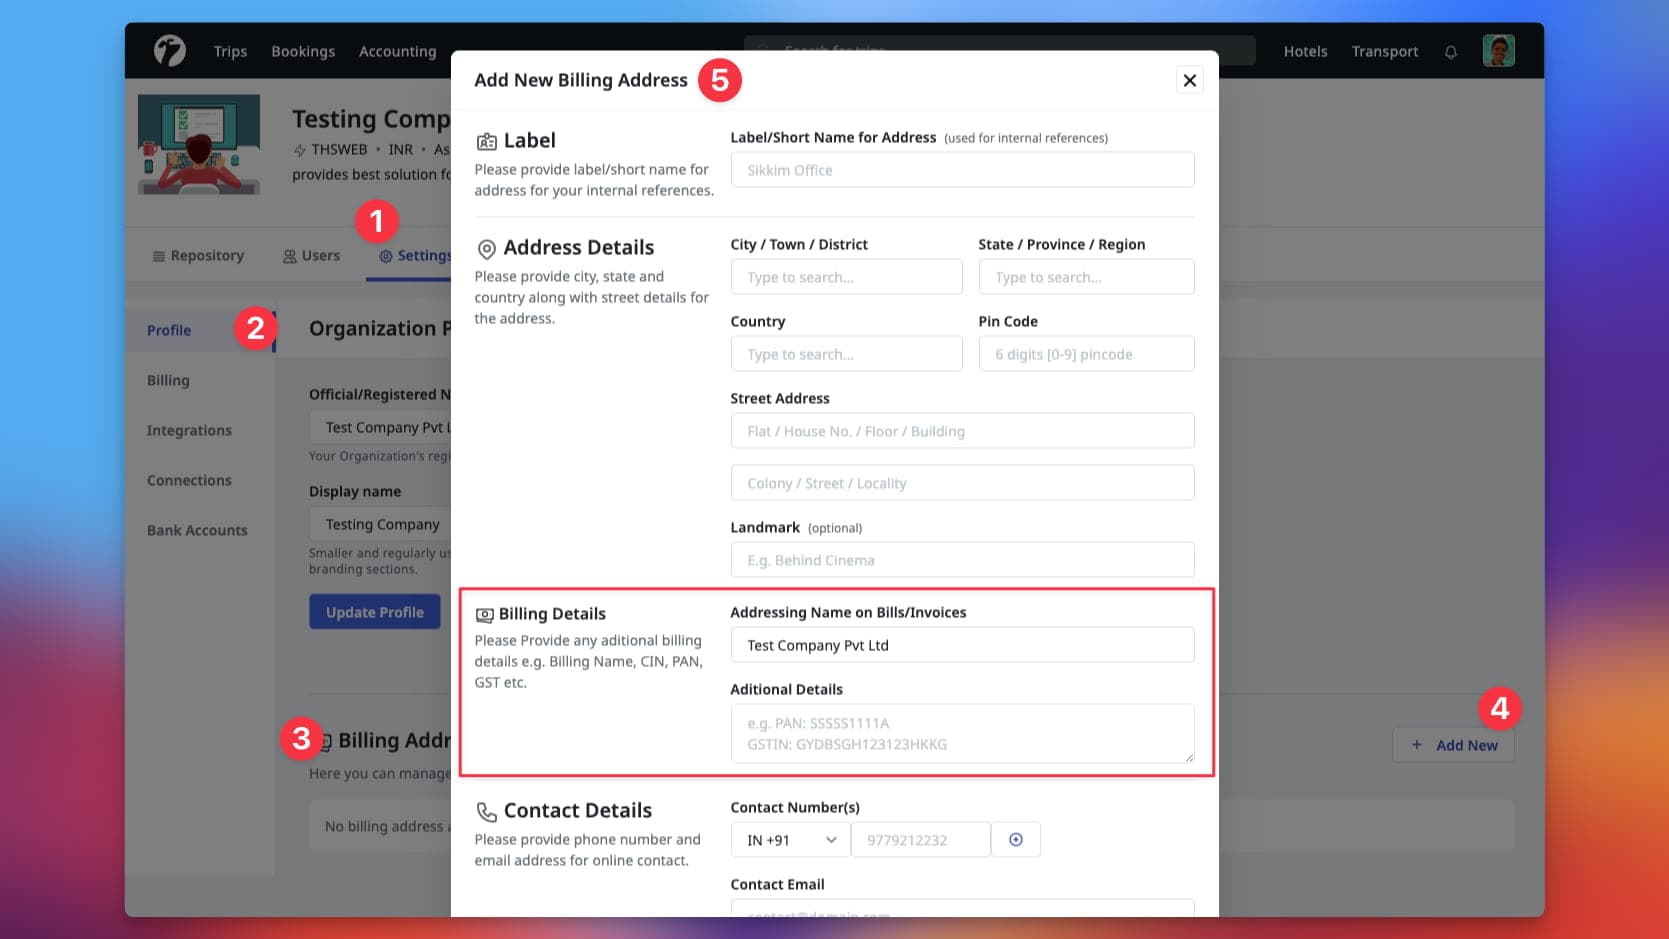
To add billing addresses, simply visit your organization’s settings page and scroll-down to the Billing Addresses section.

Adding the billing addresses is similar to how you would a contact address except the billing details. You should set the Billing Name to your organization’s billing name and Additional Billings details to include any extra information for the billing e.g. GSTIN, PAN, CIN etc. as mentioned bellow. In the contact details, you should include the contact details of your Accounts Team.
GSTIN: GYPOS123123KKSDF
PAN: GYPGSS123SSDG
CIN: 153223424GHSDG123123
Destination Wise
Before creating destination wise address(es), you MUST a primary billing address. Your first Billing Address will be your primary address and you MUST NOT associated it with any Trip Destination. Once a primary address is created, you can select Trip Destination(s) when creating a new Billing Address. This will allow you to use different billing details based on Trip Destination.
B2B Agent Billing Details
You can now attach the billing details to your B2B Agent Trip Sources. To add details, click on Edit button from Trip Source’s detailed page and add the billing details.
These details will be used in Invoice Generation (upcoming update).
Travel Activities in WhatsApp Message
The WhatsApp message of Quote Sharing will now include the Travel Activities as well. This update also improves the overall consistency of Transportation and Activity sharing in the WhatsApp message. Also, the given prices of flights will be included in the WhatsApp message.
Along with this, searching for Travel Activities in quotation will also filter-out the activities based on Ticket/Package type. Earlier, only activity’s names were searchable.
Notifications
We are bringing all your Sembark workspace notifications into its own module. This will become a centre place for all notifications in your Sembark workspace. Software automatically check for new notifications in background and you will see a red dot near the bell icon if you have any unseen notification.

Auto Integrated-Leads Distribution
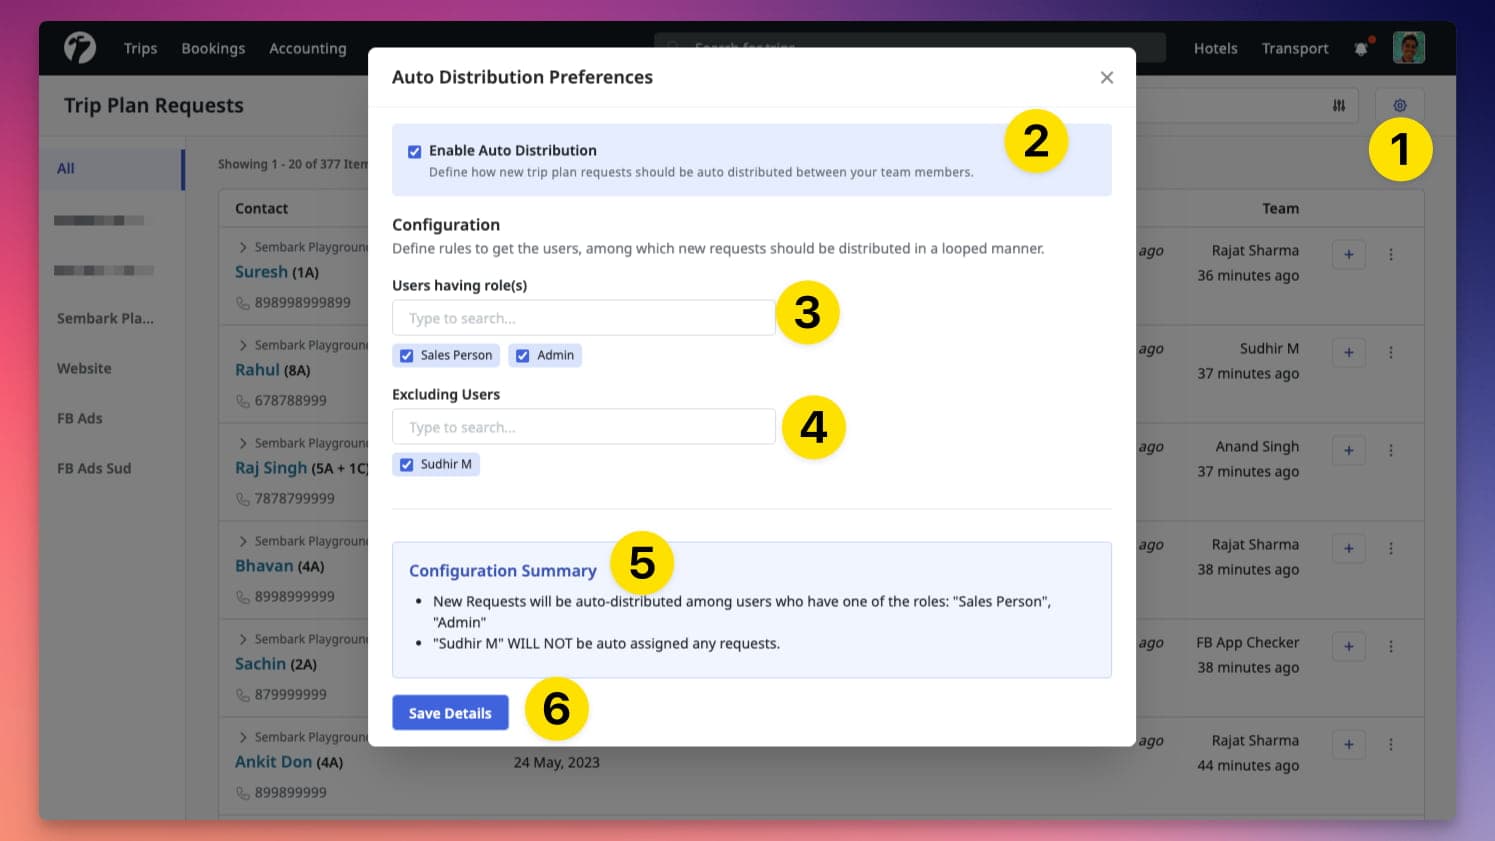
If you are using Sembark Integrations to bring leads from your Google Ads landing page(s) and Marketing site, you can now automate the leads distribution among your teammates on every new lead. All your new leads will be distributed evenly among your teammates based on rounding manner.

To enable auto distribution of your leads, follow the steps mentioned in the above image. Also check the Summary before saving details to make sure the set includes all the teammates who work on Leads. In case a team members is on leave, you should mention them in the Excluded Users to make to leads are not assigned to them. You can update these setting to your requirements any time.
Facebook Ads Leads Integration
If you are running Ads and Campaigns on your Facebook Pages for Lead generation, you know how difficult it is to regularly check for new leads and to manually downloads leads and enter into your CRM. With our new Integration, you can connect your Facebook account and Pages to bring those leads directly into your Sembark Dashboard without manual downloads and entries.
Separate Offering and Billing
The Facebook Integration is a separate offering apart from your existing monthly subscription. A setup fee and monthly/quarterly subscription fee is chargeable. Please contact our Sales Team for more details.
On every new lead from your Facebook Page(s), you will receive a real-time notification in your Sembark Dashboard. If you have configured the Auto-Leads Distribution, these leads will be automatically assigned to your Sales Team as well. On assignment, sales will also receive a notification and can start working on the lead right-away.