


This update introduces a powerful bulk payment clearance system that allows you to log multiple payments in a single transaction, streamlining your payment workflows. We’ve enhanced the Quotation PDF with pricing visibility controls and component-wise totals, added comprehensive report activity tracking for admins, and improved supplier management in operational bookings. Guest salutations are now supported system-wide, and several workflow improvements have been added across payment verification, templates, and reports.
Let’s dive into more details.
1. Bulk Payment Clearance System
We have introduced a Bulk Payment Clearance feature that allows you to log multiple payments in a single transaction, significantly reducing the time and effort required to process payments for suppliers and hotels.
Why this feature matters
Previously, each payment had to be logged individually, which was time-consuming when processing multiple payments for the same supplier or hotel. The new bulk payment clearance system lets you select and process multiple payments at once, creating a single transaction for better tracking and efficiency.
Where to access
This feature is available in three locations:
- Accounting → Outgoing Payments
- Supplier Detail Pages → Payments tab (Transport, Activities, and Hotel Suppliers)
- Hotel Detail Pages → Payments tab
Using Bulk Payment Clearance in Outgoing Payments
Navigate to Accounting → Outgoing Payments and click the Log Multiple button in the top right corner beside the search bar.
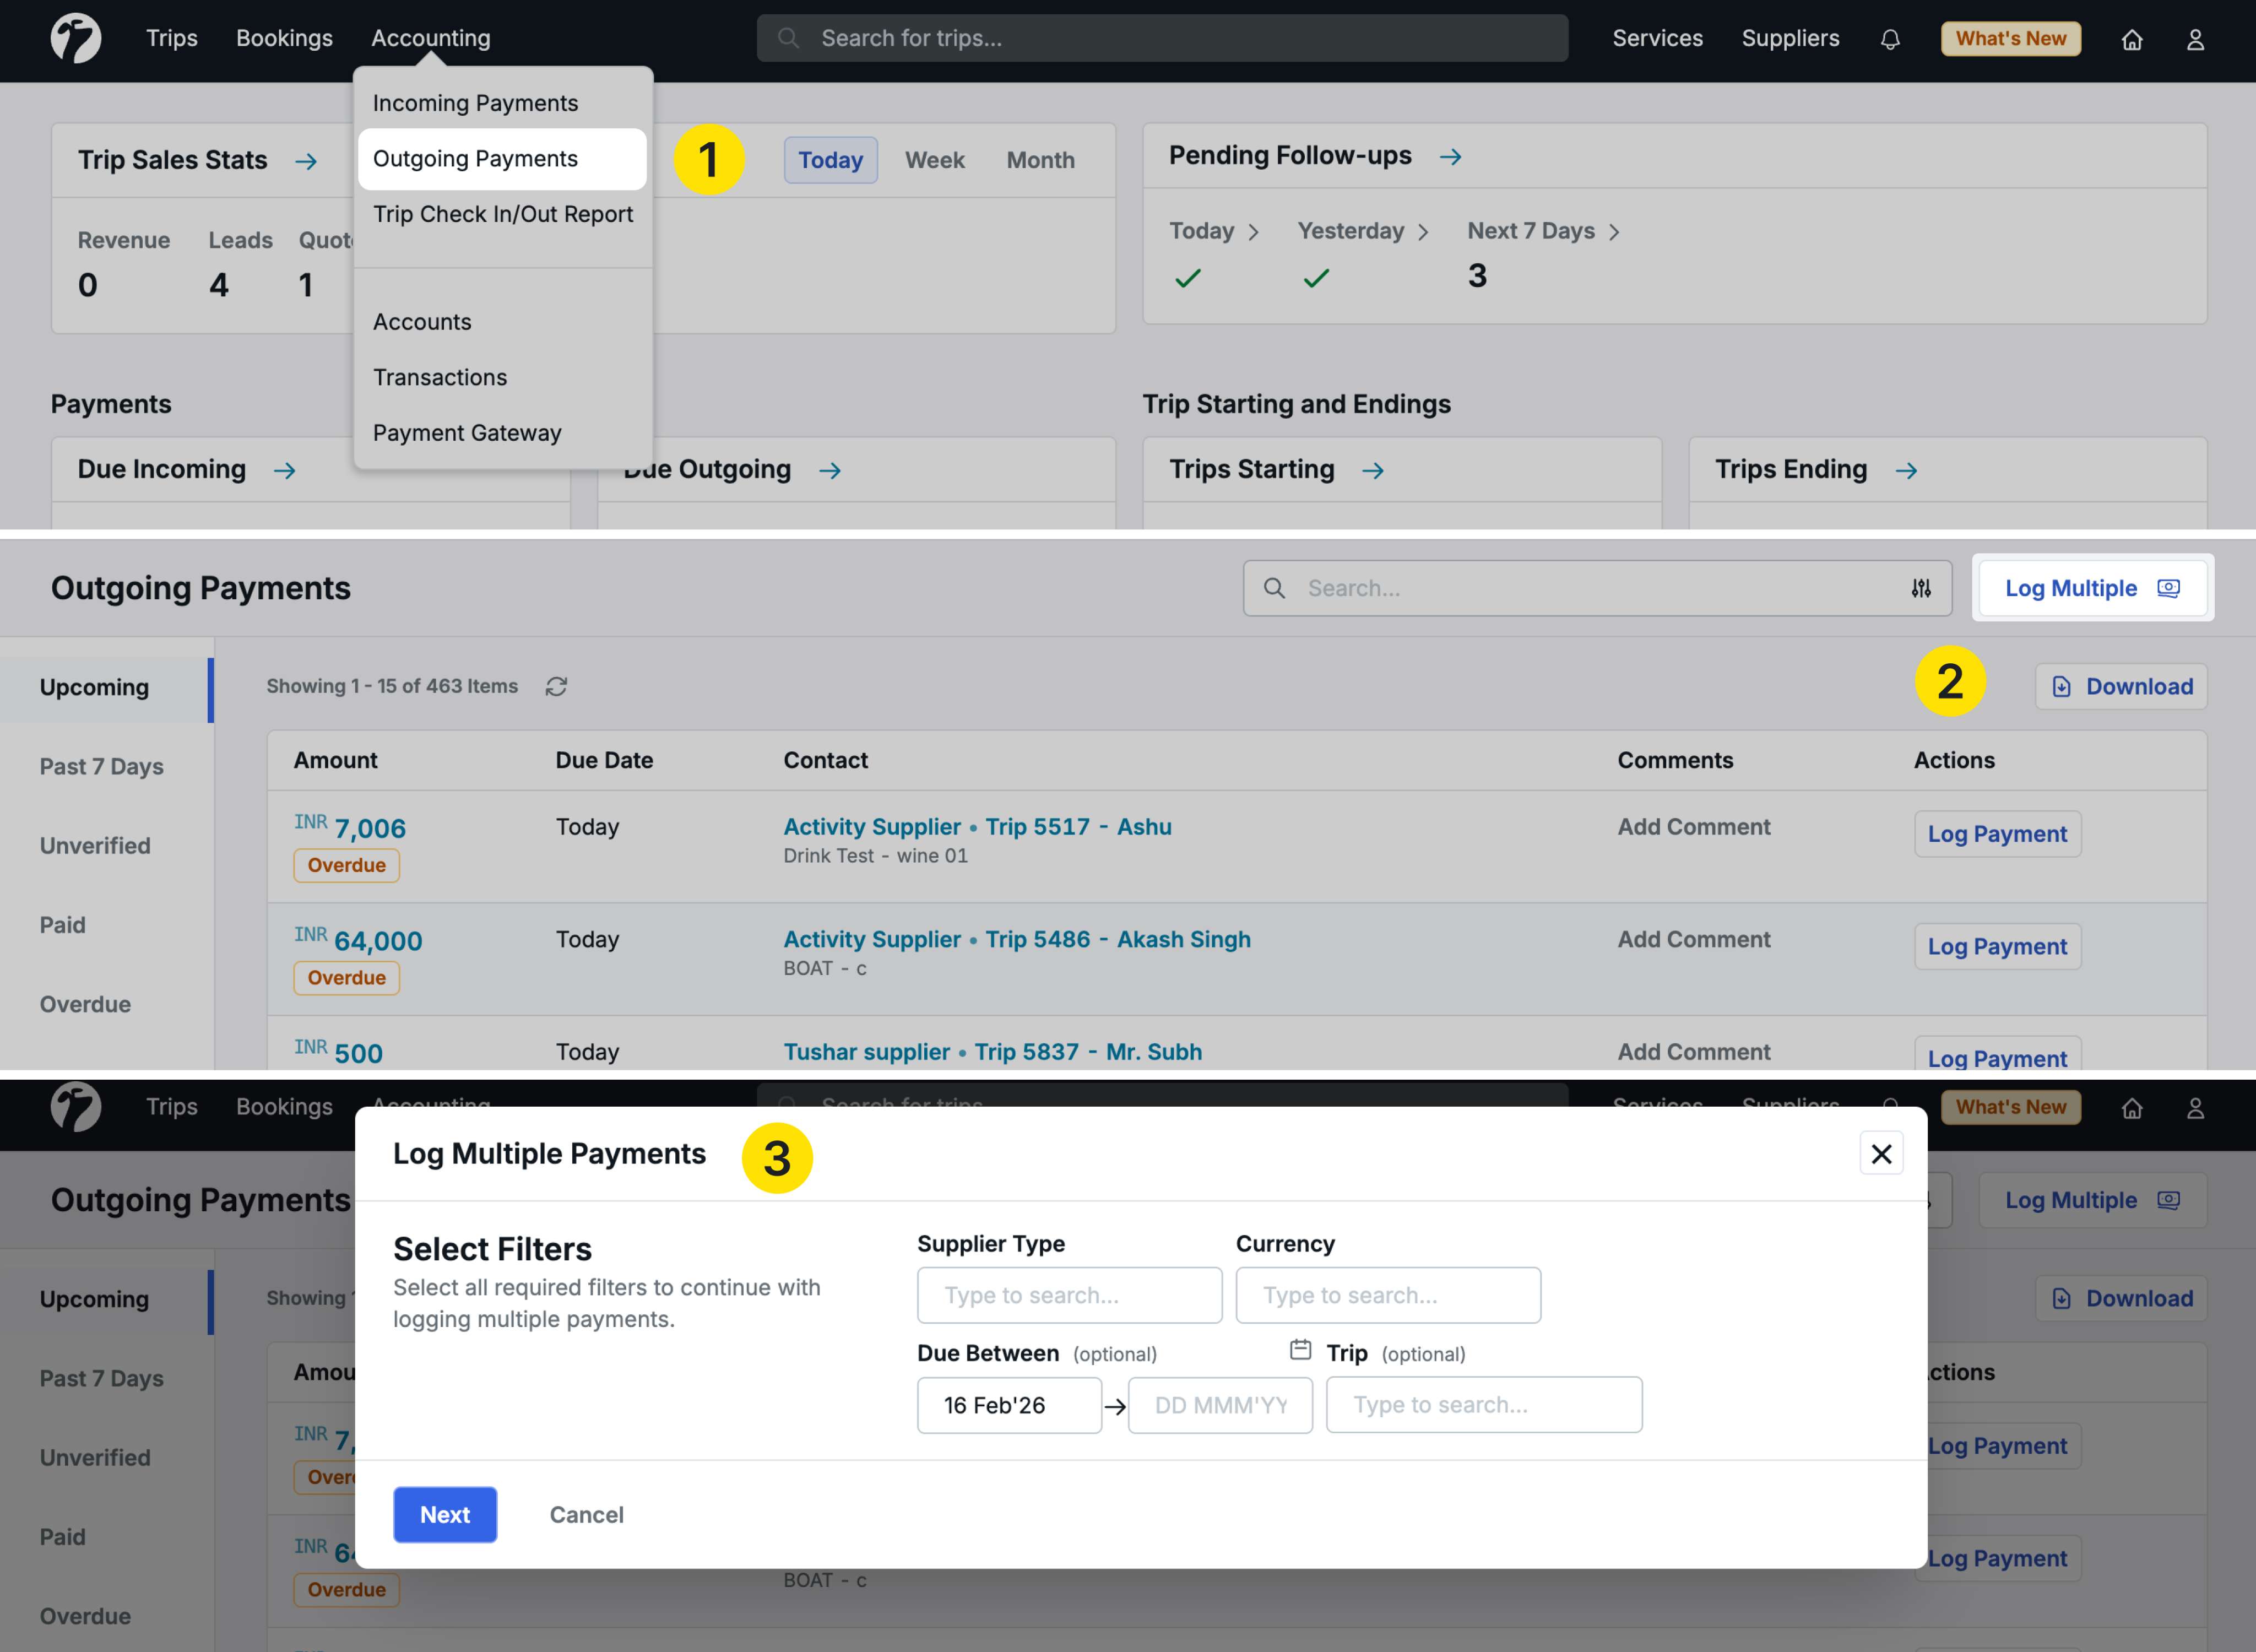
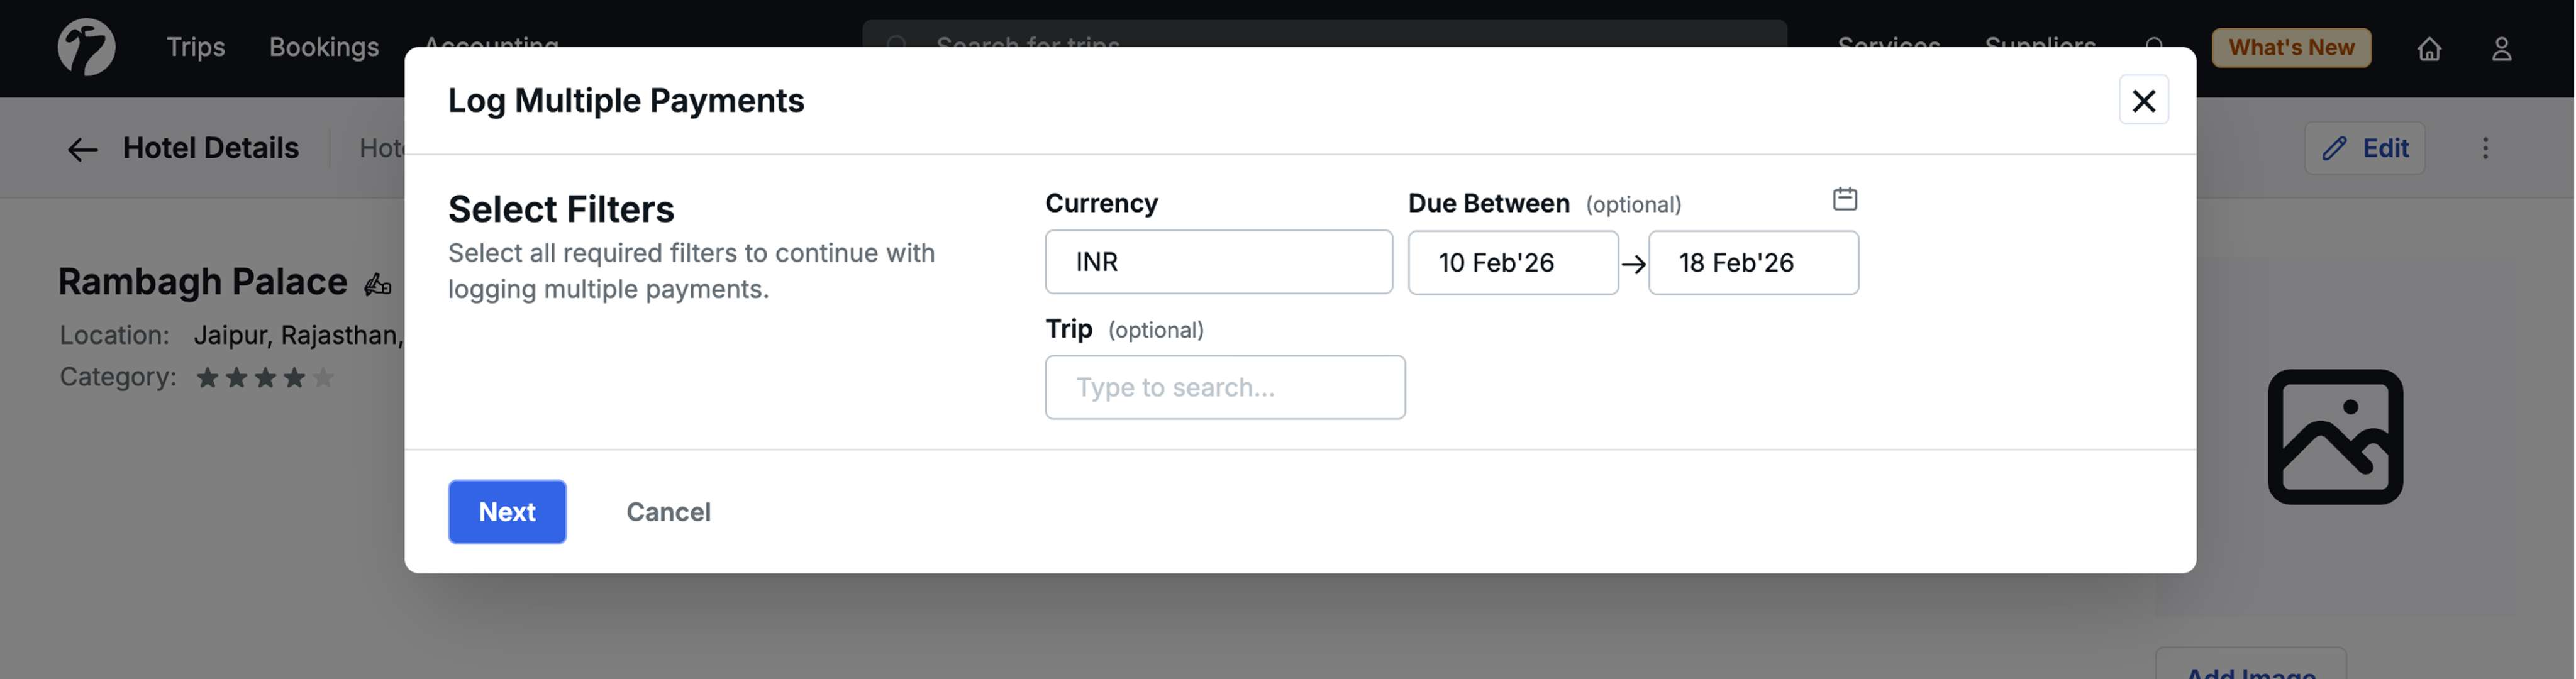
Step 1: Filter Payments
A popup opens where you need to apply filters to select the payments you want to process.
Mandatory Filters:
-
Supplier Type: Choose between “Suppliers” or “Direct Hotel”
- If you select “Suppliers”, an additional dropdown appears to select a specific supplier
- You can search and select one supplier from the list
-
Currency: Select the currency for the payments you want to log
Important: You can only process payments for one supplier or hotel at a time in a single bulk transaction.
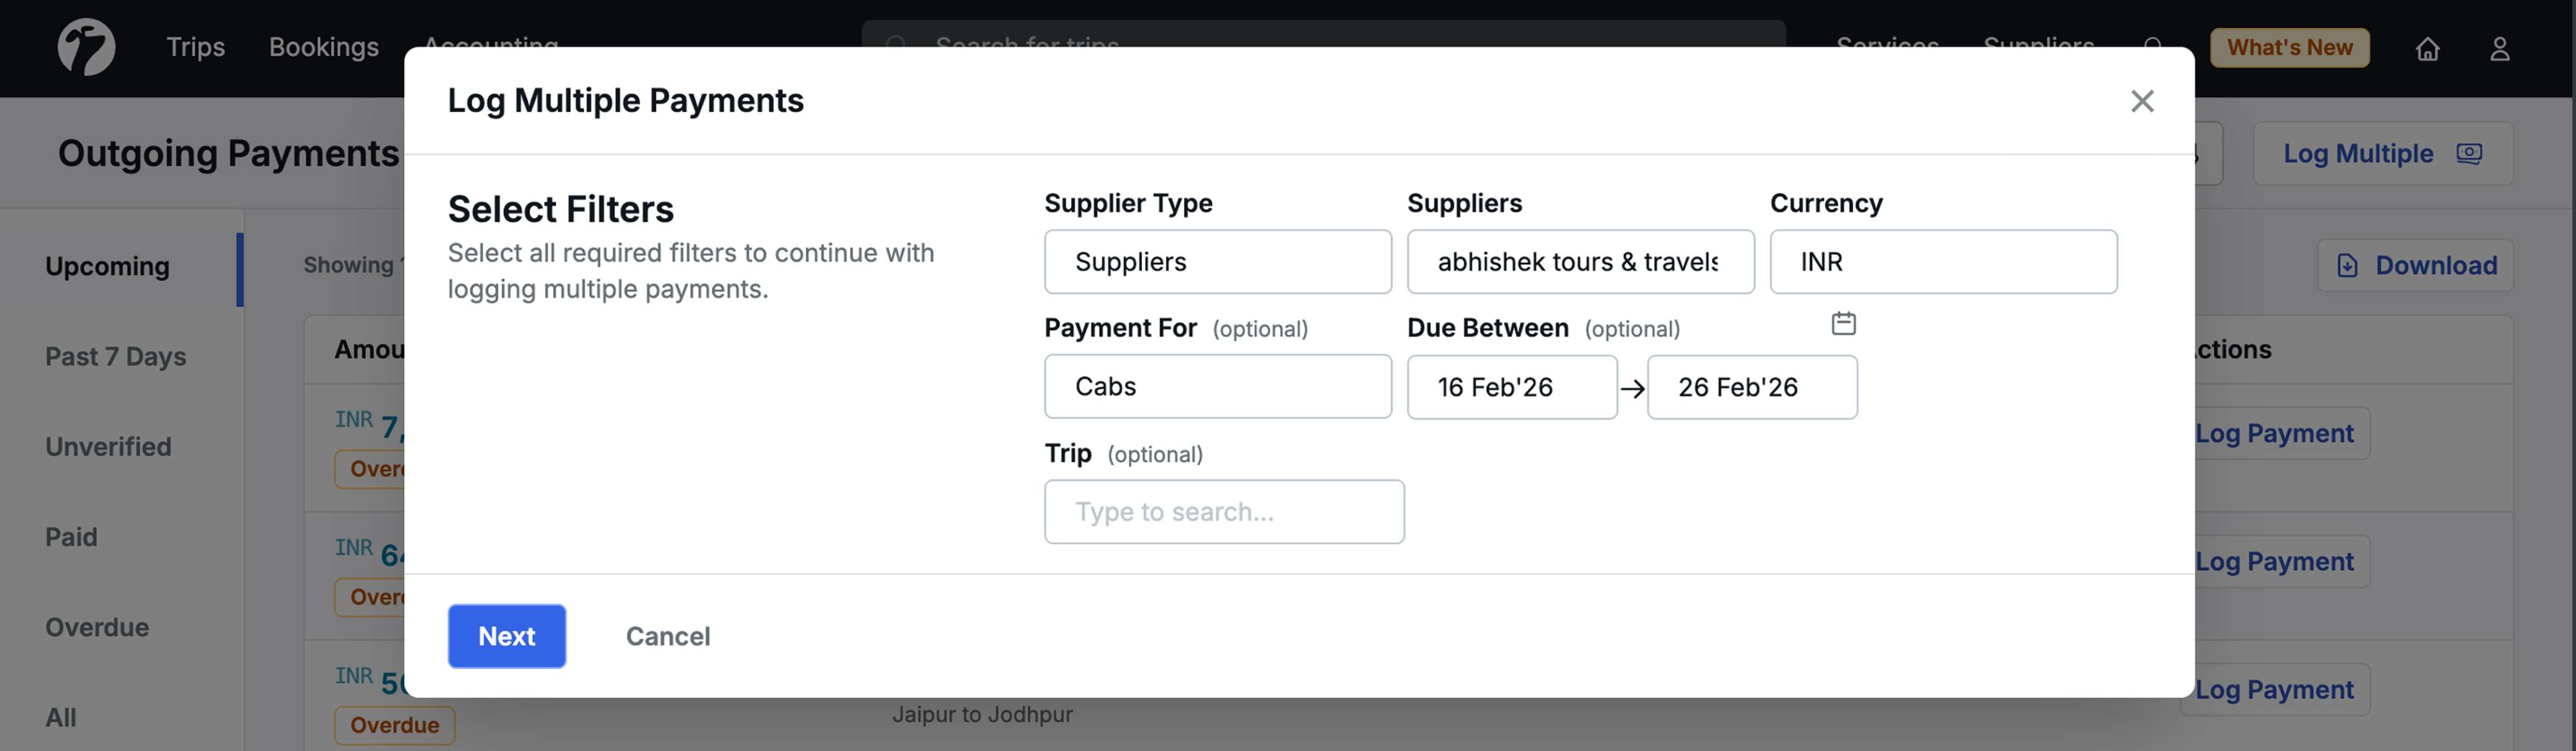
Optional Filters:
- Payment For: Filter by service type (Cabs, Activities, or Hotel) - only appears when “Suppliers” is selected
- Due Between: Filter payments by due date range
- Trip: Select a specific trip if you want to clear payments for that trip only
Once you’ve applied your filters, click Next.
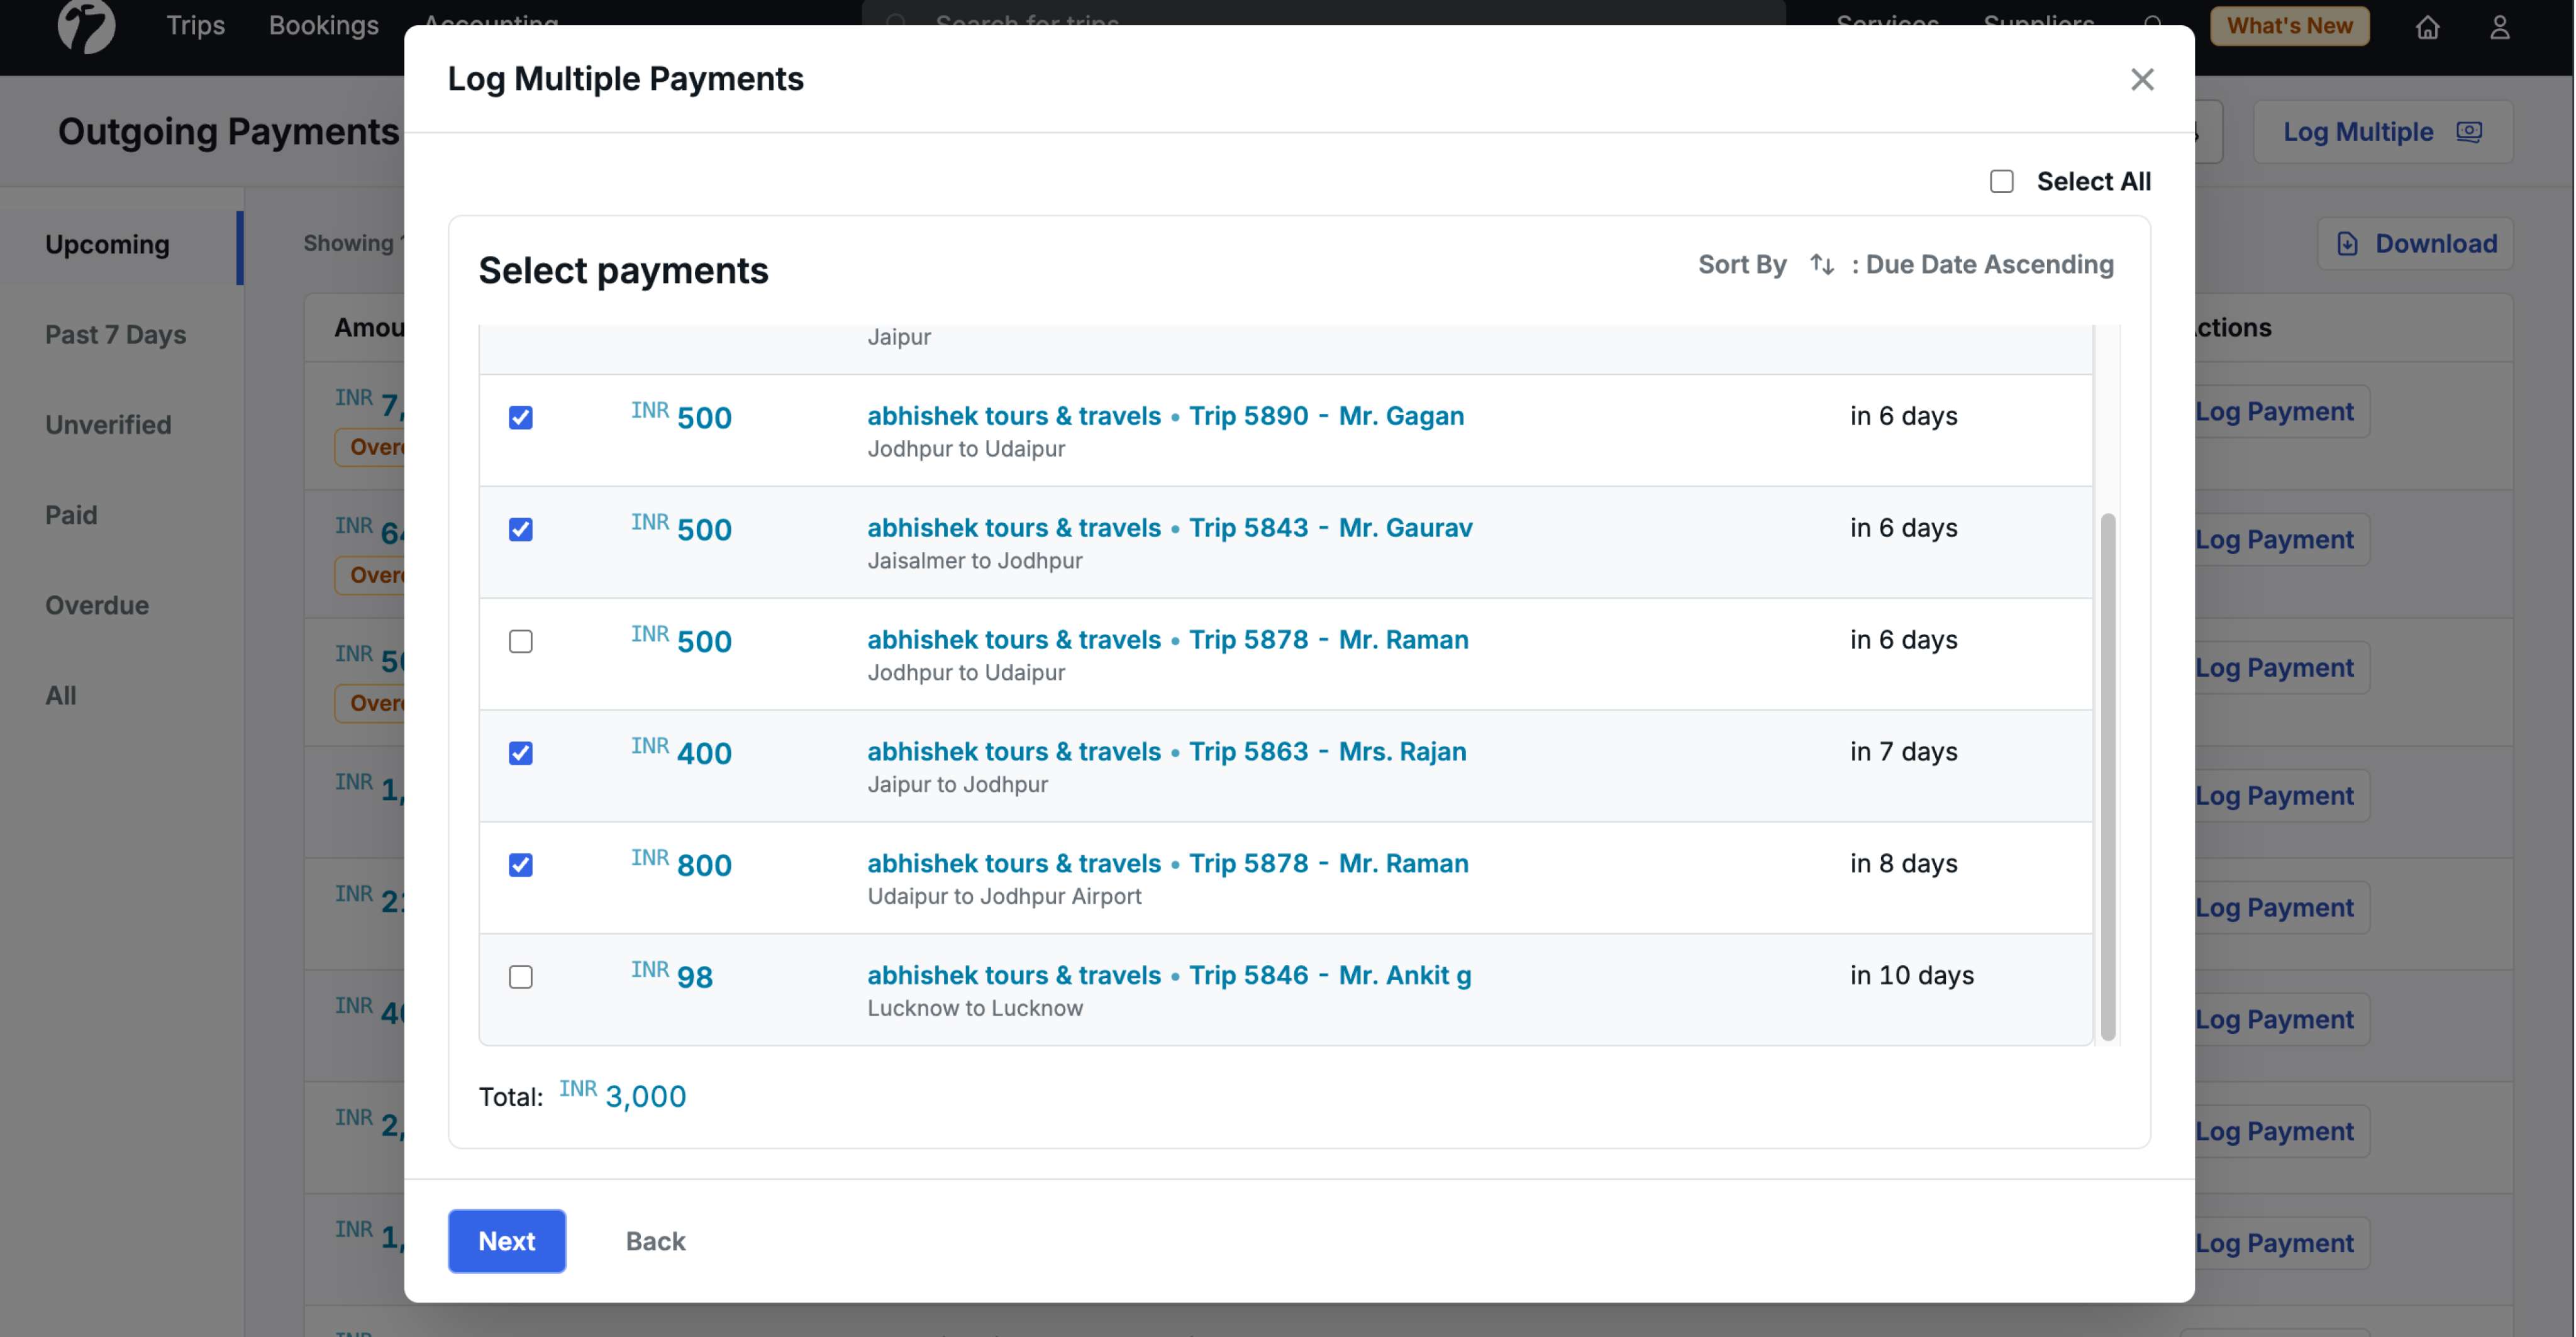
Step 2: Select Payments
All payments matching your filters are displayed with the following information:
- Amount: Payment amount
- Contact: Details about the payment including associated trip, service type (activity/hotel/transport), and other relevant information
- Due Date: When the payment is due
Selection options:
- Select individual payments by checking the boxes
- Use Select All to select all displayed payments
- Sort payments by Due Date (Ascending or Descending)
Minimum requirement: You must select at least 2 payments to proceed with bulk payment clearance.
Click Next to continue.
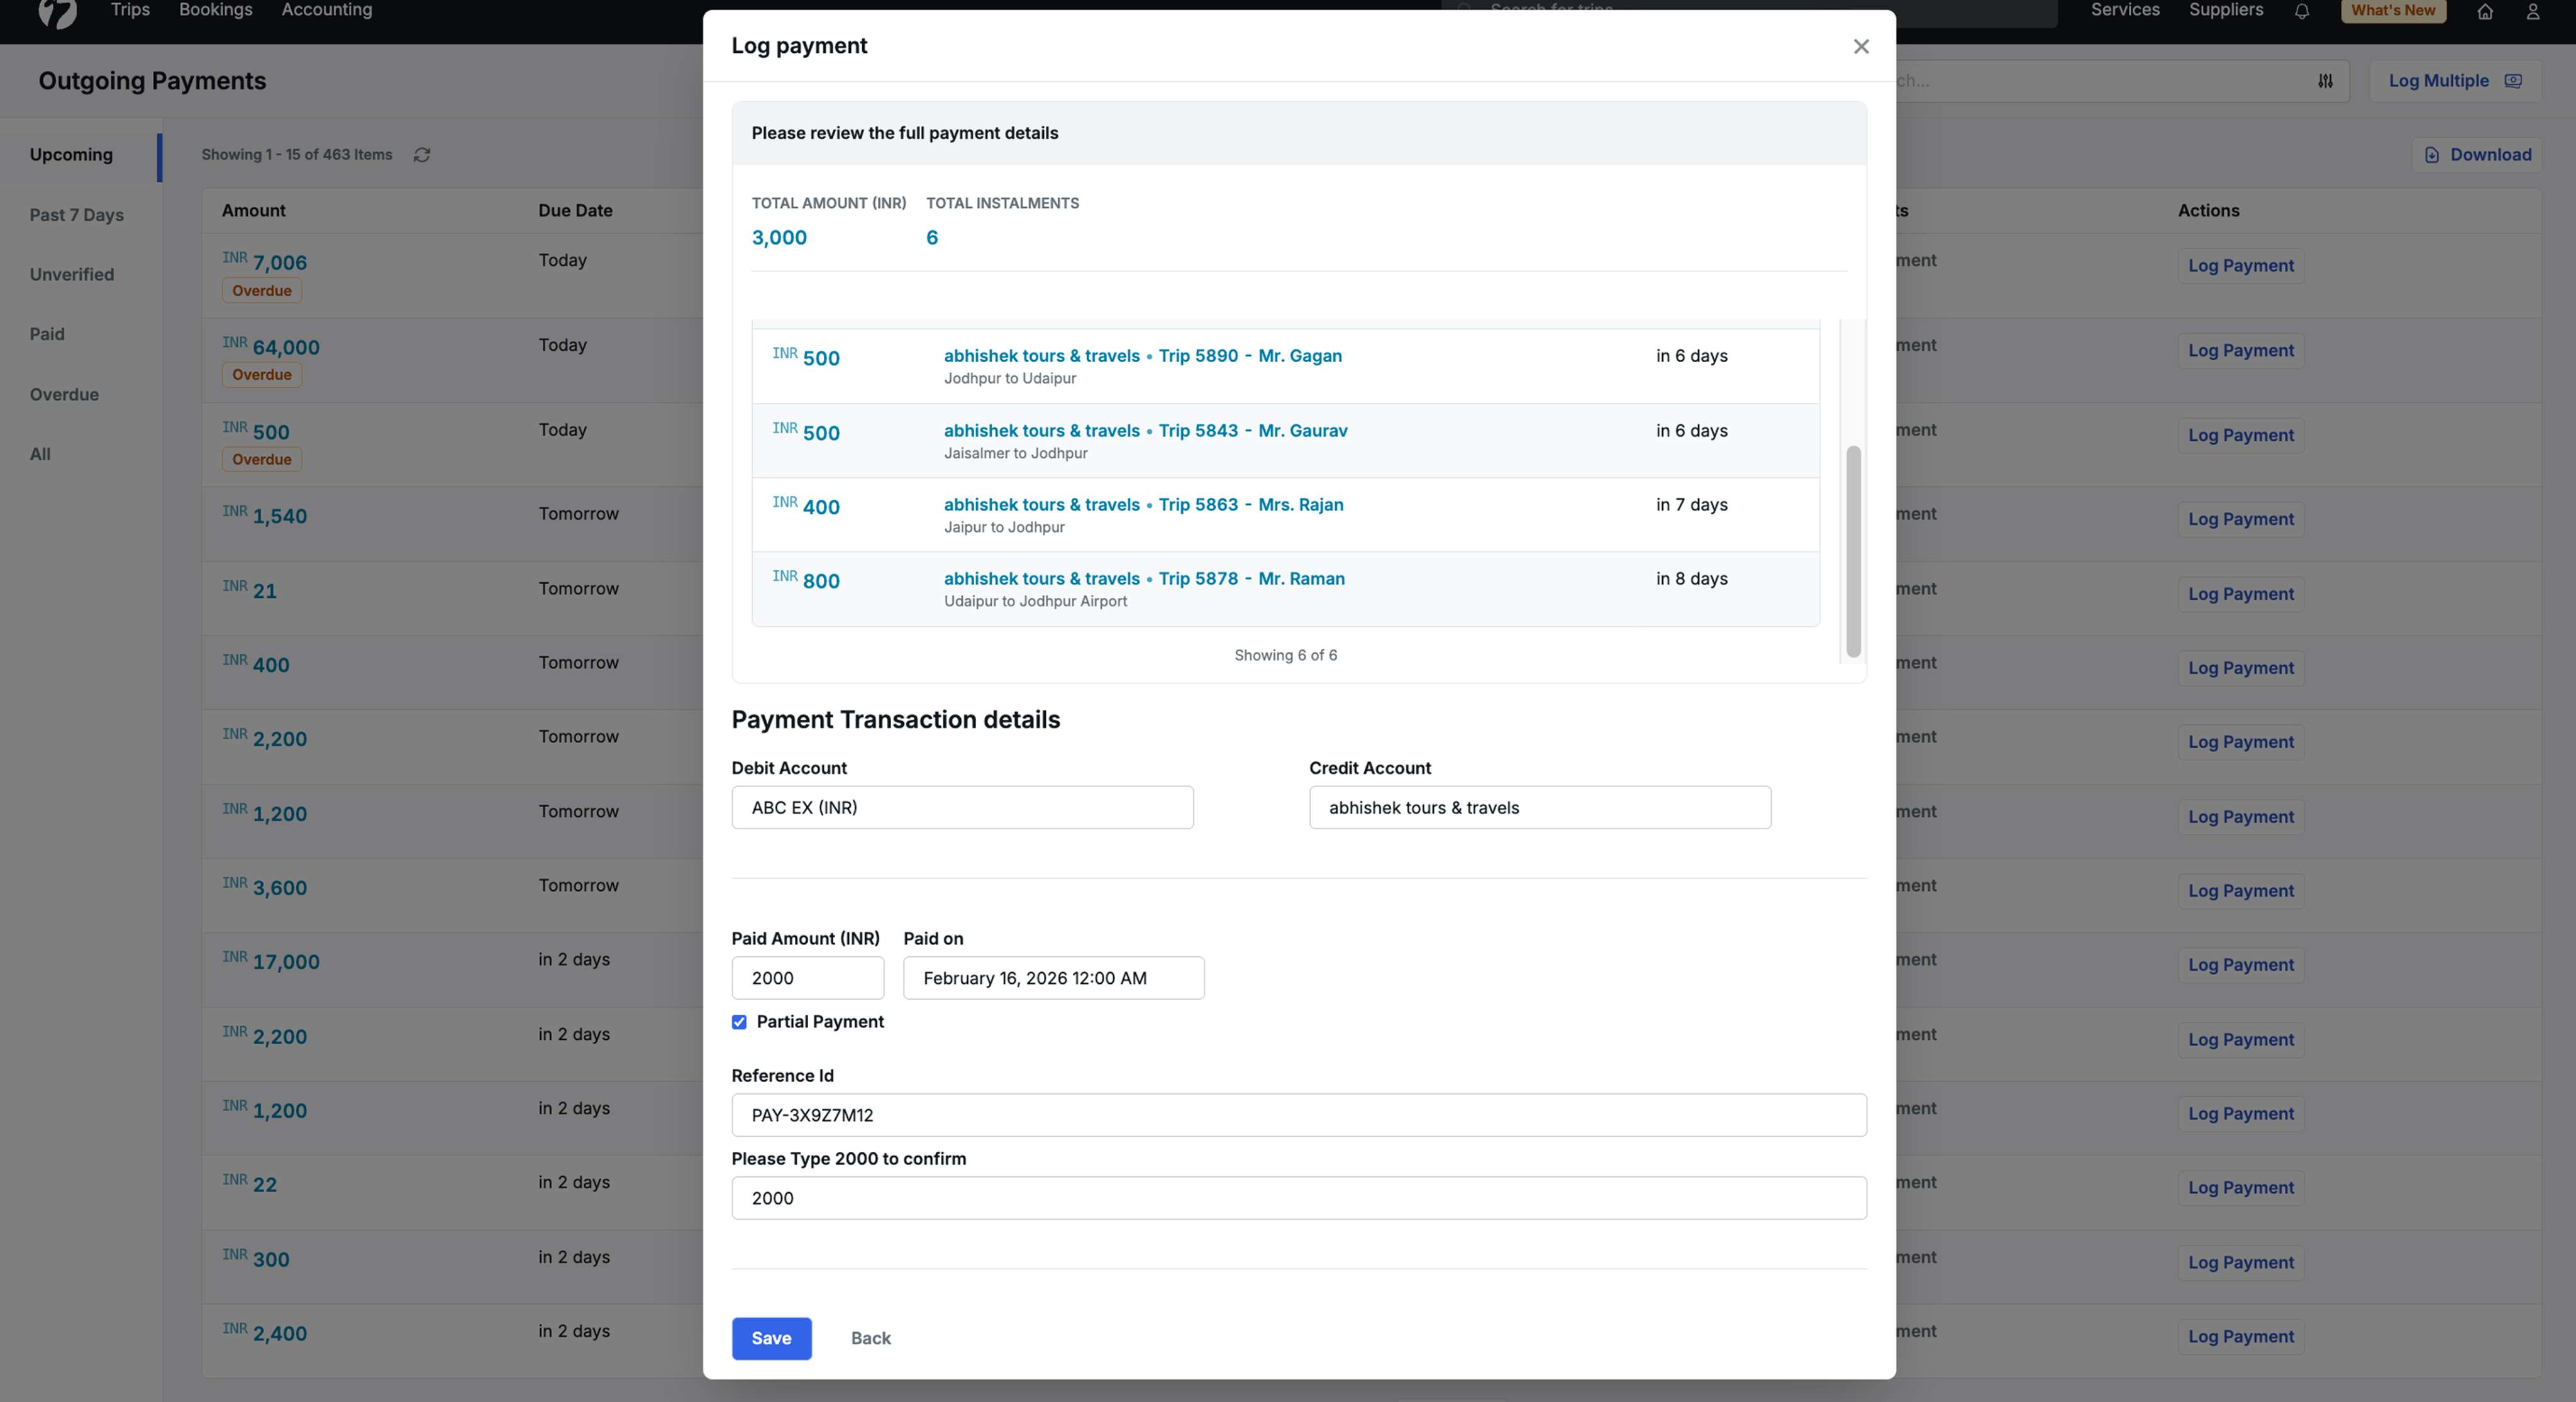
Step 3: Confirm and Process Payment
A confirmation screen shows a summary of your selected payments:
Payment Summary:
- Total Amount: Combined amount of all selected payments
- Total Transactions: Number of payments being processed
- Payment List: All selected payments displayed
Transaction Details:
You need to fill in the following information:
-
Debit Account: Defaults to your company account (for outgoing payments)
-
Credit Account: Defaults to the supplier’s account
- You can change these accounts if needed
-
Paid Amount: Shows the total amount being paid
-
Paid On: Date of payment
-
Reference ID: Mandatory field for tracking this bulk transaction
- This reference ID will be used to identify all payments processed in this transaction
-
Amount Confirmation: Type the total amount to confirm the payment
Partial Payment Option:
If you need to pay a partial amount instead of the full total:
-
Check the Partial Payment checkbox
-
Edit the Paid Amount to your desired amount
-
The system will apply the partial payment in sequence:
-
Full amounts are paid for installments in order
-
The last installment is split into two parts
-
Example: For payments of ₹3,000, ₹3,000, and ₹4,000 (total ₹10,000), if you pay ₹9,000:
- First two payments (₹3,000 each) are fully paid
- The ₹4,000 installment is split: ₹3,000 marked as paid, ₹1,000 remains as a new installment
-
Use Case: This is useful when suppliers or hotels request a specific payment amount that doesn’t match your total due payments.
Click Save to process the payment. A success message confirms “Payment logged successfully.”
Using Bulk Payment Clearance in Supplier Pages
Navigate to any supplier detail page:
- Services → Transport Suppliers / Activity Suppliers / Hotel Suppliers
- Select a supplier and go to the Payments tab
- Click Log Multiple in the top right corner
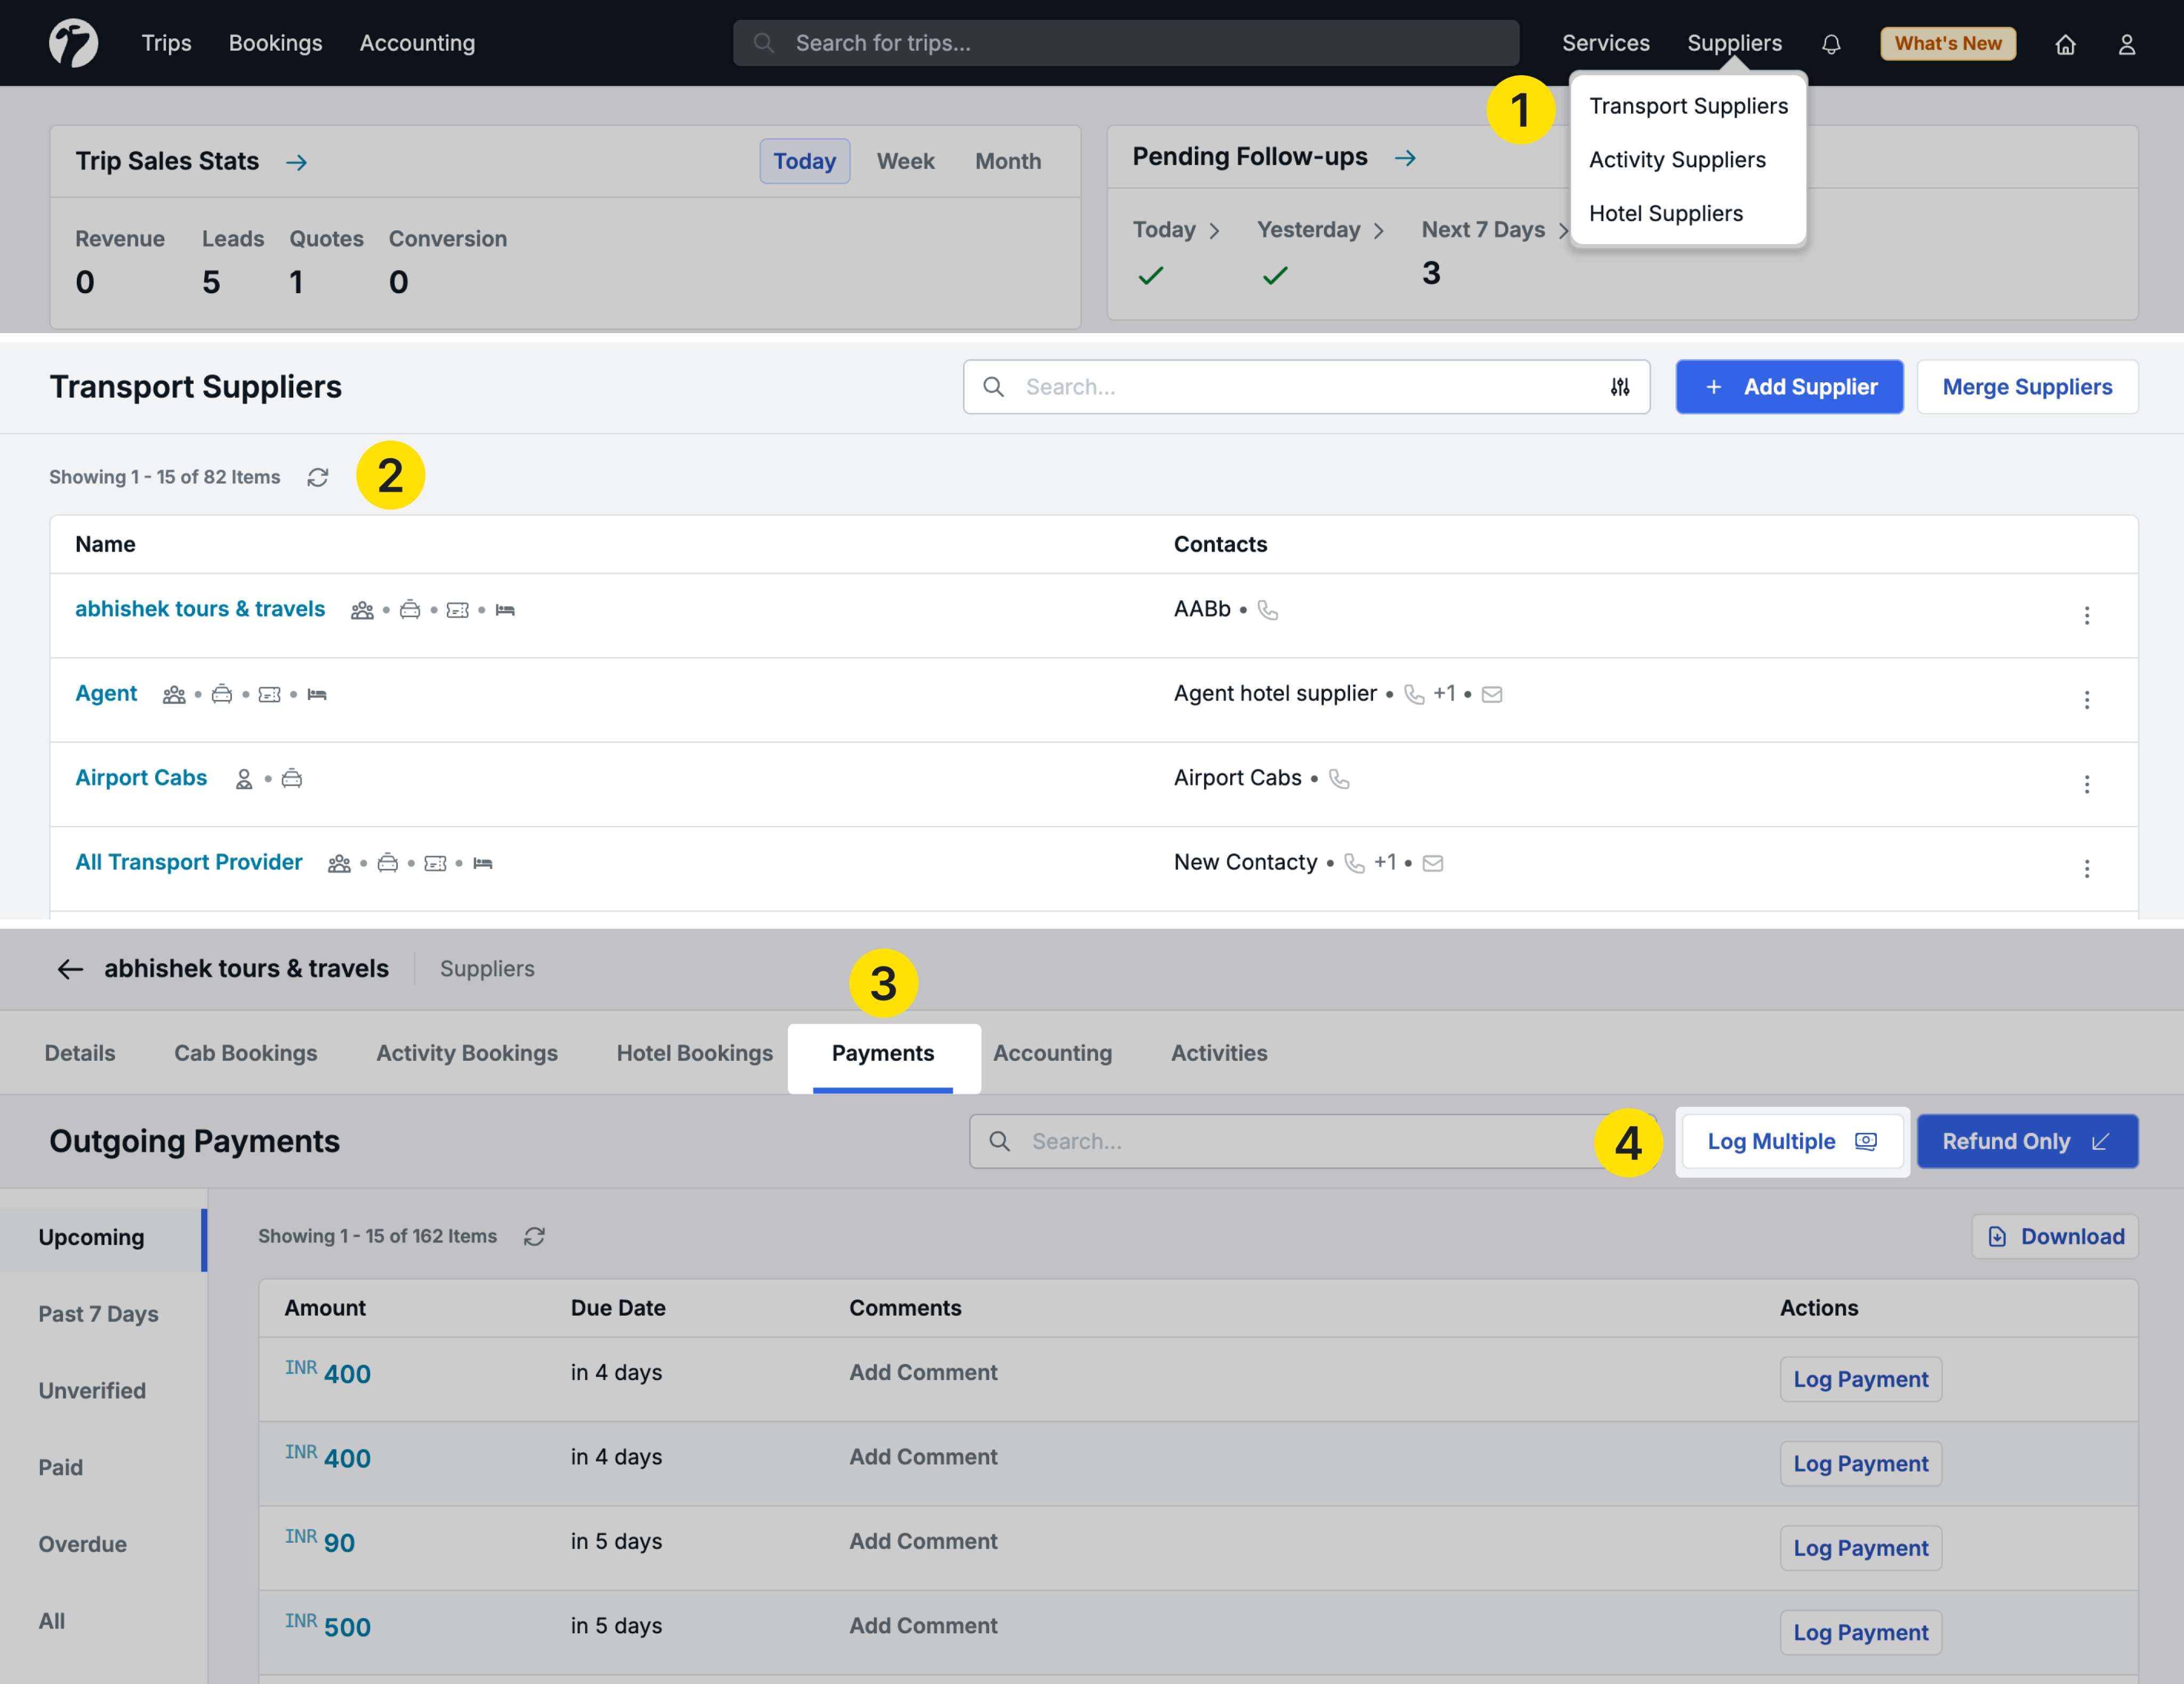
Simplified filters:
Since you’re already on a specific supplier’s page, the system knows which supplier you’re working with. You only need to apply:
- Currency (Mandatory)
- Payment For (Optional) - for transport/activity suppliers only
- Due Between (Optional)
- Trip (Optional)
The rest of the process is identical to the Outgoing Payments flow.

Using Bulk Payment Clearance in Hotel Pages
Navigate to a hotel detail page:
- Services → Hotels
- Select a hotel and go to the Payments tab
- Click Log Multiple in the top right corner
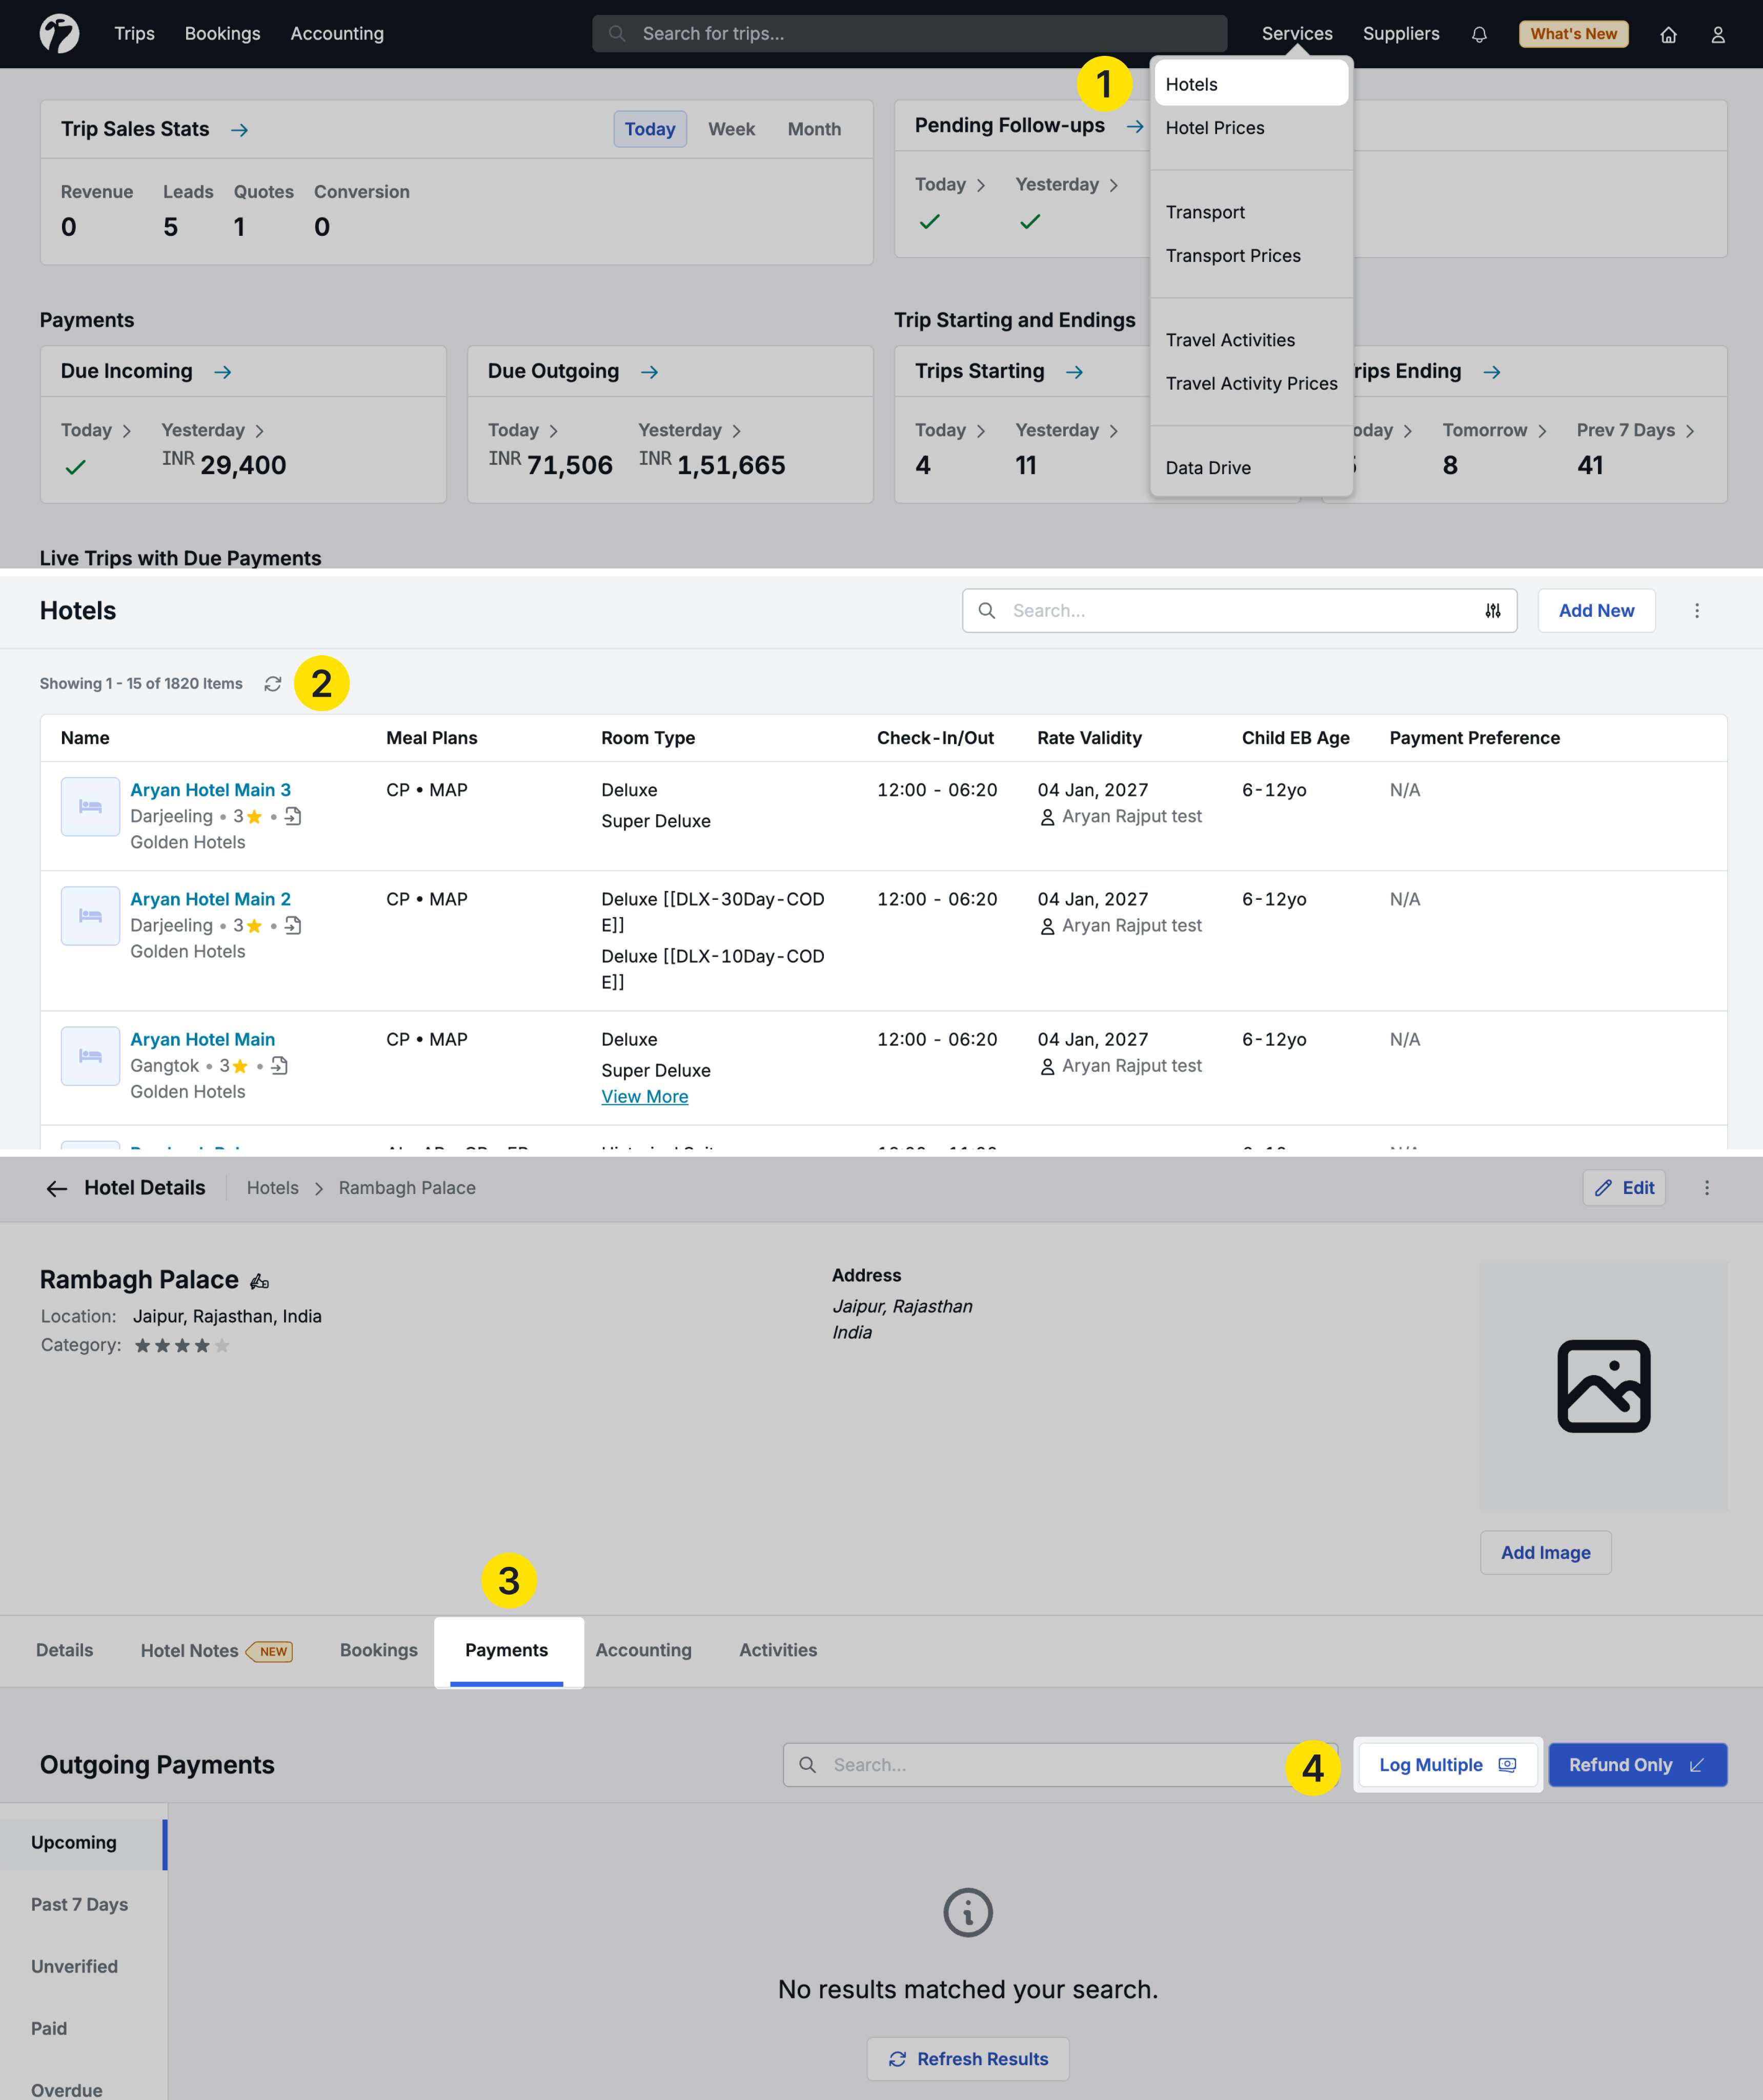
Hotel-specific filters:
Since you’re on a specific hotel’s page:
- Currency (Mandatory)
- Due Between (Optional)
- Trip (Optional)
Note: The “Payment For” filter is not available for hotels as they don’t have multiple service types.
Transaction Management
When you log multiple payments using bulk clearance, the system creates one single transaction for all selected payments.
![]()
Viewing Bulk Payment Transactions
Navigate to Accounting → Transactions to see all transactions:
- One transaction is created for the entire bulk payment (not separate transactions for each installment)
- The Reference ID you provided is displayed against this transaction
- Hover on the ellipsis (•••) menu and click Details to see complete information
Transaction Details include:
- Transaction Details: Date, Narration, Created By
- Accounts Involved: Debit and Credit accounts used
- Trips and Installments: Complete list of all payments/installments processed in this bulk transaction
This allows you to backtrack and see exactly which payments were included in any bulk payment transaction.
![]()
Payment Verification for Bulk Payments
After logging bulk payments, you can verify, unverify, or revert them through the Installment Detail Page.
Accessing Installment Details
Each payment processed in the bulk clearance has its own installment detail page where you can manage it.
Bulk Payment Indicator:
At the top of the installment summary, you’ll see a message:
- “This installment was logged by combining [X] payments into one”
- Example: “This installment was logged by combining 10 payments into one”
This clearly indicates the payment was part of a bulk transaction.
Verifying Bulk Payments
When you verify one payment from a bulk transaction:
-
Click Verify Payment
-
A confirmation popup shows:
-
Payment Details:
- Amount
- Number of installments involved
- Payment paid on date
- Logged by (username)
- Debit and Credit accounts
- Reference ID
-
Trips and Installments: All payments included in this bulk transaction
-
Additional Confirmation Checkboxes:
- Checkbox 1 (existing): “I have verified with accounts that this is a valid transaction”
- Checkbox 2 (new): “This will verify all [X] installments for a total amount of [Currency] [Amount] under this payment”
Both checkboxes must be checked to proceed.
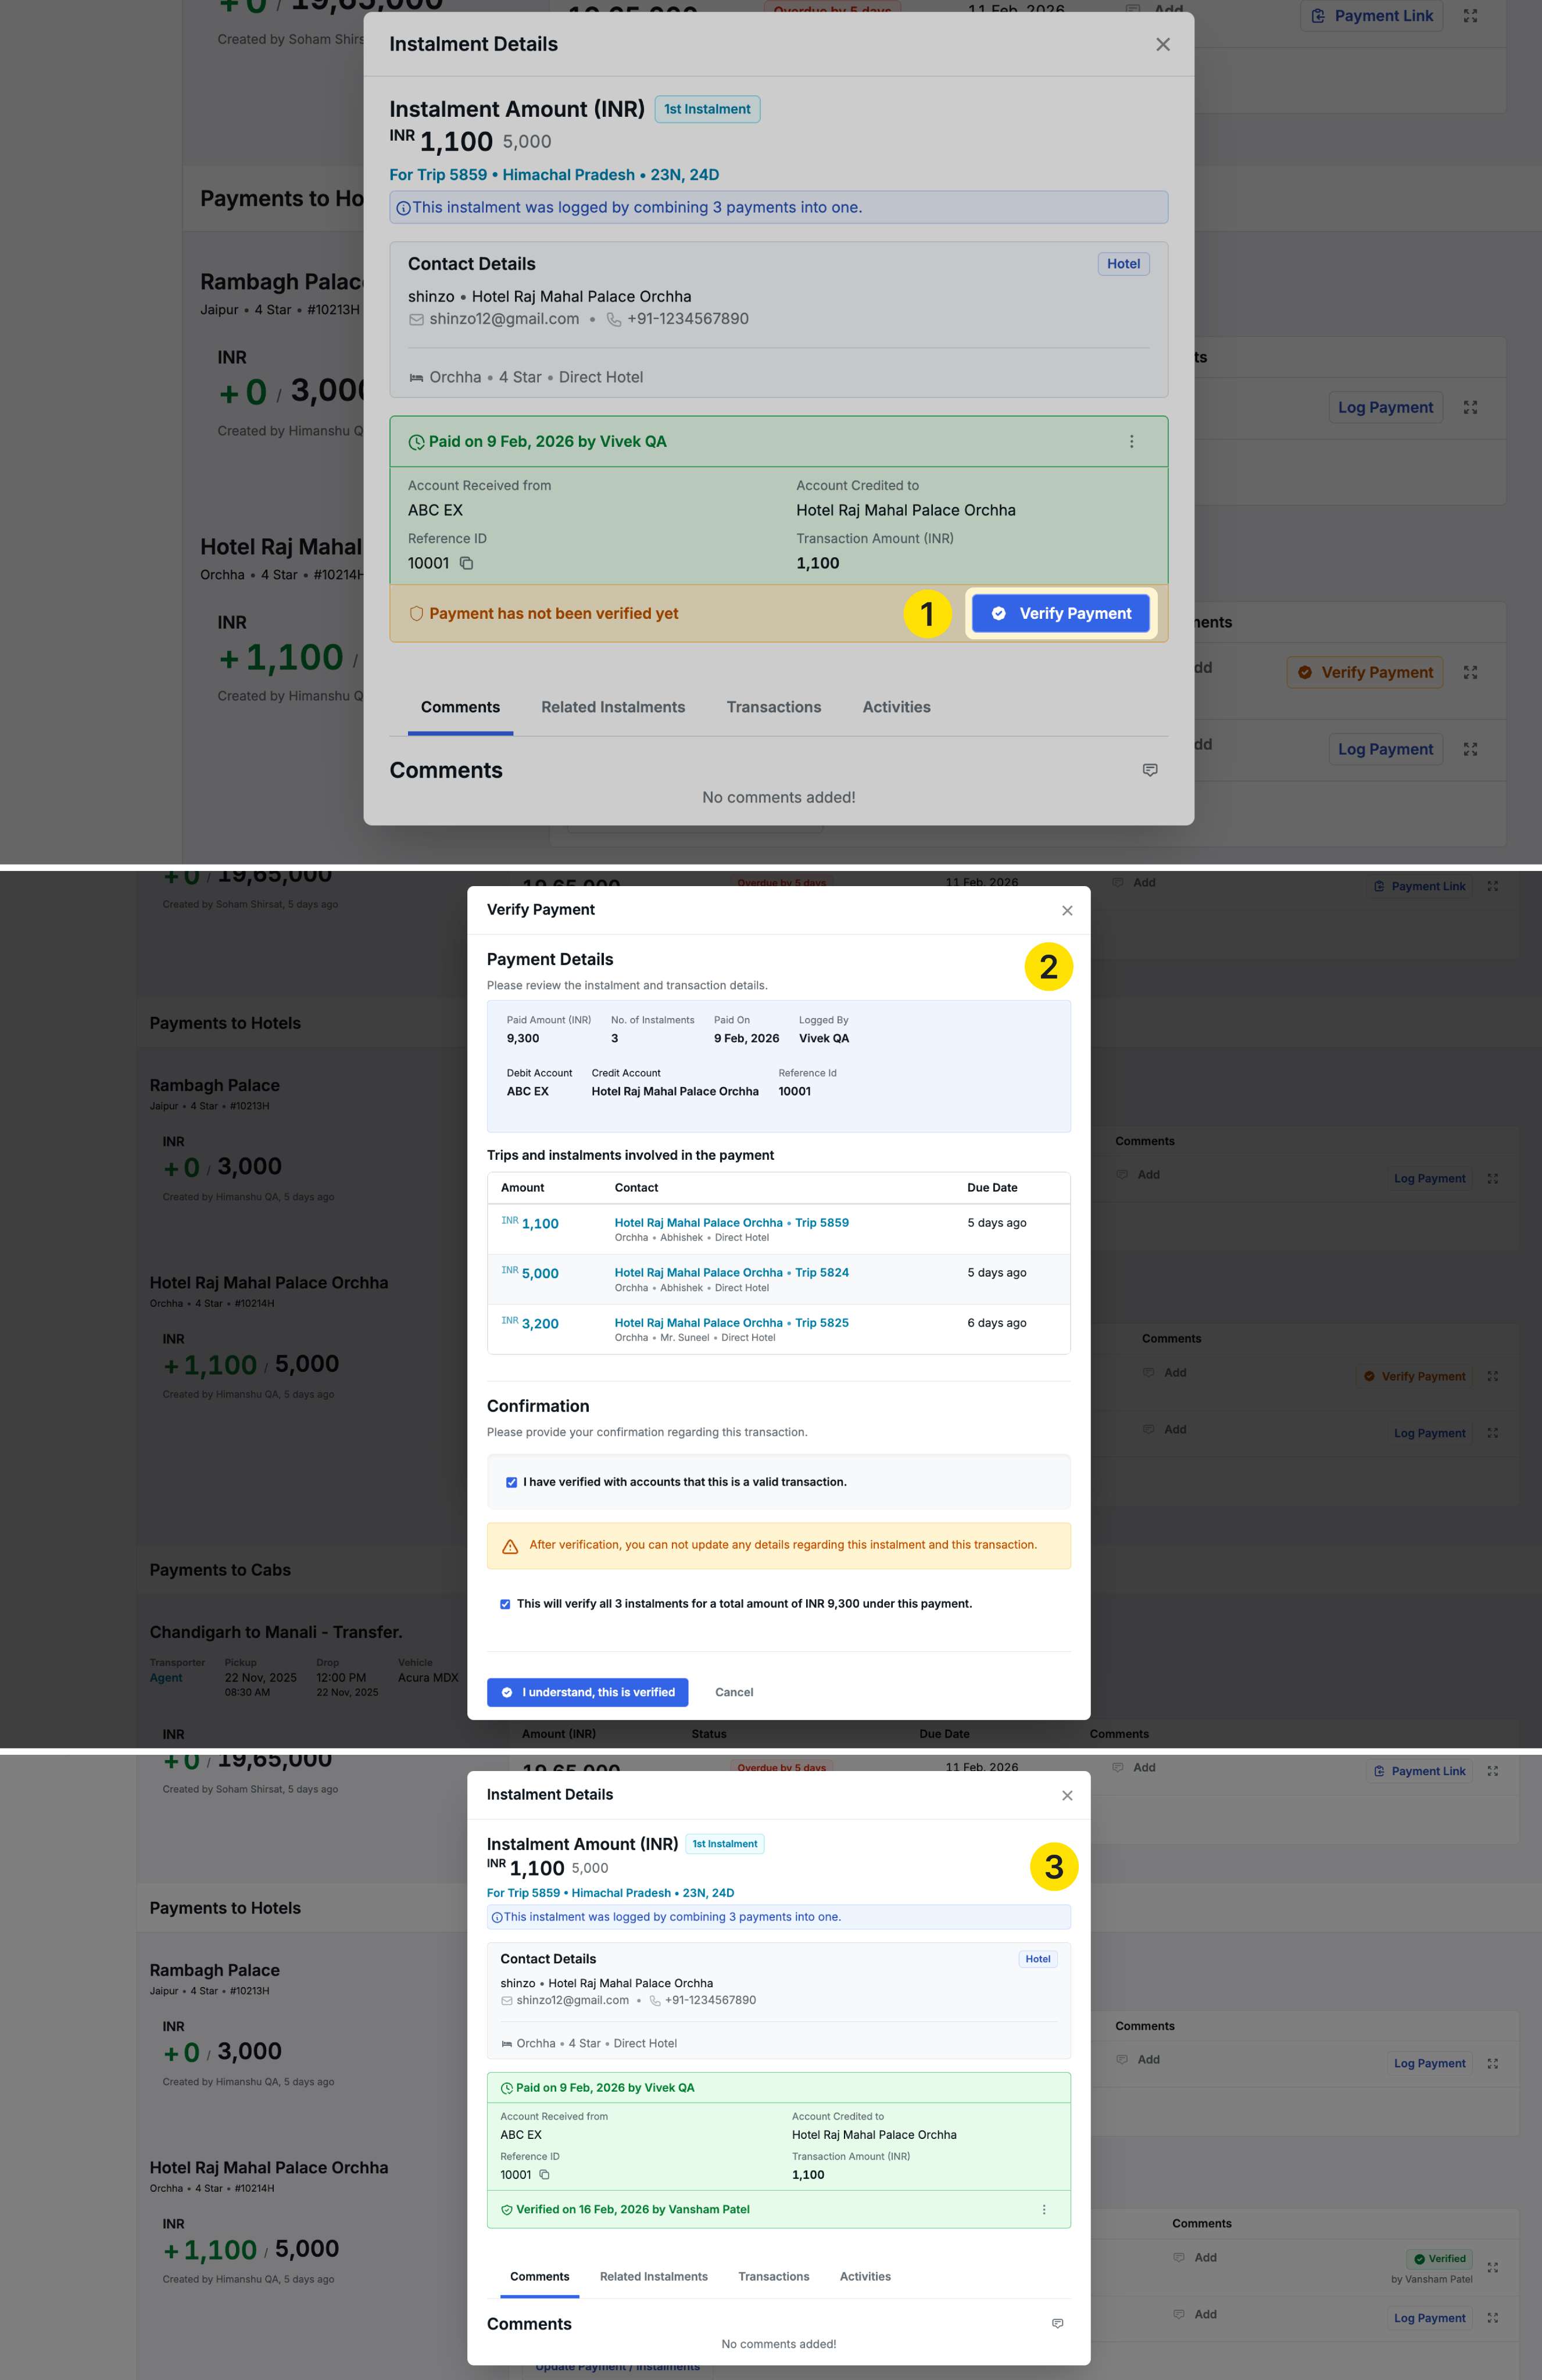
Important: Verifying one payment from the bulk transaction automatically verifies all other payments that were logged together.
Click I understand, this is verified to complete verification.
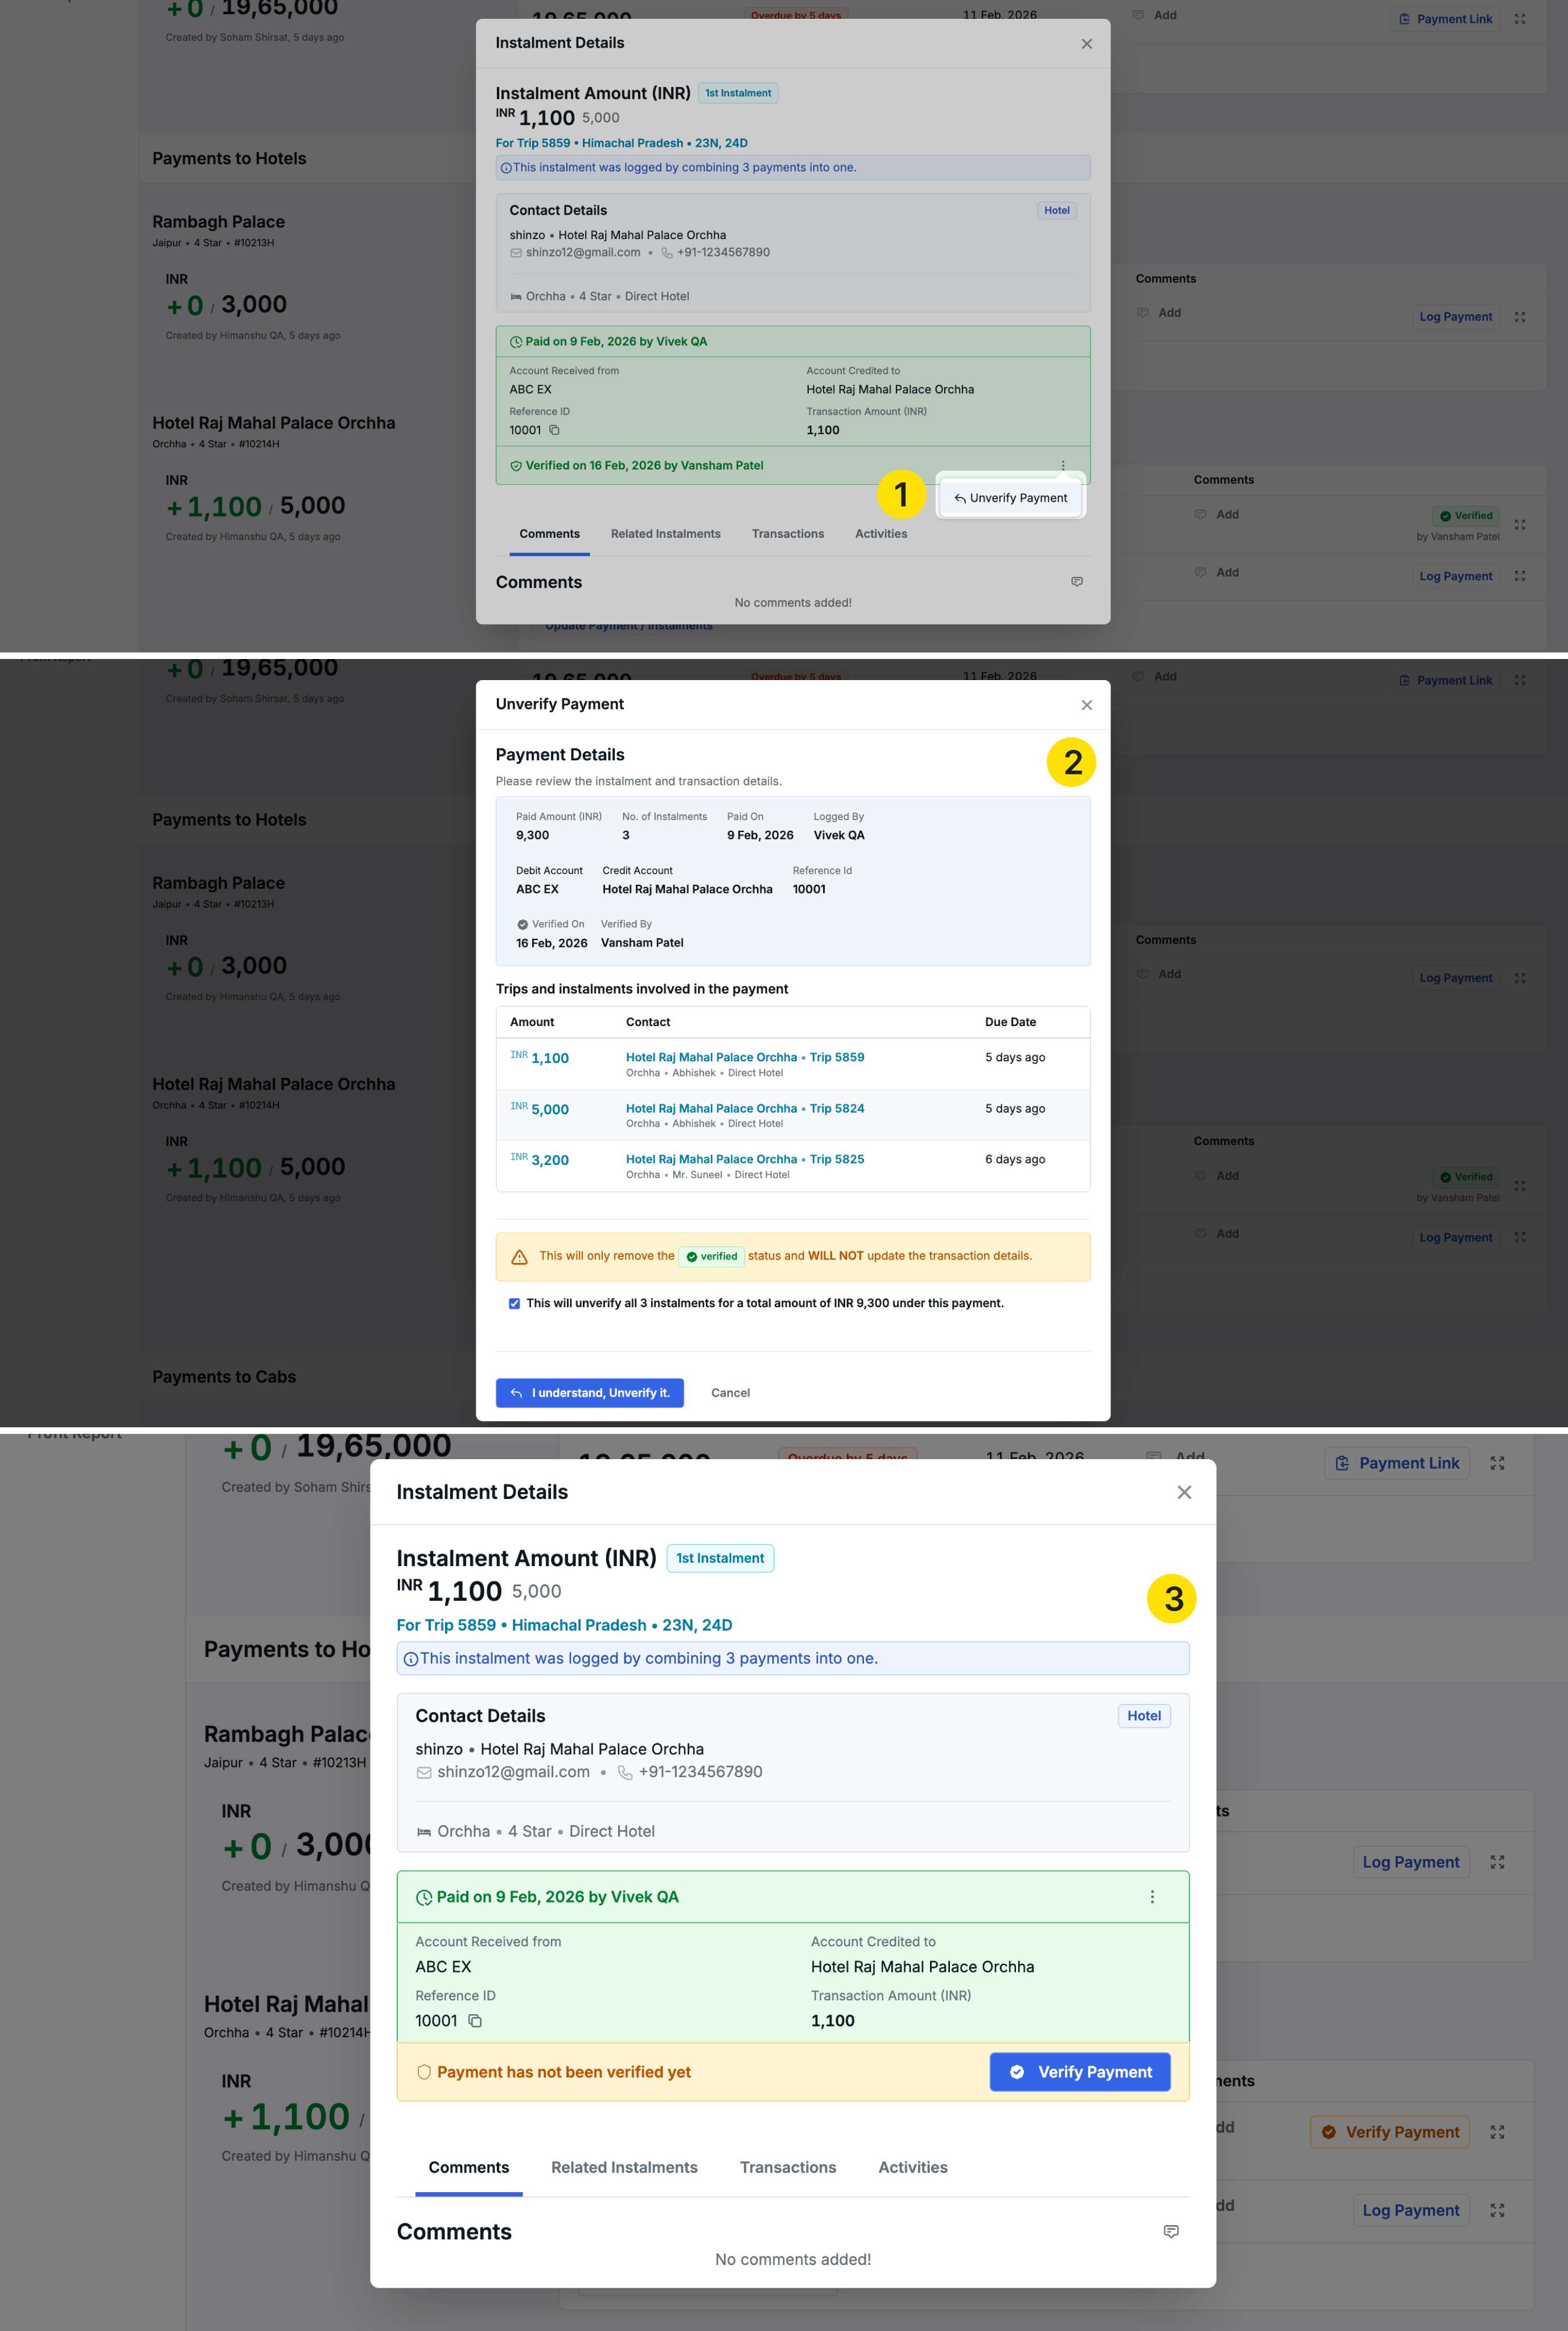
Unverifying Bulk Payments
The unverify process follows the same pattern:
- Click Unverify Payment
- Review payment details and installments
- Check the confirmation: “This will unverify all [X] installments for a total amount of [Currency] [Amount] under this payment”
- Confirm to unverify
Unverifying one payment unverifies all payments in the bulk transaction.
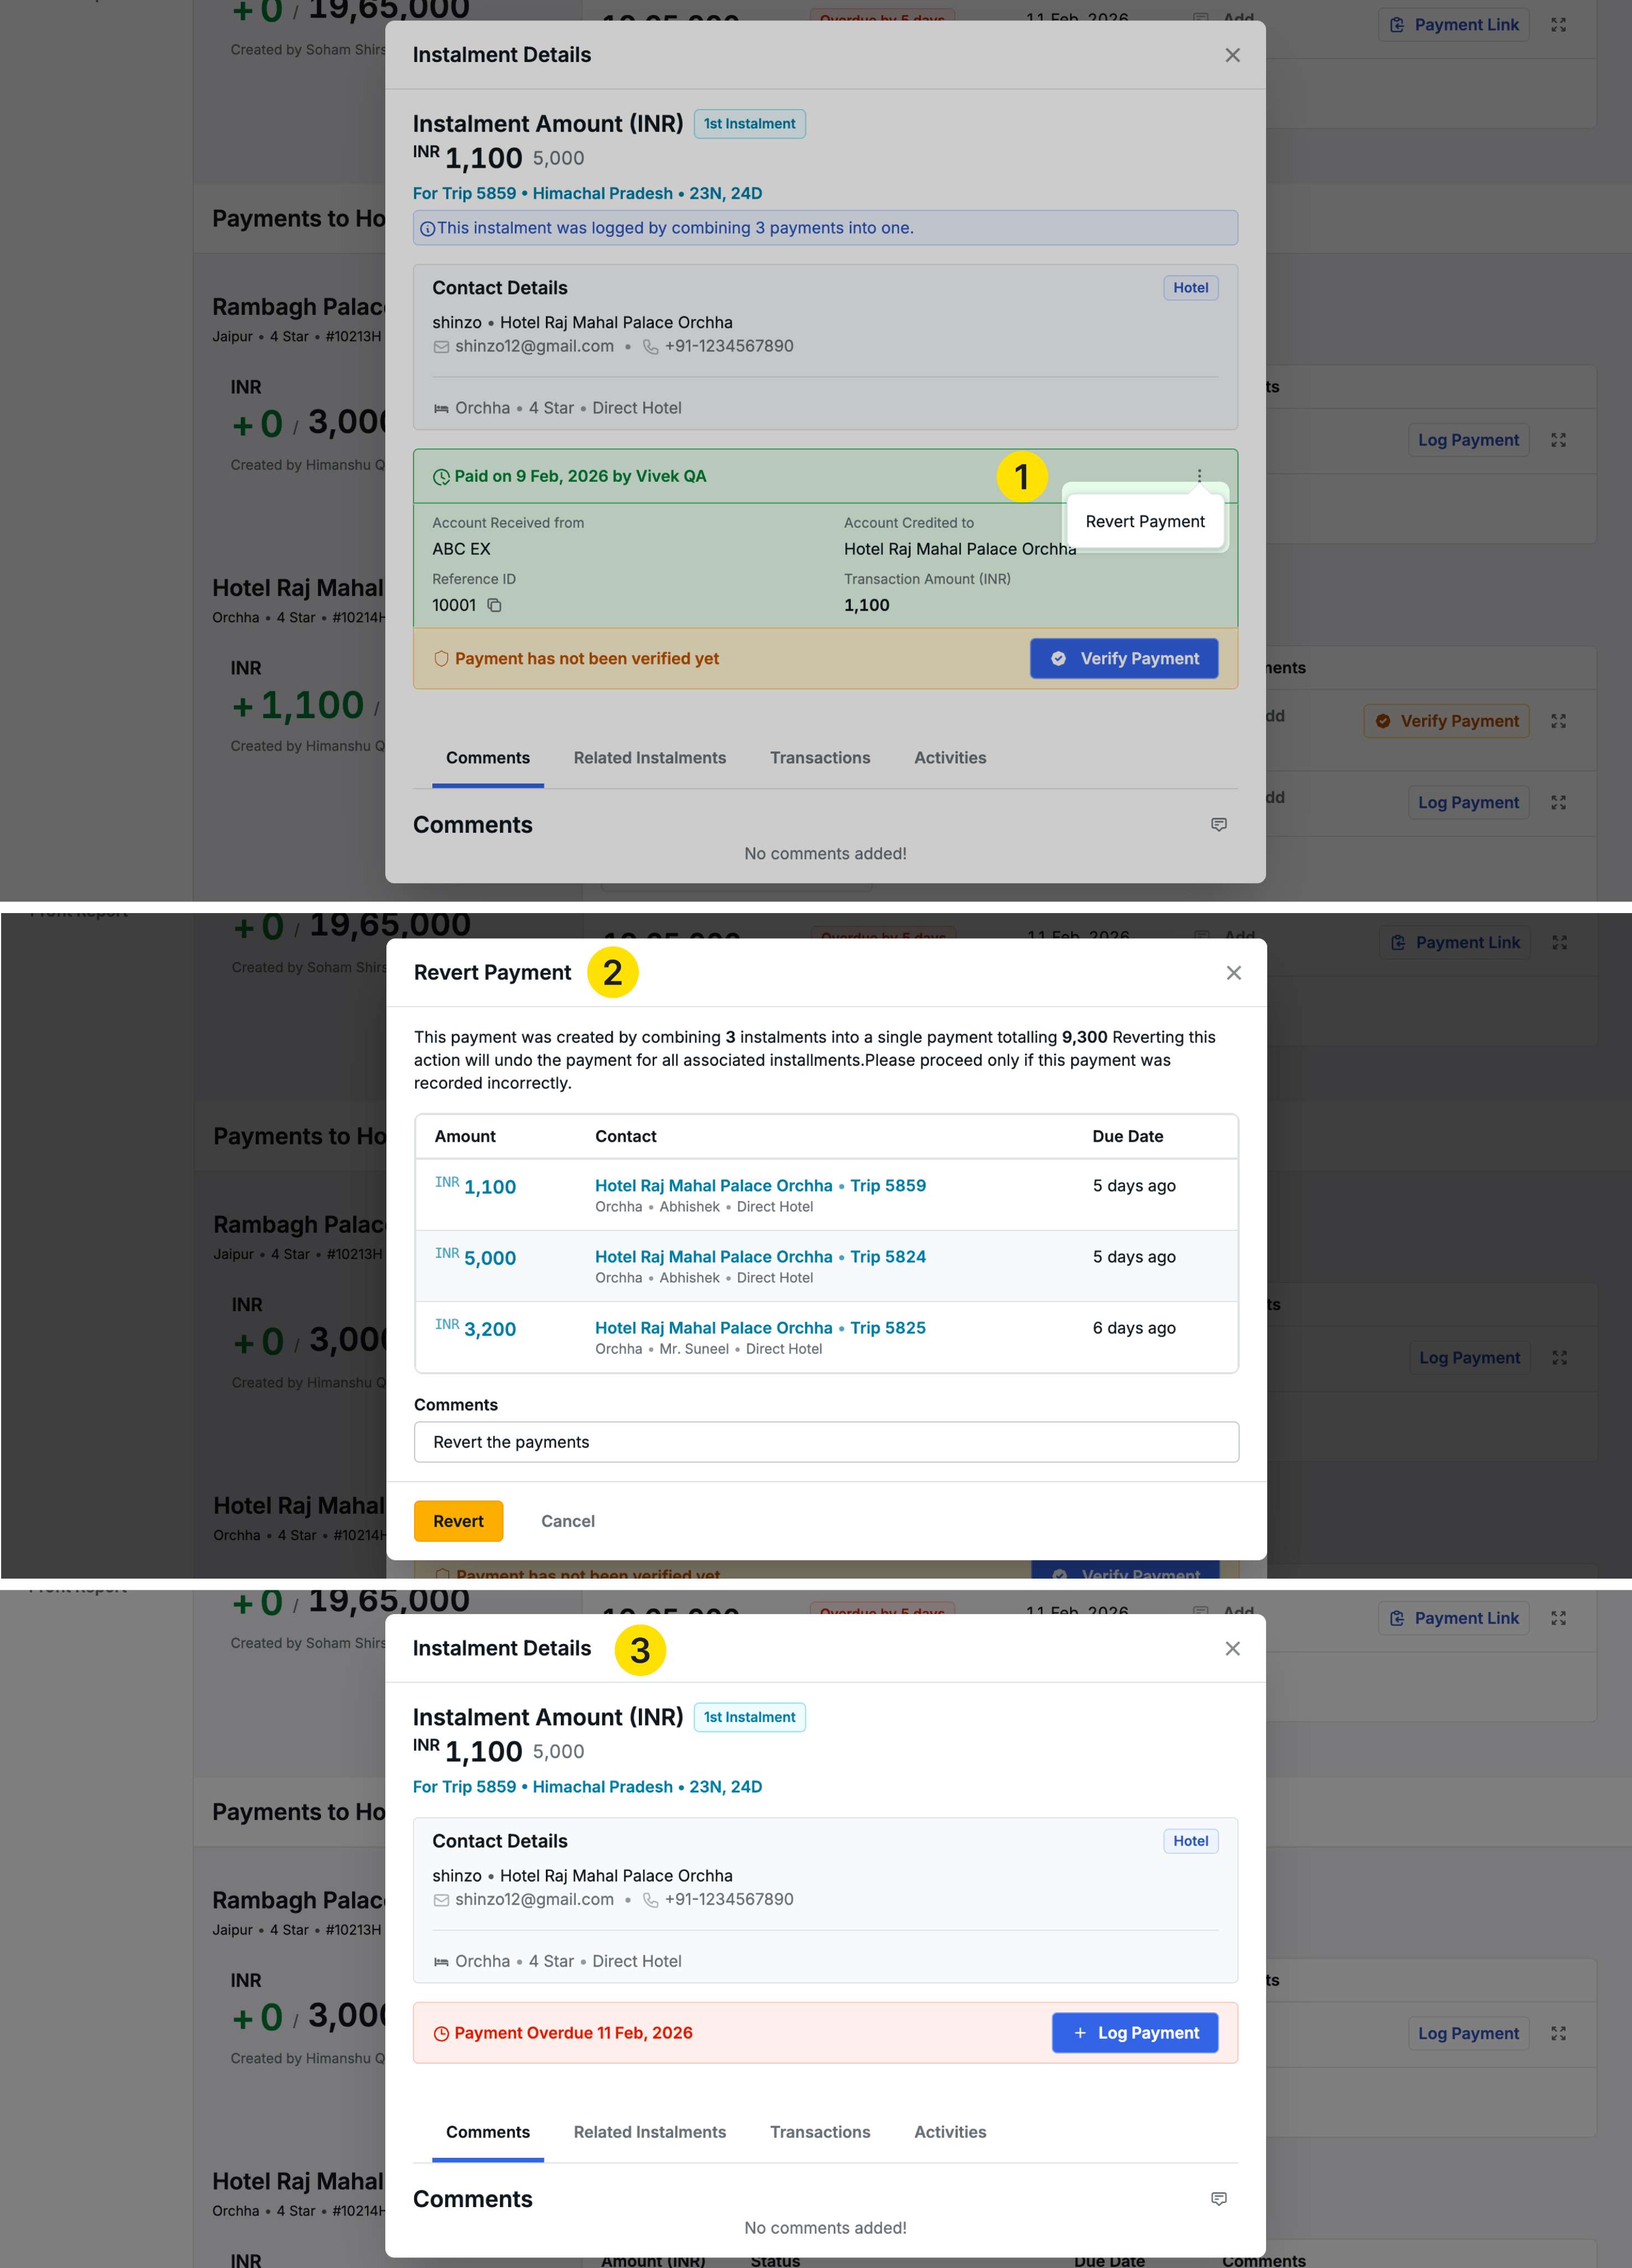
Reverting Bulk Payments
If you need to revert a bulk payment:
- Click Revert Payment
- View all payments involved in this bulk transaction
- Add a comment explaining the reason for reverting
- Confirm the revert action
Reverting one payment reverts all payments that were logged together in the bulk transaction.
Benefits
- Time Savings: Process multiple payments in minutes instead of logging each individually
- Single Transaction: One transaction for all payments simplifies reconciliation
- Reference ID Tracking: Track entire bulk payment groups with one reference ID
- Flexible Filtering: Find and select relevant payments quickly with powerful filters
- Partial Payment Support: Pay exact amounts requested by suppliers
- Complete Audit Trail: Full visibility of which payments were processed together
2. Report Activities - Admin Monitoring
We have introduced a Report Activities module that gives admins complete visibility into which team members are downloading reports, what filters they’re using, and when downloads occur.
Accessing Report Activities
Navigate to Profile → Organization → Repository → Report Activities
This feature is admin-only for monitoring and security purposes.
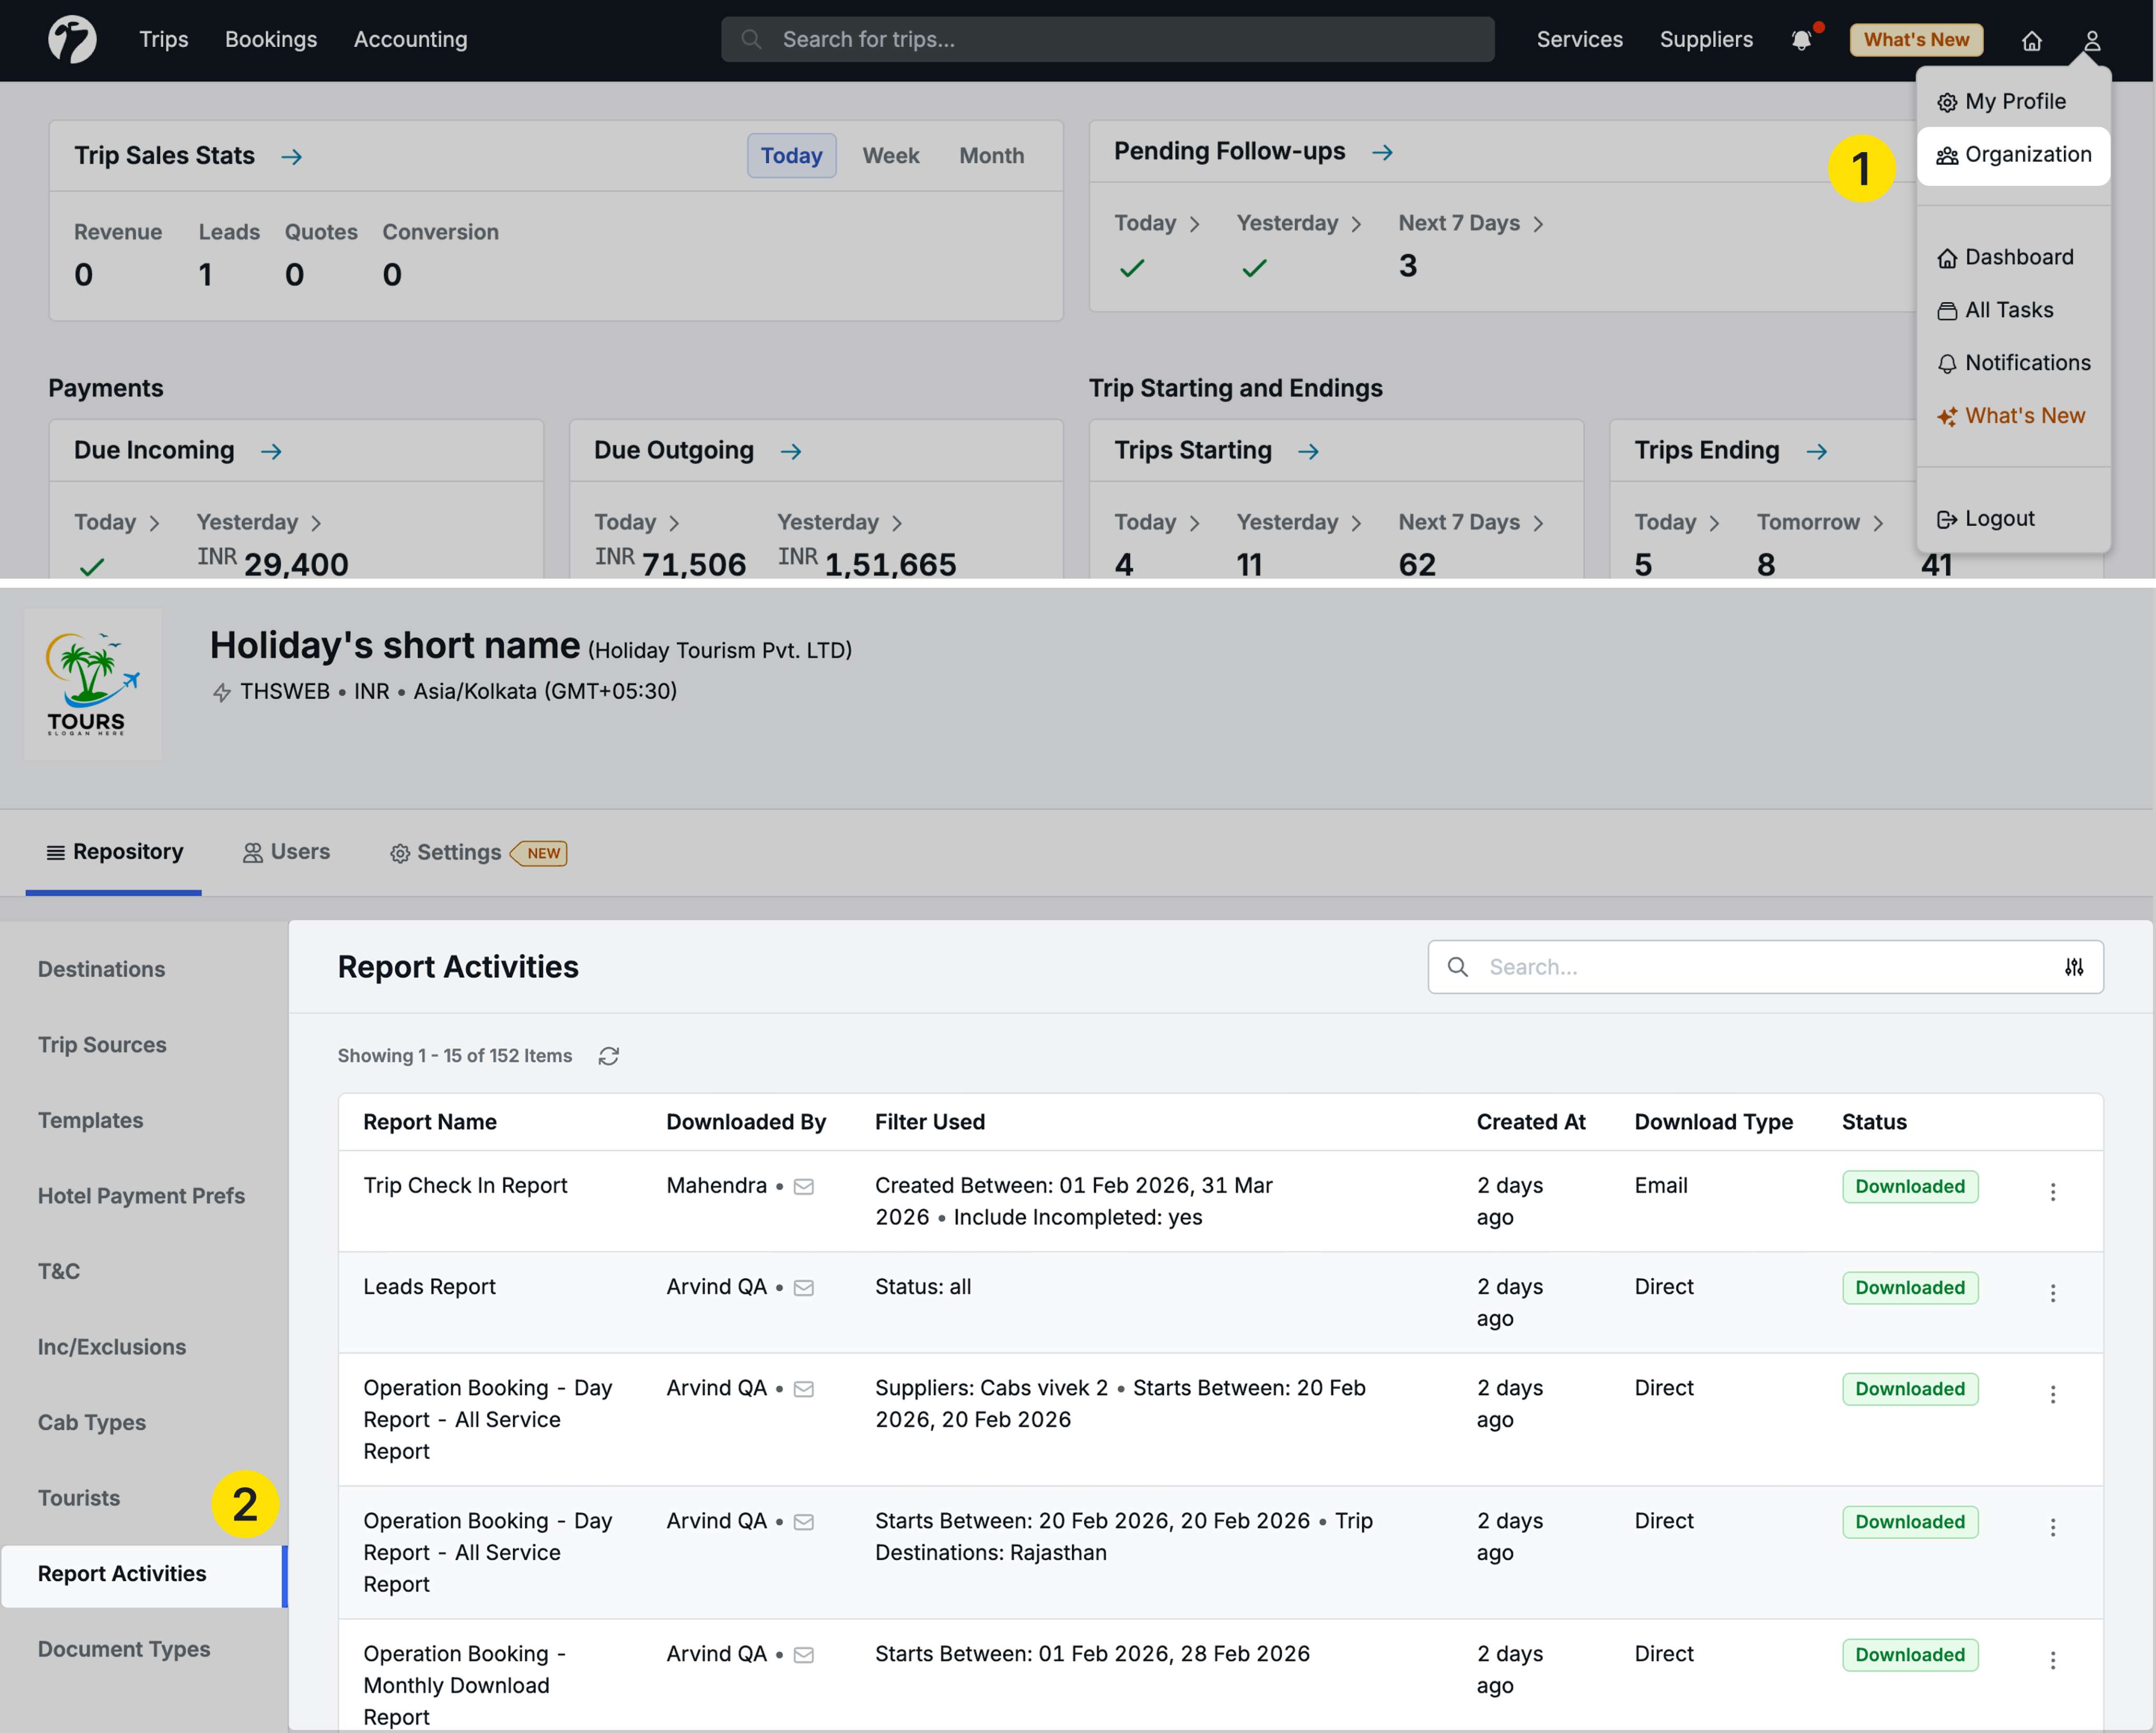
What You Can See
The Report Activities page displays comprehensive information about all report downloads:
Columns displayed:
-
Report Name: Which report was downloaded
-
Downloaded By: User name who downloaded the report
-
Filter Used: What filters were applied when generating the report
-
Created At: Date and time of download
-
Download Type: How the report was delivered
- Direct: Downloaded directly in browser
- Email: Sent to user’s email address
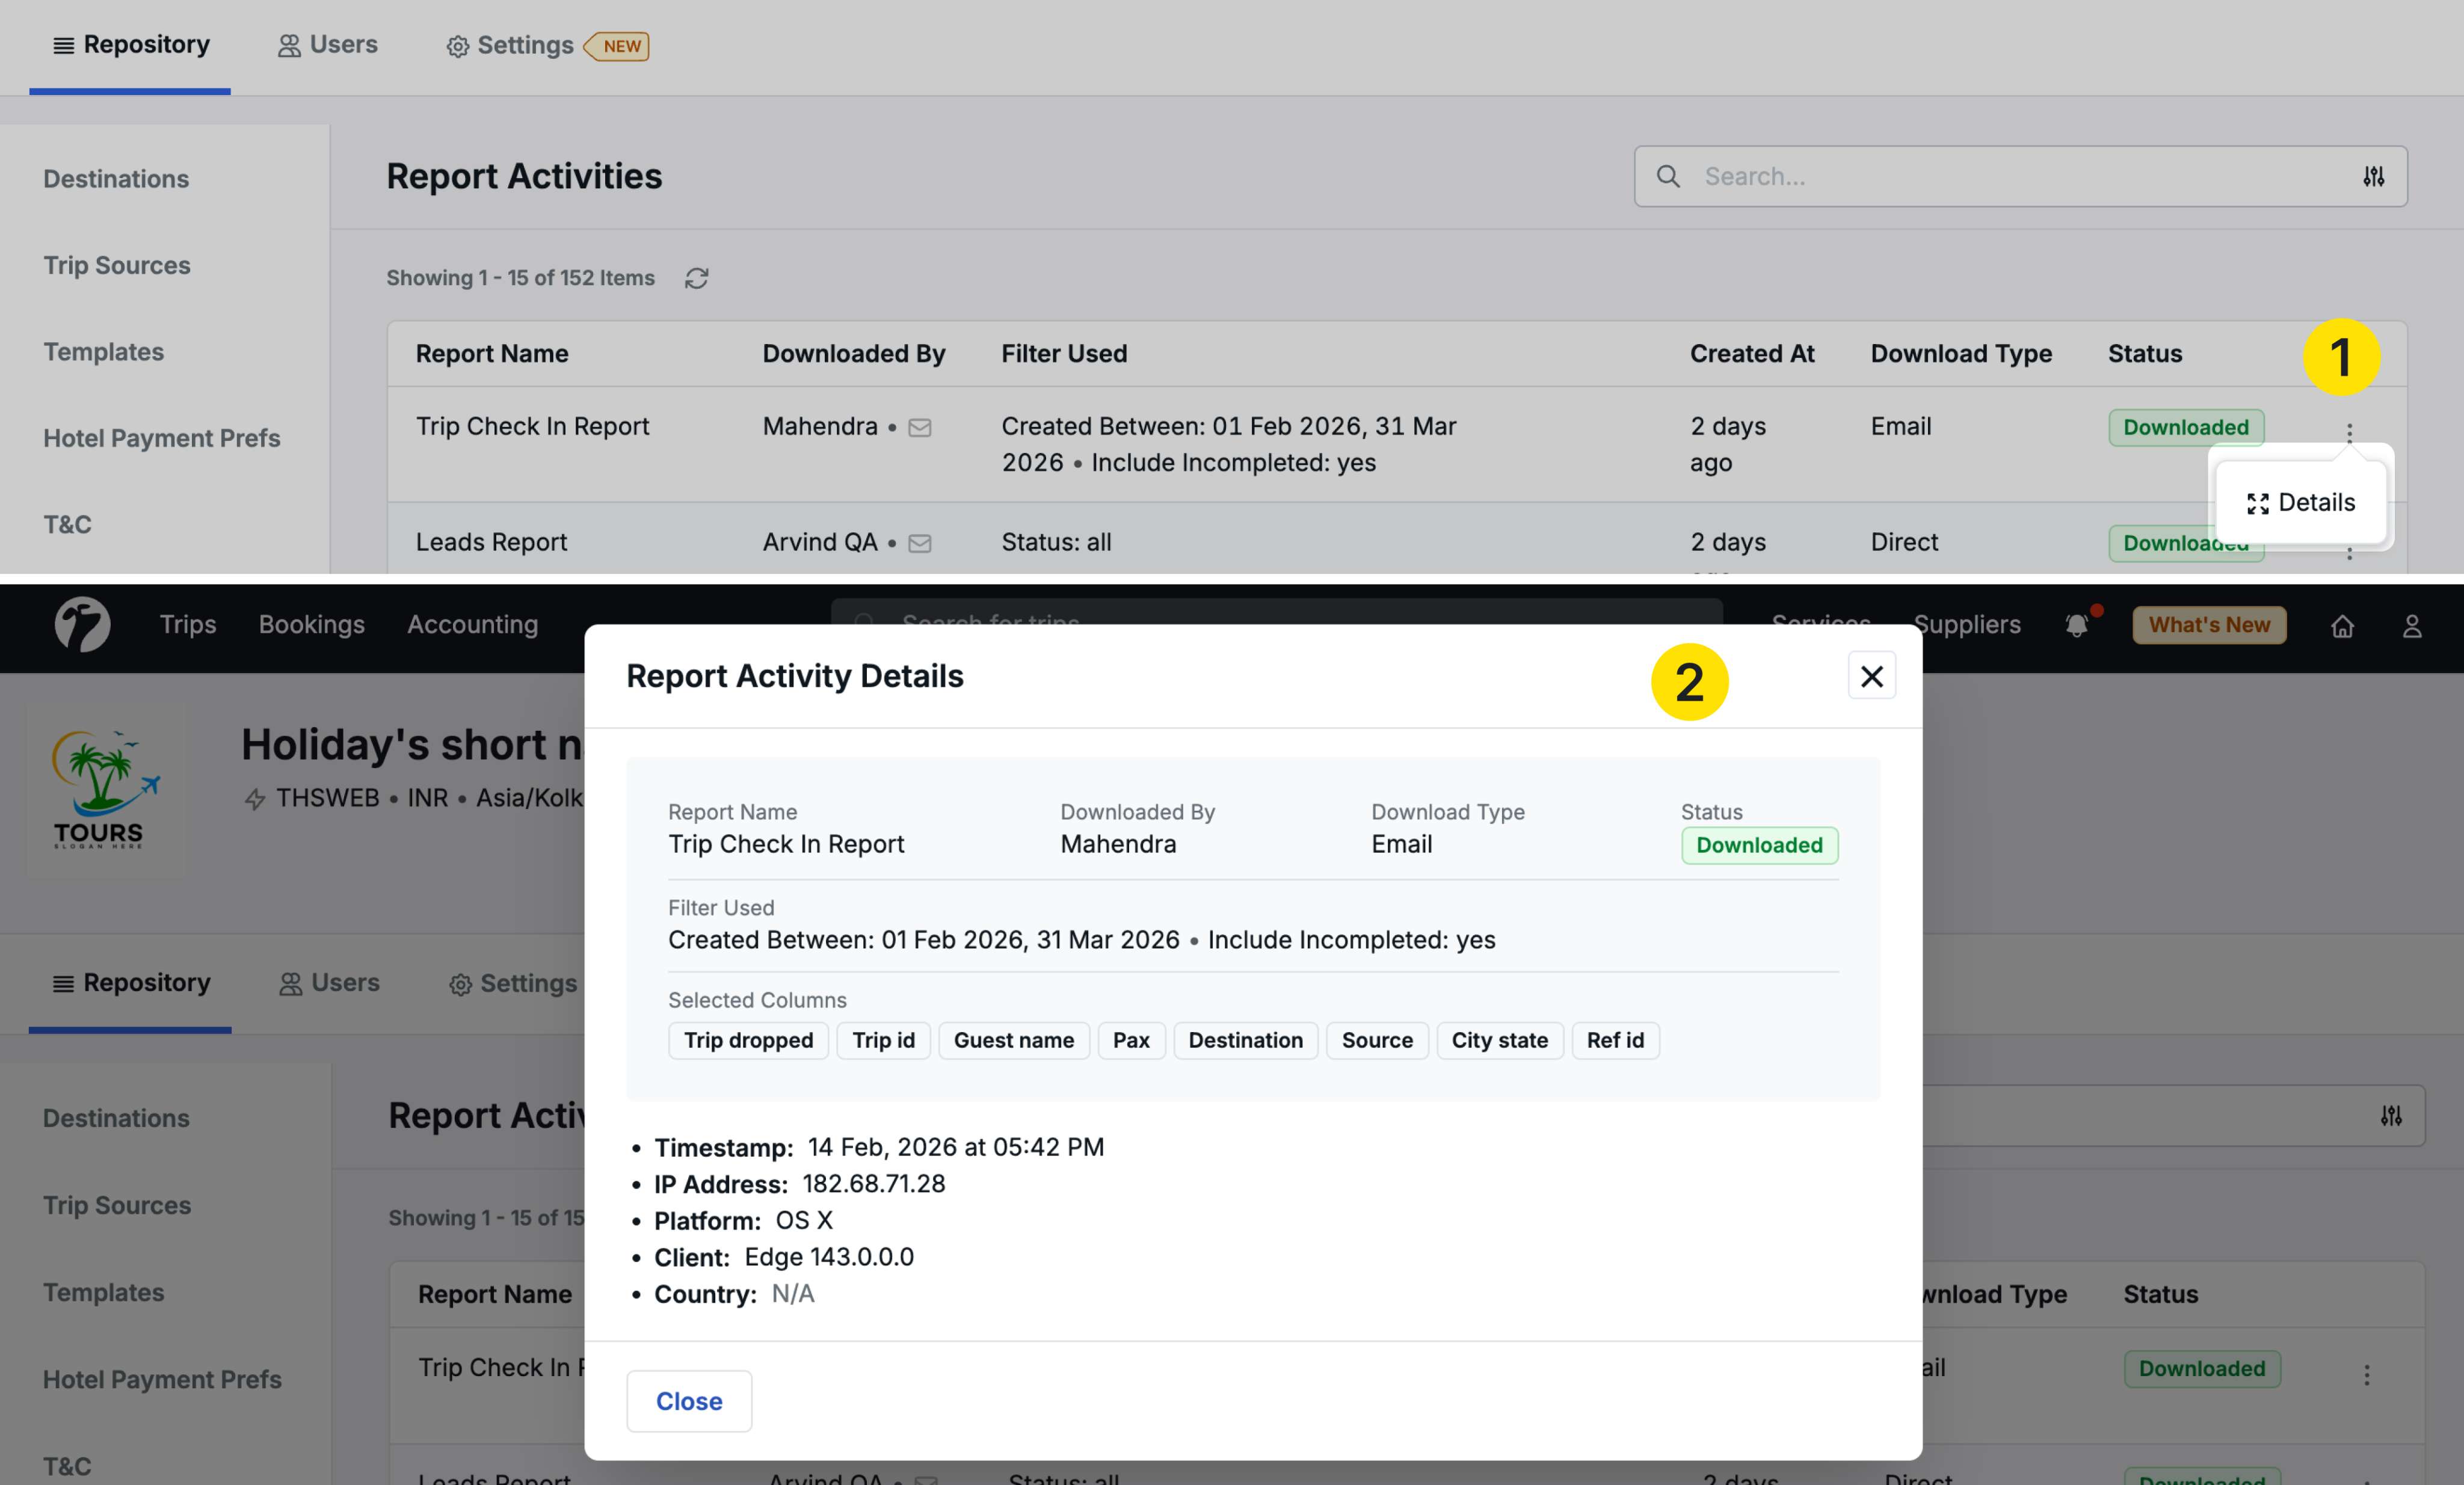
Viewing Detailed Information
Hover on the ellipsis (•••) menu beside any report activity and click Details to see:
- Complete filter parameters used
- Selected Columns: Exact columns included in the downloaded report
- Full download timestamp
- User information
Why This Matters
- Data Security: Monitor access to sensitive financial and operational data
- Team Oversight: Track which reports your team members are using most frequently
- Compliance: Maintain audit trails for report downloads
- Usage Patterns: Understand which reports are most valuable to your team
- Accountability: Full visibility of who downloaded what and when
Reports Tracked
Report activities are currently recorded for the following reports:
- Operation Booking - Day Report - All Service Report
- Operation Booking - Monthly Download Report
- Operation Booking - Monthly Overview Download Report
- Trip Check Out Report
- Trip Check In Report
- Leads Report
- Trip Plan Requests Report
- Trip Plan Requests Report - (Trip Sources & Sales Person)
Additional reports may be added to tracking in future updates.
3. Daily Operations Bulk Booking System
We have extended supplier management capabilities to the Operational Bookings module, allowing you to update suppliers for transport and activity services across multiple trips from a single day view.
Accessing the Feature
Navigate to Bookings → Operational Bookings and select a specific date (e.g., February 14, 2026).
You’ll see all transport services and activities scheduled for that day across all trips.
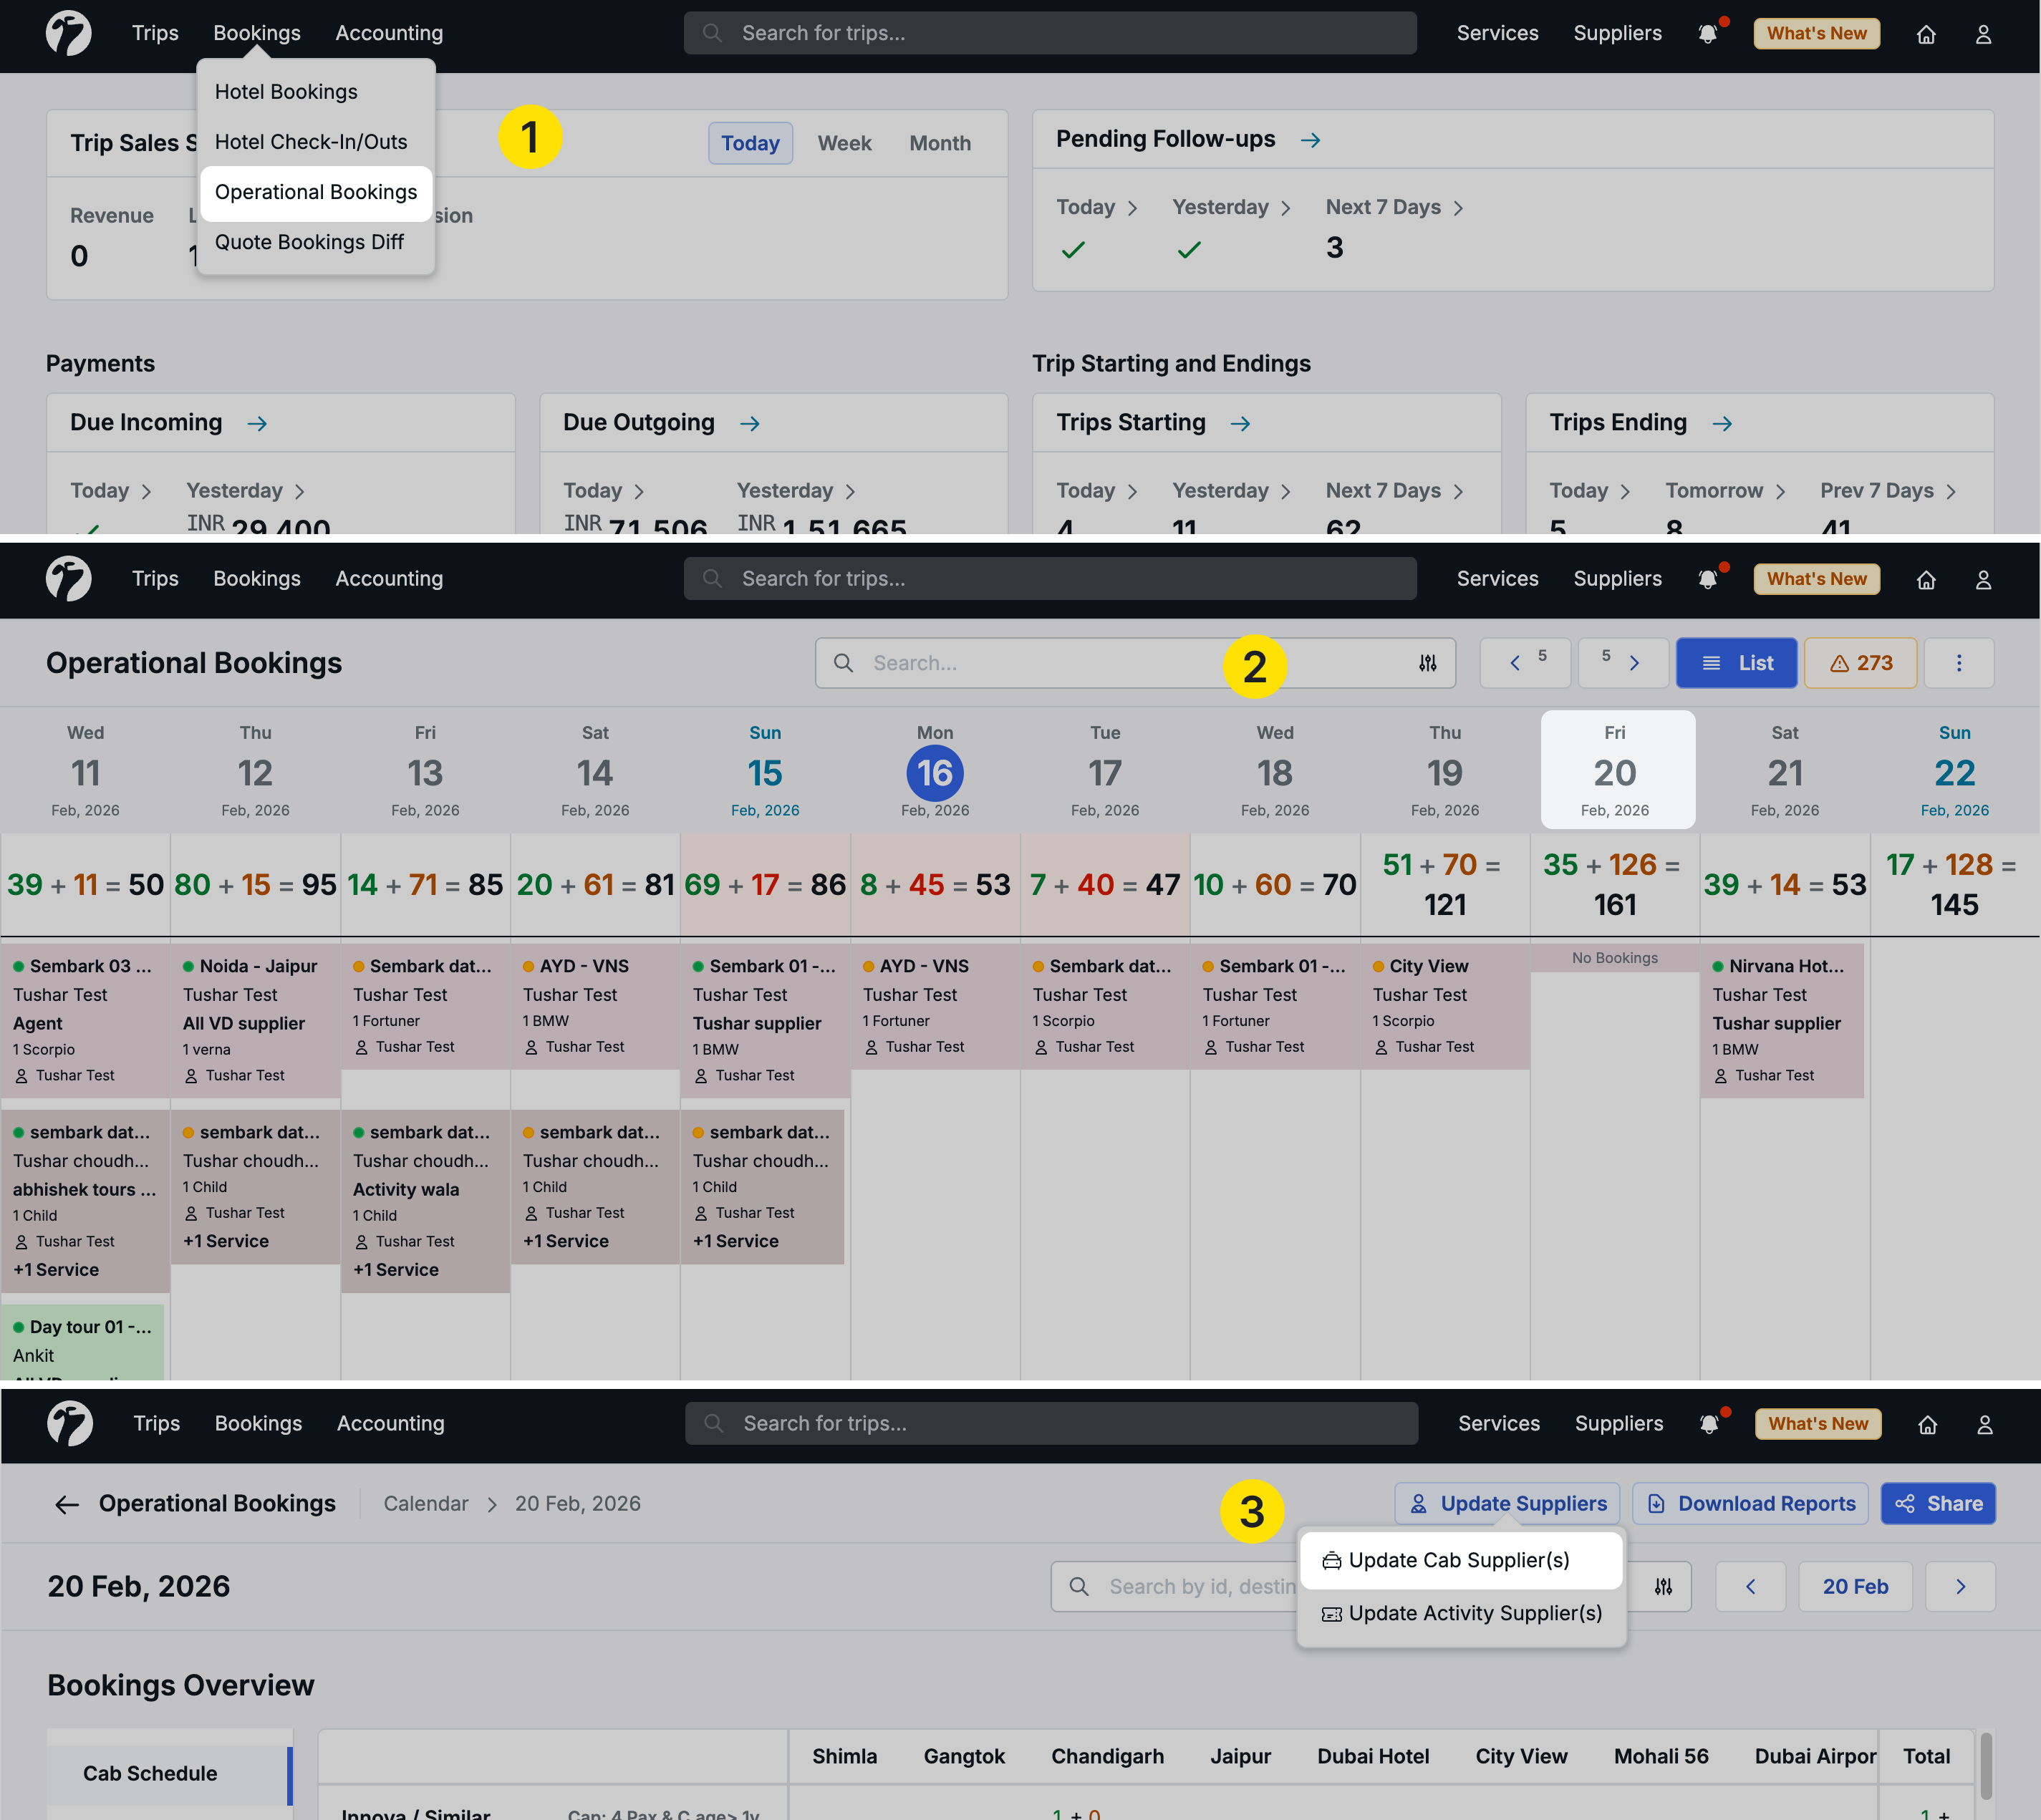
Updating Suppliers in Bulk
Click the Update Supplier button in the top right corner to see two options:
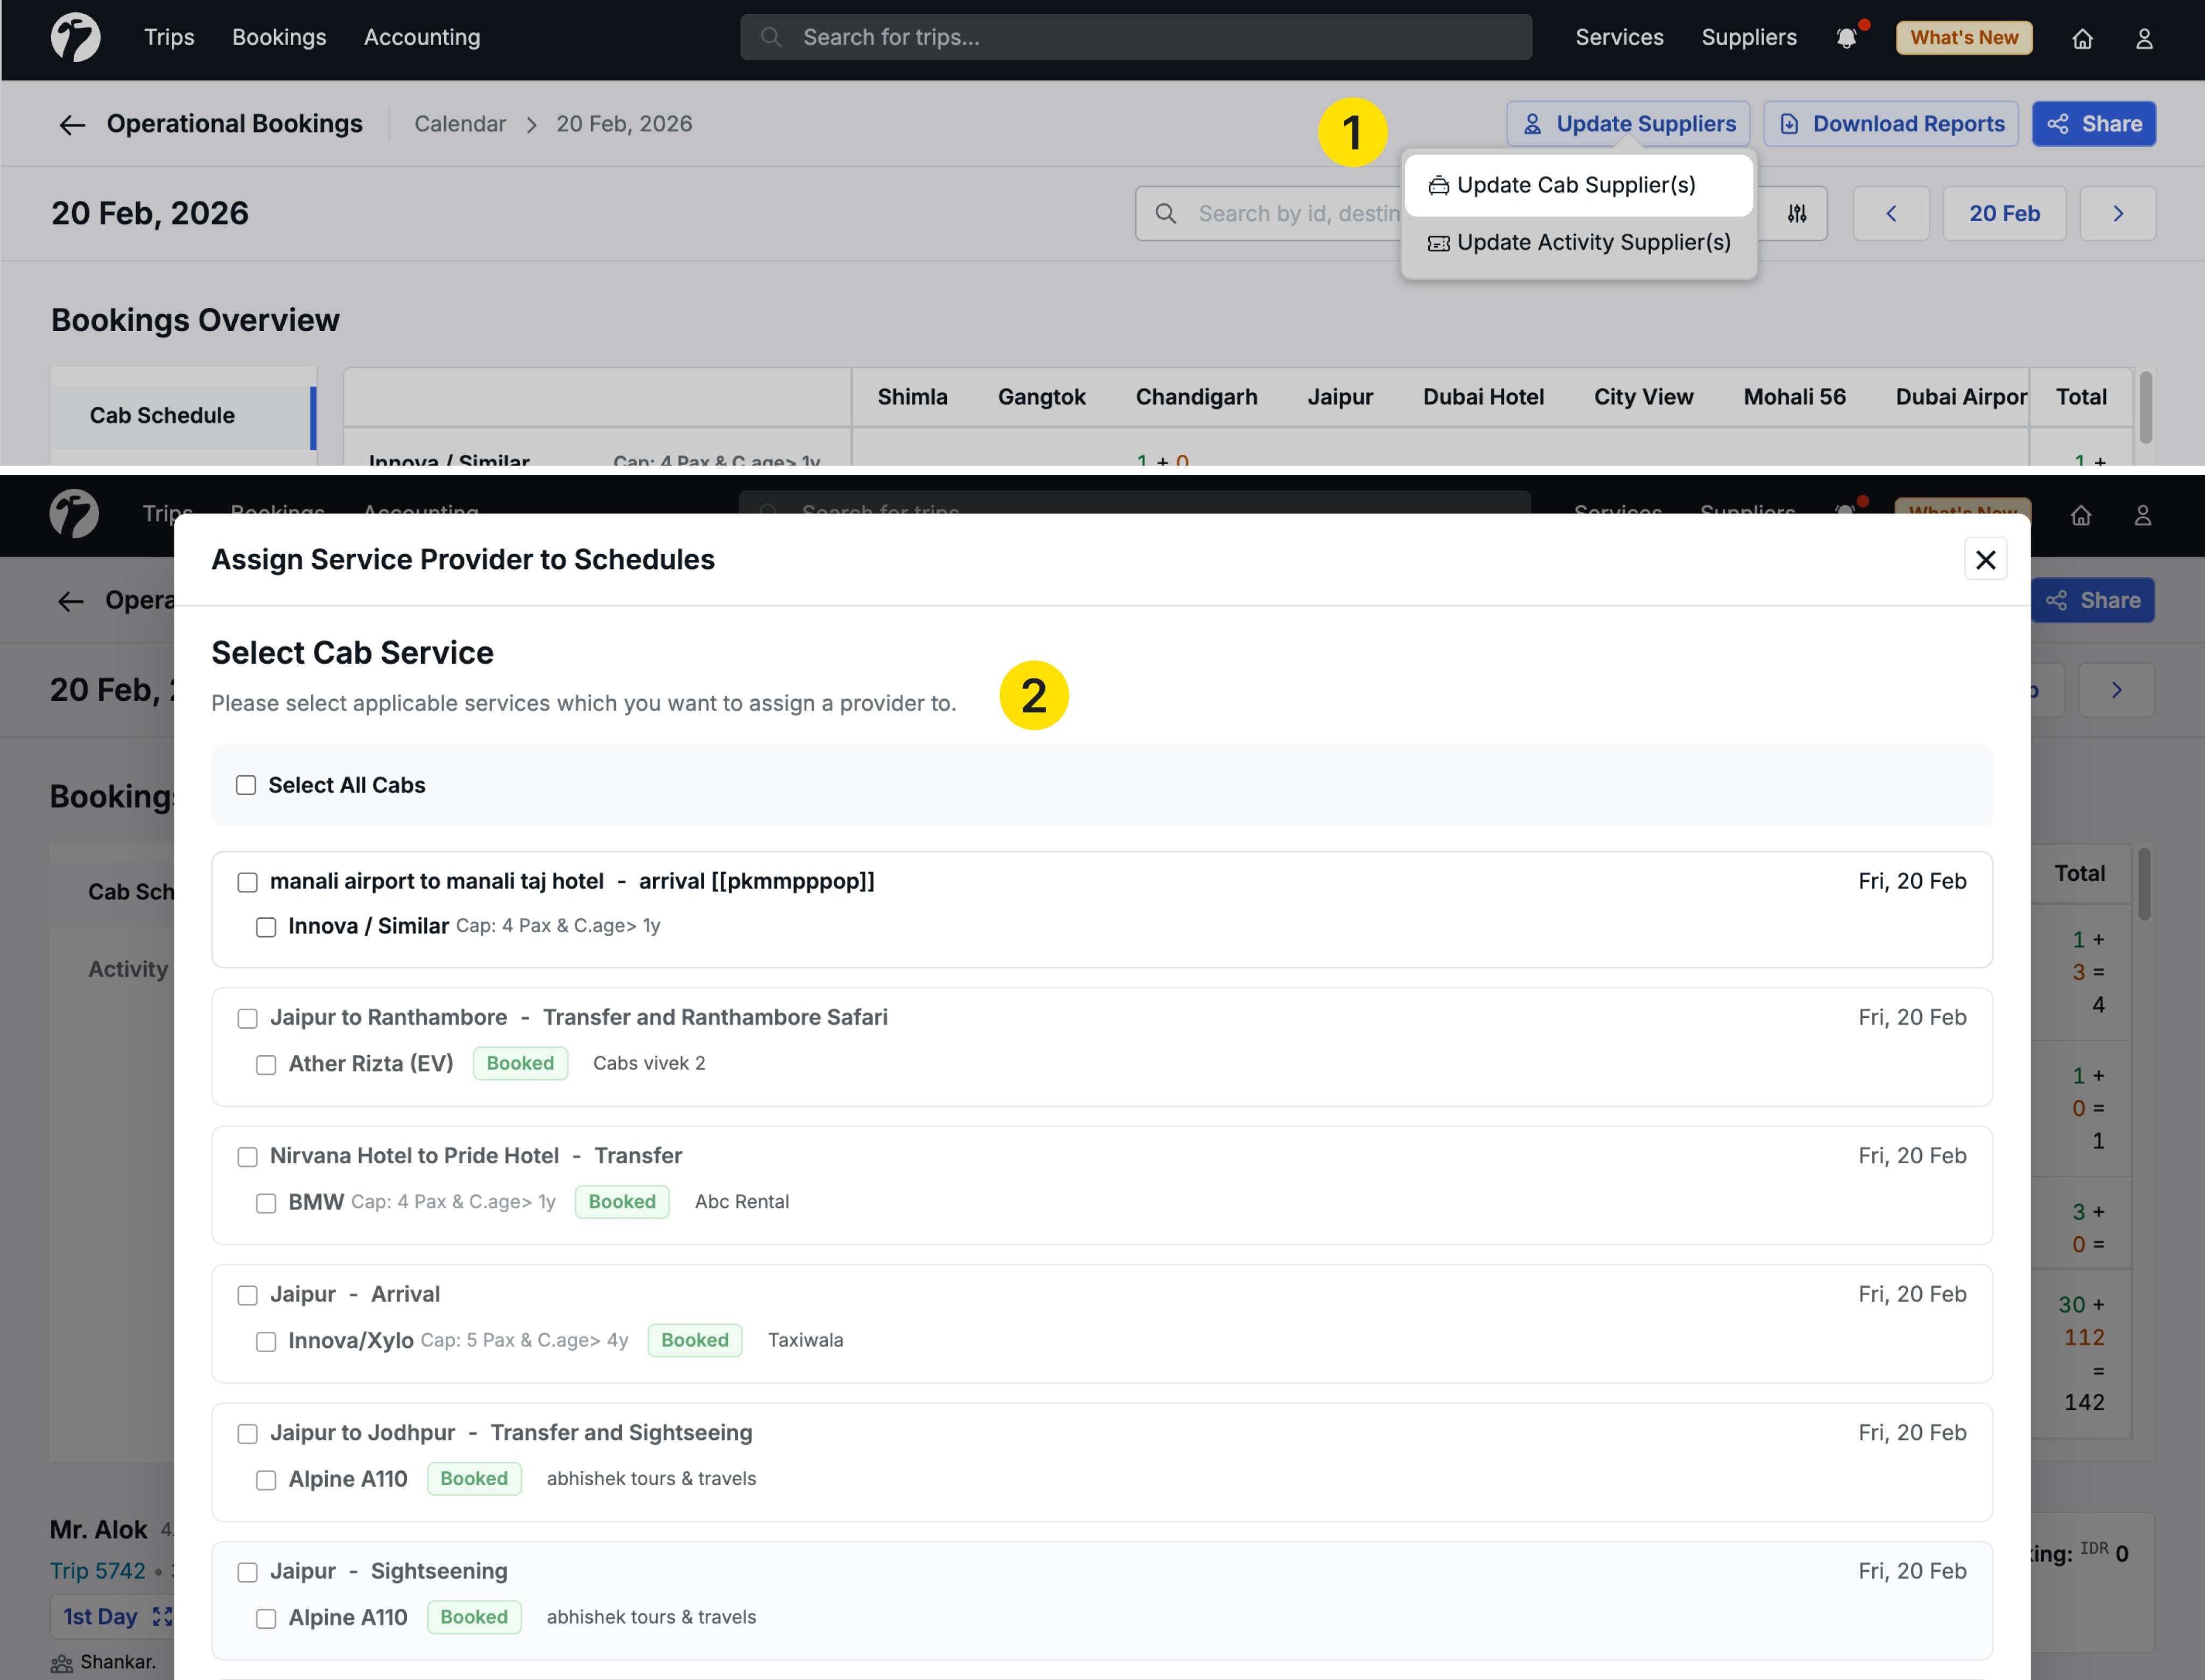
Update Cab Suppliers
-
Click Update Cab Supplier
-
The “Assign Service Provider to Schedules” popup opens
-
Select the cab services you want to update (from multiple trips for that day)
-
Click Next
-
Assign the service provider:
- Supplier Name: Select the transport supplier
- Driver: Assign specific driver
- Cab Details: Add cab information
- Update Pricing: Modify service pricing if needed
-
Check Confirm Booking with Supplier
-
Click Assign to update
Key Difference from Trip-Level Updates:
In the trip’s Service Booking section, you can only update suppliers for that specific trip’s services. Here in Operational Bookings, you can see and update all transport services across multiple trips for a particular day.
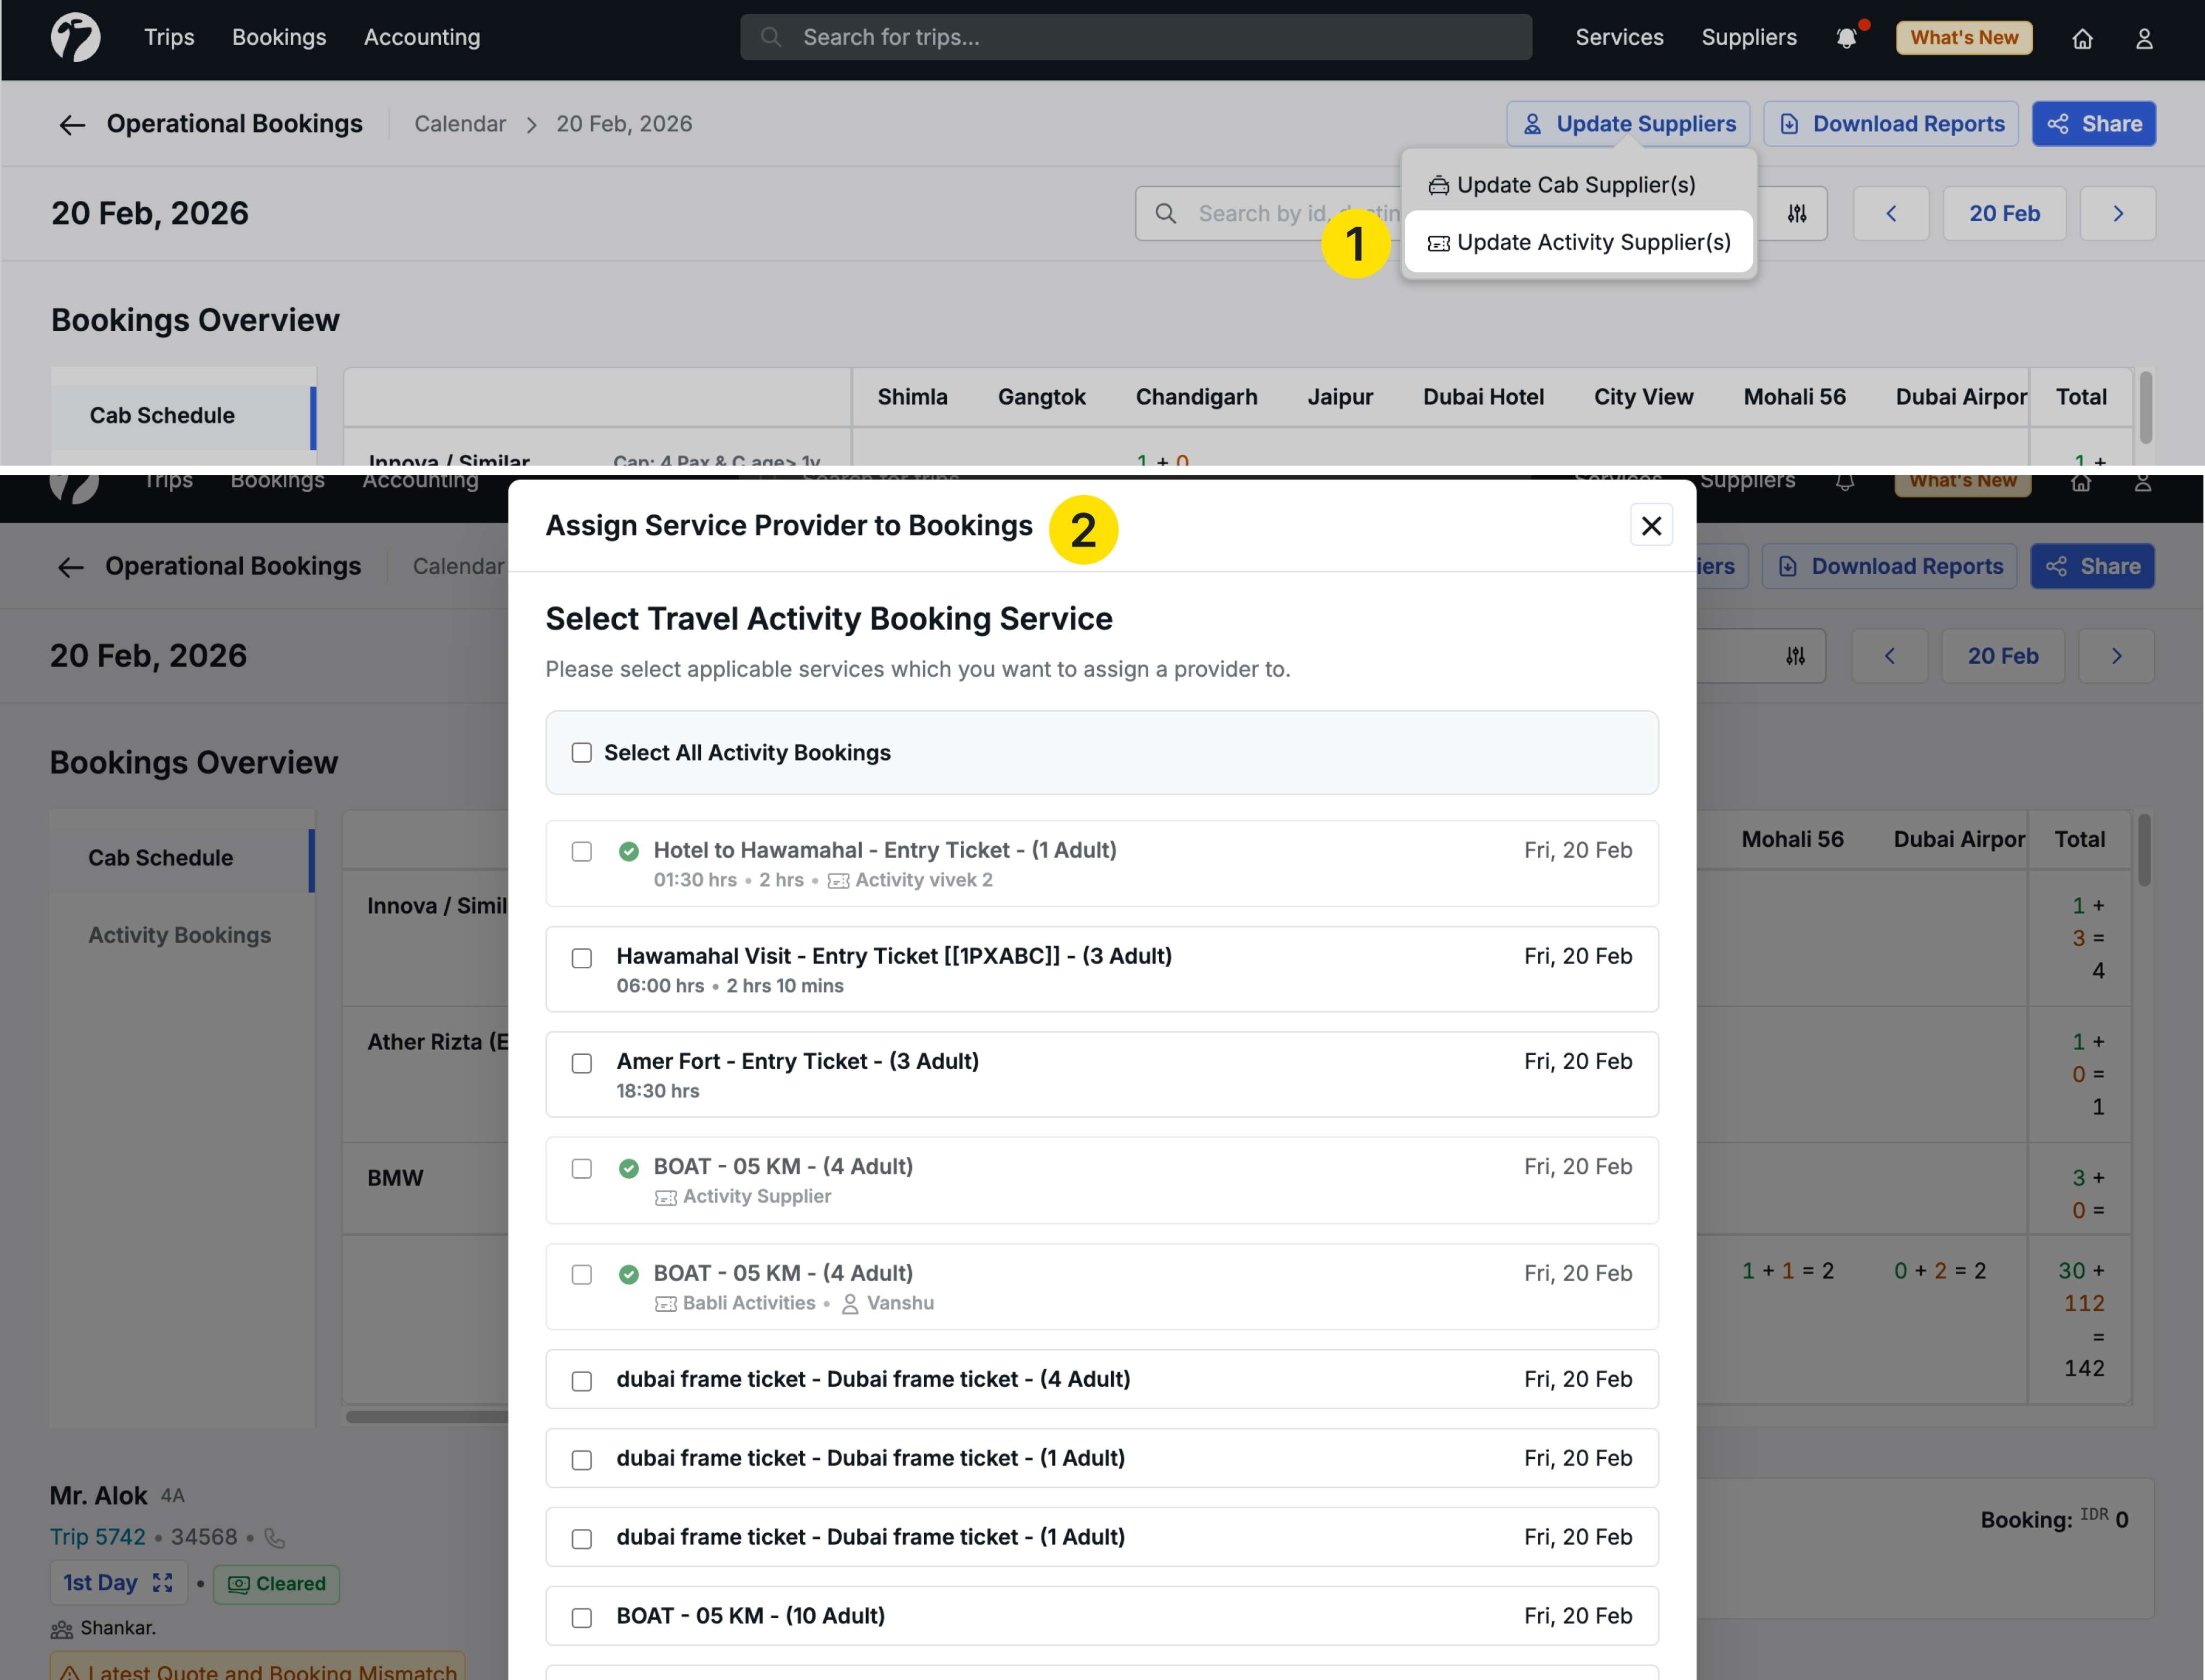
Update Activity Suppliers
- Click Update Activity Supplier
- The “Assign Service Provider to Booking” popup opens
- Select the activities you want to update (from multiple trips for that day)
- Click Next
- Assign the activity supplier
- Update any relevant details
- Confirm and assign
Filtering for Efficient
Use the filters in Operational Bookings to narrow down services:
- Destination: Filter by specific destinations
- Service City: Show services in particular cities
- Valid Drivers: Filter by driver availability
- And more…
This makes it easy to update suppliers for specific groups of services efficiently.
Reports Consolidation
As part of this update, we’ve consolidated the report download options:
- Previous: Separate buttons for “All Services Report”, “Transport Report”, and “Activities Report”
- Now: Single Download Reports button with a dropdown menu containing all three options
This cleaner interface reduces clutter while maintaining access to all report types.

Benefits
- Multi-Trip Management: Update suppliers across all trips for a day from one screen
- Bulk Operations: Process multiple service updates simultaneously
- Day-Level Visibility: See all operational requirements for a specific date
- Efficient Filtering: Find and update relevant services quickly
- Centralized Workflow: Manage suppliers without navigating to individual trips
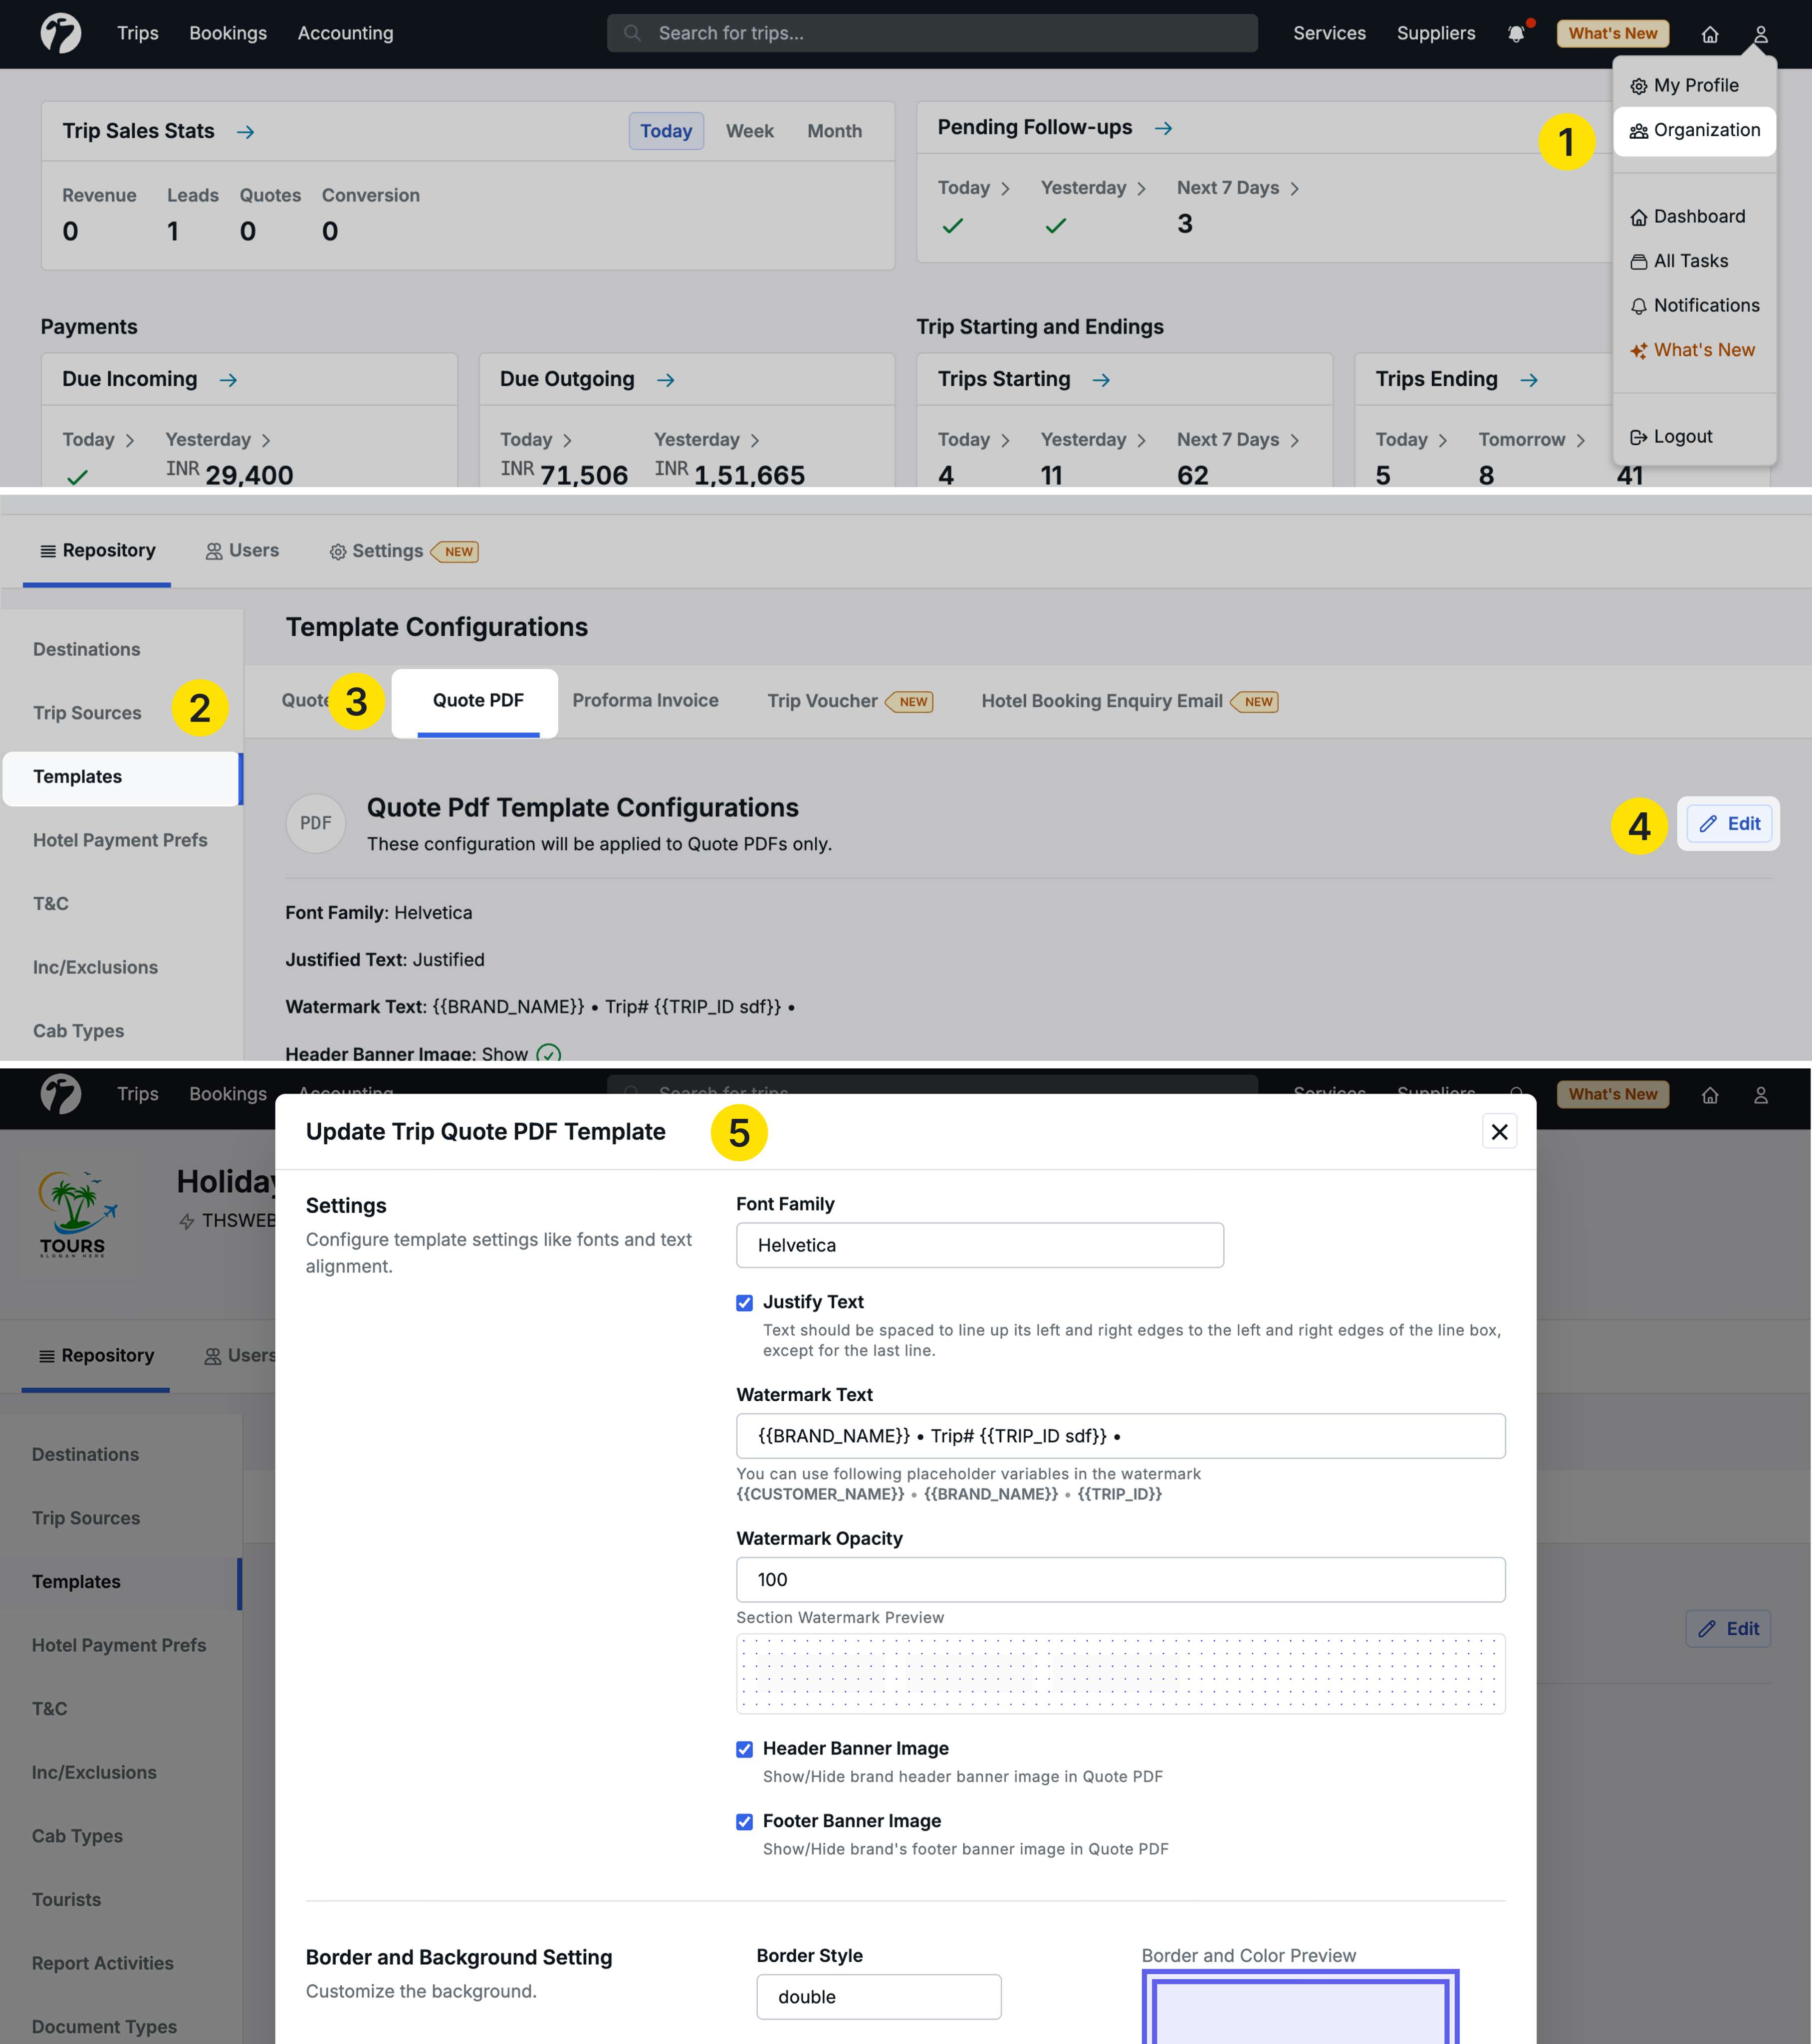
4. Quotation PDF Enhancements
We have added three powerful enhancements to the Quotation PDF that give you more control over pricing visibility and presentation.
Accessing Template Settings
Navigate to Profile → Organization → Repository → Templates → Quote PDF
All three enhancements are configured at the template level with activation options during PDF generation.
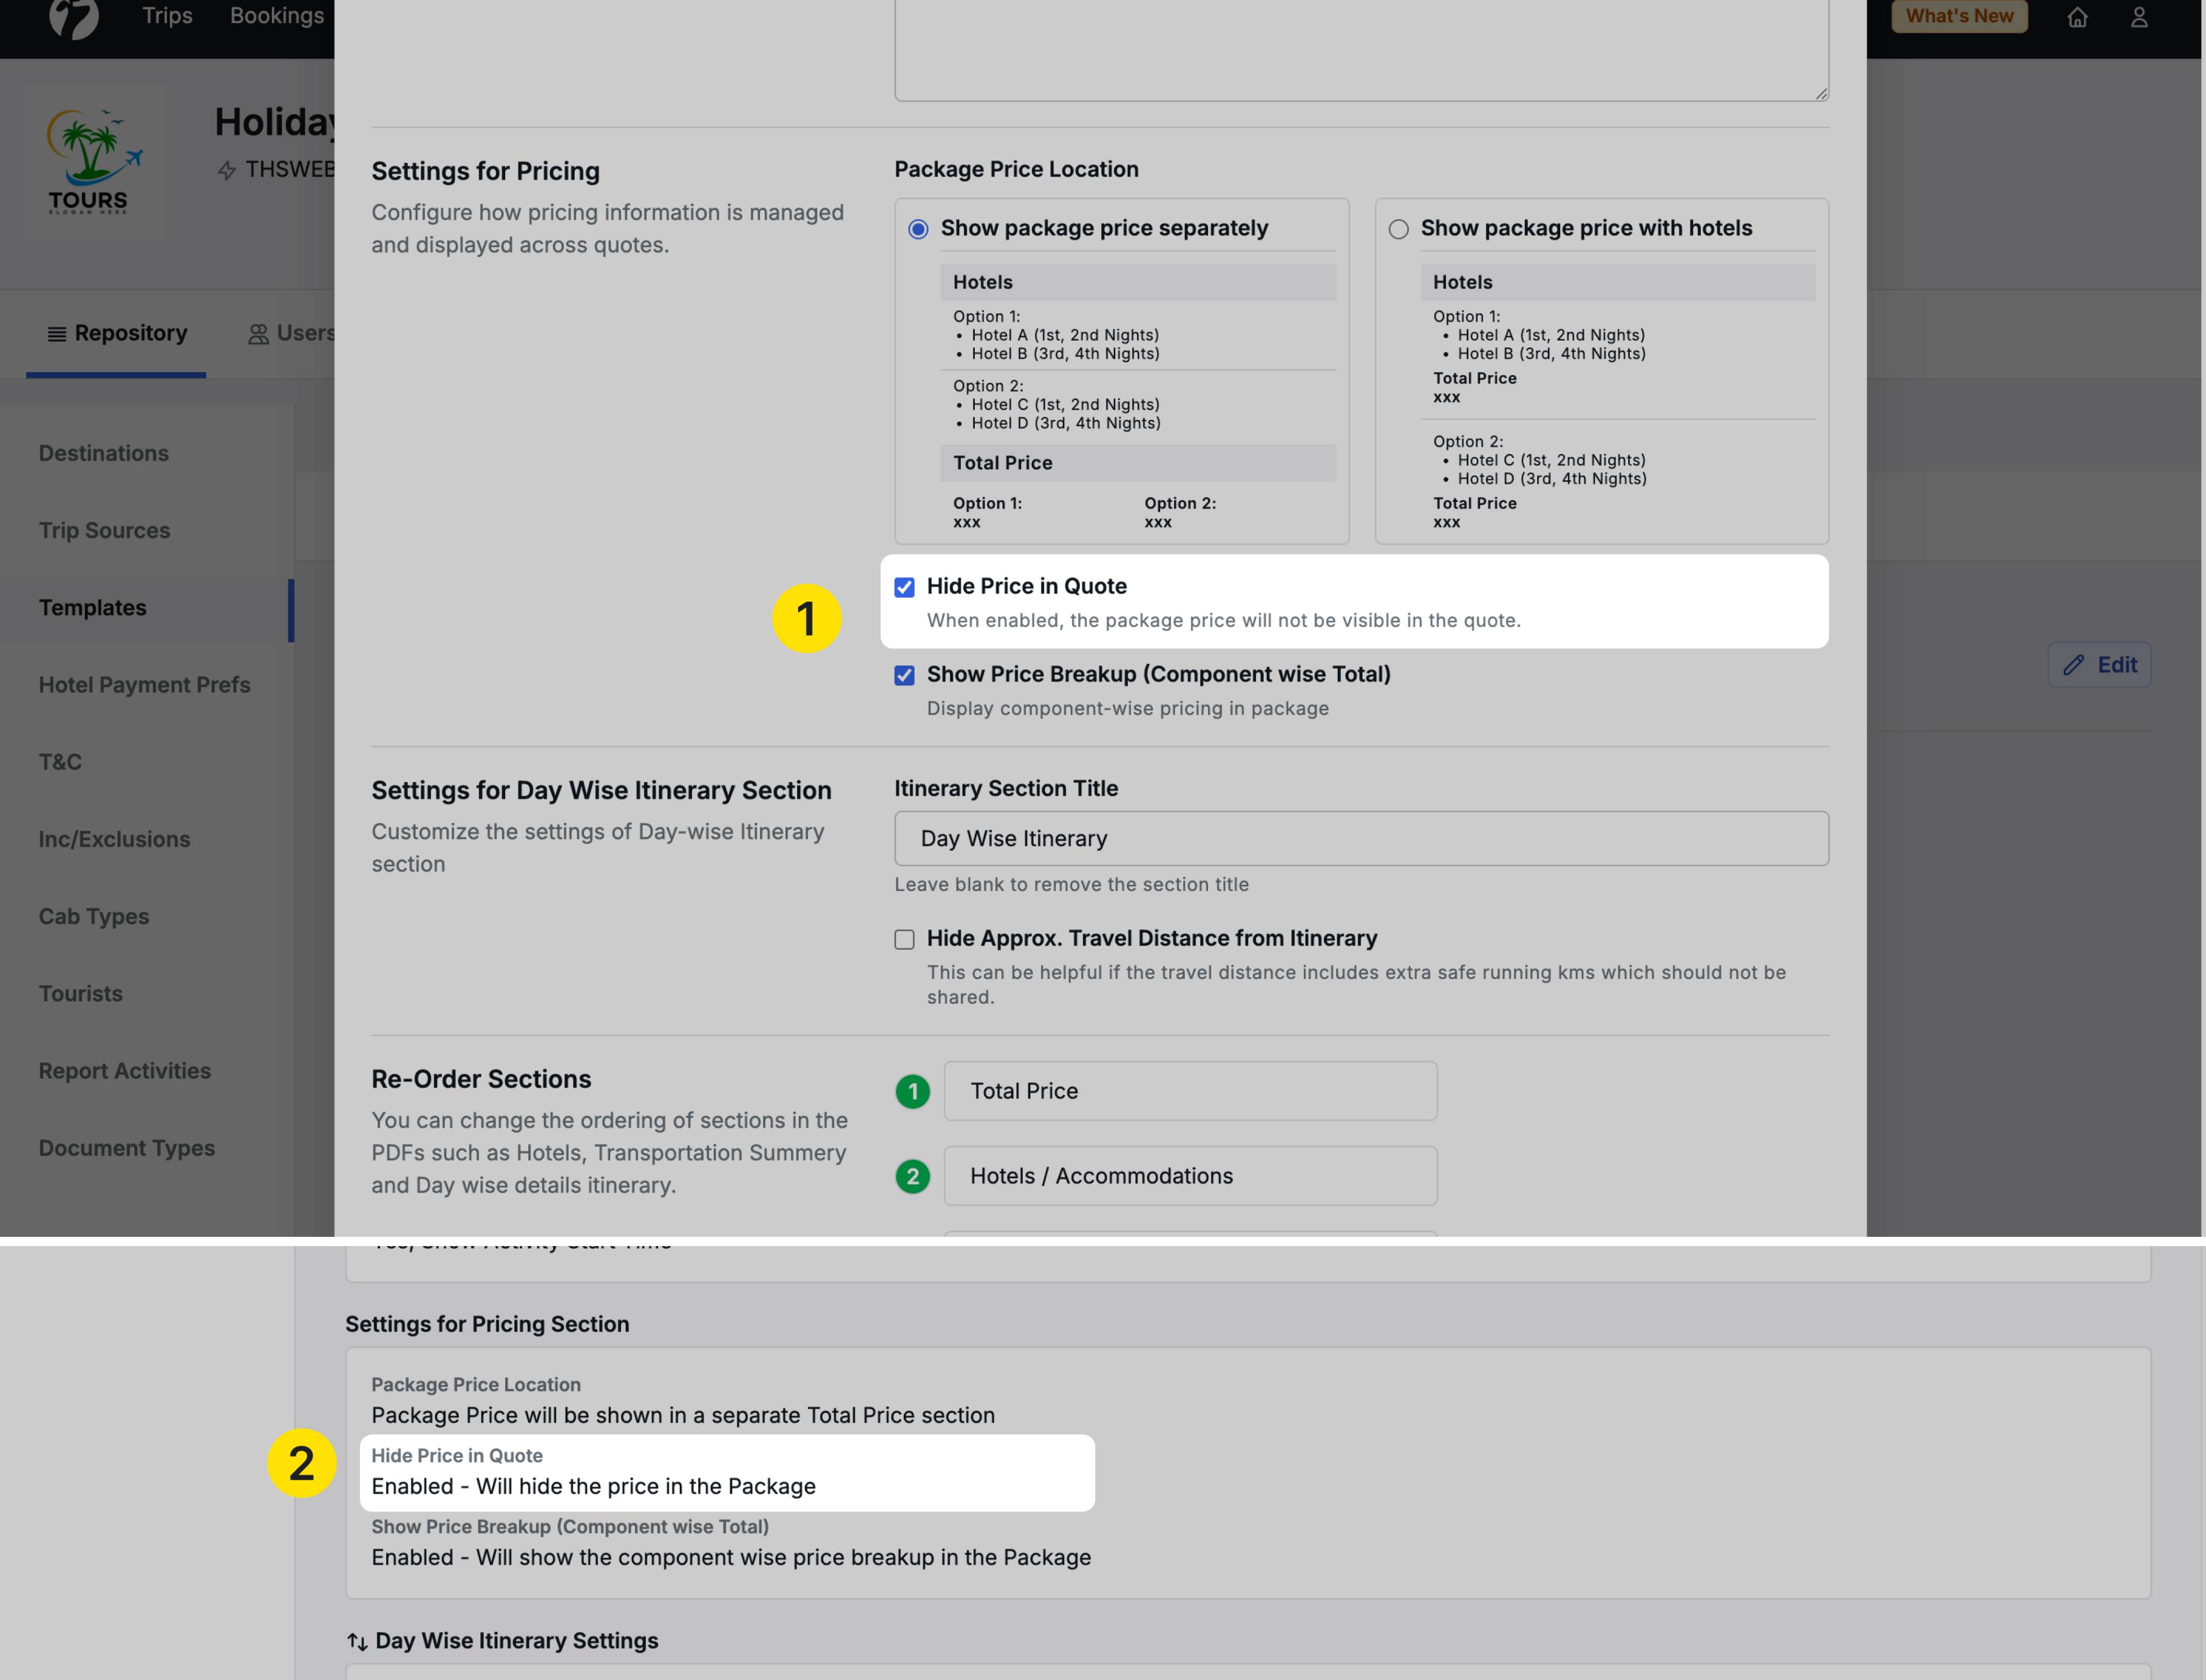
Enhancement 1: Hide Prices in Quotation
You can now generate quotation PDFs without showing any prices, allowing clients to review inclusions before seeing costs.
How to Configure
Step 1: Enable in Template
- In the Quote PDF template, find the Settings for Pricing section
- Check the Hide Price in Quote checkbox
- Save the template
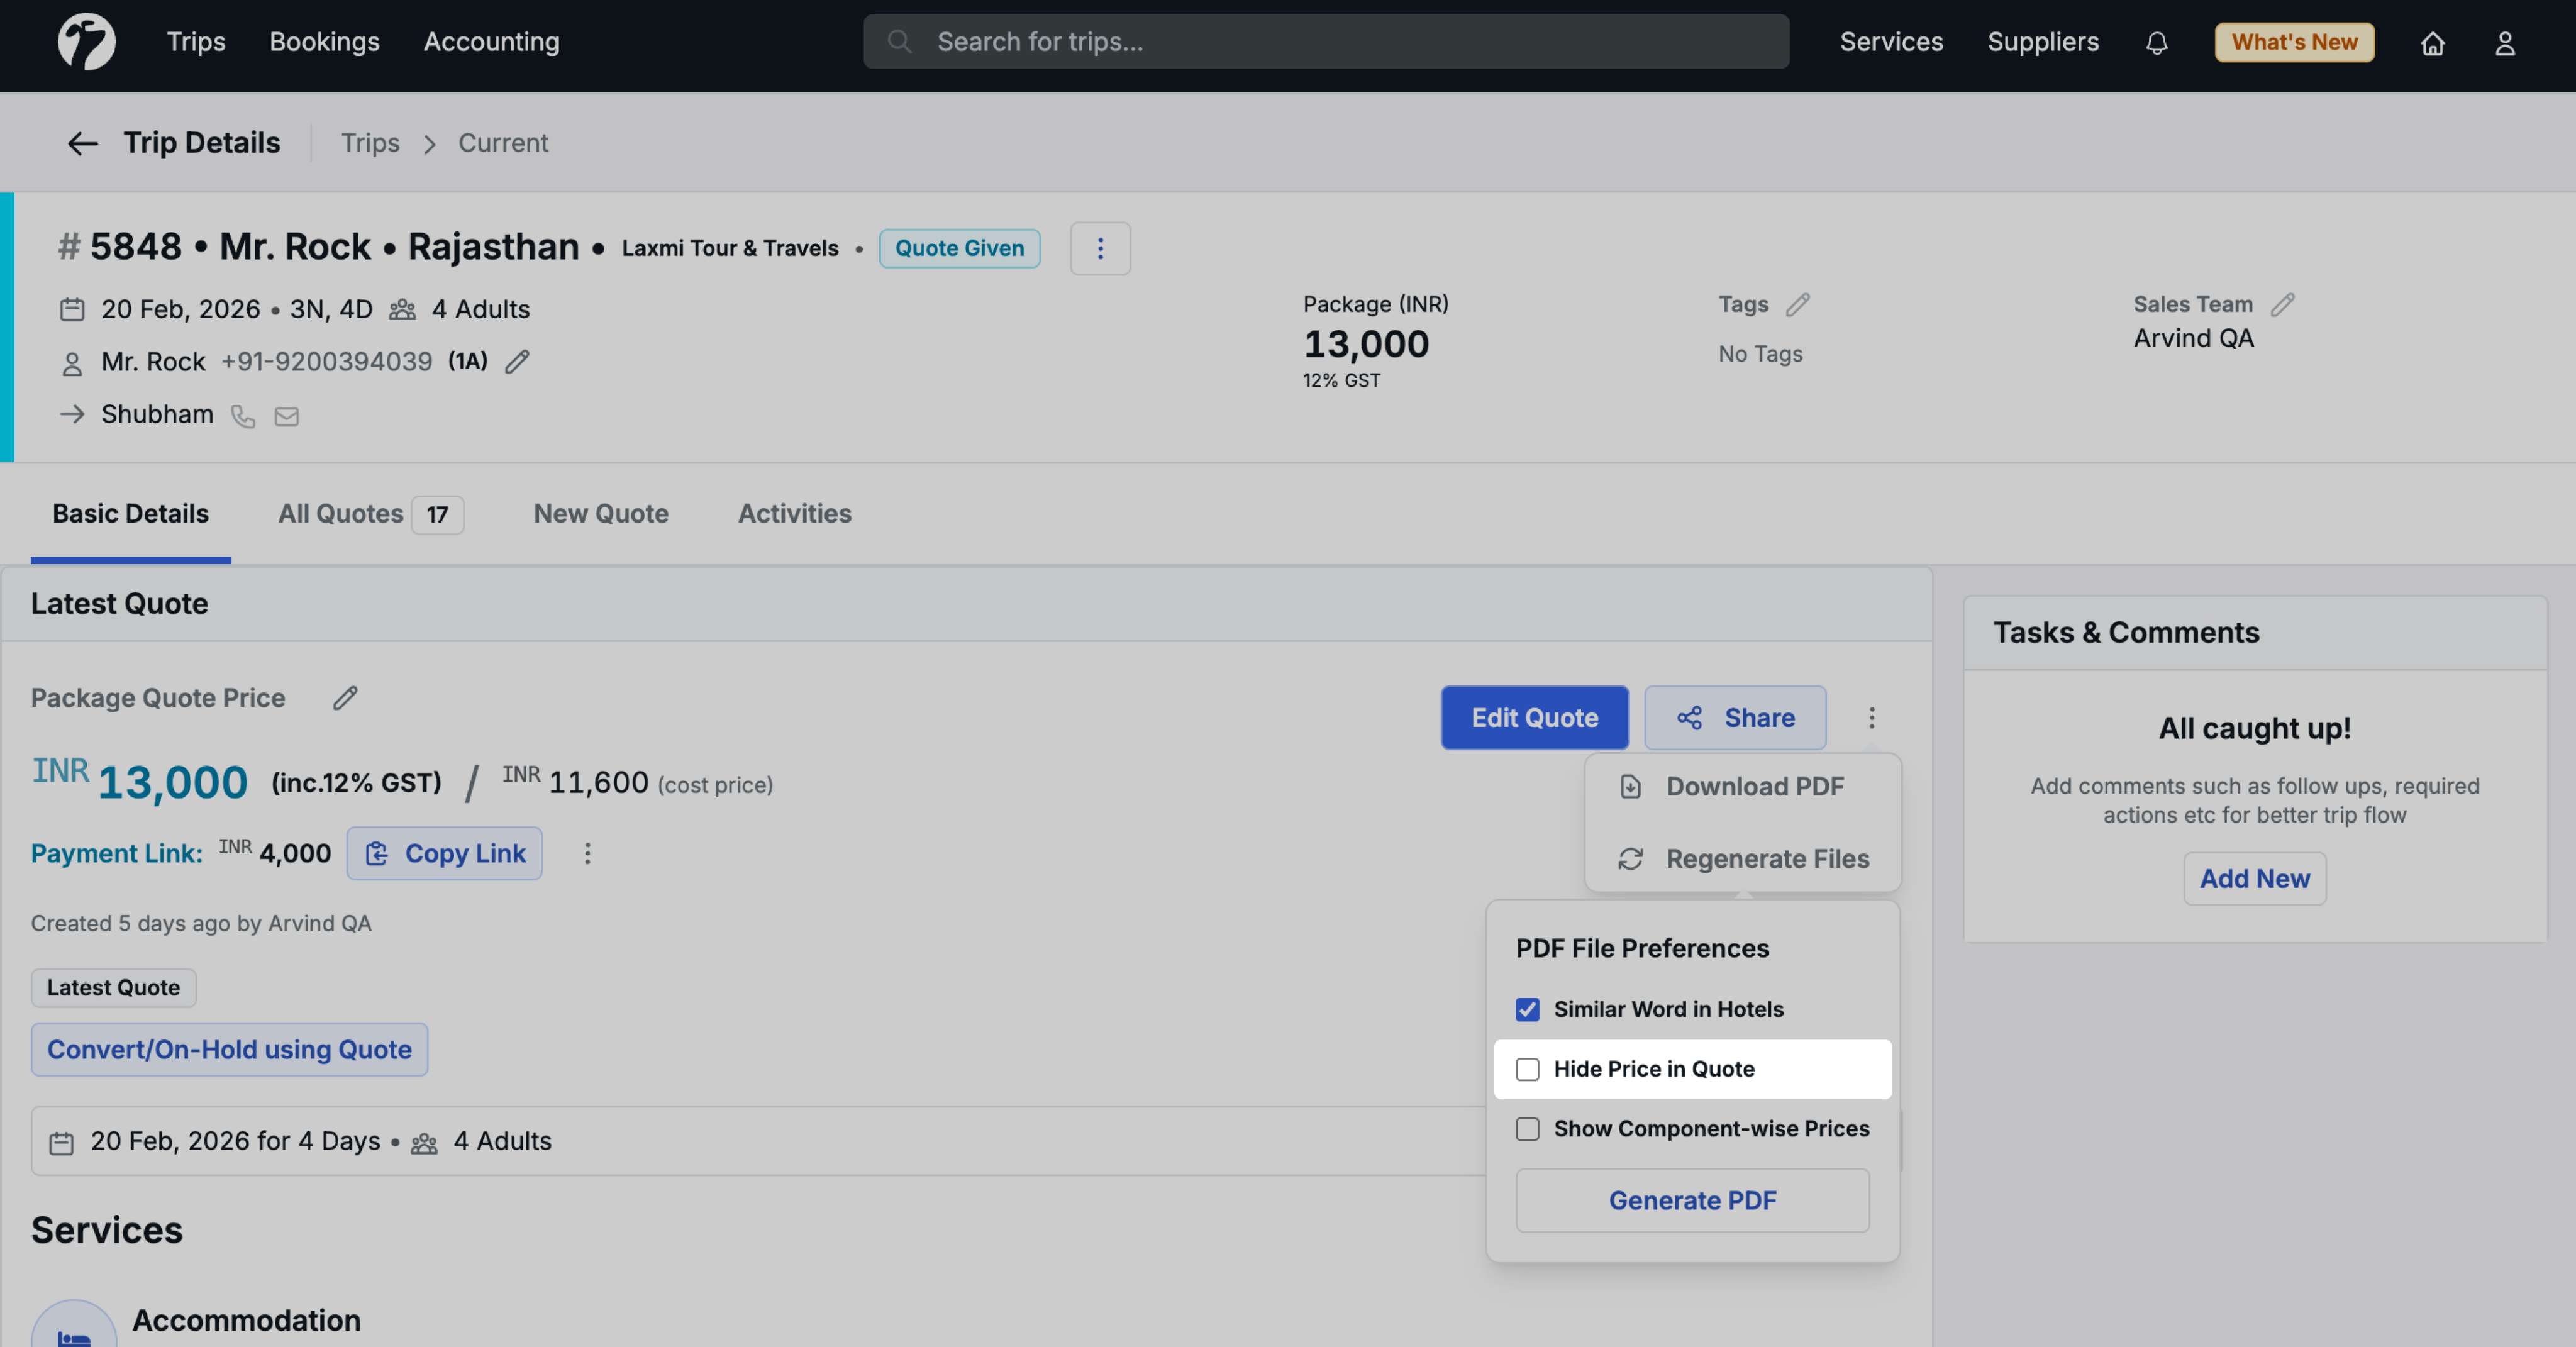
Step 2: Use When Generating PDF
-
Go to any trip and click the PDF button to regenerate the quotation
-
A new checkbox appears: Hide Quote Price
- This checkbox only appears if you enabled “Hide Price in Quote” in the template
-
Check Hide Quote Price to generate a PDF without pricing
Use Case
This is particularly useful when you want to:
- Share quotation details without revealing pricing initially
- Let clients focus on inclusions and itinerary before discussing costs
- Avoid price-based comparisons in early conversations
- Show full pricing only after the client is satisfied with the package content
Once the client is happy with the quotation, regenerate the PDF without the “Hide Quote Price” option to show full pricing.
Enhancement 2: Component-Wise Price Totals
Display subtotals after each component (Hotels, Transport, Activities, Flights, Other Inclusions) instead of only showing a grand total at the end.
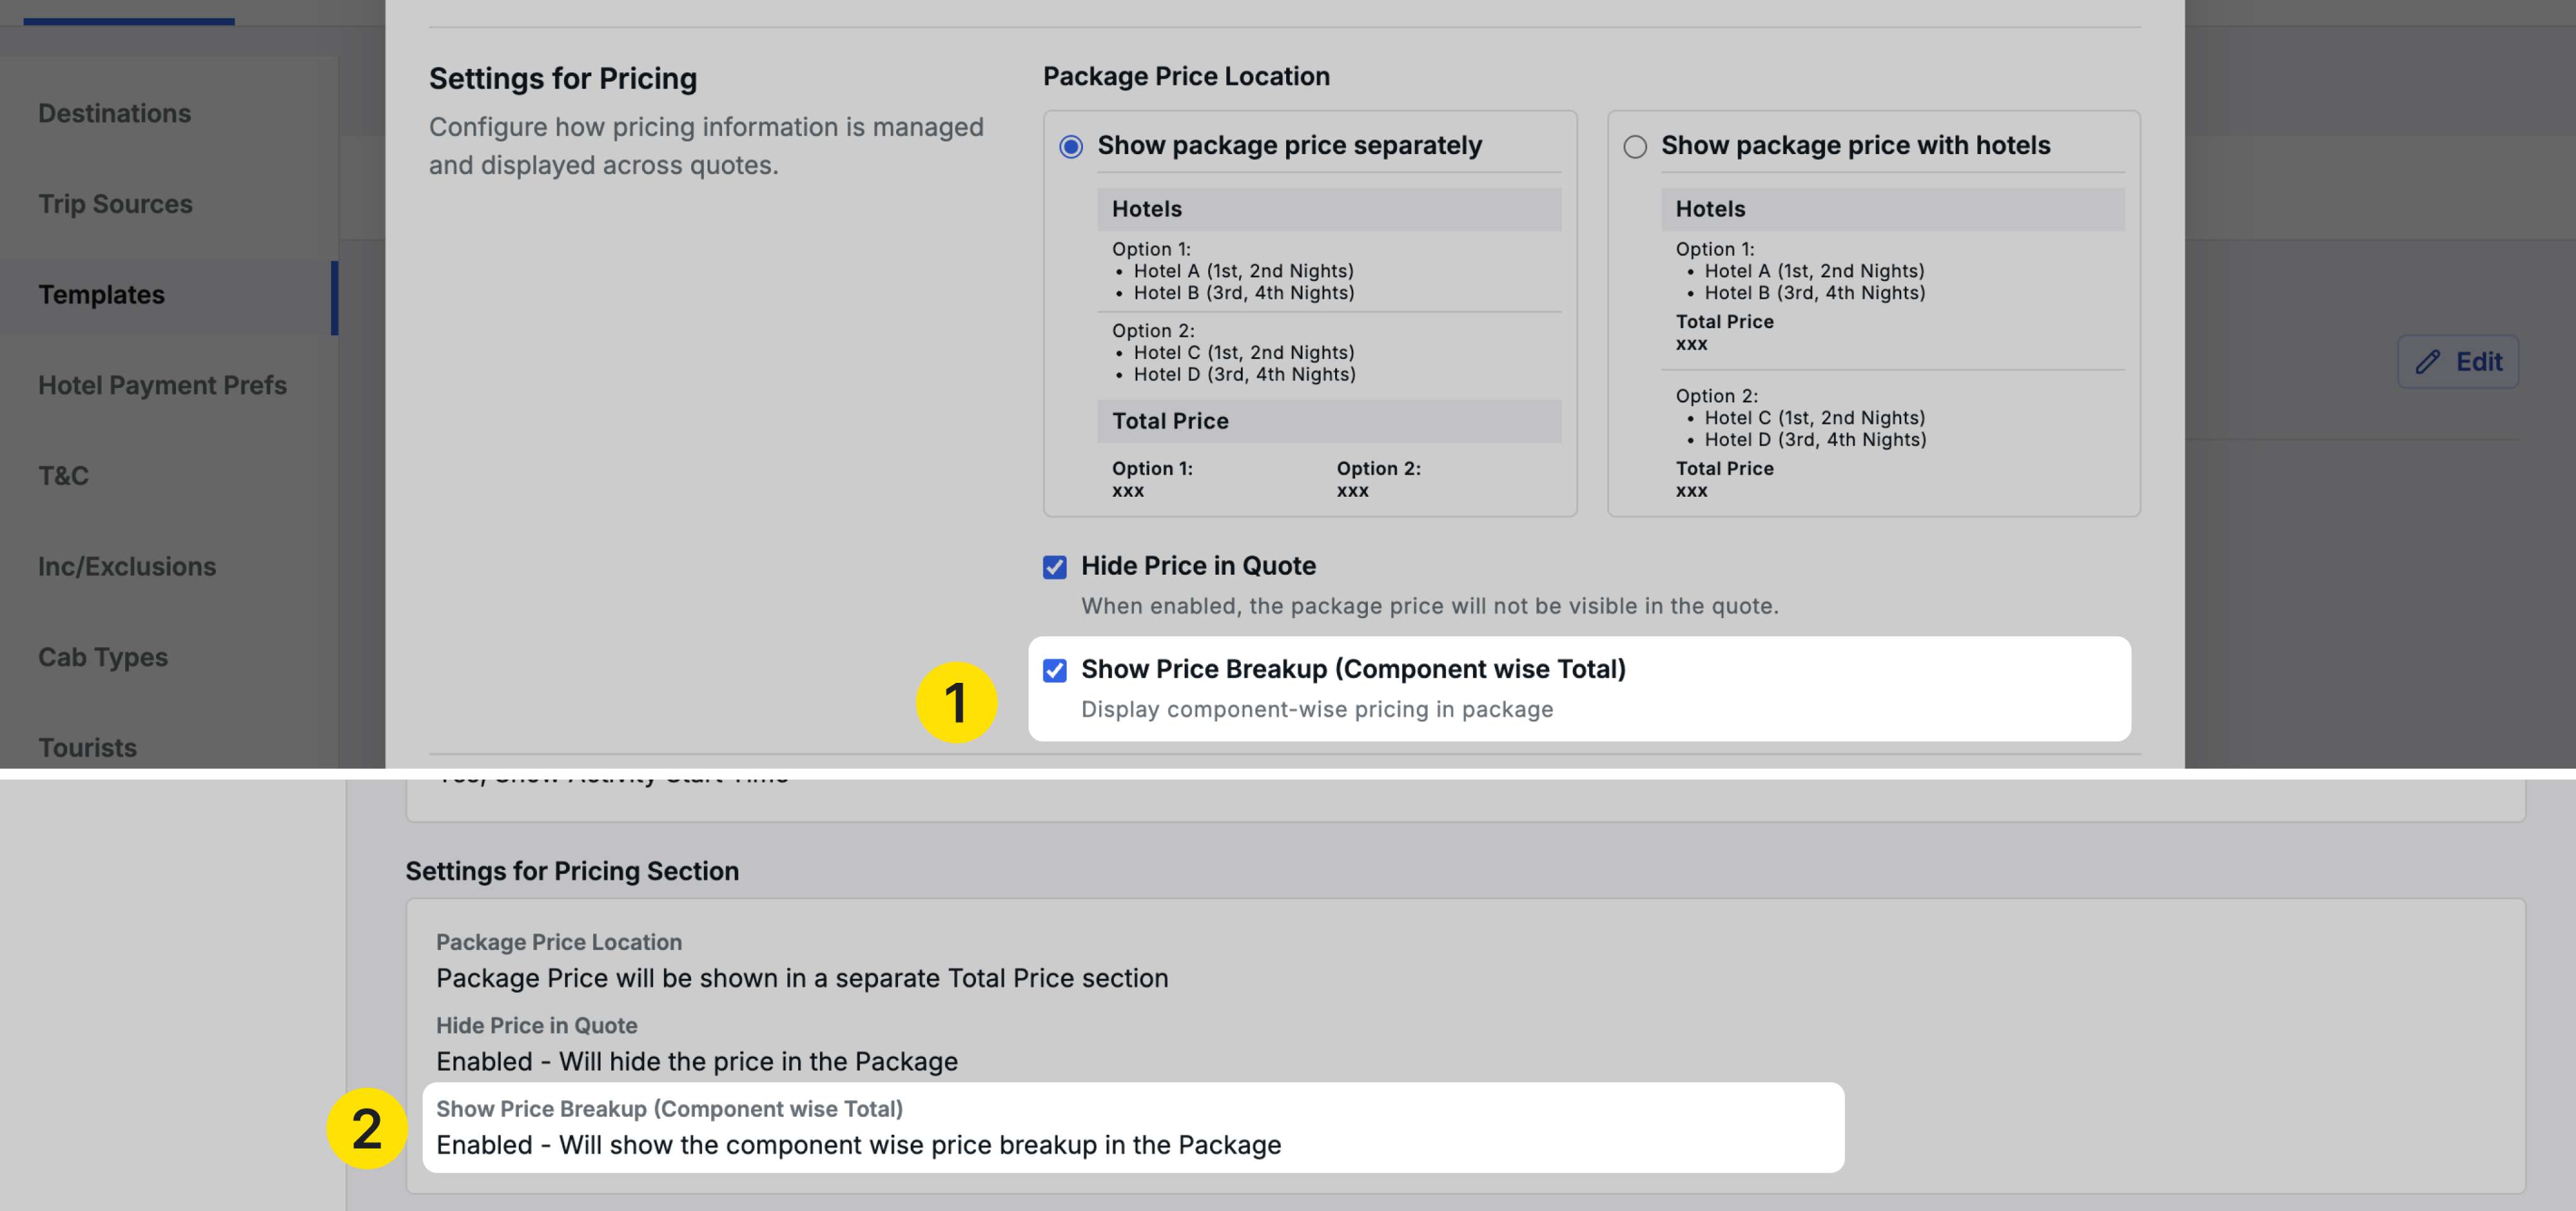
How to Configure
Step 1: Enable in Template
- In the Quote PDF template, find the Settings for Pricing section
- Check the Show Price Breakup Component-Wise Total checkbox
- Save the template
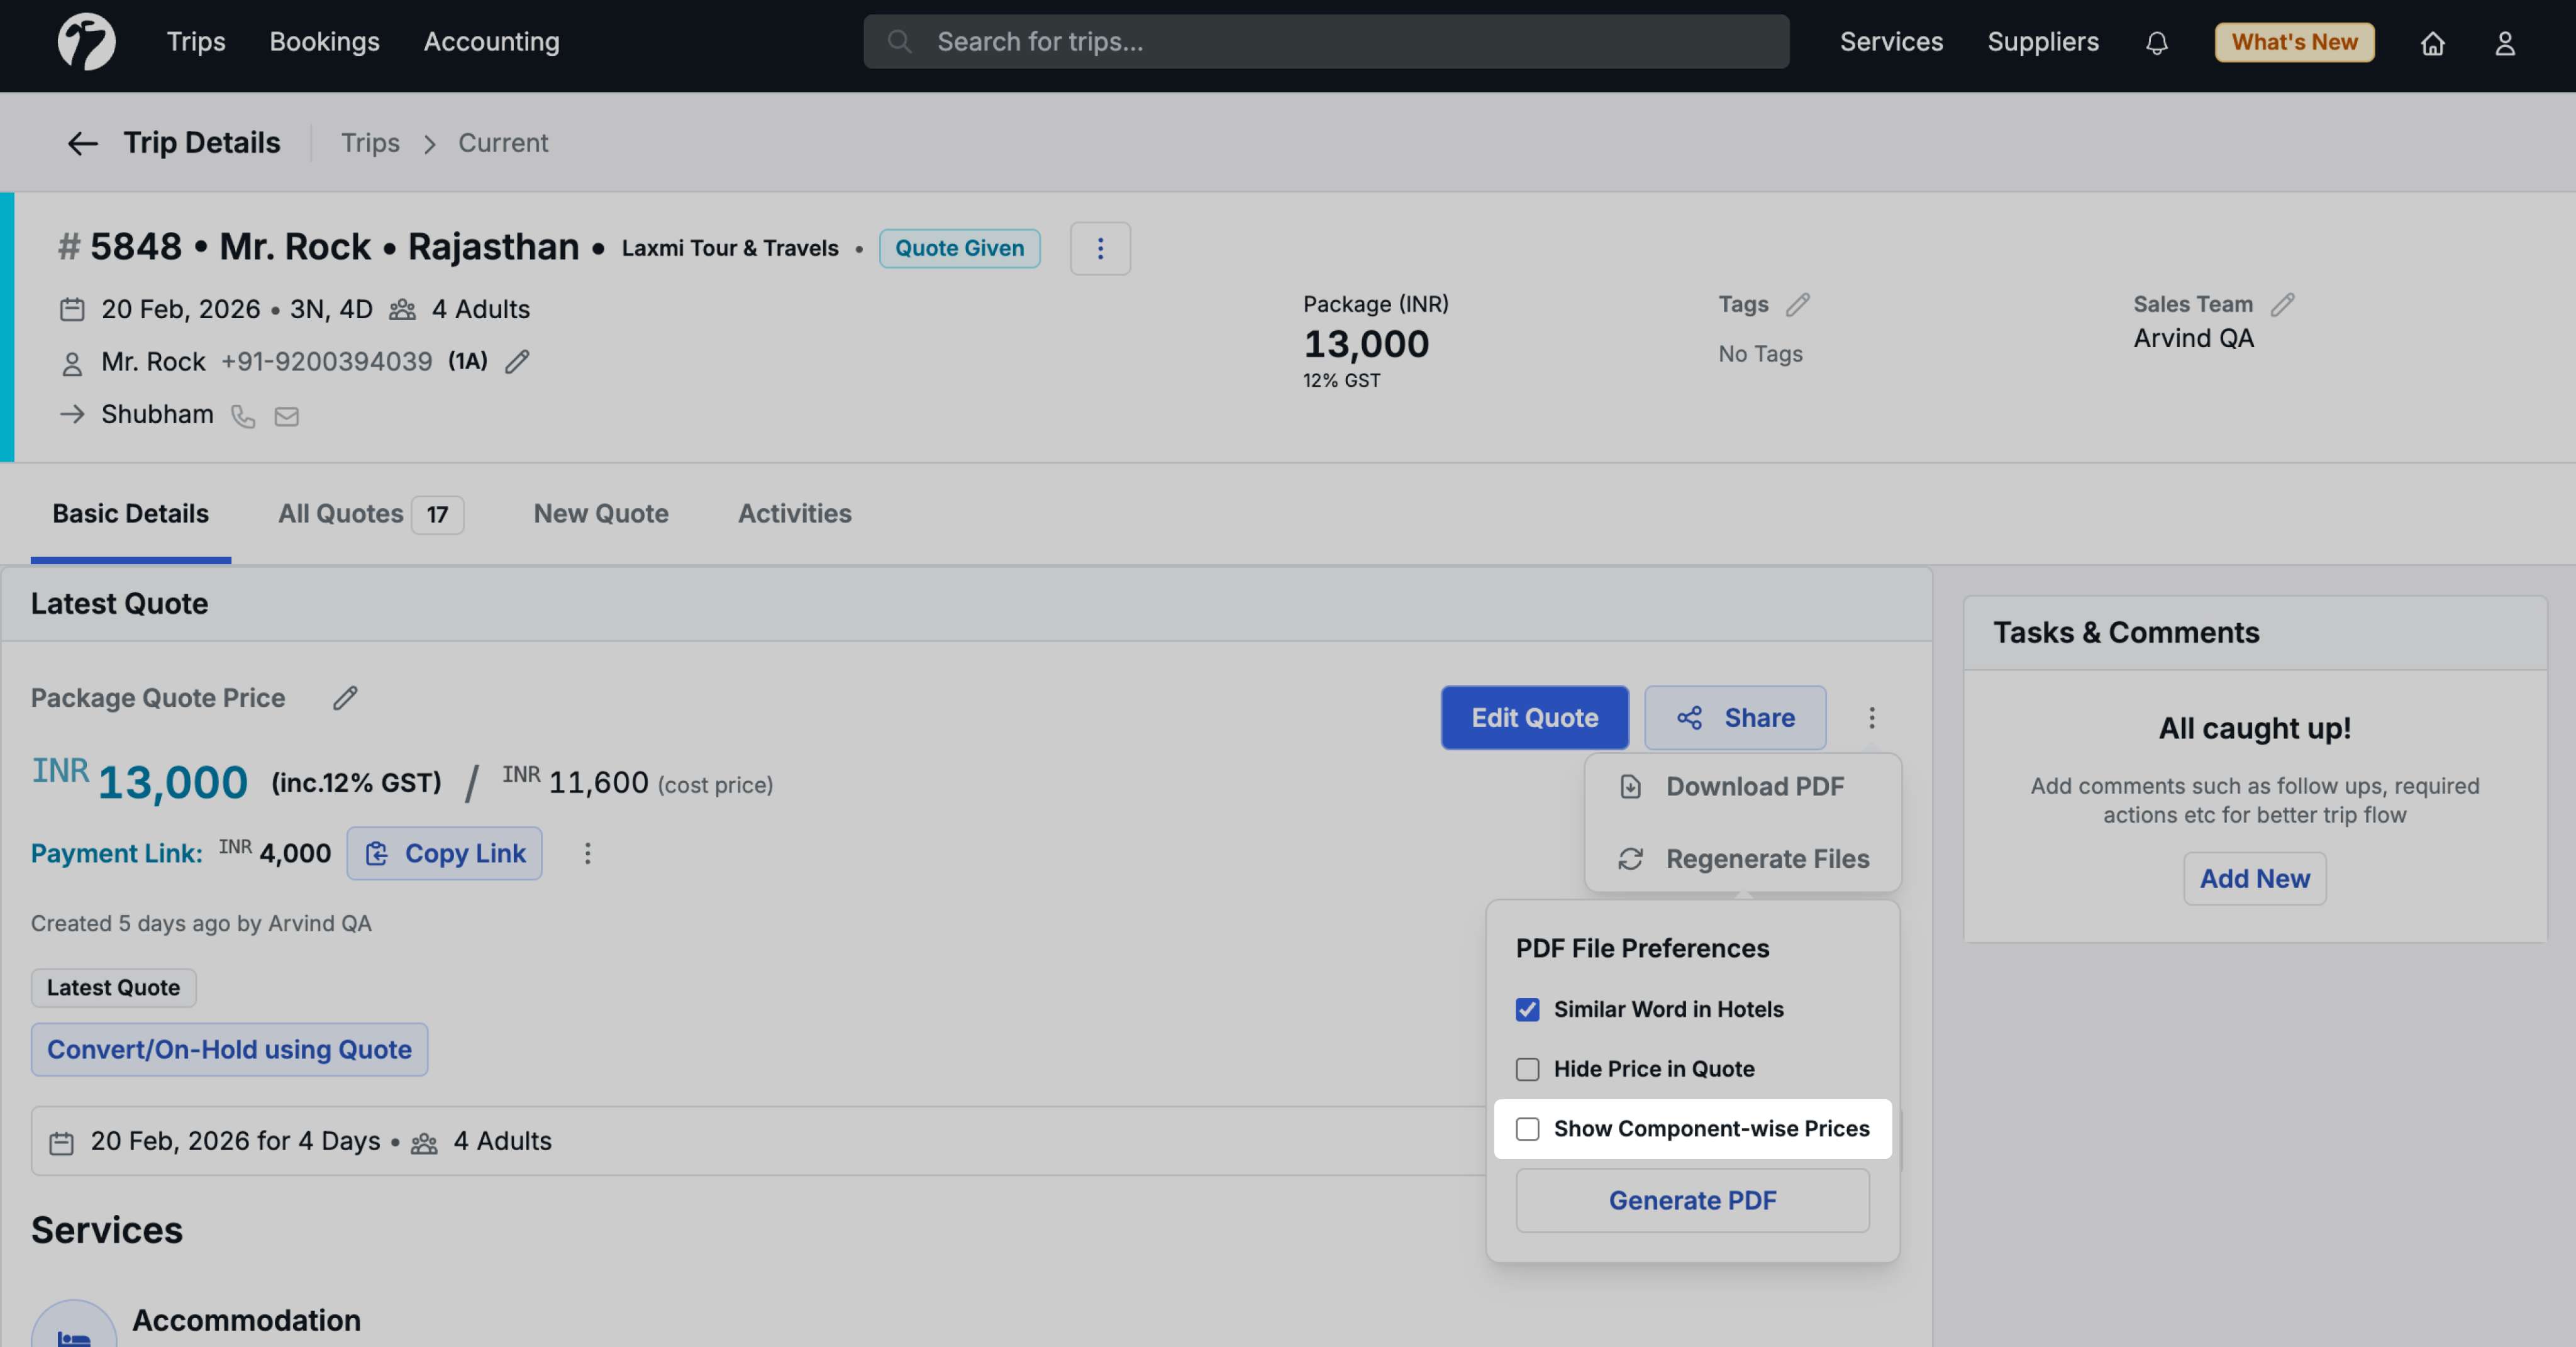
Step 2: Use When Generating PDF
-
Go to any trip and regenerate the quotation PDF
-
A new checkbox appears: Component-Wise Price Total
- This checkbox only appears if you enabled it in the template
-
Check this option to generate a PDF with component-wise totals
What It Shows
When enabled, the PDF displays:
-
Hotels section with all hotel details
- Subtotal for Hotels at the end of the hotels section
-
Transport section with all transport services
- Subtotal for Transport at the end
-
Activities section with all activities
- Subtotal for Activities at the end
-
Flights section with flight details
- Subtotal for Flights at the end
-
Other Inclusions section
- Subtotal for Other Inclusions at the end
Benefits
- Transparent Pricing: Clients can see cost breakdown by component
- Better Understanding: Clear visibility of where costs are allocated
- Easy Comparison: Simplifies comparing quotes with similar itineraries
- Professional Presentation: Organized pricing structure
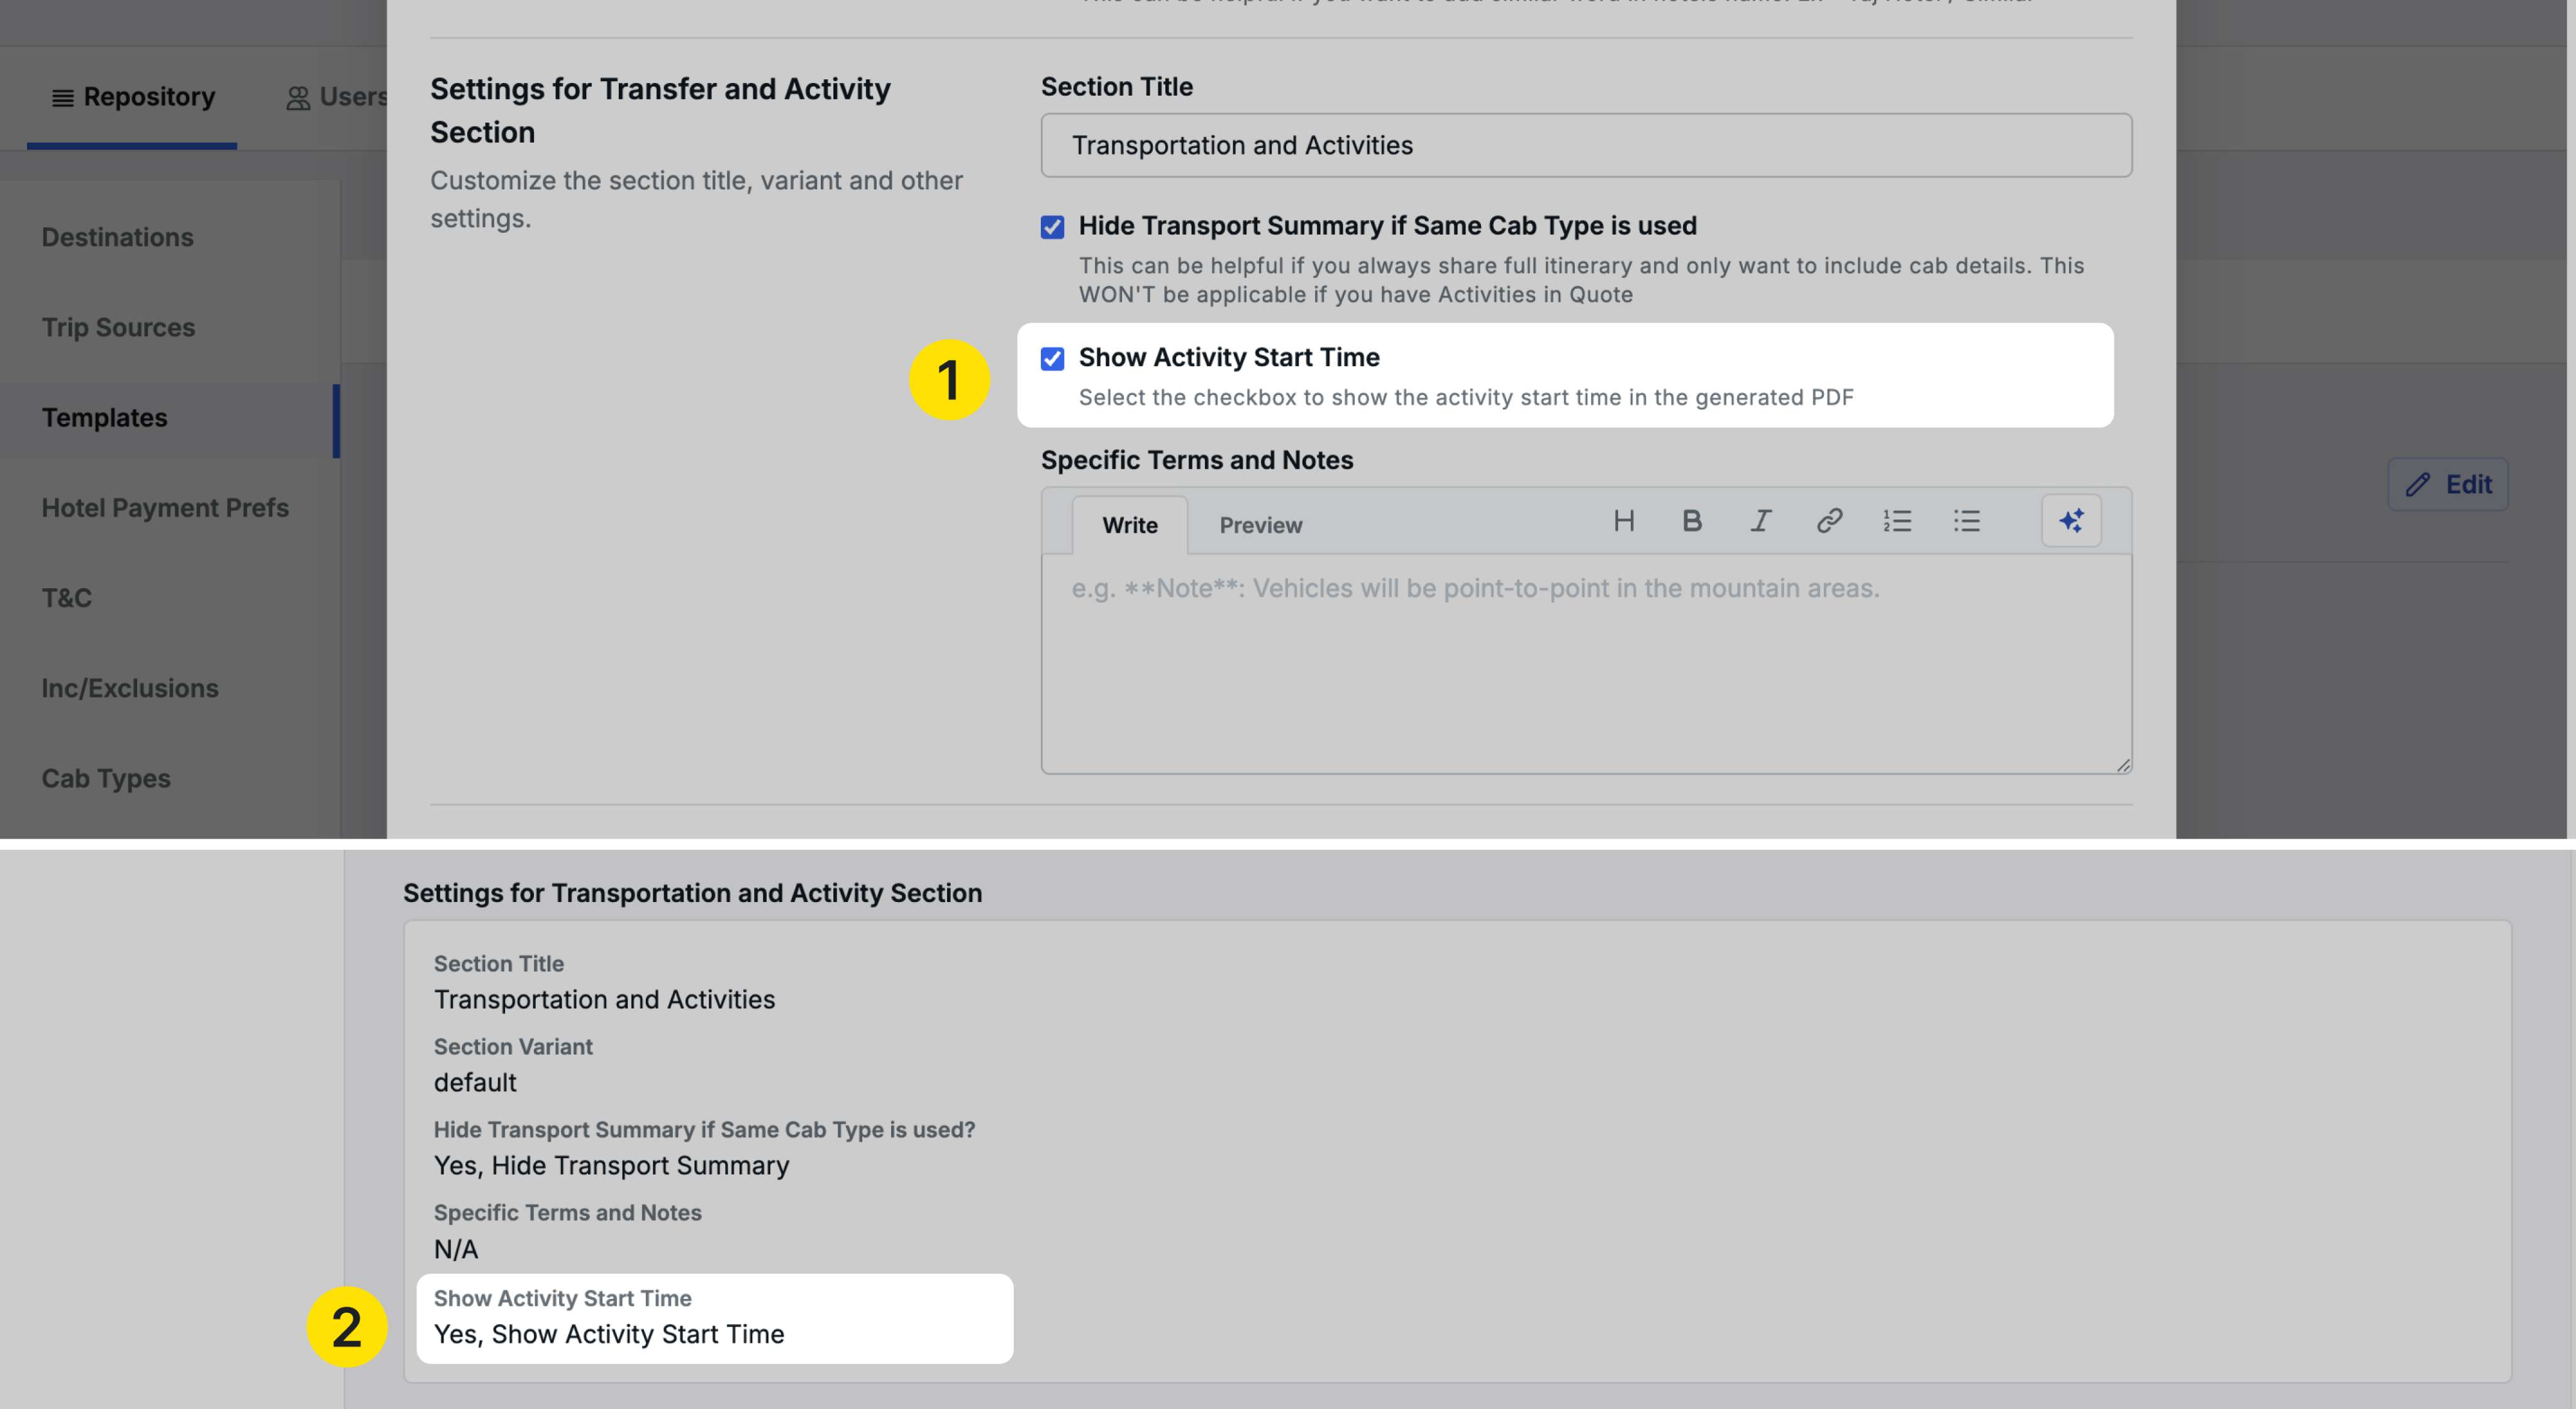
Enhancement 3: Show Activity Start Time
Display start times for activities in the quotation PDF when available.
How to Configure
- In the Quote PDF template, find the Settings for Transfers and Activities section
- Check the Show Activities Start Time checkbox
- Save the template
Effect:
- All future quotations will include activity start times (if added for those activities)
- This is a template-level setting without a per-PDF toggle
- Start times appear automatically for activities that have this information
Benefits
- Better Planning: Clients know exact timing for each activity
- Schedule Coordination: Easier to plan daily itineraries
- Professional Detail: More comprehensive quotation information
- Clear Expectations: Clients understand time commitments for activities
5. Proforma Invoice - Line Item Rearrangement
We have added the ability to rearrange line items in Proforma Invoices, giving you control over the sequence in which items appear.
Accessing the Feature
Navigate to any trip → Accounting tab → Proforma Invoice tab → Create or edit a Proforma Invoice
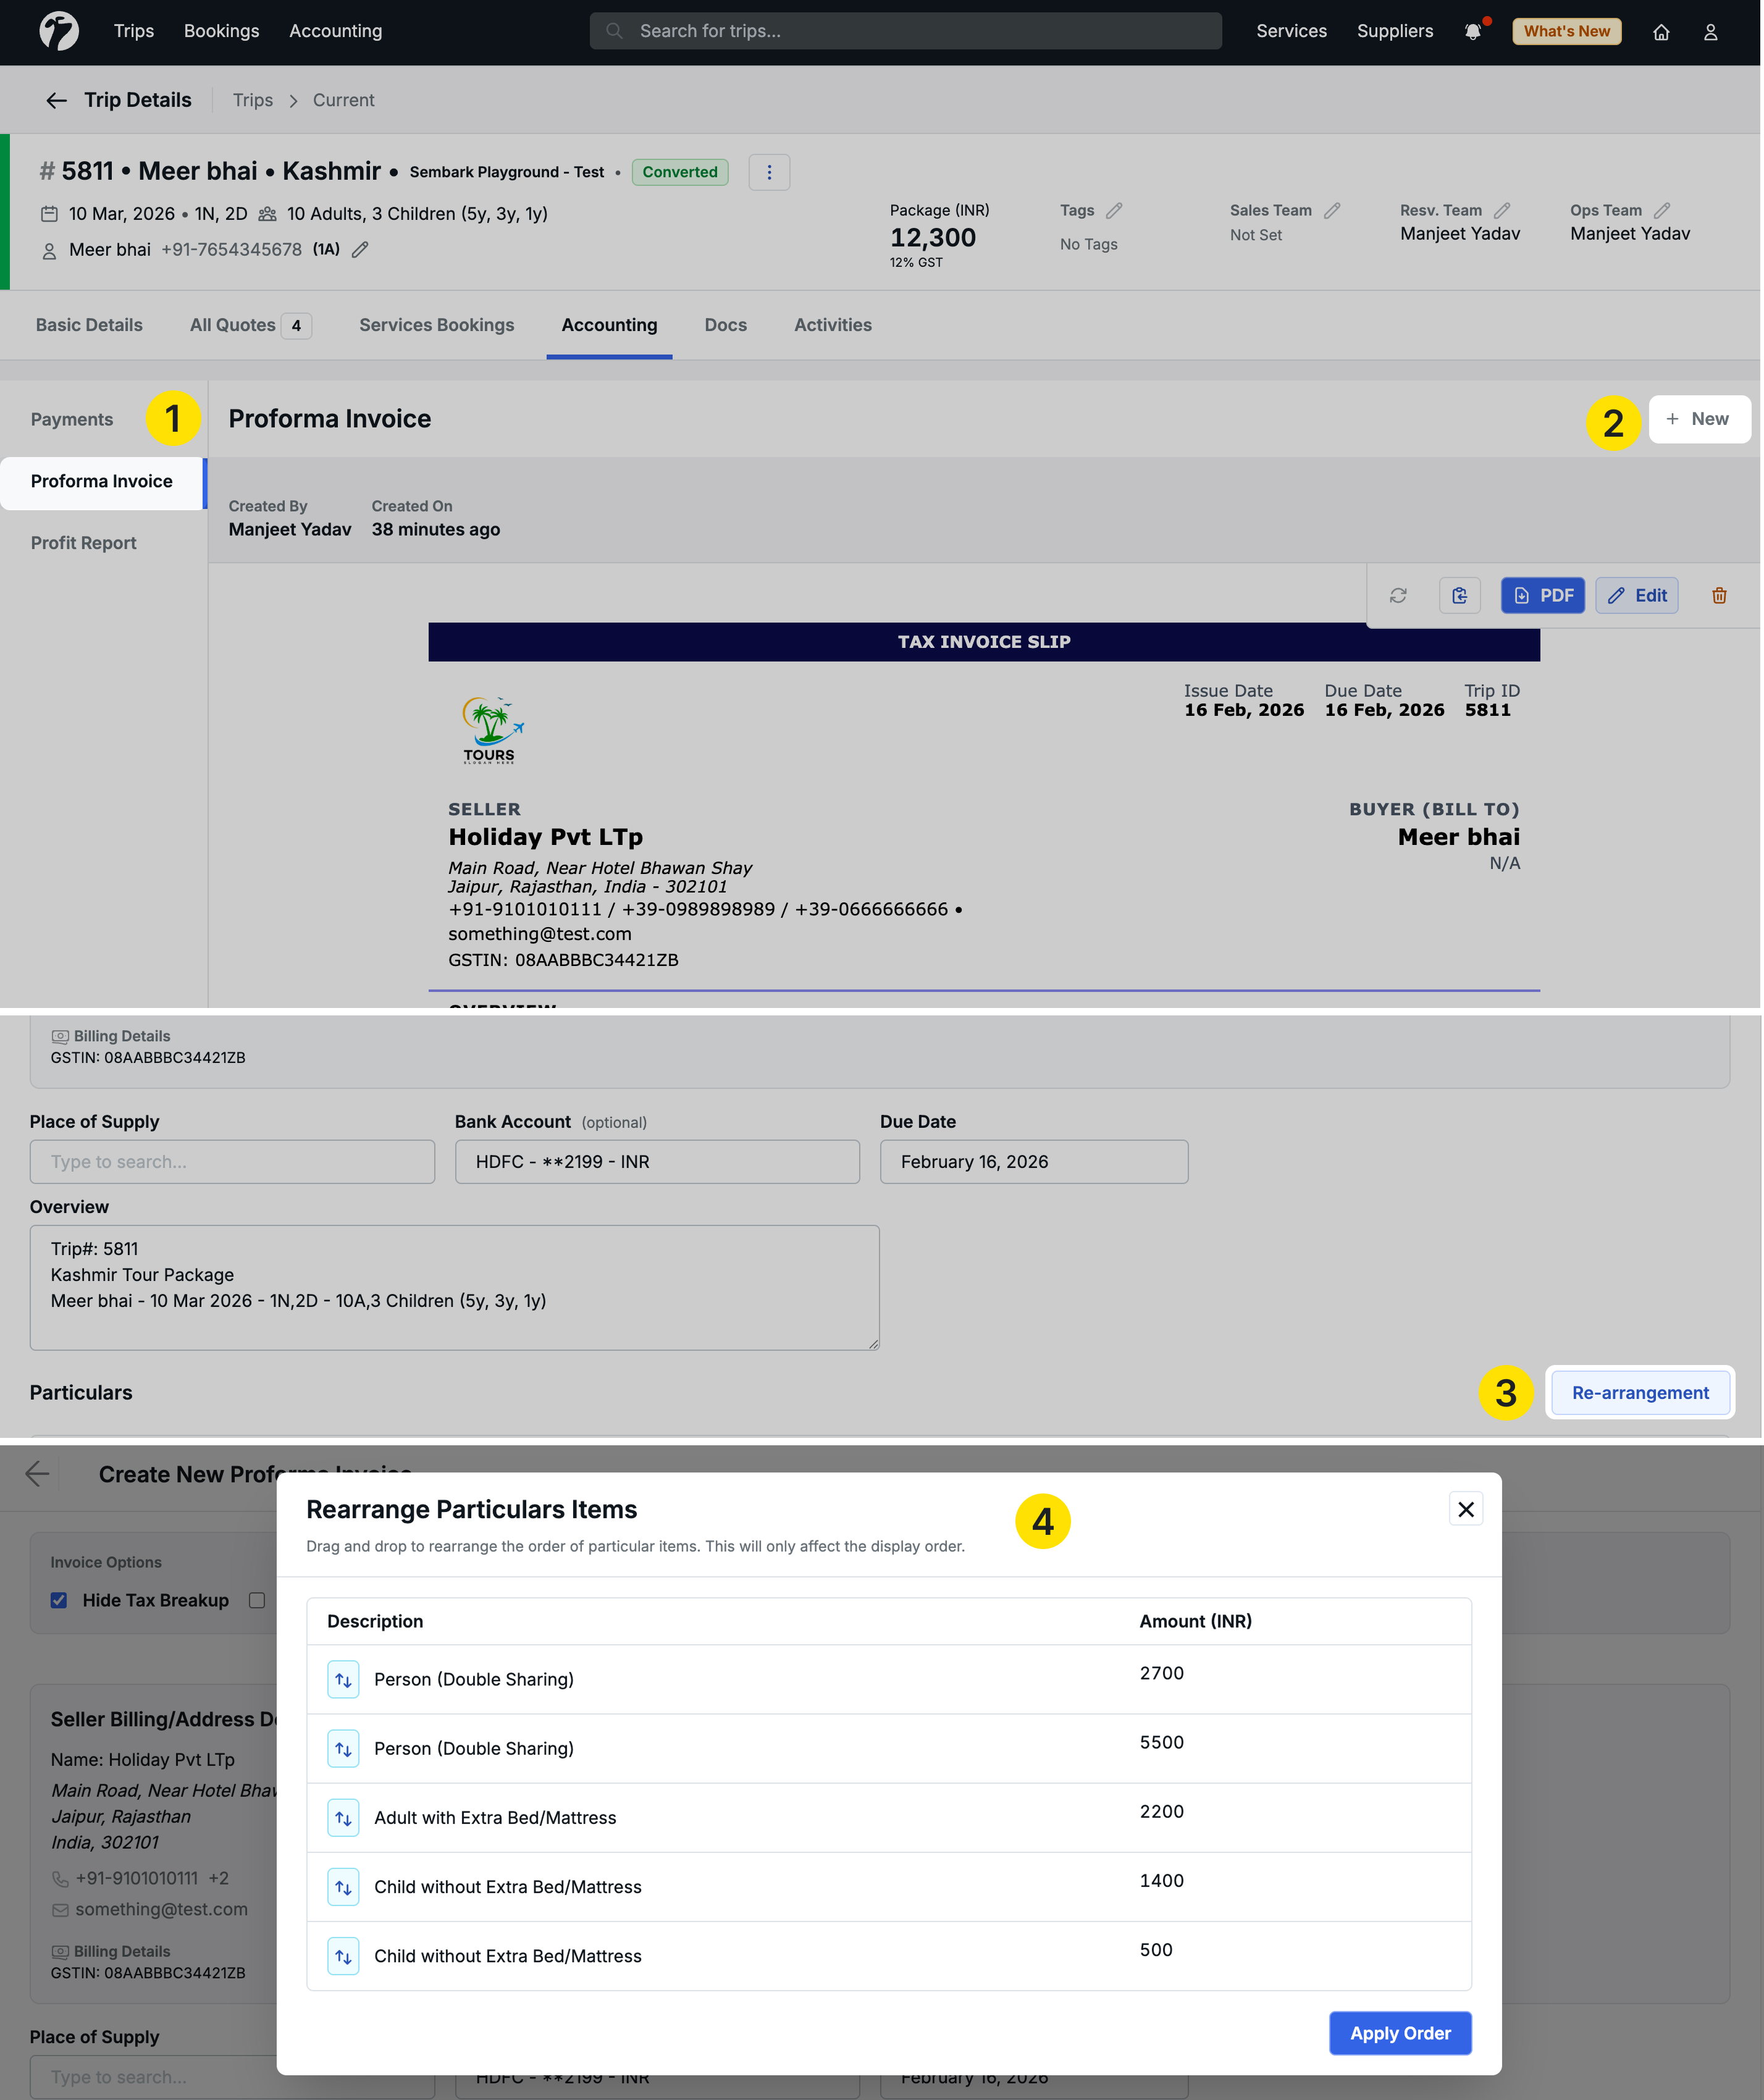
How to Rearrange Items
Once you’ve added line items to your Proforma Invoice:
-
Click the Rearrange button in the Particulars section
-
A popup displays all your line items with:
- Description: Item description
- Amount: Item amount
- Drag handle: Use to reorder items
-
Drag and drop items up or down to your preferred sequence
-
Click Apply Order to save the new arrangement
The line items are reordered in the Proforma Invoice editor.
Saving the Changes
After rearranging:
- Click Save to save the Proforma Invoice with the new sequence
- Download the PDF to see items in your preferred order
- You can edit and rearrange again anytime
Use Case
This is helpful when:
- The first item added should appear last in the final invoice
- You want to group similar items together
- Client requests a specific order of line items
- You need to reorder after adding new items
6. Hotel Check-In/Out Details in Service Schedules
We have added hotel check-in, check-out, and stay details to the Schedule Details popup for transport and activity services.
Where to Access
The Schedule Details popup is available in two places:
- Operational Bookings → Select a day → Click on any transport or activity service
- Trip Detail Page → Service Booking tab → Click on any transport or activity service

What’s New
The Schedule Details popup now shows:
- Service Name and details
- Hotel Check-In Details: Where the guest is checking in on that day
- Hotel Check-Out Details: Where the guest is checking out on that day
- Hotel Stay Details: Where the guest is staying on that service day
- Self-Booked Hotel Details: Also included when applicable
Why This Matters
When viewing a transport or activity service, you can now see:
- Pickup Location: Where to pick up guests based on their hotel
- Drop Location: Where guests are staying or checking out
- Guest Location: Current accommodation for that day
This is especially useful for:
- Transport Coordination: Drivers know exact pickup/drop locations
- Activity Planning: Organizers know where guests are staying
- Operational Clarity: Complete picture of guest locations for each service
Previously, this information was only visible at the day level. Now it’s available directly on each service for quick reference.
7. Guest Salutation Support System-Wide
We have added salutation support for guest names throughout the entire system, allowing you to add titles (Mr., Mrs., Ms.) to guest names.
Adding Salutation
When creating a new trip or editing guest details:
- A Salutation field now appears beside the guest name field
- Select from: Mr., Mrs., or Ms.
- This field is optional
Where Salutations Appear
Once you add a salutation for a guest, it will be displayed wherever the guest name is shown:
In the System UI:
- Trip detail pages
- Guest information sections
- Service bookings
- All trip-related screens
In Documents:
- Trip Vouchers
- Hotel Vouchers
- Proforma Invoices
- Any document displaying guest information
In Communications:
- Email templates
- WhatsApp messages
- Guest sharing communications
- All automated messages
In Reports:
- Trip Lead Reports
- Sales Reports
- Any report with a guest name column
Benefits
- Professional Communication: Proper titles in all guest interactions
- Personalized Service: More formal and respectful communication
- Consistent Branding: Professional appearance across all touchpoints
- Cultural Appropriateness: Proper address titles for different guests
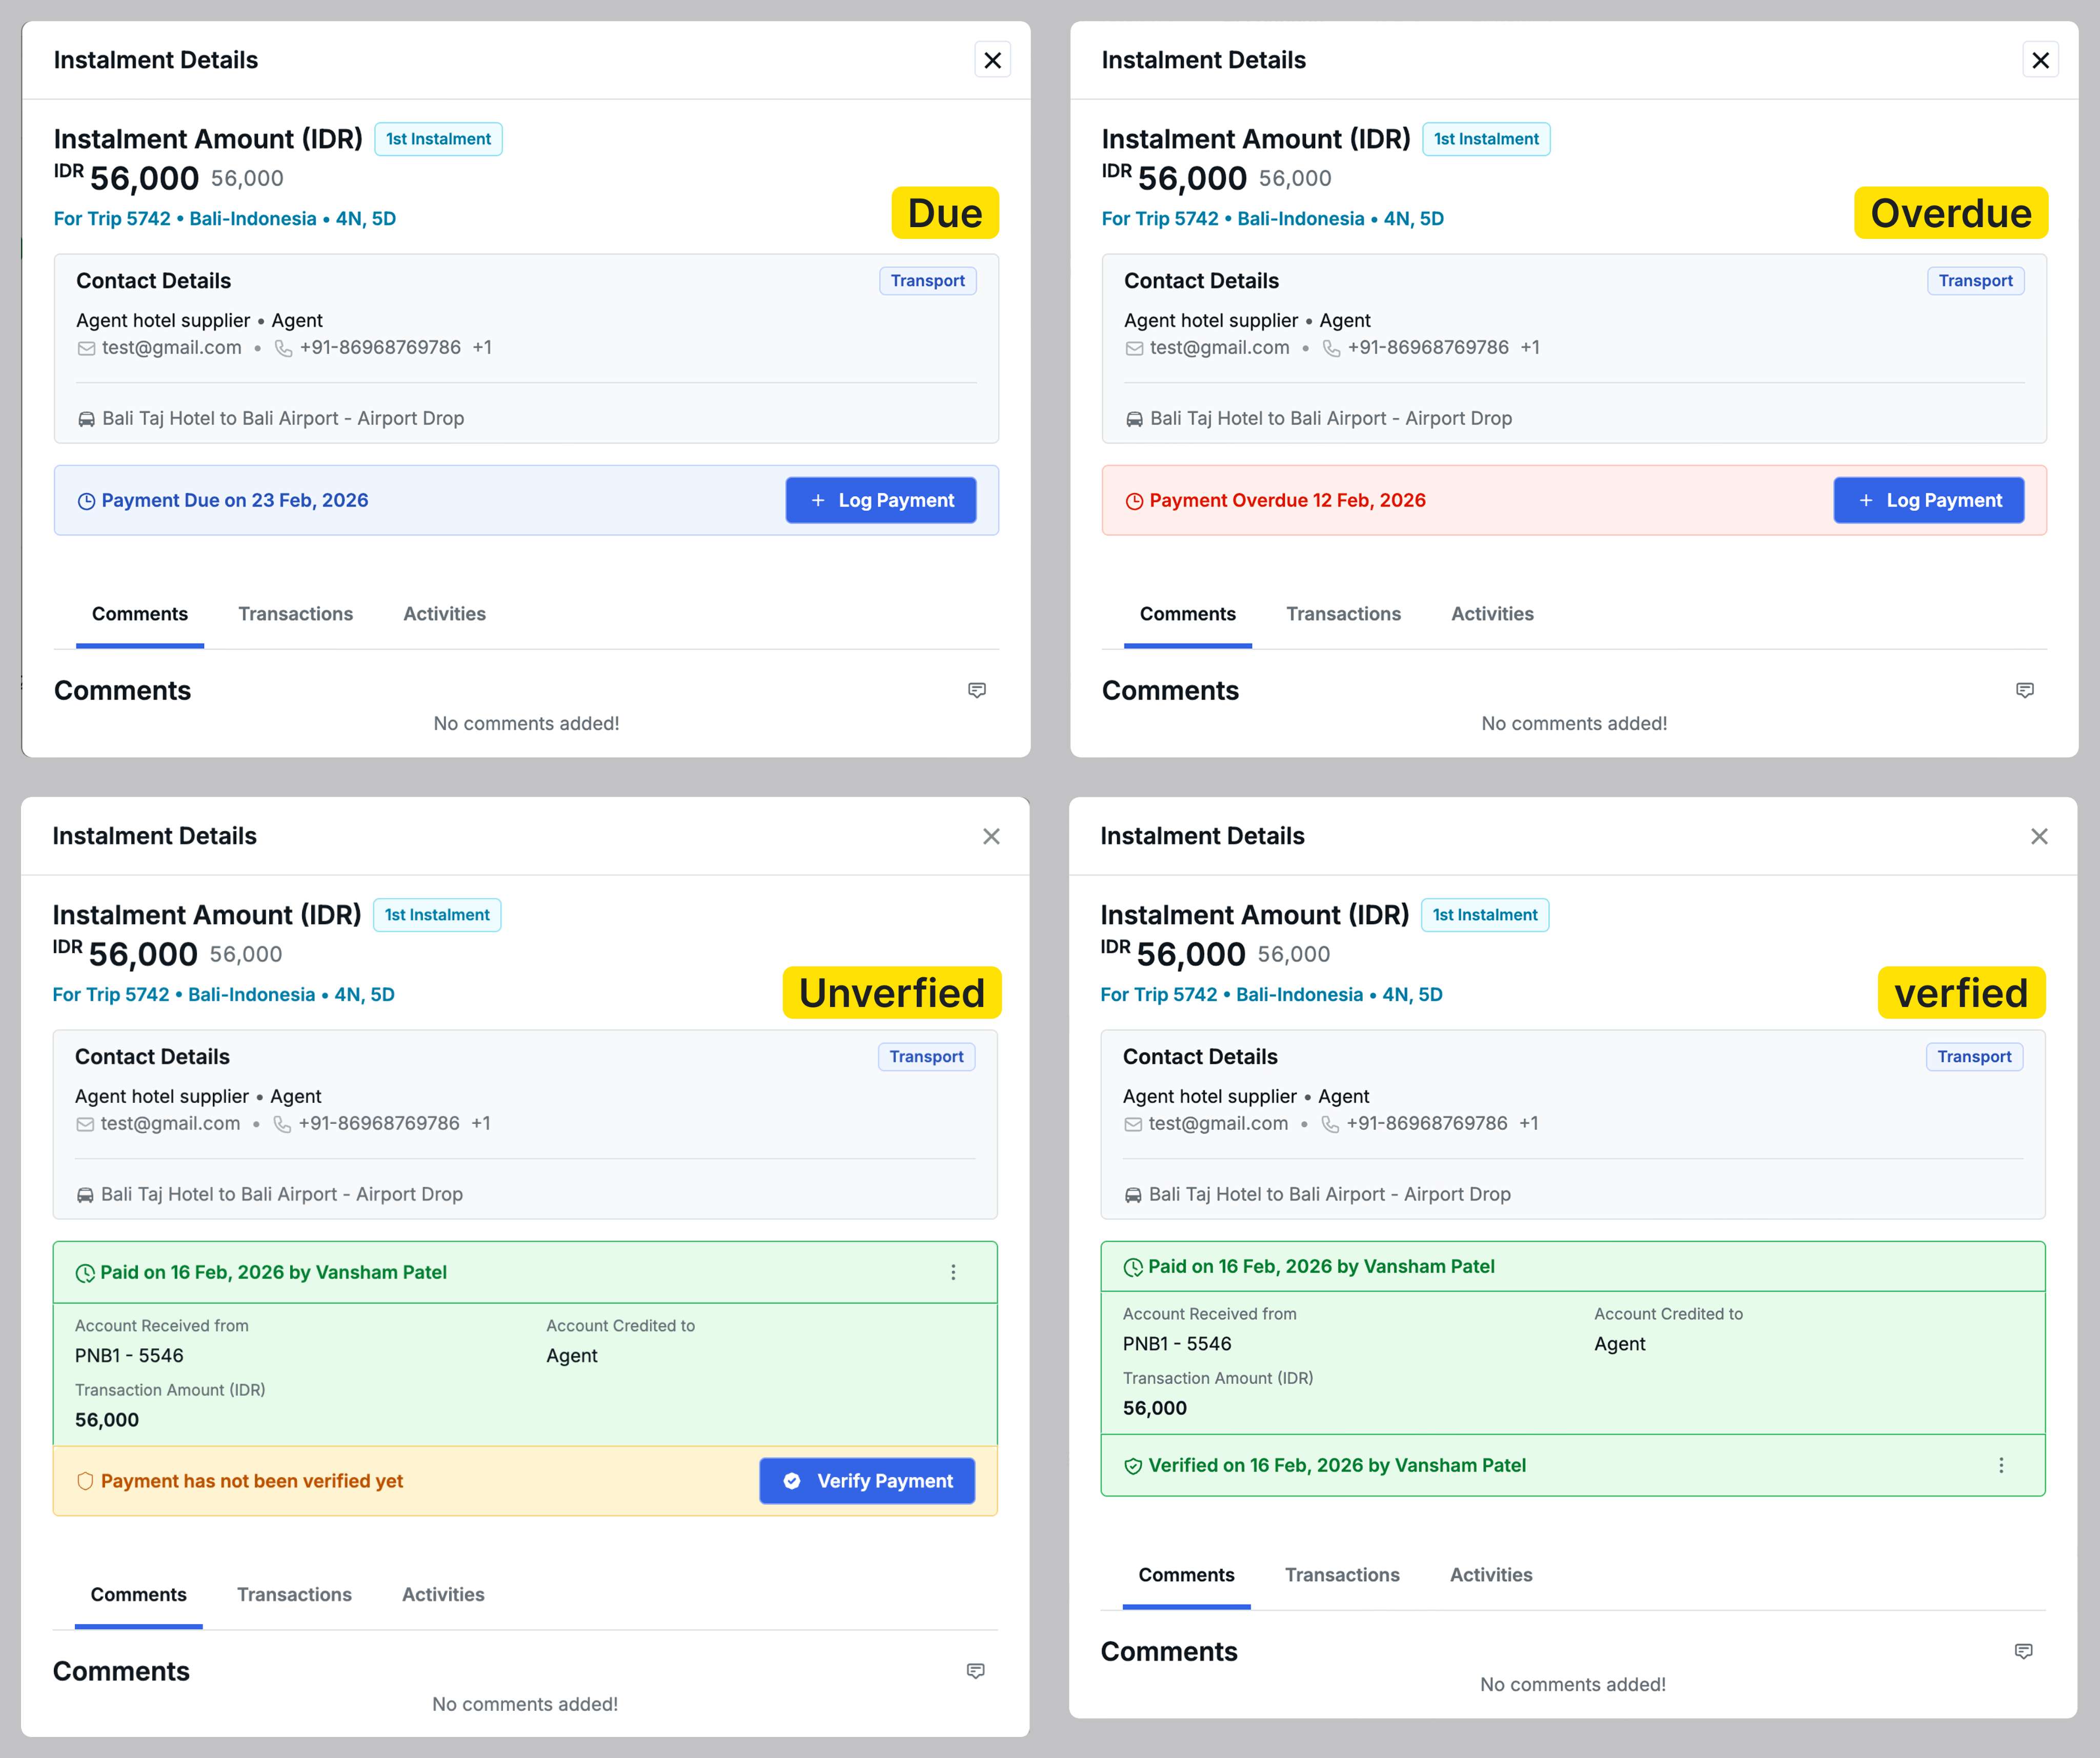
8. Instalment Details Pop-up - Redesigned Interface
We have redesigned the Instalment Details Pop-up with better organization and clearer payment state visibility for easier payment management.
Improved Organization
The redesigned pop-up features a cleaner layout with distinct sections:
Instalment Summary:
- Amount display showing current instalment and total payment (e.g., INR 1,50,400 / 1,88,400)
- Instalment tag indicating sequence (e.g., “2nd Instalment”)
- Clickable trip details linking to the Trip Details page
Contact Details:
- Dynamically displays relevant information based on payment type (Transport, Activities, Hotel, B2B Agent, or Guest)
- Shows supplier/hotel name, contact person, email, and phone with appropriate service tags
Payment States
The interface adapts to show relevant actions for each payment state:
- Due State: Shows payment due date with Log Payment button (and Payment Link button for Payment Gateway enabled trips)
- Paid (Unverified): Displays payment details with Verify Payment button and Revert Payment option
- Paid (Verified): Shows verified status with Generate Receipt button and Unverify Payment option
- Overdue State: Highlighted in red with payment options
Four-Tab Details Section
Quick access to comprehensive information:
- Comments: View and add comments with timestamps
- Related Instalments: Overview of all instalments in the payment plan
- Transactions: Complete audit trail of financial transactions
- Activities: Timeline of all actions performed on this instalment
Benefits
- Clear visual hierarchy: Information organized in logical sections
- State-specific actions: Only relevant options appear for each payment state
- Dynamic contact details: Contextual information based on payment type
- Clean interface: Optional fields hidden when not in use
9. Other Improvements
- Trip Source City and Email in Trip Lead Report: Trip Lead Report now includes the trip source city and email fields for better lead tracking and communication
- B2B Trip Source Email Icon: An email icon now appears for B2B trip sources in the trip lead list. Hover over the icon to see the source’s email address
- Proforma Invoice Currency Display: Currency symbols have been removed from Proforma Invoices and replaced with currency codes (e.g., INR, USD) for clearer international invoicing
- Cab Type Parsing Improvements: Enhanced validation for cab type special codes. Only age and capacity values are now allowed inside {{}} brackets. Multiple short codes and incorrect formatting are invalidated during quotation and rate upload processes
- Email Blocking for Inactive Users: All notifications and emails are now blocked for disabled, deleted, and unverified users to prevent email bounce and delivery penalties
- Timezone Issue Fixes: Resolved various timezone-related issues across the system to improve data listing accuracy and reporting when accessing from multiple timezones