This release introduces Activity Vouchers — a complete voucher generation workflow for trip activities — along with FOC (Free of Cost) support at both the activity and trip level. We have also added bulk assignment feature for Trip Plan Requests, making it easy to redistribute leads across your sales team. Several enhancements and fixes round out this update.
Let’s dive into more details.
Activity Vouchers
We have introduced Activity Vouchers, a dedicated voucher generation workflow for activities added in quotations. You can now generate, download, and share activity vouchers directly from the Service Booking page — with full support for QR codes, ticket numbers, PNRs, and file attachments.
Why this feature matters
Earlier, there was no structured way to generate vouchers for activities. Teams had to rely on manual workarounds or external documents. With Activity Vouchers, you can now produce clean, detailed vouchers — with or without supplier branding — that are ready to share or download in seconds.
Getting Started
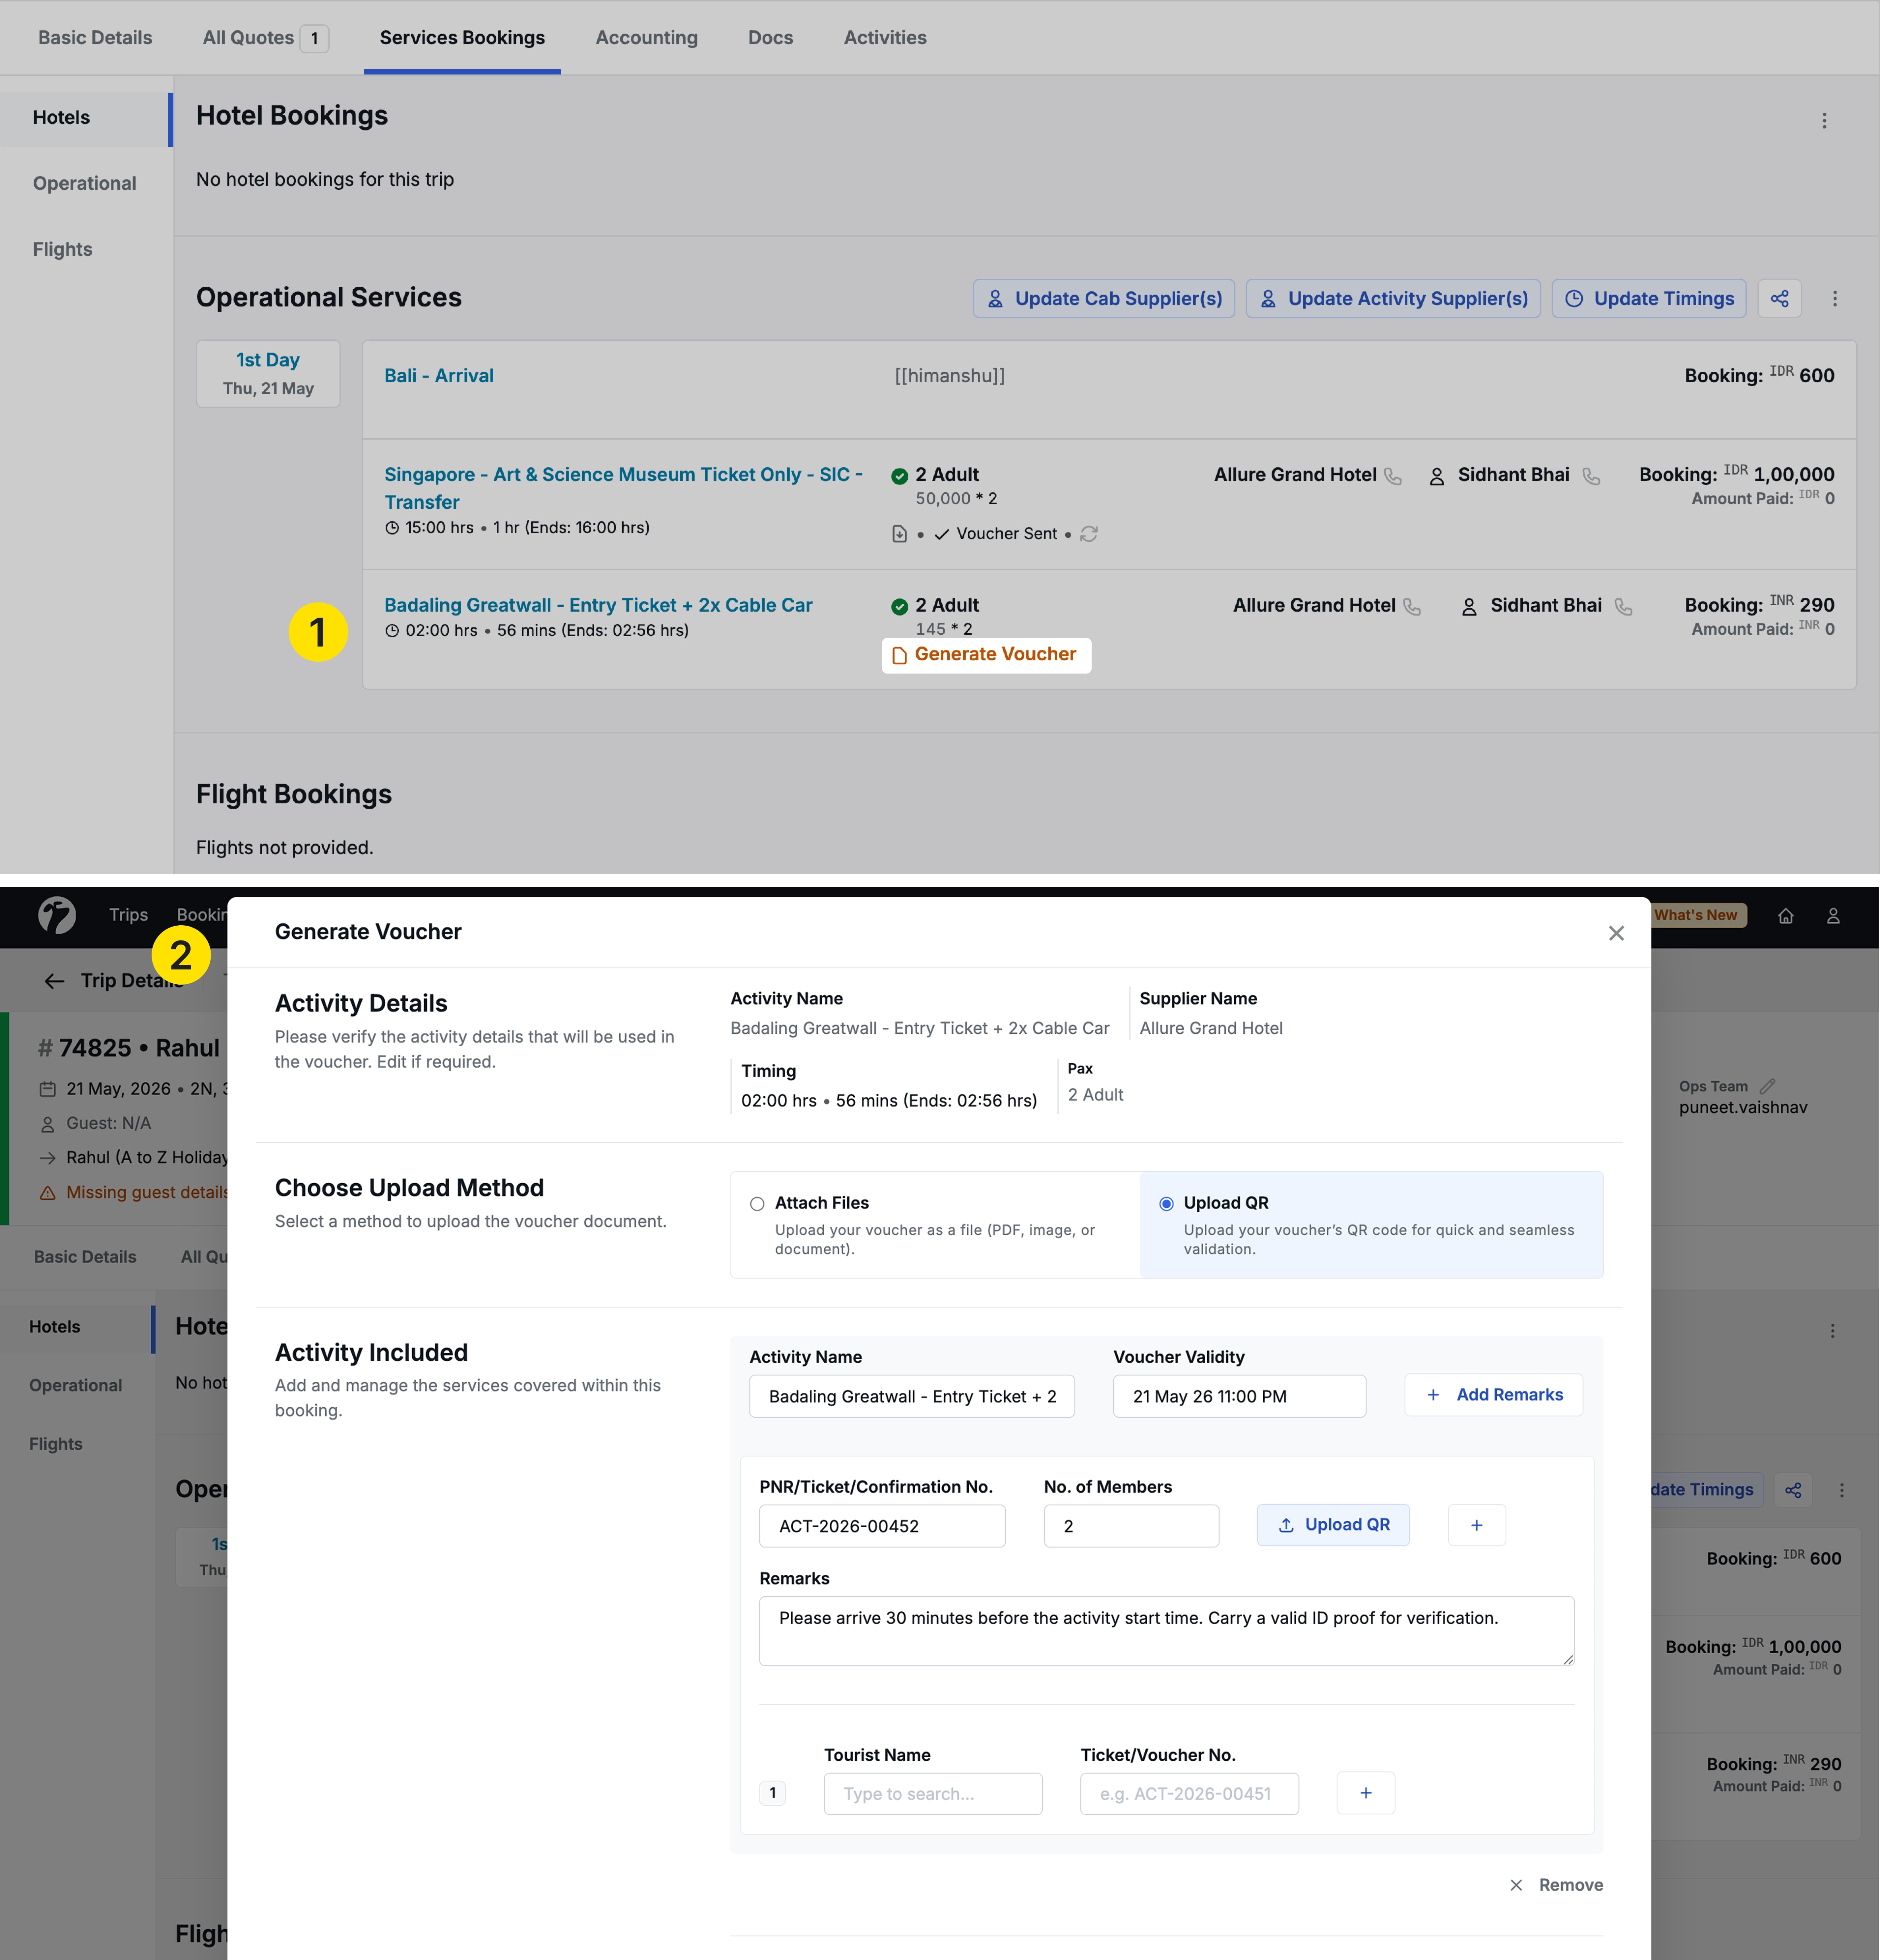
To generate voucher for confirmed booking, navigate to confirmed/booked activity bookings where you should a Generate Voucher button becomes visible on the activity screen.
Voucher generation is only possible for confirmed bookings
Before you can generate a voucher, you must assign a supplier to the activity mark it as confirmed. The Generate Voucher button will not appear until a supplier has been assigned and the activity is marked as booked.
Voucher Details Preview
When you click Generate Voucher, a summary of the full activity details is displayed before you proceed. This includes:
- Activity Name
- Number of Pax
- Supplier Name
- Timing
- Duration
- Activity Start and End Time
Choosing an Upload Method
After reviewing activity details, you select how you want to attach ticket or QR information to the voucher. There are two methods:
Method 1: Attach File
Use this method when you have a ticket or booking confirmation saved as a file.
- Select the Attach File option.
- A Select File section will appear below.
- Upload your file — supported formats are PDF, PNG, JPG, and JPEG.
- You can upload a single file or multiple files at once.
- Click Generate Voucher to complete the process.
Note: If you upload multiple files, the downloaded voucher will be packaged as a ZIP file.
Method 2: Upload QR
Use this method when you have individual QR codes or ticket numbers for members.
- Select the Upload QR option.
- An Activities Included section opens, listing all sub-activities under the parent activity.
- Select the activities you want to include.
For each activity, you can fill in:
- Voucher Validity
- Remarks
- Confirmation Number / PNR / Ticket Number
- Number of Members
Scanning or Uploading QR Codes
For each member’s ticket, you can either scan a QR or upload a QR image:
Scan QR:
- Allow camera access on your device.
- Point the camera at a QR from any image or PDF.
- The system automatically reads and fills in the Ticket Number / PNR.
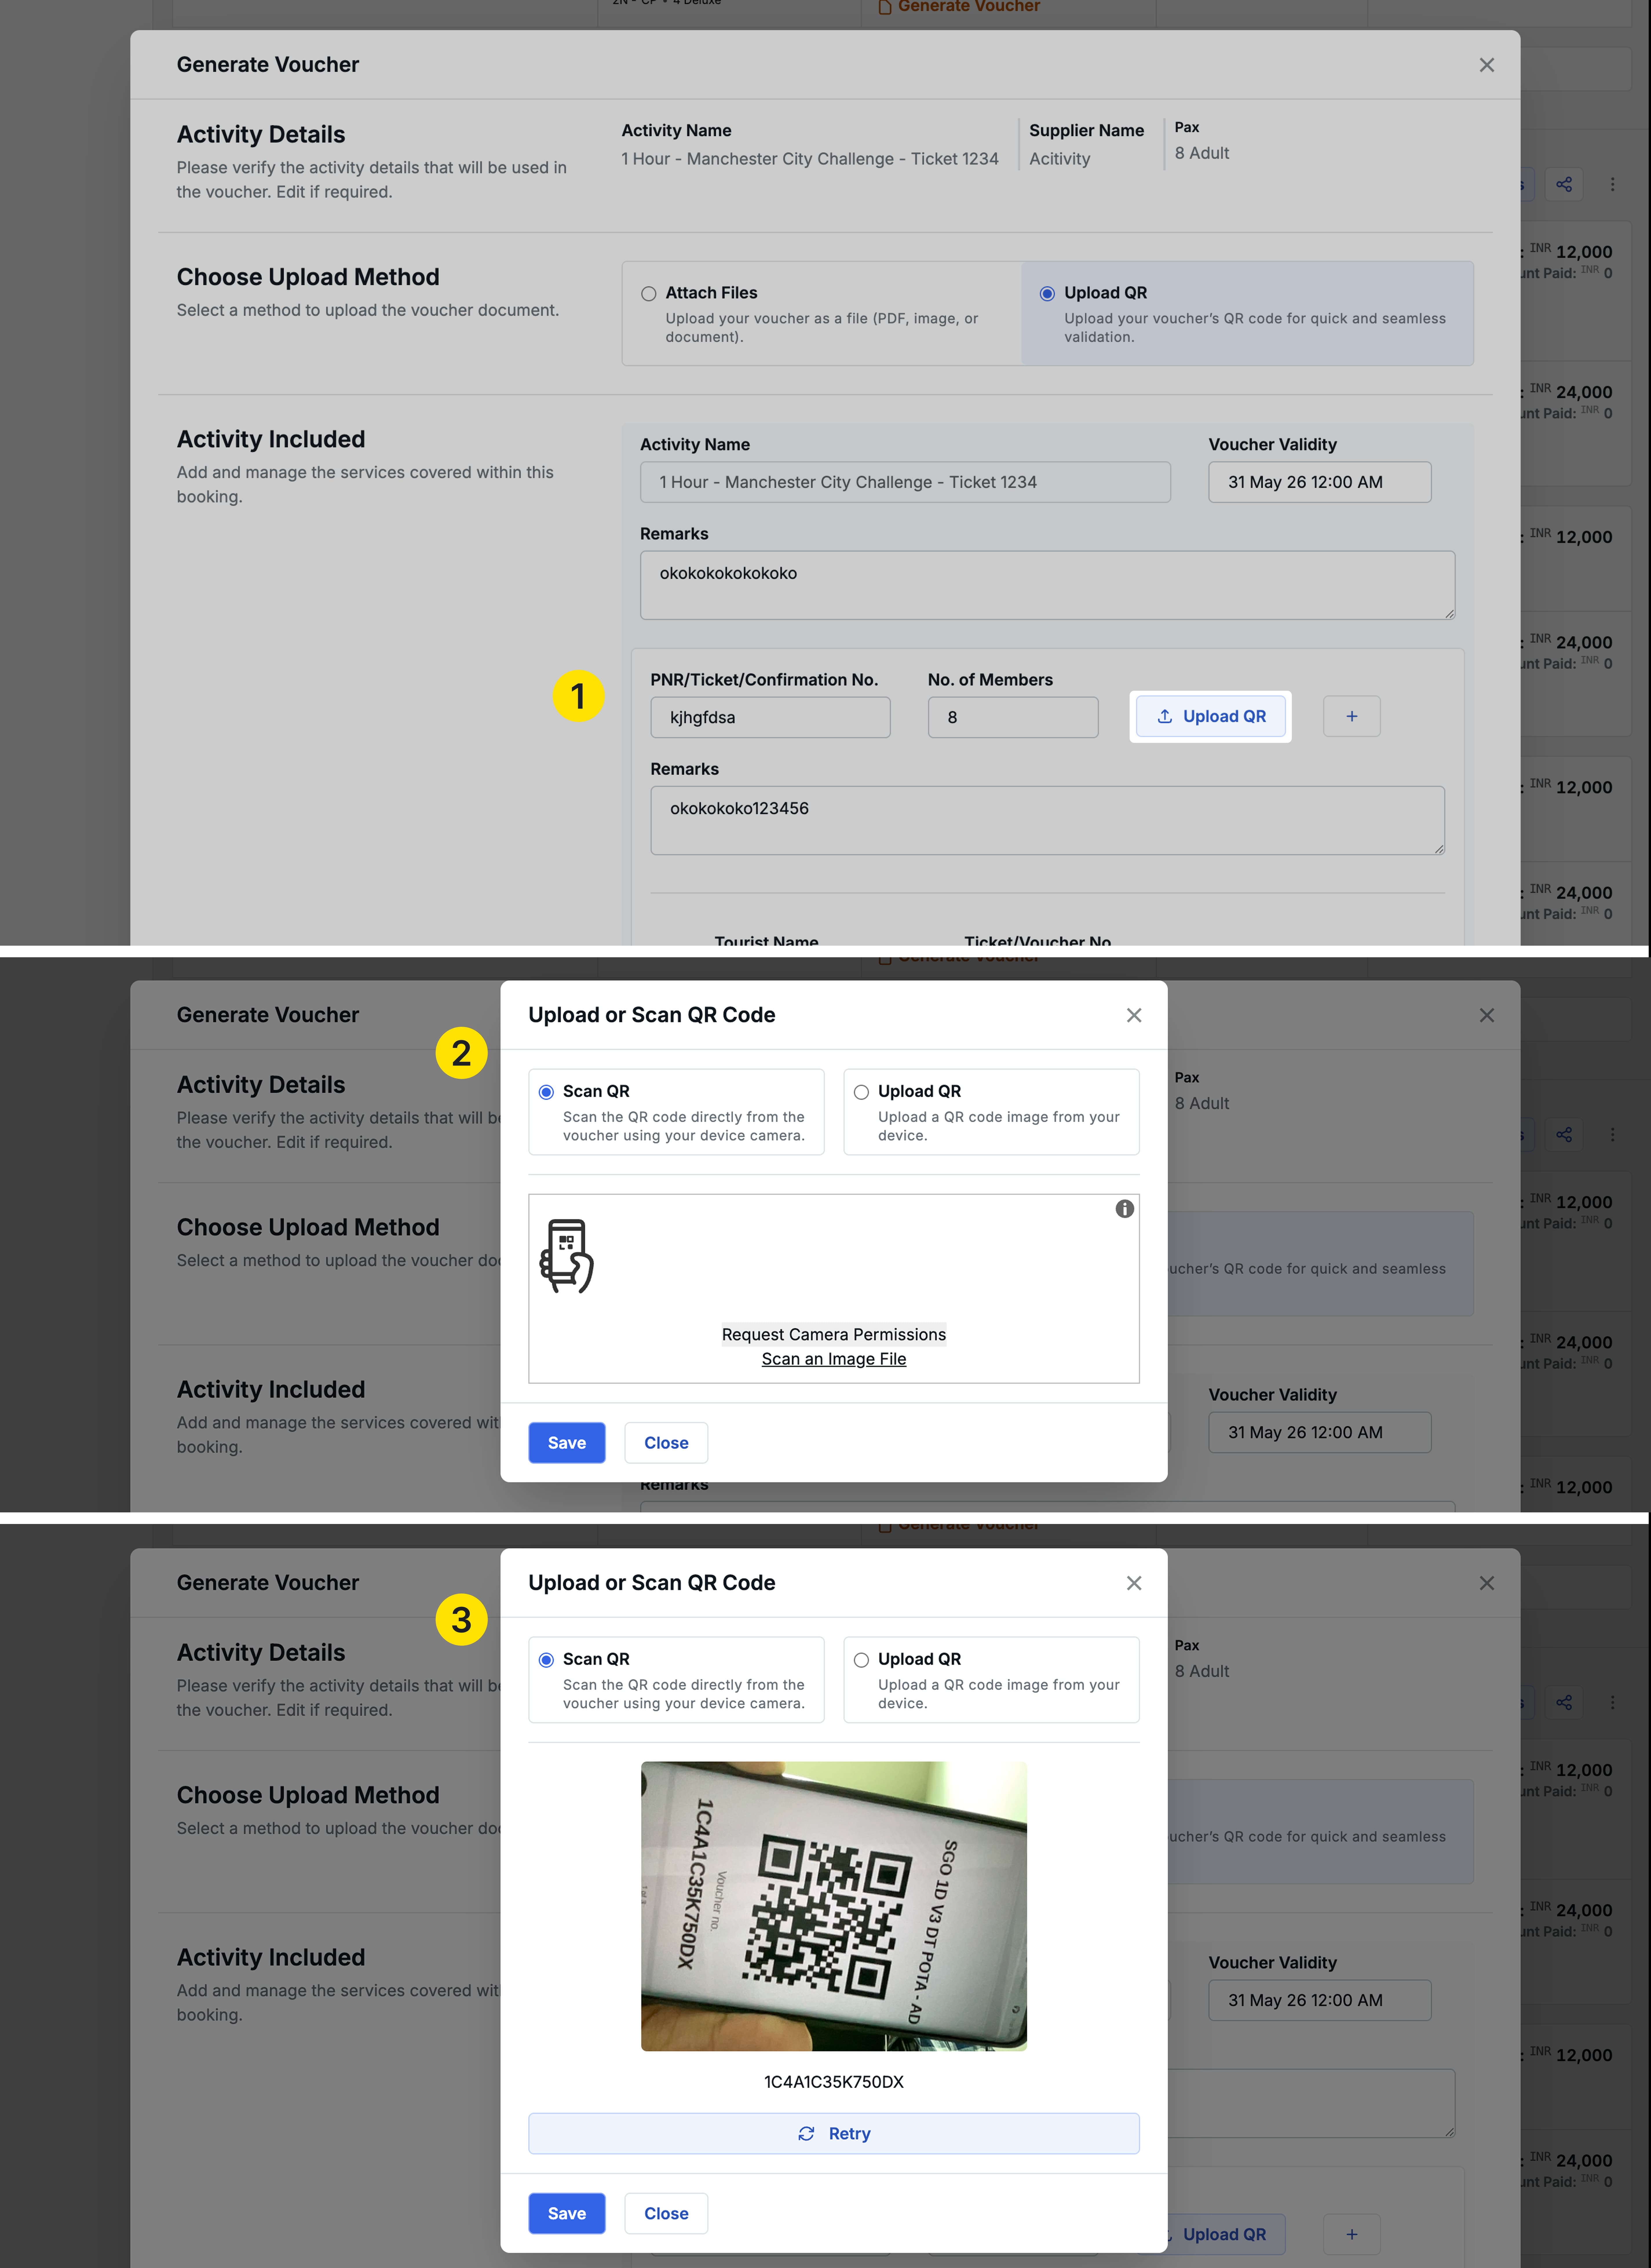
Upload QR:
- Upload a JPG, JPEG, PNG, or PDF file containing the QR.
- The system automatically scans and extracts the PNR / Ticket Number.
- You can also add a remark against each upload.

Important: The number of tourist names and ticket/voucher numbers you can add is determined by the Number of Members you select. The counts must match.
Voucher Preferences
Before generating, you can configure the following options:
Remove Branding:
- When enabled, the header and footer branding is stripped from the PDF.
- A clean, non-branded voucher PDF is generated — useful when sharing with guests.
Terms and Remarks:
- You can add notes or remarks that apply to the complete parent activity voucher.
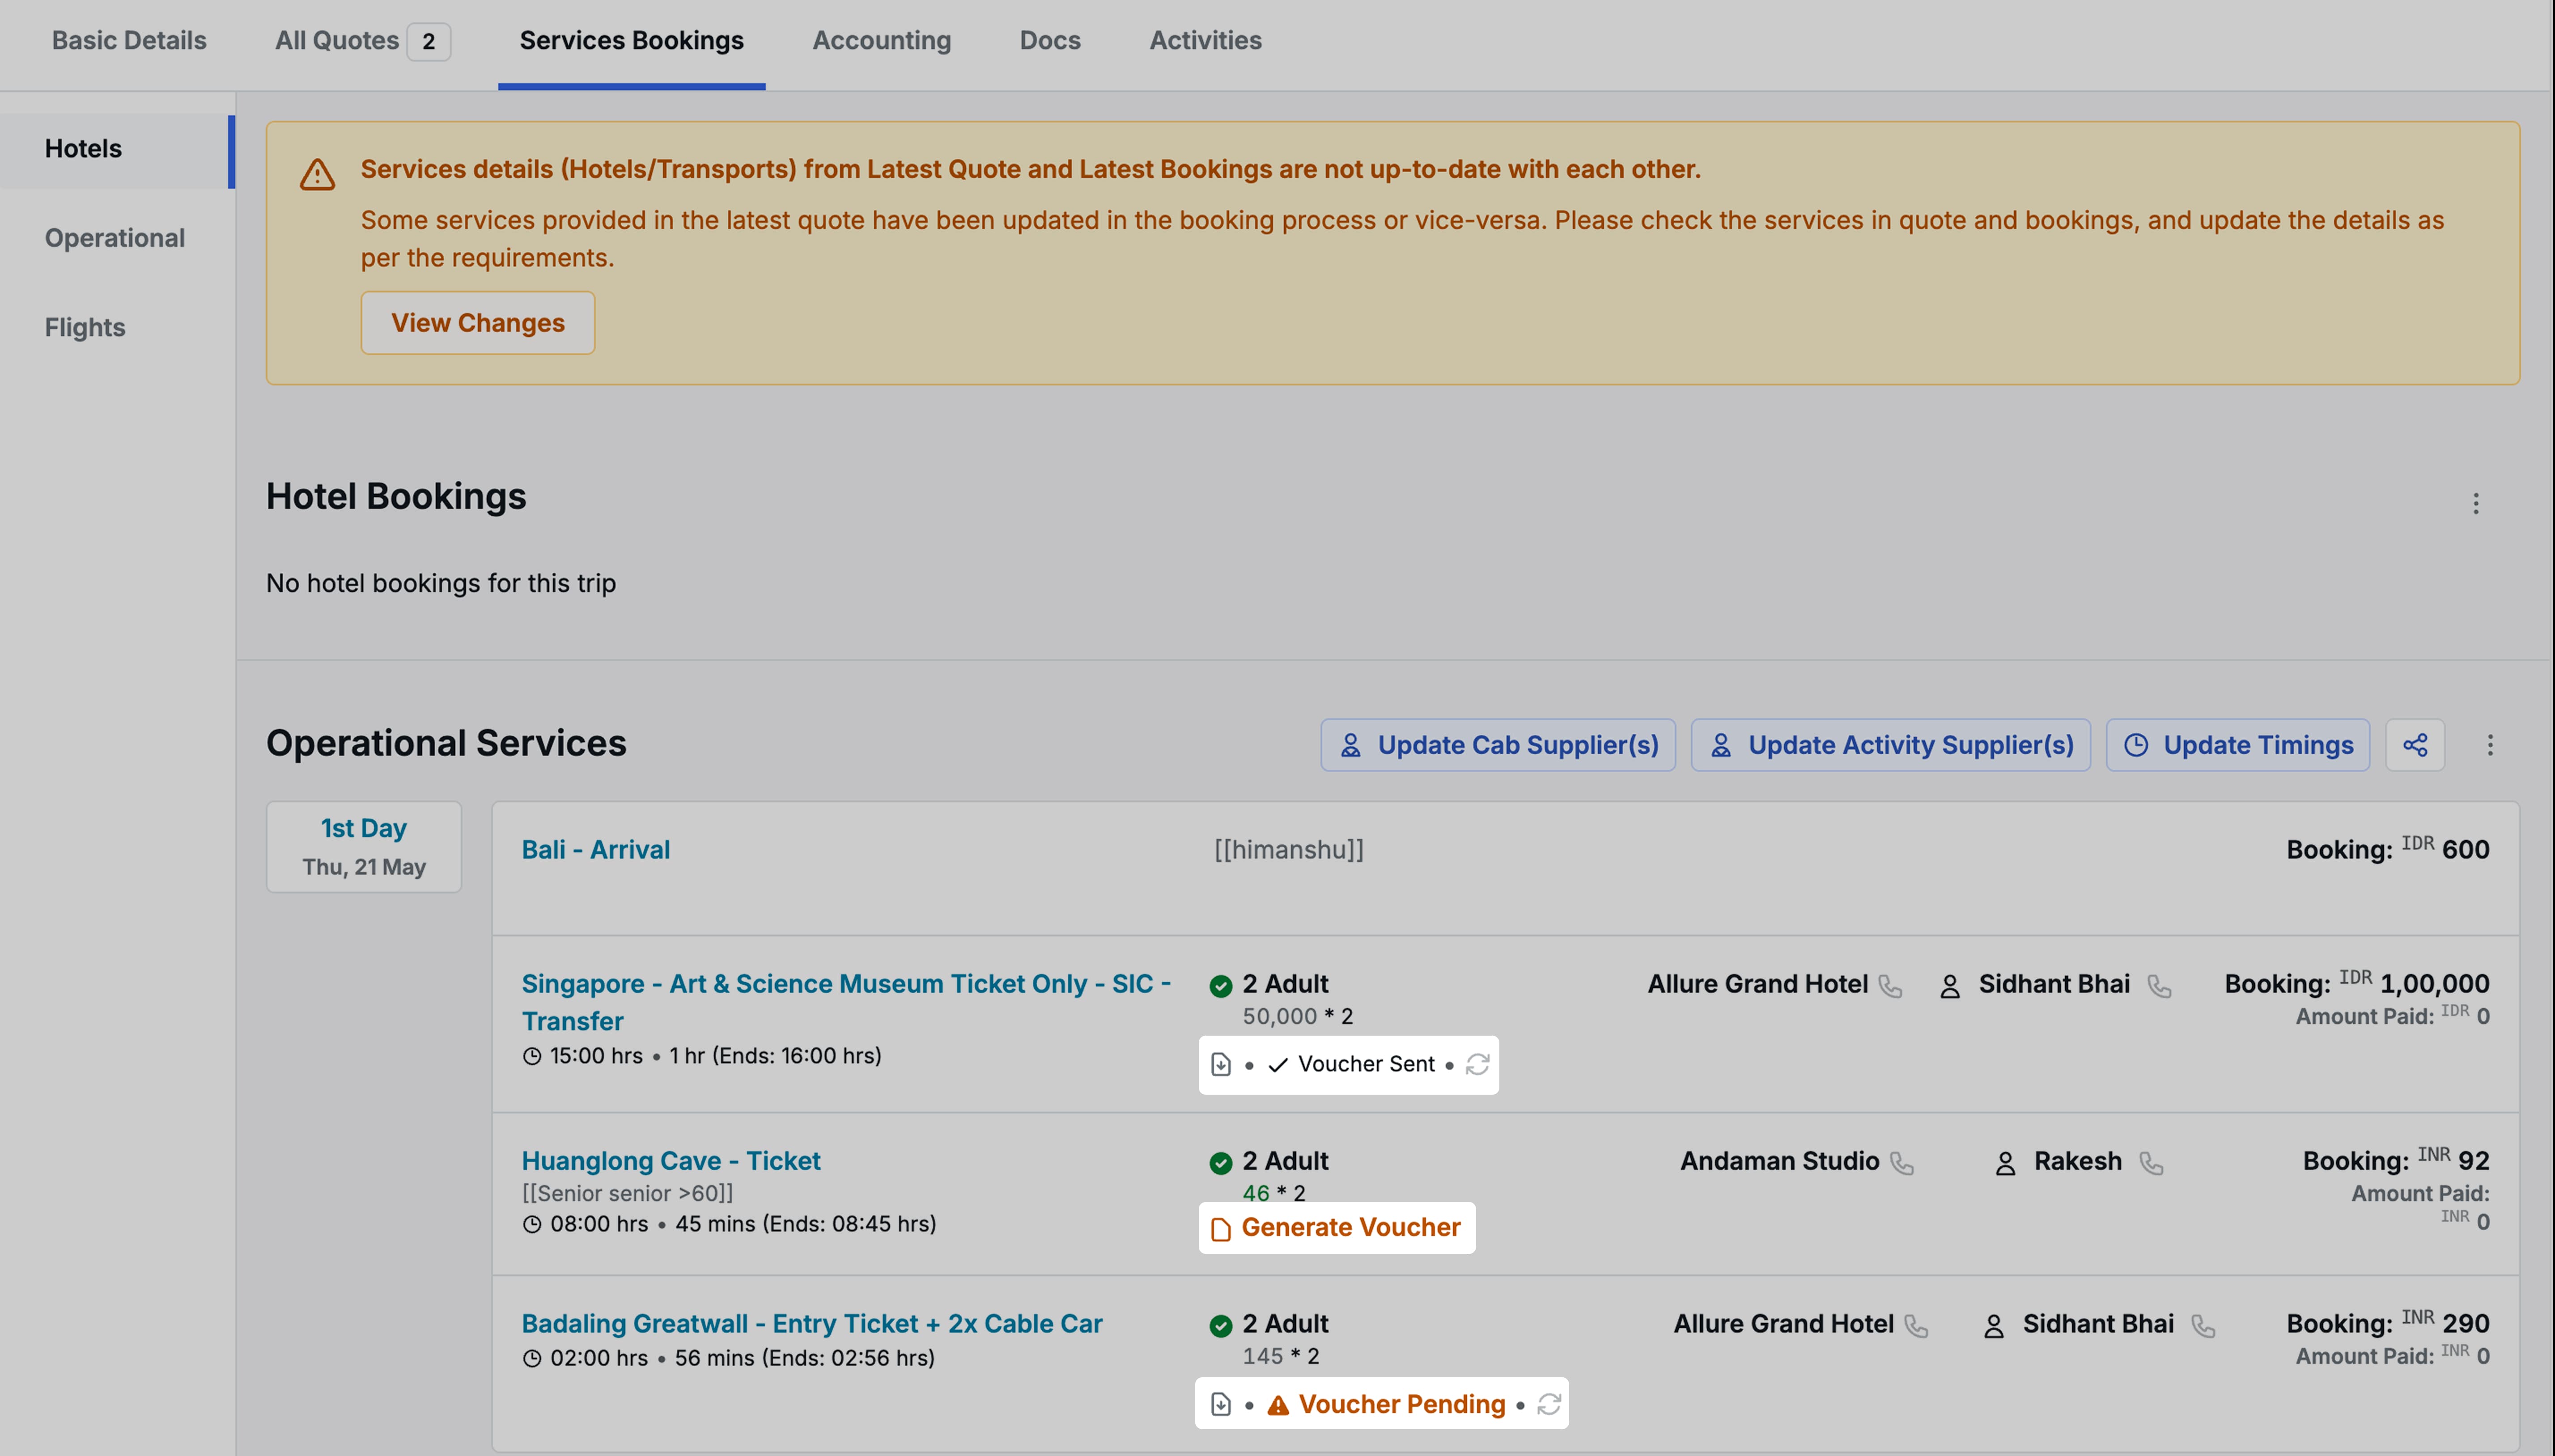
After the Voucher is Generated
Once you click Generate Voucher, you are redirected back to the Service Booking screen. Three options appear on the activity:
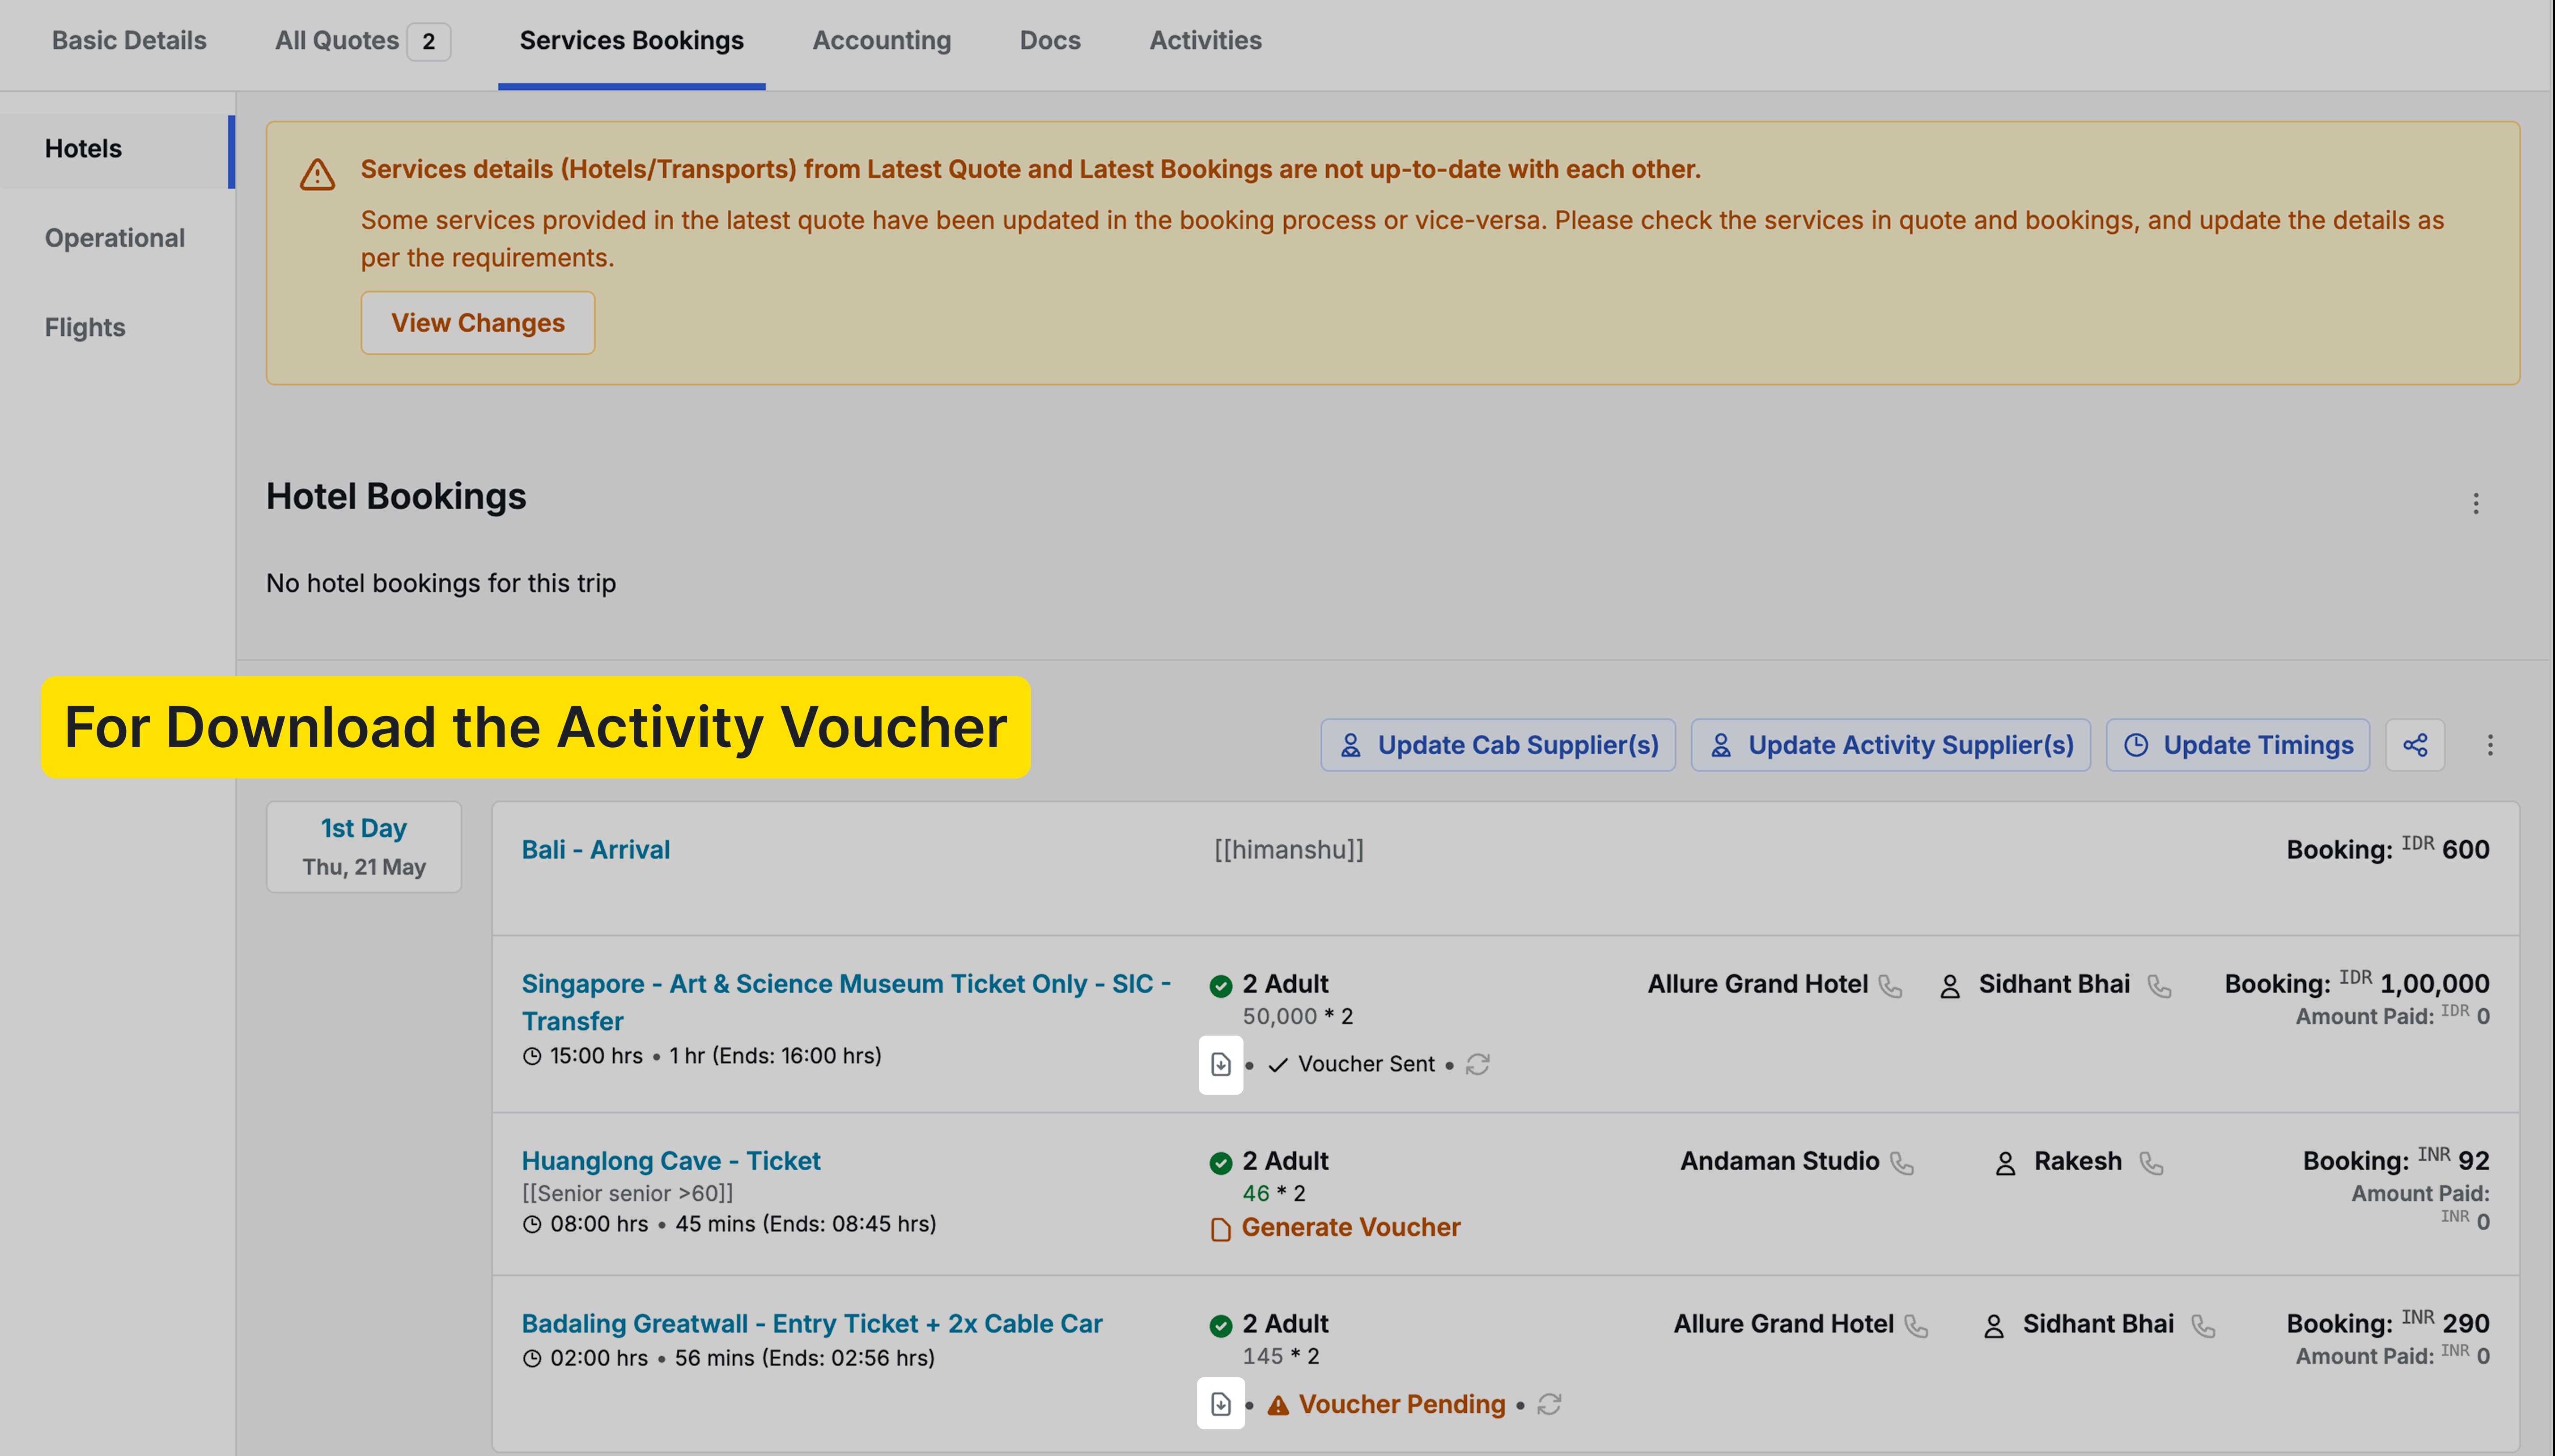
- Download Voucher — Download the generated voucher directly. Multiple files are packaged as a ZIP.
- Voucher Pending — Mark or send the voucher.
- Regenerate — Replace or update the voucher (detailed below).
Voucher Regeneration
If a voucher has already been generated and you need to update it, click the Regenerate option on the Service Booking screen.
When the regeneration screen opens:
- All previously uploaded files or QR data are already visible.
- An Already Uploaded indicator appears below the existing uploads.
From here, you can:
- Remove previously uploaded files or QR data.
- Add new files or QR uploads.
- Upload additional files alongside the existing ones.
After making your changes, click Generate Voucher again. This works for both the Attach File method and the Upload QR method.
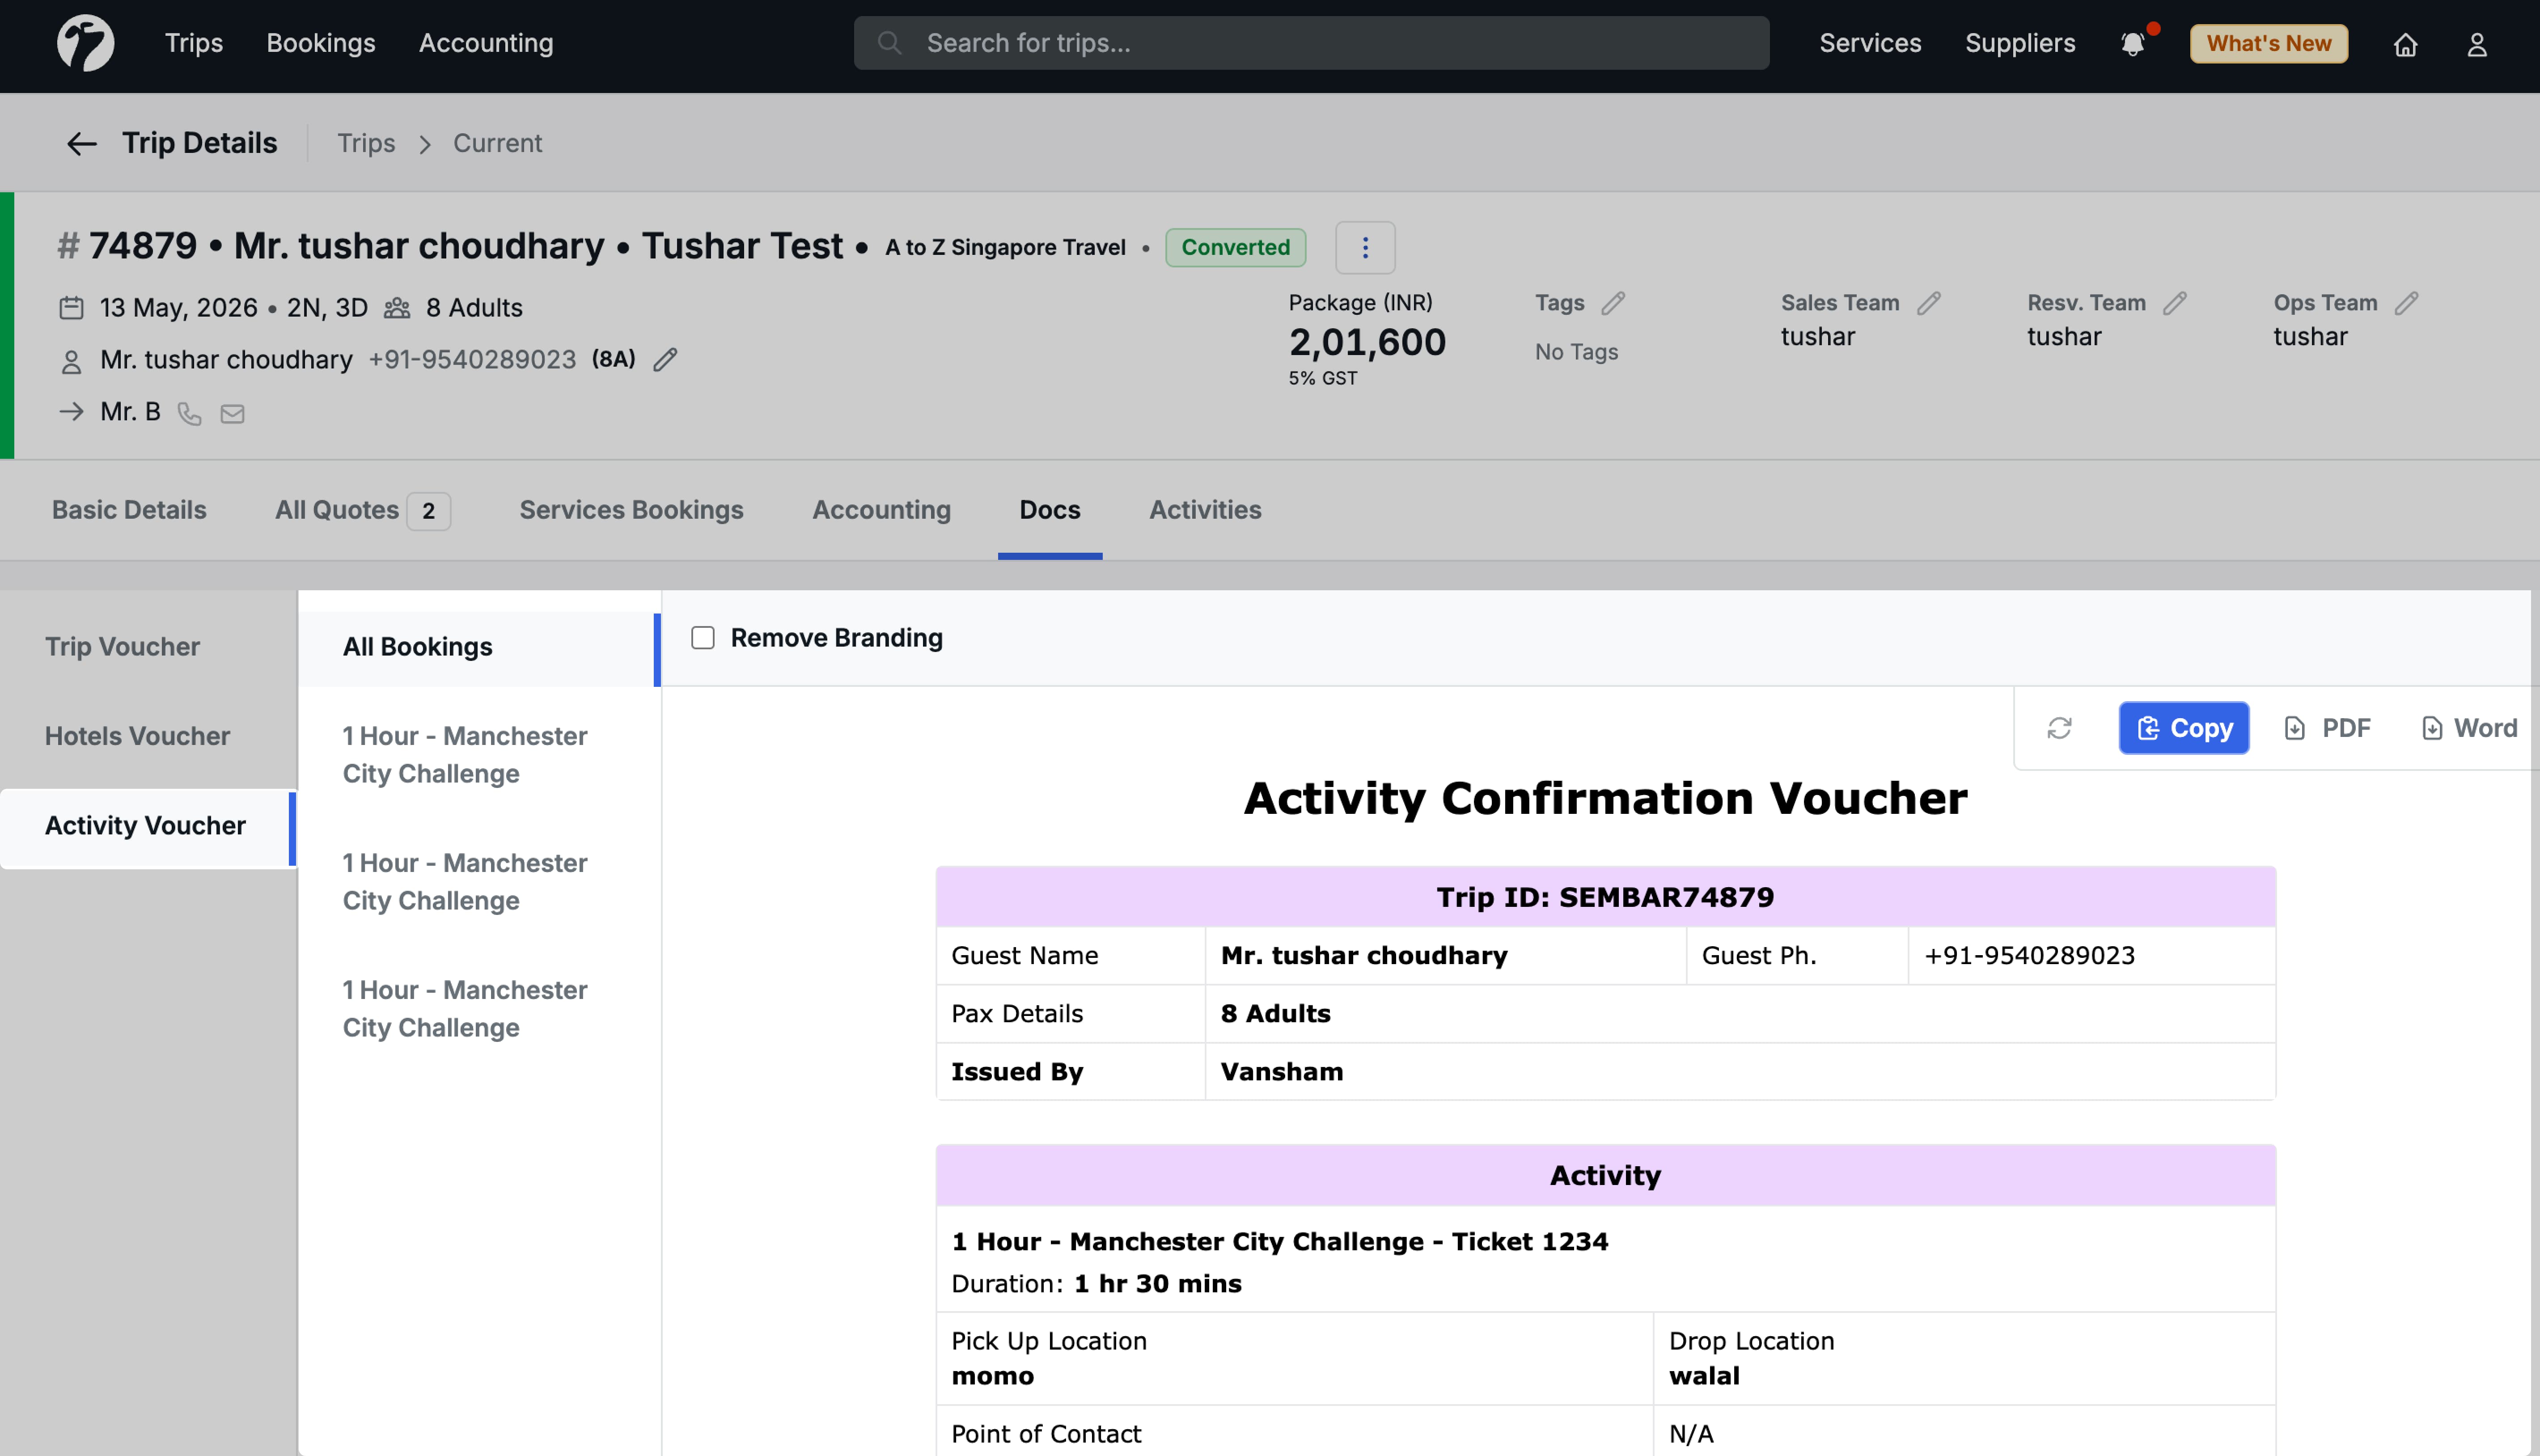
Where to Access the Generated Voucher
Once a voucher is generated, it is available in two places:
1. Service Booking Page
Download the voucher directly from the activity on the Service Booking page.
2. Docs Section
Navigate to the Docs Section of the trip to find:
- One Combined Voucher covering all activities in the quotation.
- Separate individual vouchers for each activity.
Vouchers in the Docs Section can be:
-
Copied
-
Downloaded as PDF
-
Downloaded in Word format
Supported Use Cases
Activity Vouchers are built to handle the full range of real-world ticketing scenarios. Here are all the cases covered:
Case 1: Single QR — Multiple Members (Names Known)
One QR covers multiple members and all names are available.
Example: A group activity ticket QR lists 4 members — Guest A, Guest B, Guest C, and Guest D. All four names are known and can be added individually.
Case 2: Single QR — Multiple Members (Names Not Available)
One QR covers multiple members but individual names are not listed. The voucher can still be generated. Member names are not mandatory in this case.
Case 3: Individual QR Per Member
Every member has their own separate QR for the same activity.
Example: A Burj Khalifa activity booking for 5 guests — each guest has their own QR code. All five can be uploaded individually and the voucher will be generated per member.
Case 4: Single Ticket with Multiple Activities, Separate QR Per Activity
One parent ticket covers multiple activities, and each activity inside it has its own QR.
Example: A Jaipur City Tour ticket includes Amer Fort, City Palace, Albert Hall, and Hawa Mahal — each with a separate QR code.
Case 5: Single Ticket — Multiple Activities — Separate QR Per Member Per Activity
One parent ticket covers multiple activities, and every individual member has their own QR for each applicable activity.
Example: A Jaipur City Tour for 5 guests (Guest A through E), covering Amer Fort, City Palace, Albert Hall, and Hawa Mahal. Each guest has a unique QR for every activity in the tour.
Case 6: No QR Available — PNR / Confirmation Number Only
No QR exists for the booking, but a PNR or Confirmation Number is available.
Multiple members can still be added. The voucher is generated using the PNR details alone.
Case 7: No QR and No Individual Member Tickets
No QR and no per-member tickets are available. Only overall booking details exist.
Example: The booking confirmation only states “Activity Ticket for 5 Members.” This is fully supported — the voucher is generated based on the booking information available.
Case 8: Single Ticket — One PNR — One QR — One Member
The simplest scenario: one ticket, one PNR, one QR, one guest. Fully supported.
Case 9: One Booking — Multiple Travellers — Different Ticket Numbers
A single booking with one PNR and one QR, but each traveller within the booking has a different ticket/sheet number. All traveller ticket numbers can be entered separately under the same parent booking.
Benefits
- Full support for individual, group, and complex multi-activity ticket structures.
- Automatic QR scanning removes manual data entry for ticket and PNR details.
- Vouchers are available for download in multiple formats from both the Service Booking page and the Docs section.
- Regeneration ensures vouchers stay current without starting from scratch.
- Branding can be removed for customer-facing copies when needed.
Activity FOC
We have introduced the Activity FOC feature, which lets you designate one or more guests as Free of Cost (FOC) for a specific activity in the quotation. The activity cost is then calculated only for the paying members.
Why this feature matters
Many activities in group trips include complimentary entries — for example, one guide or one escort who joins the activity at no charge. Without a dedicated FOC field, teams had to manually adjust prices or add workaround notes. Activity FOC handles this correctly inside the pricing logic itself.
How Activity FOC Works
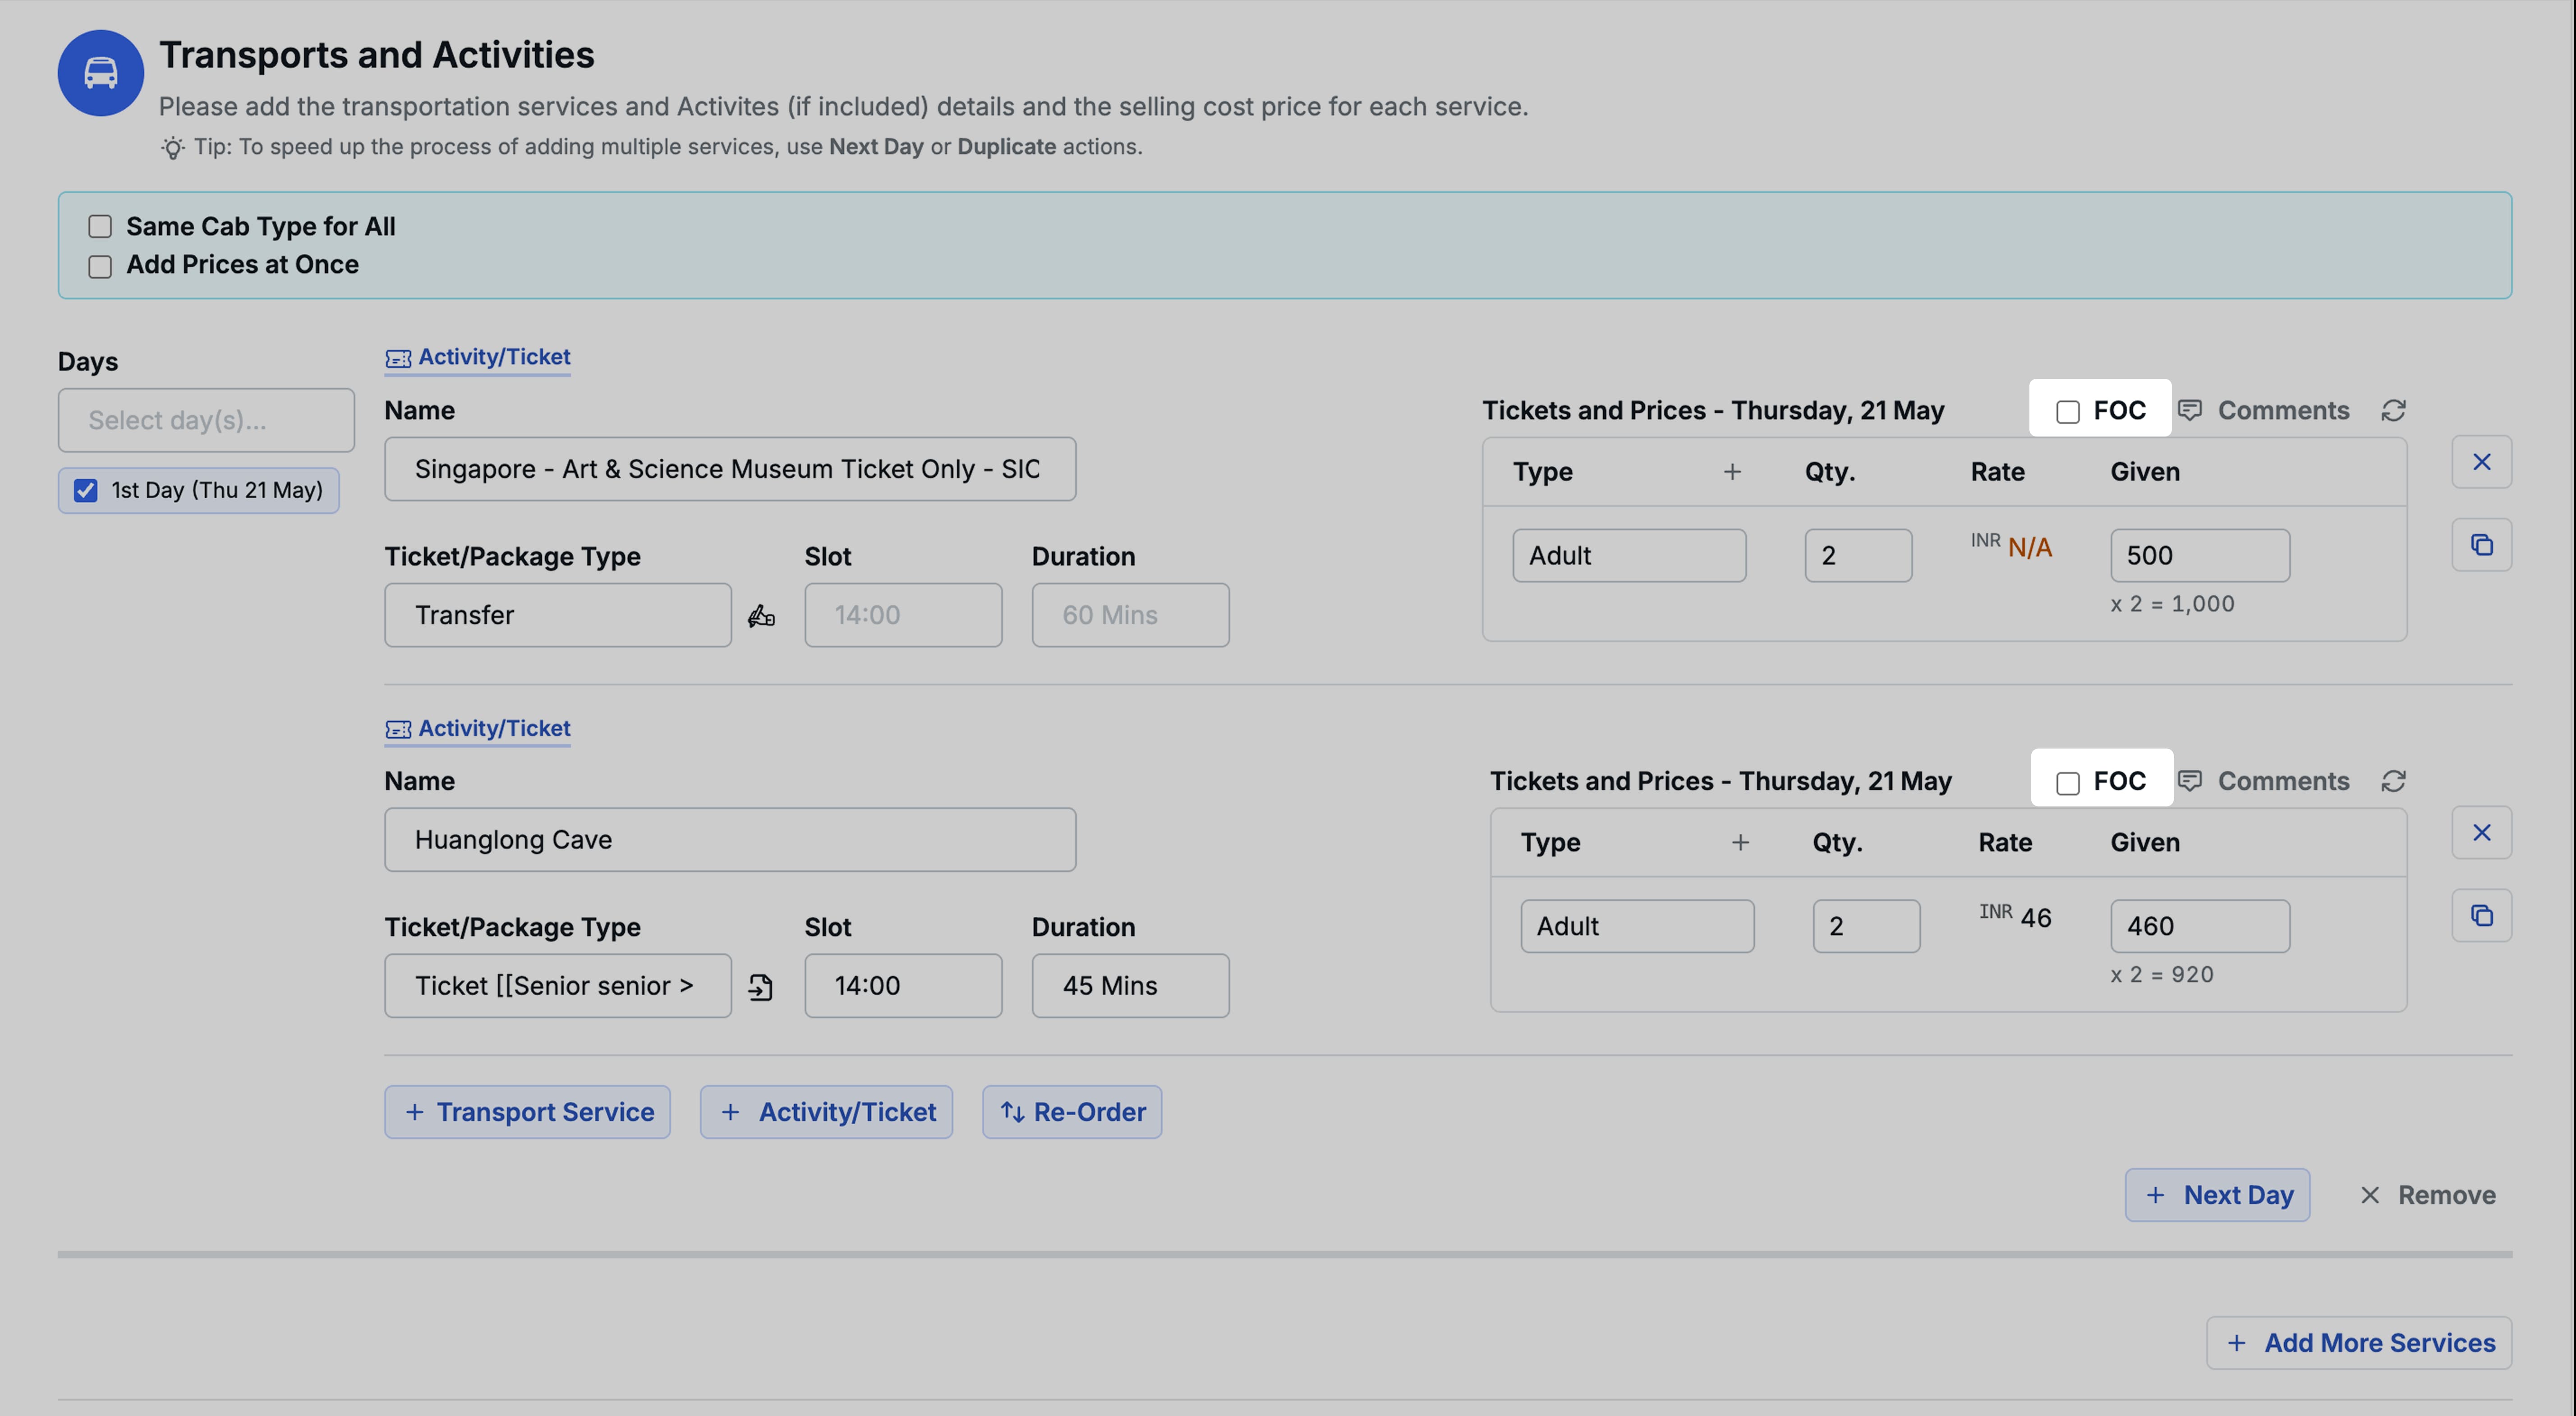
Step 1: Add the Activity
Add the required activity to the quotation as usual.
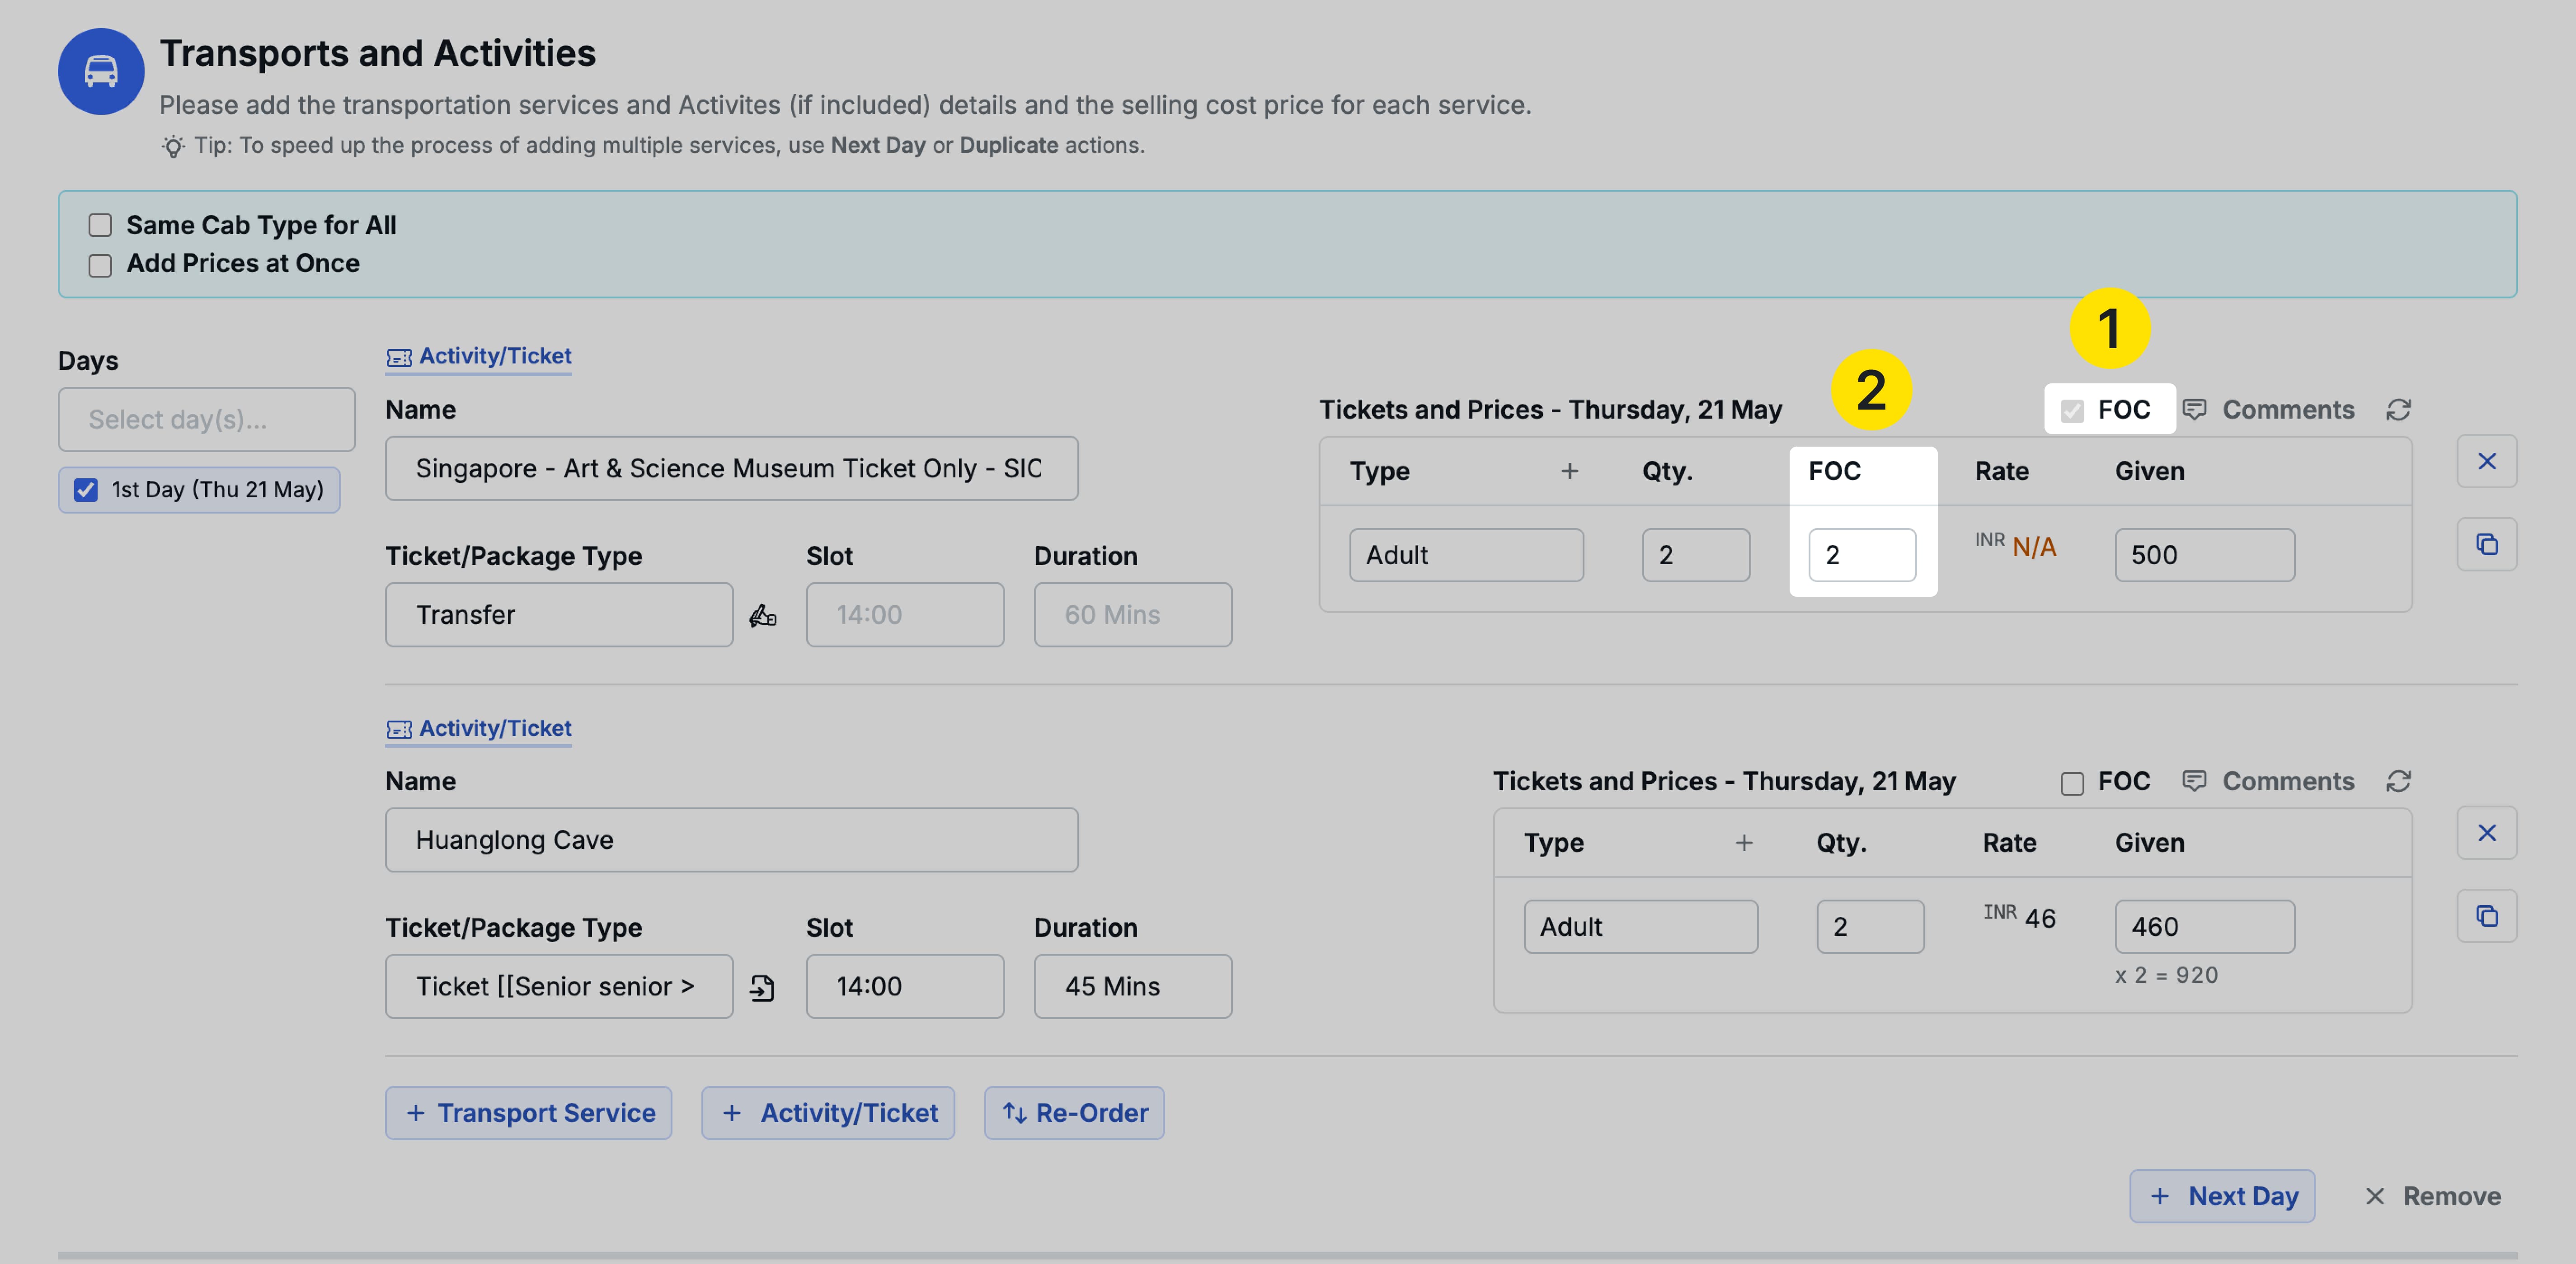
Step 2: Click the FOC Button
Once the activity is added, an FOC button appears in the top-right area of the activity section. Click it to open the FOC configuration.
Step 3: Enter FOC Quantities
Separate input fields appear for:
- FOC Adults
- FOC Children
Enter the number of guests (Adults/child separately) who should be considered Free of Cost in each category.
Not available in Group Tickets
This feature is not available for group activity tickets.
Pricing Calculation
Activity FOC changes the cost calculation so that only paying members are charged.
Example:
- Total guests in the trip: 5
- FOC given: 1
- Activity cost per person: INR 100.00
Only 4 members are charged:
4 × 100 = INR 400.00
The final activity cost is INR 400.00, not INR 500.00
Rules and Limitations
1. FOC count cannot be equal to the total number of guests
You cannot mark all guests as FOC. At minimum, one guest must always be a paying member.
Example: If there are 5 guests, the maximum FOC allowed is 4.
2. FOC Cannot Exceed Total Guest Count
The FOC value must always be less than the total number of adults or children in the respective category.
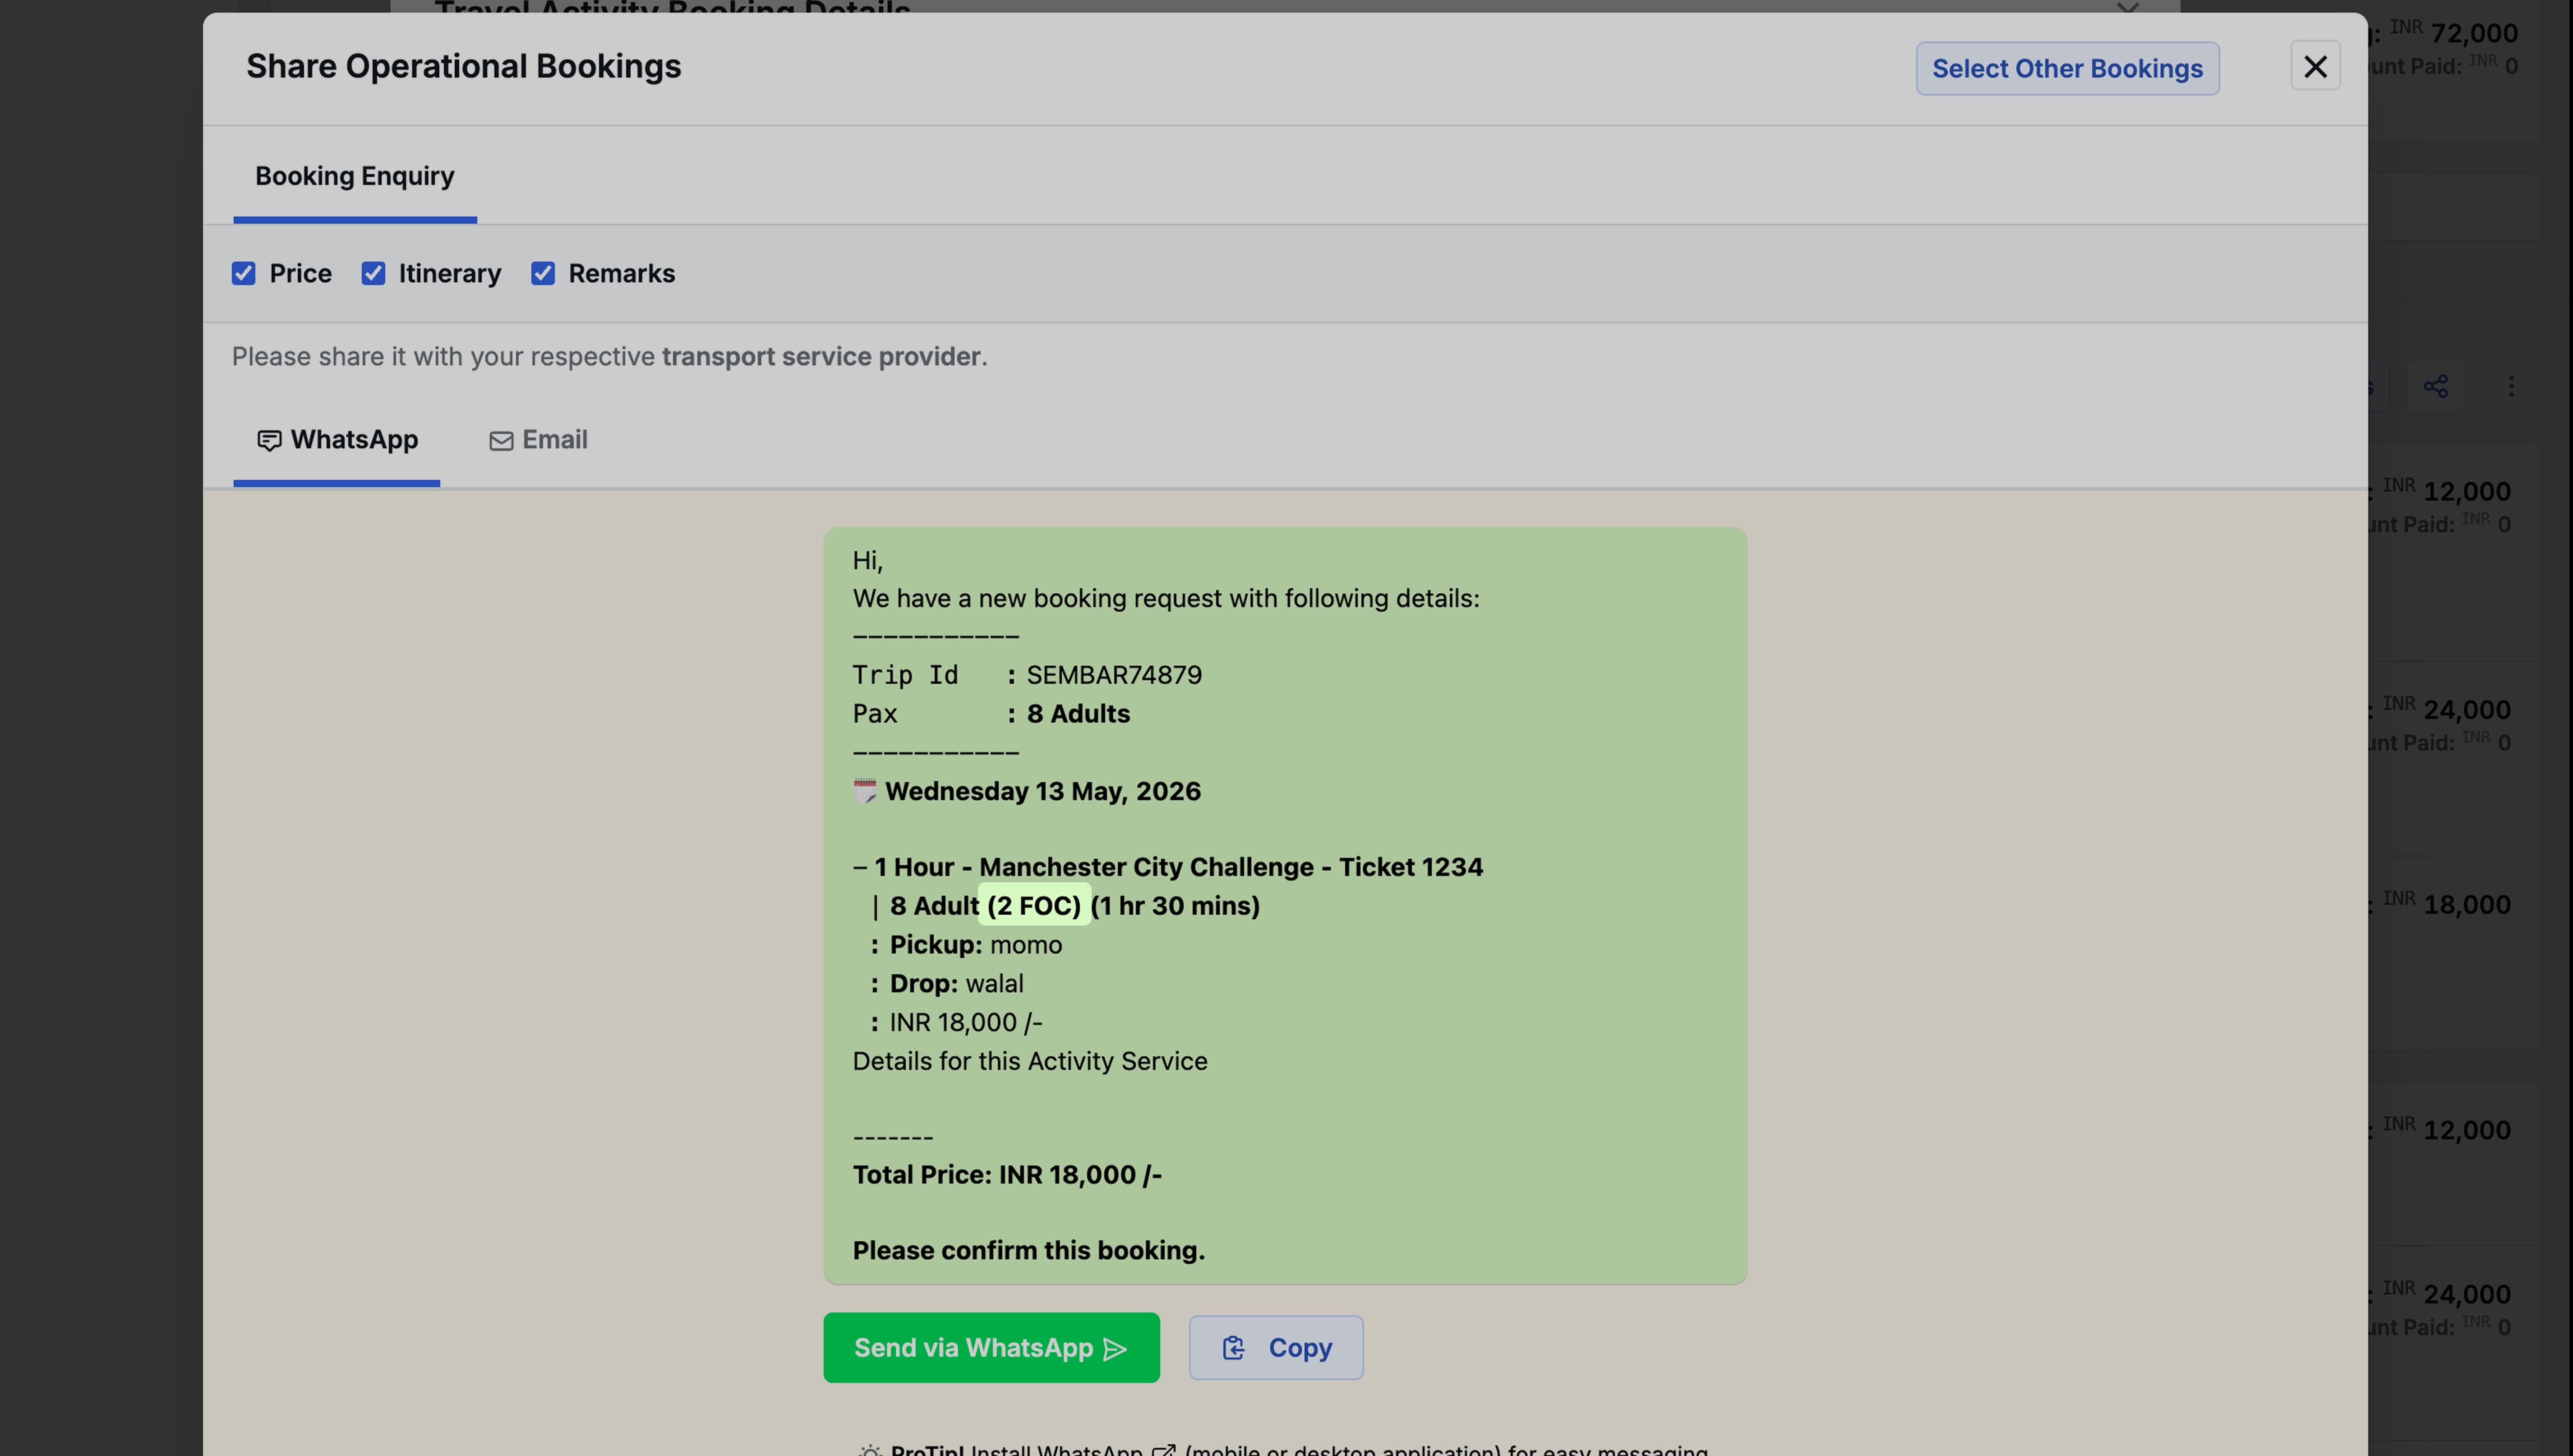
Supplier only Sharing of Activity FOCs
Activity FOC details can only be shared with suppliers and service providers. This information is not visible to customers.
Benefits
- Accurately reflects complimentary activity inclusions in your cost calculations.
- Eliminates manual price adjustments for FOC guests.
- Keeps supplier-facing documents accurate without exposing internal pricing logic to customers.
Total Package Free of Cost (FOC)
We have introduced Total FOC (Free of Cost) members support at the package level as well, allowing you to mark a specific number of travellers as complimentary. The system automatically recalculates the per-person pricing by distributing the total package cost only among paying travellers, giving you accurate quotations without any manual work. You can set Total FOC while creating a new query or later from the pricing strategy section on the trip detail page.
Why this feature matters
When handling Group Tours or special bulk travellers requests, it is common to offer a few seats as complimentary — for tour leaders, group coordinators, or as part of a promotional deal. Previously, there was no straight forward way to formally account for these travellers within the system. You had to manually adjust pricing or add notes outside the system, which made quotations inaccurate and difficult to share with clients and required manually intervention on every quotation sharing by manually calculating the per-person prices and adding text notes. With this update, Total FOC is now a part of your trip pricing workflow.
Where to Set Total FOC
There are two places where you can enter the Total FOC count for a trip.
On the New Query Form
When creating a new query from the Trips module using the New Query button on the top right, you will now see a Total FOC field alongside the existing Number of Adults and Number of Children fields in the Destination and Duration section. Enter the number of complimentary travellers you want to include for this trip.
In the Pricing Strategy Section
If you did not set the Total FOC while creating the query, or if you need to add or update it later, you can do so from the Pricing Strategy section while creating a quotation. When the pricing strategy is set to Overall, you will see a new Total FOC field within it where you can enter or modify the complimentary pax count. This means you can always adjust Total FOC during quotation creation, without needing to go back to the query form.
Overall Only
The Total FOC option is available only when the pricing strategy is set to Overall. The other three pricing strategies — Per Person, Per Component, and Per Person Per Component — do not support Total FOC.
The Total FOC value entered on the new query form automatically reflects in the pricing strategy section, and any changes made in the pricing strategy section are saved back to the trip as well.
Validation Rule
The Total FOC count must always be less than the total number of travellers (adults + children). It cannot be equal to or greater than the total pax count, since at least one traveller must remain as a paying guest.
How Total FOC Affects Pricing
Total FOC is available only when you use the Overall pricing strategy. The other three strategies — Per Person, Per Component, and Per Person Per Component — do not include this option. Here is how the calculation works:
- You enter all hotel details and other services as usual for the full group, including the Total FOC travellers.
- The system calculates the total package price for all travellers.
- It then divides this total by the remaining paying travellers (total pax minus Total FOC) to arrive at the adjusted per-person price.
Example: If your total package price is ₹60,000 for 10 travellers and you mark 2 as FOC, the per-person price will be calculated as ₹60,000 ÷ 8 = ₹7,500 per person. The FOC travellers are included in the trip but are not charged.
Important: The total package amount itself does not change. FOC only affects how the cost is distributed on a per-person basis. Your hotel bookings, service costs, and supplier payments remain calculated for the full group.
Total FOC Across Quotation, Voucher, and Sharing
Once you save the Total FOC details, they are reflected across all the places where trip pricing is visible and shared:
Trip Details Page: The Total FOC count and adjusted per-person pricing are visible in the pricing section.
Quotation Sharing: When you share a quotation with a client, the price per person reflects the adjusted amount after accounting for FOC travellers.
Quotation PDF: The exported PDF includes the Total FOC information, showing clients a clear breakdown of the pricing.
Trip Voucher: The Total FOC details are also visible in the trip voucher, so your operations team and suppliers have full visibility of the complimentary pax.
Email Sharing: Quotations sent via email also carry the updated per-person pricing with FOC accounted for.
Benefits
- Set Total FOC from the query form upfront or add it later from the pricing strategy section — flexible entry at any stage
- Accurate per-person pricing that automatically adjusts based on paying guests only
- Works within the overall pricing strategy, keeping your per-component costs unaffected
- Consistent Total FOC information across trip details, quotations, PDFs, vouchers, and emails
- Simple validation ensures at least one paying traveller is always present
- Clean, professional quotations and vouchers that clearly reflect your FOC offering to clients
Trip Plan Request – Bulk Assign
We have introduced the Bulk Assign feature on the Trip Plan Request page. This allows you to reassign multiple leads from one sales person to another in a single action — useful when team members are unavailable, leaving the organisation, or when leads need to be redistributed by destination or workload.
Why this feature matters
Previously, reassigning leads had to be done one at a time. For organisations managing large volumes of leads — especially during team changes — this was time-consuming and error-prone. Bulk Assign makes it possible to move dozens of leads in one step, so no lead falls through the cracks.
Common Use Cases
- A sales person is leaving the organisation and their active leads need to be handed over.
- A team member goes on extended leave and their leads need temporary coverage.
- Leads for a specific destination need to be moved to a specialist team member.
- You want to consolidate leads from multiple team members under one person.
How to Use Bulk Assign
Step 1: Open Trip Plan Requests
Navigate to Trip Plan Requests.
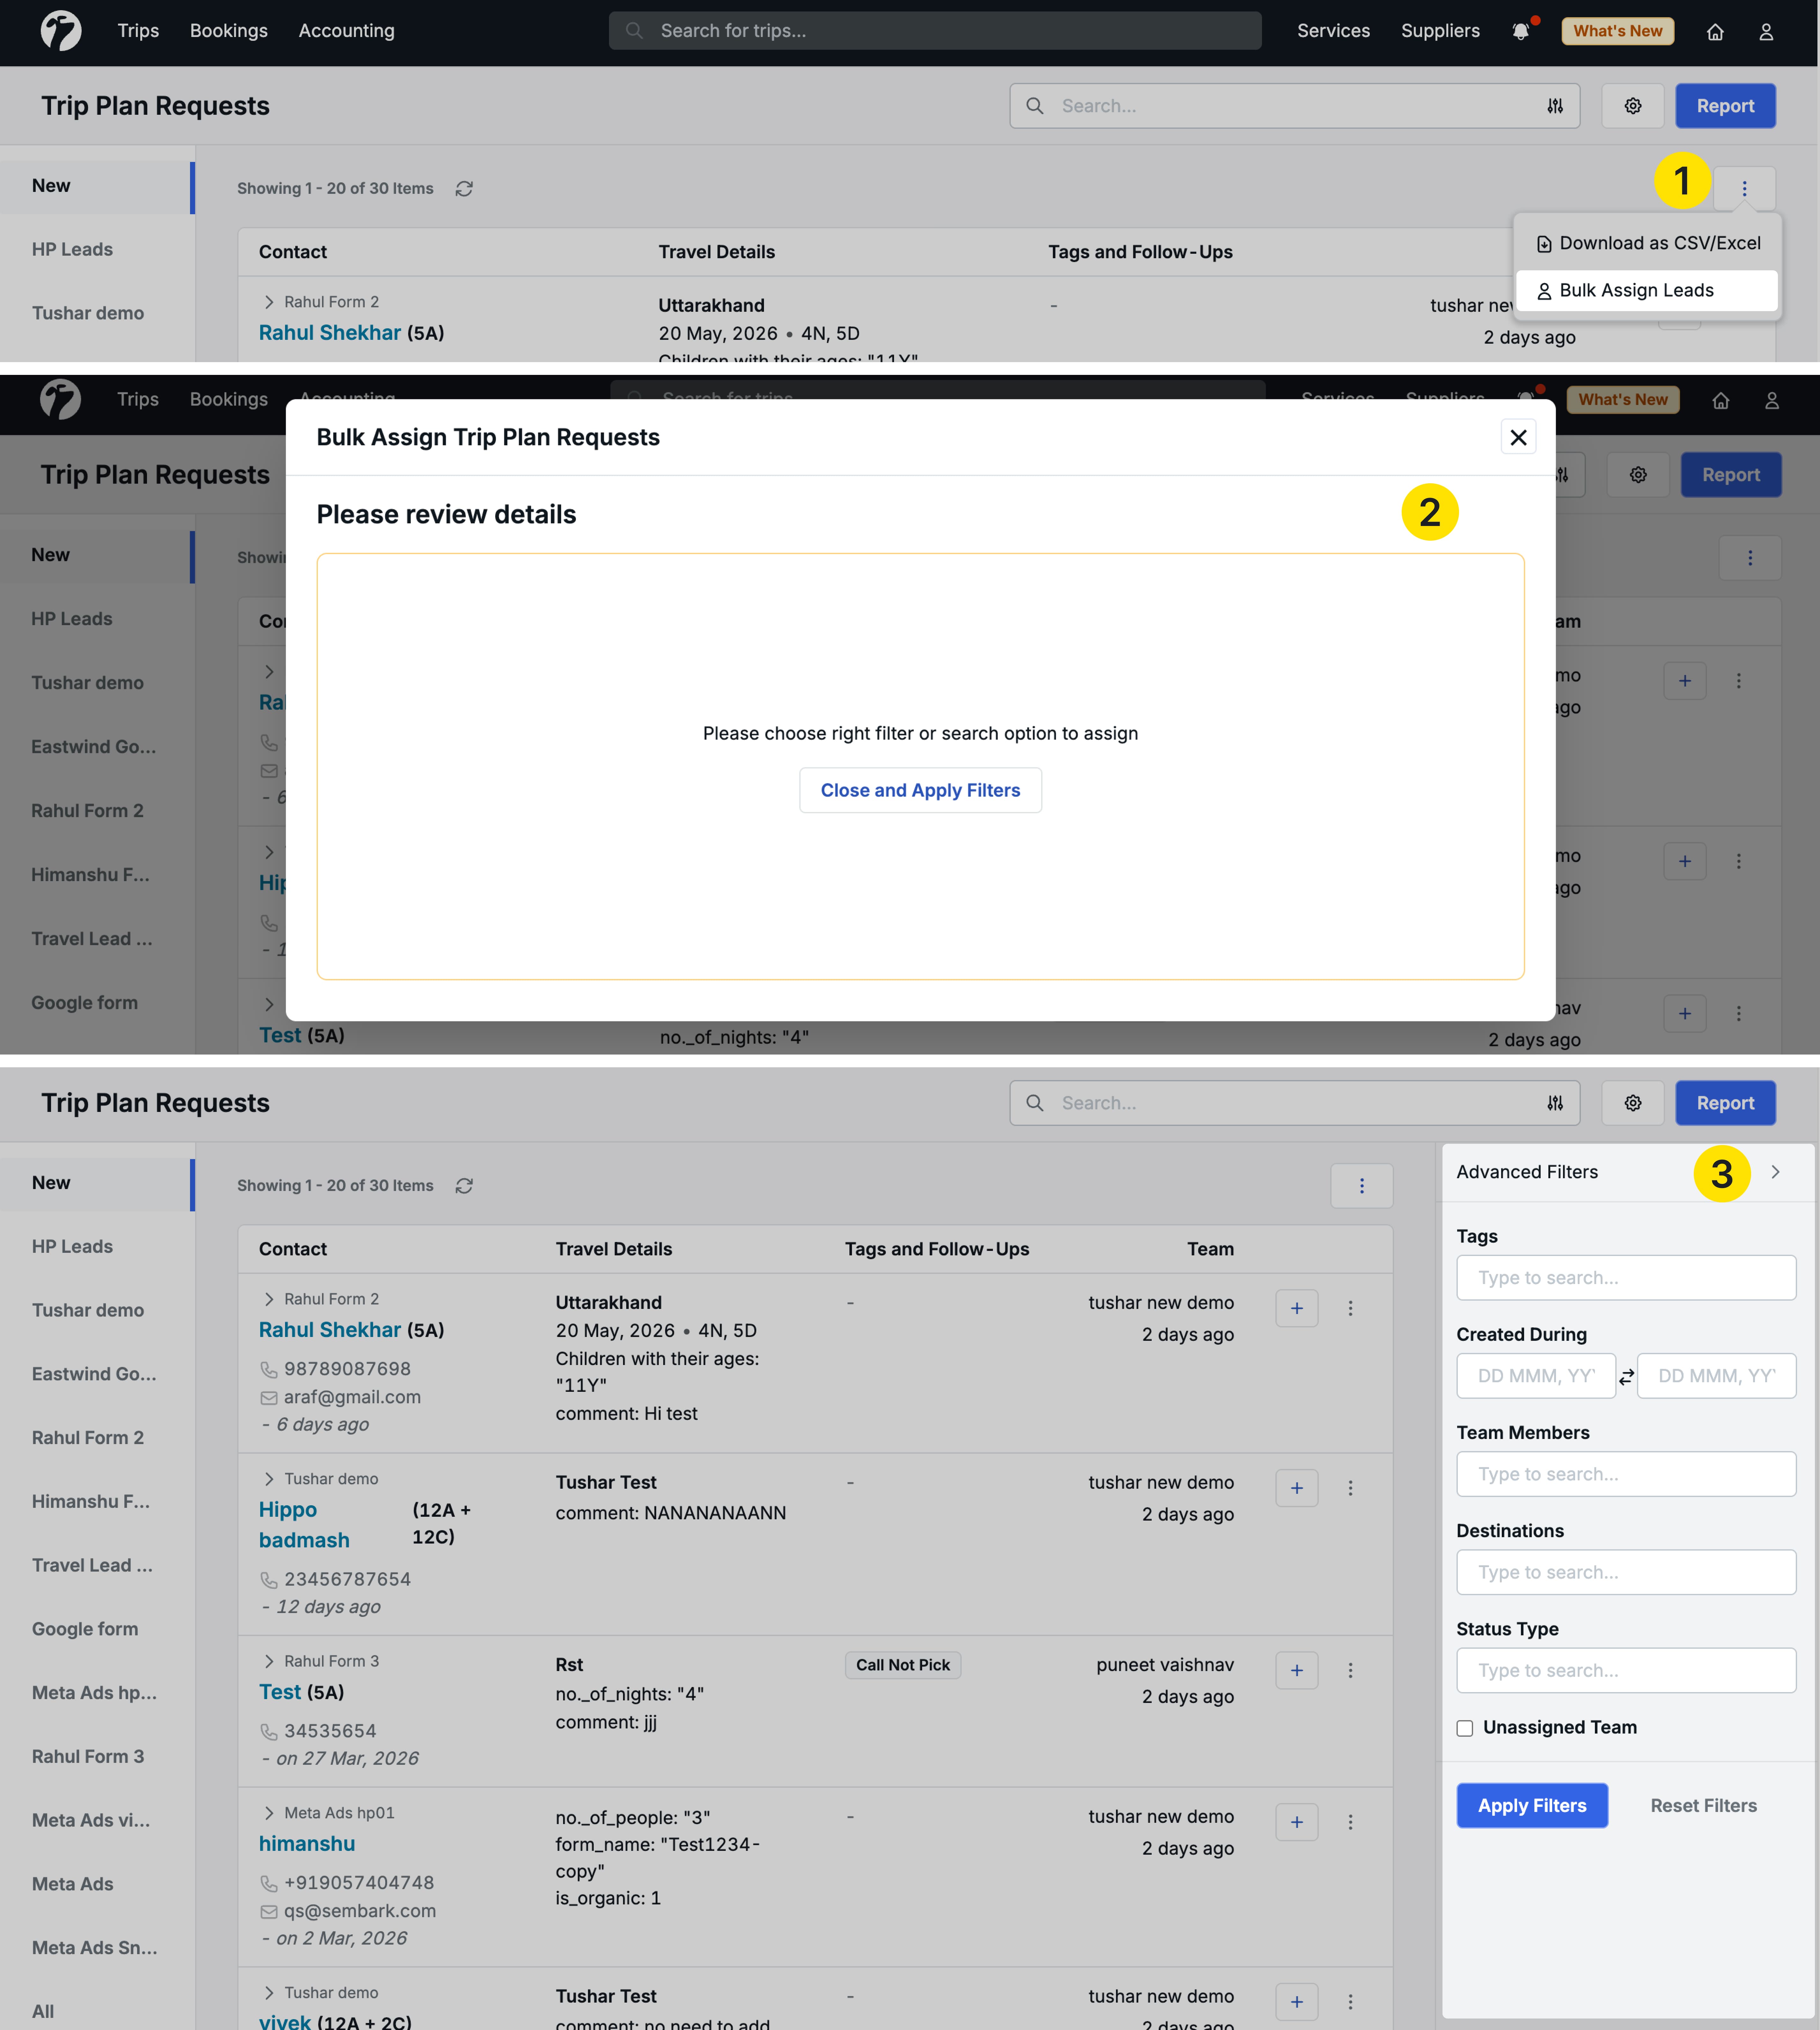
Step 2: Apply Filters
You must apply filters before bulk assigning. This helps you target exactly the leads you want to reassign.
Available filters include:
- Date Range (Created Between)
- Destination
- Team Member
- Lead Type
- Any other available filters
Example 1 — Reassign by Employee: Sales Person X is leaving. Filter leads created between 1 April to 30 April assigned to Person X, then reassign them all to a replacement.
Example 2 — Reassign by Destination: Dubai leads should now be handled by Member Y instead of Member X. Filter by destination = Dubai, then bulk assign to Member Y.
Example 3 — Merge Leads from Multiple Members: Filter for leads from both Member X and Member Y, then assign all of them to Member Z in one action.
Step 3: Open Bulk Assign
Once the filtered leads list appears:
-
Click the Ellipsis (⋮) option at the top of the list.
-
Select Bulk Assign Leads.
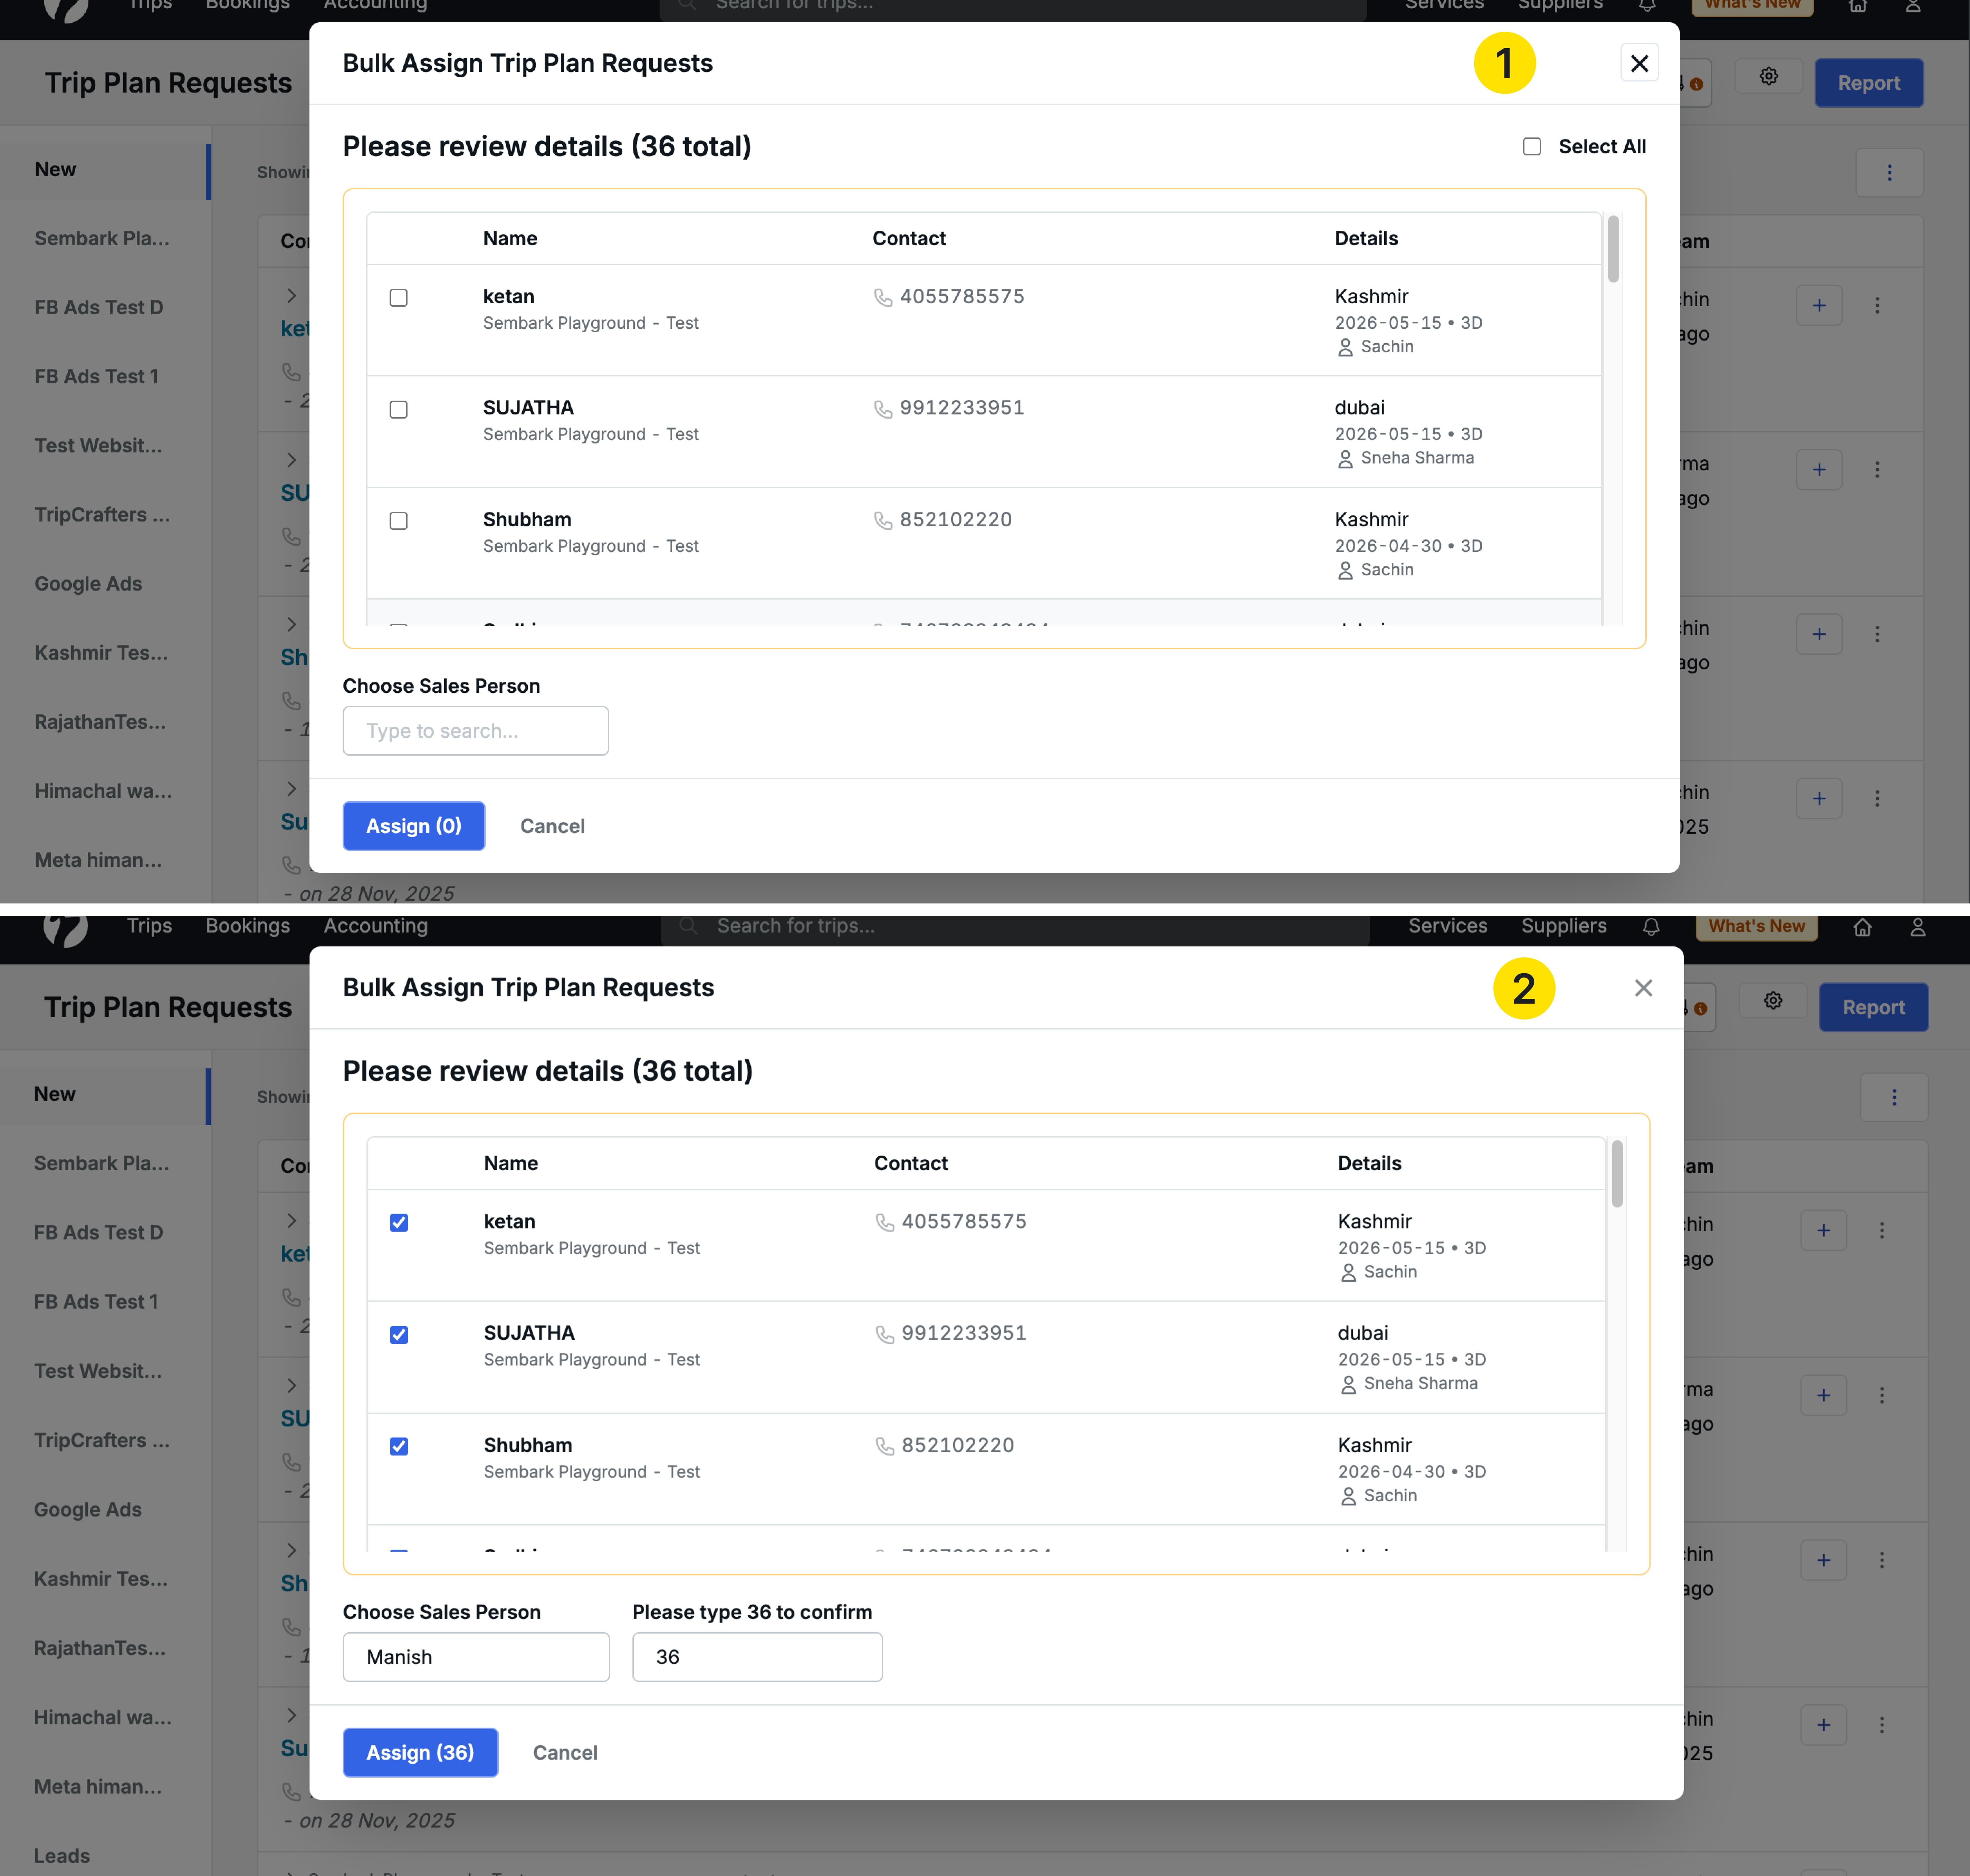
Step 4: Select Leads
A modal window opens displaying all filtered leads. You can:
- Select individual leads using checkboxes.
- Select all filtered leads at once.
Step 5: Choose a Sales Person
Below the lead list, a Choose Sales Person dropdown appears. Select the team member you want to assign the leads to.
Step 6: Confirm the Assignment
A confirmation step is required before the assignment goes through.
Example: If you selected 5 leads, you must type 5 in the confirmation field. Only after entering the correct number will the assignment proceed.
This prevents accidental bulk reassignments.
After Assignment
Once confirmed:
- The selected leads move to the new sales person immediately.
- The Team Member column updates to show the new assignee’s name.
- The new sales person can begin working on those leads right away.
Support for Deleted Team Members
We have also extended Bulk Assign to support deleted team members.
If a team member has already left the organisation and their account has been removed, their old leads are not lost. You can still locate those leads by filtering for the deleted member and reassigning them to an active sales person.
The Team Member dropdown in the filter is ordered as follows:
- Active Users
- Disabled Users
- Deleted Users
This ensures that historical leads from former team members remain accessible and manageable.
Benefits
- Reassign dozens of leads in one step instead of updating each one manually.
- Maintain continuity when team members are unavailable or leave the organisation.
- Filter by destination, date range, or team member to reassign exactly the right leads.
- Deleted team member support ensures no lead is ever permanently orphaned.
Text Higlighting and Table Support in Text Editor
-
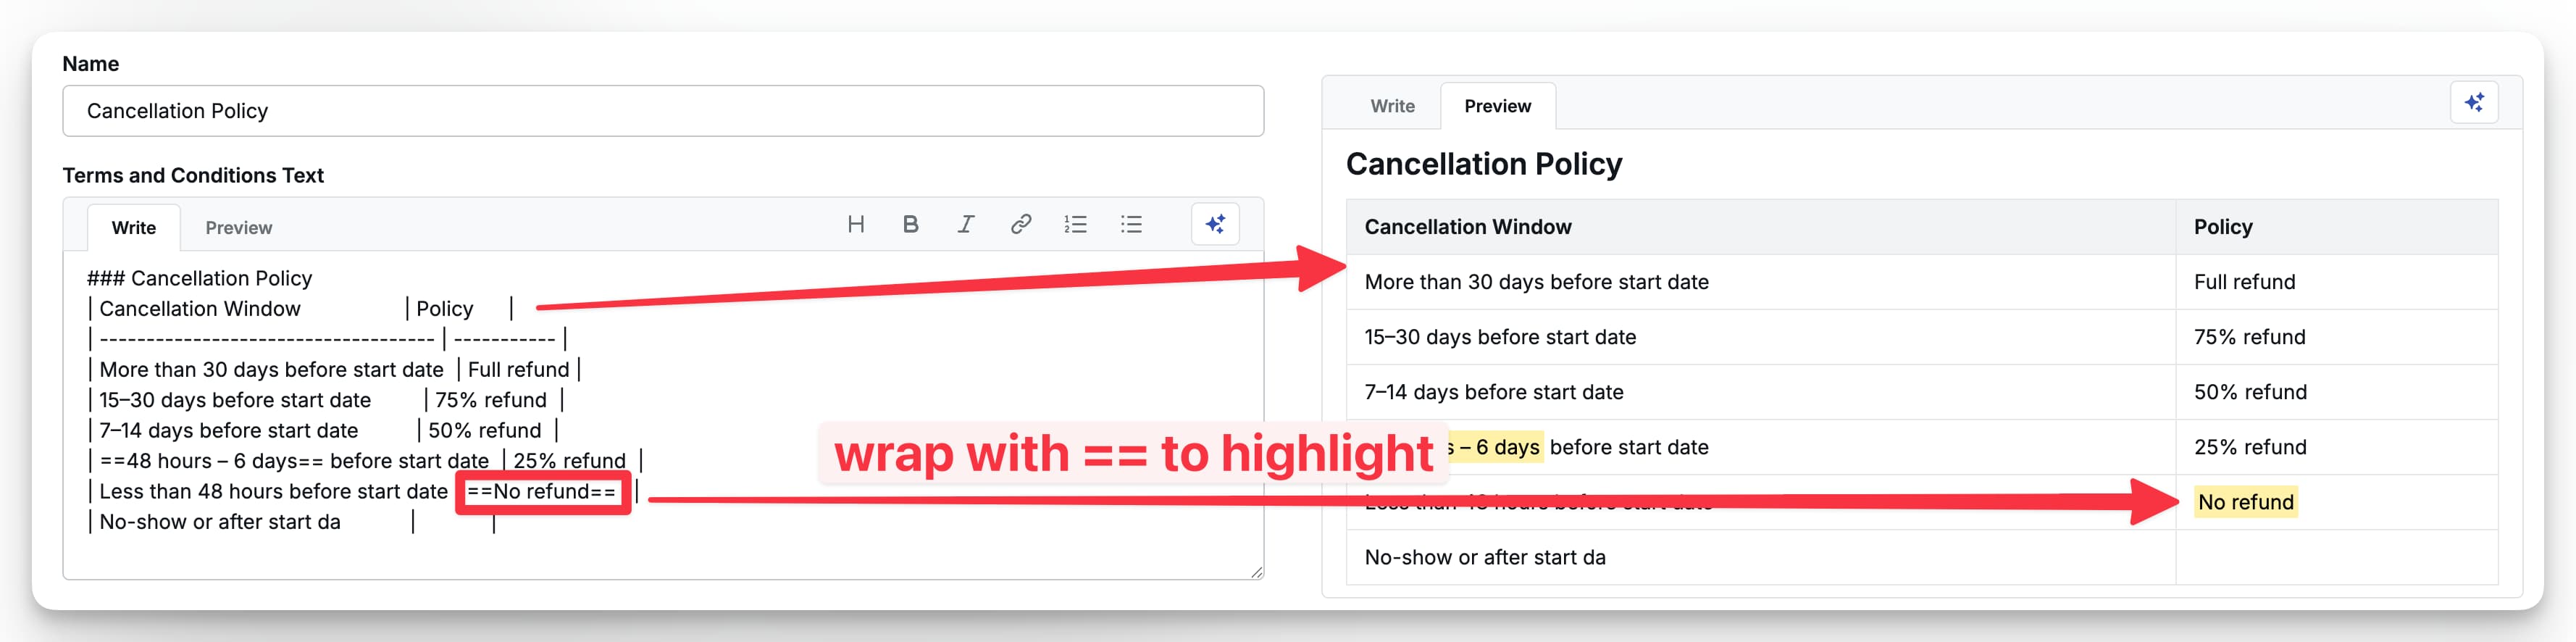
Markdown Editor — Text Highlighting: You can now highlight text inside the markdown editor to draw attention to key information in quotations and documents.
-
Markdown Editor — Table Support: Tables can now be created directly inside the markdown editor, allowing you to add structured data within quotation content.
Bank Account Dropdown in Trip Voucher Pricing
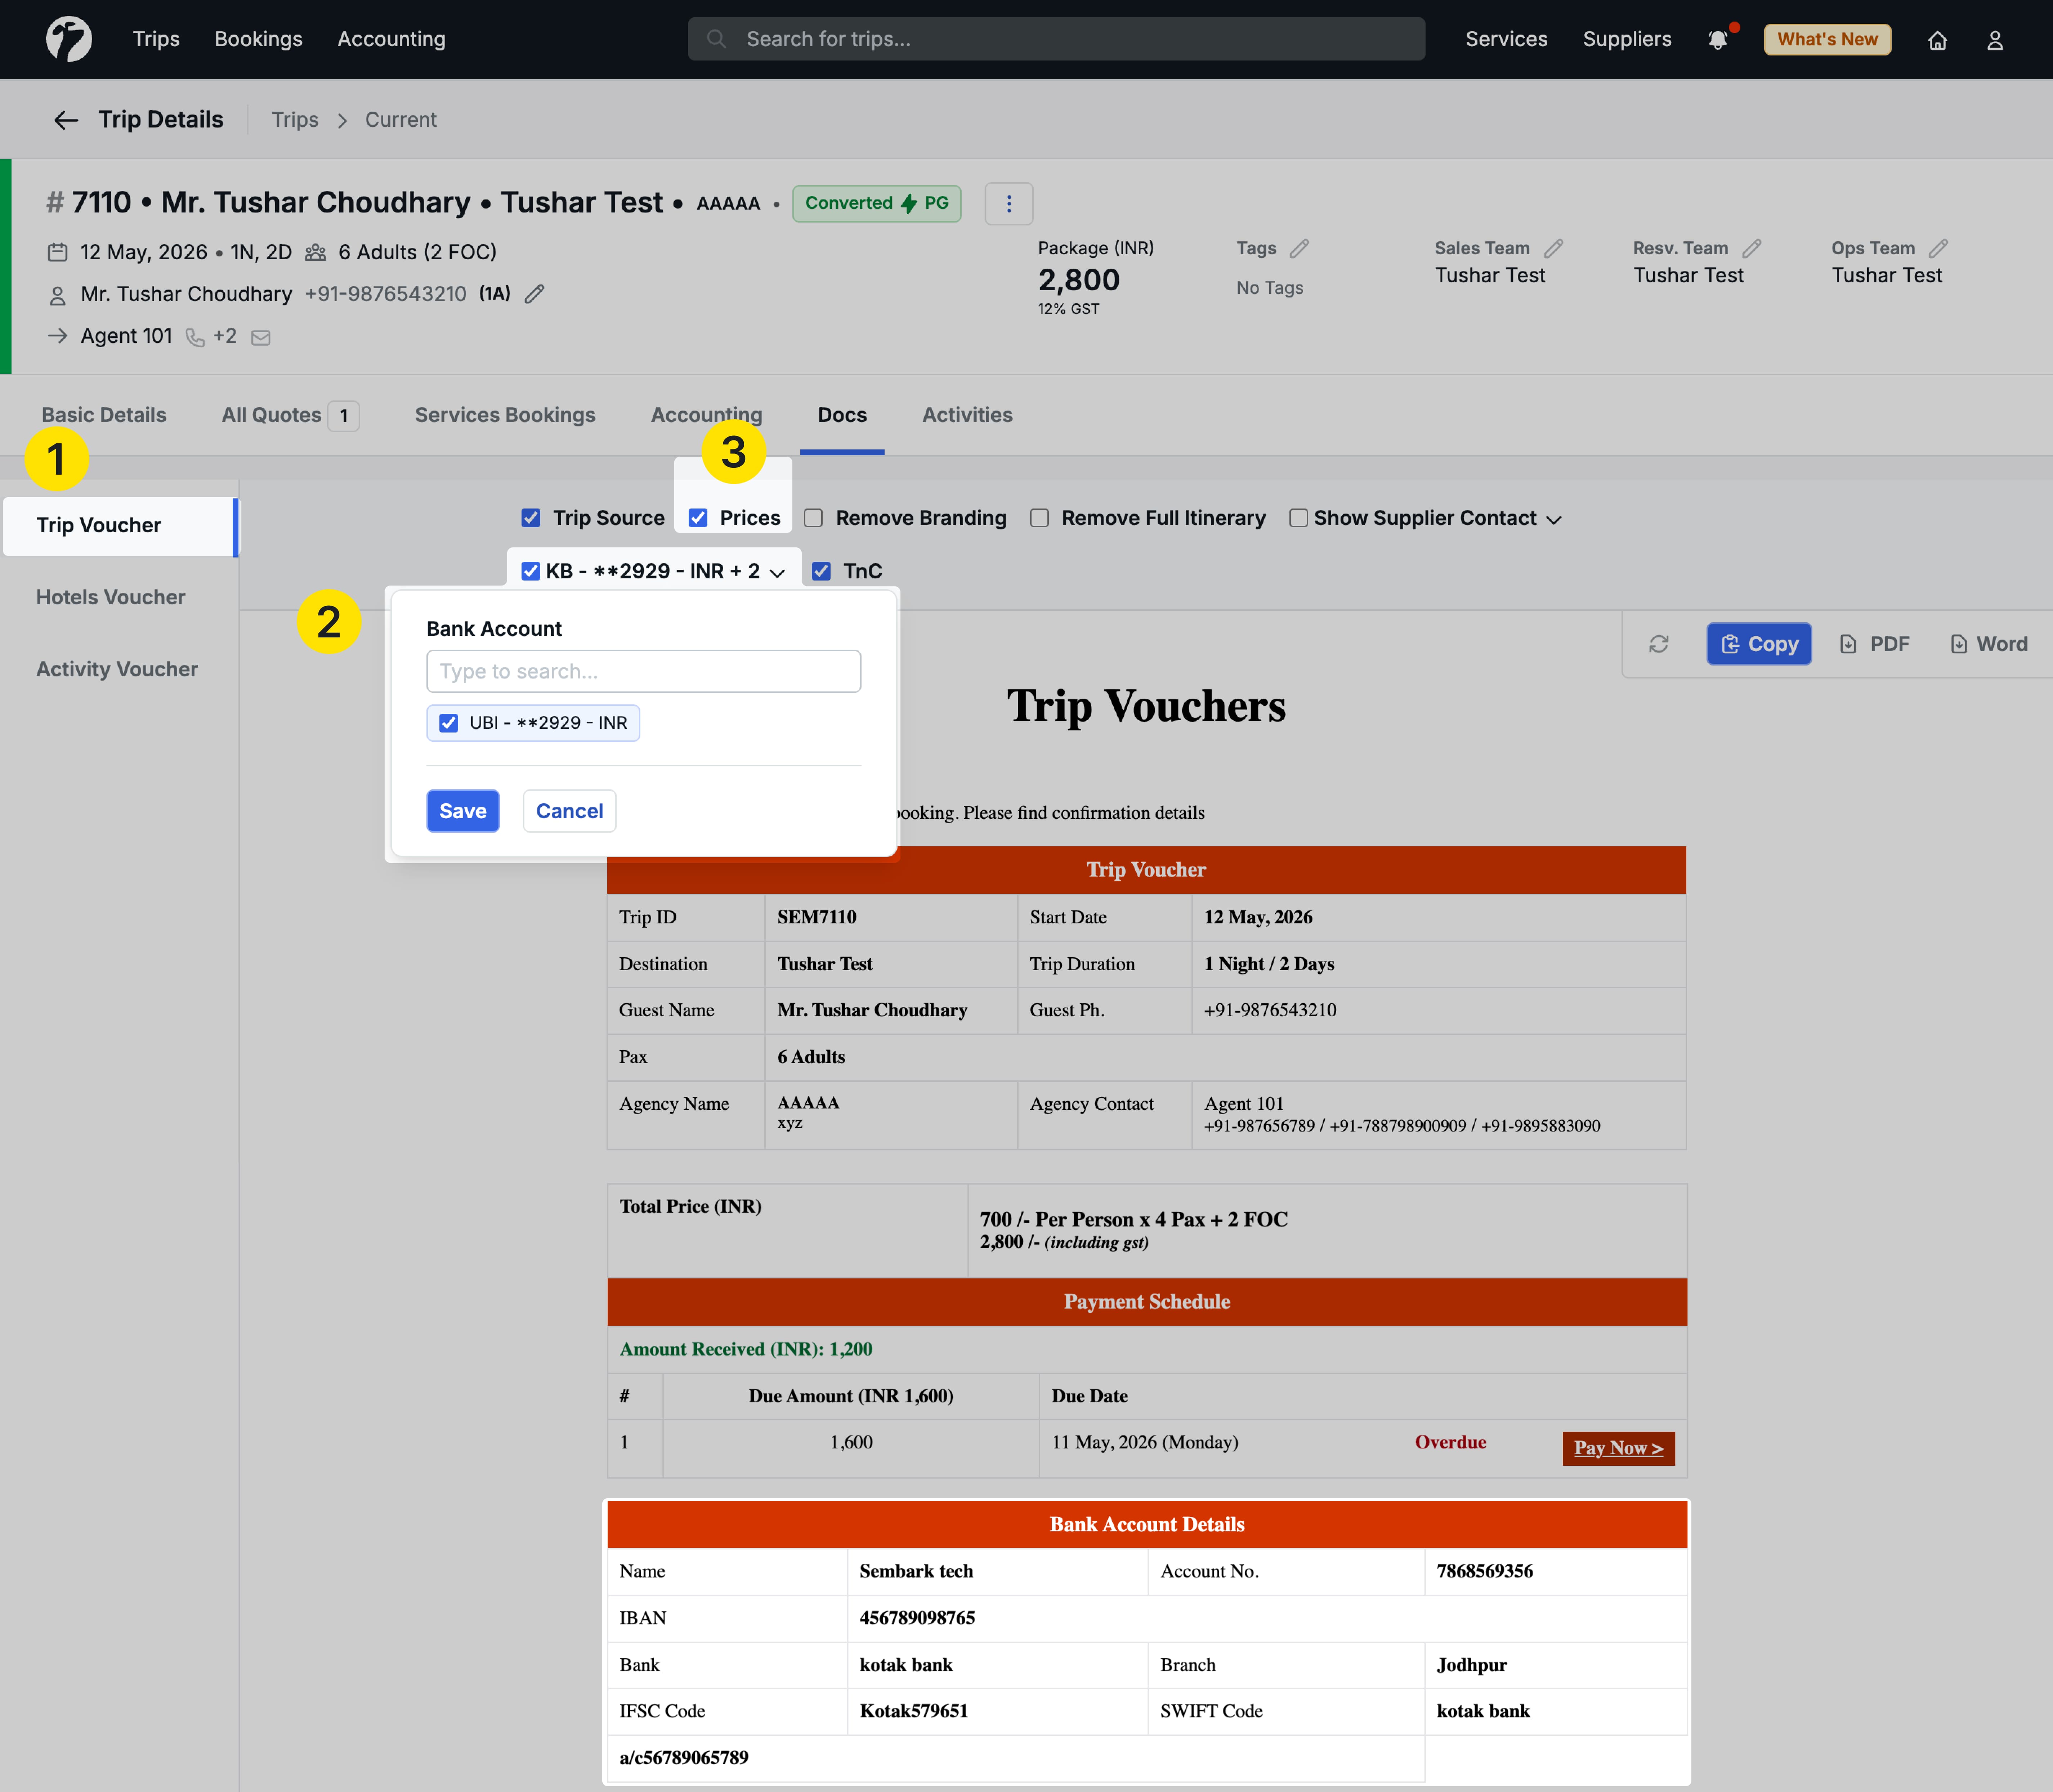
Bank Account Dropdown in Trip Voucher Pricing: A dropdown has been added to the Trip Voucher Pricing section that lists all bank accounts linked to the selected destination. You can choose which bank account details to display on the customer-facing voucher. This works for both Hold/Unhold conditions and normal converted quotations.
Other Improvements
- Hotel Inquiry Mail — Hotel Notes Included: Hotel notes added to a booking are now included in the hotel inquiry email, provided the notes are set to display in quotation, voucher, or both. Notes marked as “Internal Use Only” are not included.
- Inclusion / Exclusion Heading Customisation: The section titles for Inclusion and Exclusion can now be renamed. Navigate to Profile → Organisation → Templates → Quote Period → Edit → Settings for the Inclusion / Exclusion section to customise.
- New Columns in Trip Operation Service Report: The Trip Operation Service Report now includes Paid Amount, Due Amount, Refund Payment Amount, Paid Refund Payment Amount, and Due Booking Amount columns for better payment and refund visibility.
- Hotel Night Count Display Fix: Fixed an issue where multiple hotel services on the same day caused night counts to display incorrectly (e.g., “1, 2, 3, 4, 5 nights”). Each hotel service now correctly shows its own individual night count (e.g., “1 Night”, “1 Night”).