
Version 1.175 brings a significant overhaul to how your Quote PDFs look and feel. We have introduced advanced customisation options for your PDF templates — covering font control, section layout variations, and section visibility — alongside a brand-new Branded and Non-Branded PDF capability that will help DMCs working with B2B agents.
Let’s dive into more details.
1. Advanced Quote PDF Template Settings
We have significantly expanded the customisation capabilities of the Quote PDF Template, giving you granular control over fonts, section layouts, and section visibility — so you can create more polished, attractive, and brand-aligned quotation PDFs for your customers.
Accessing the Quote PDF Template
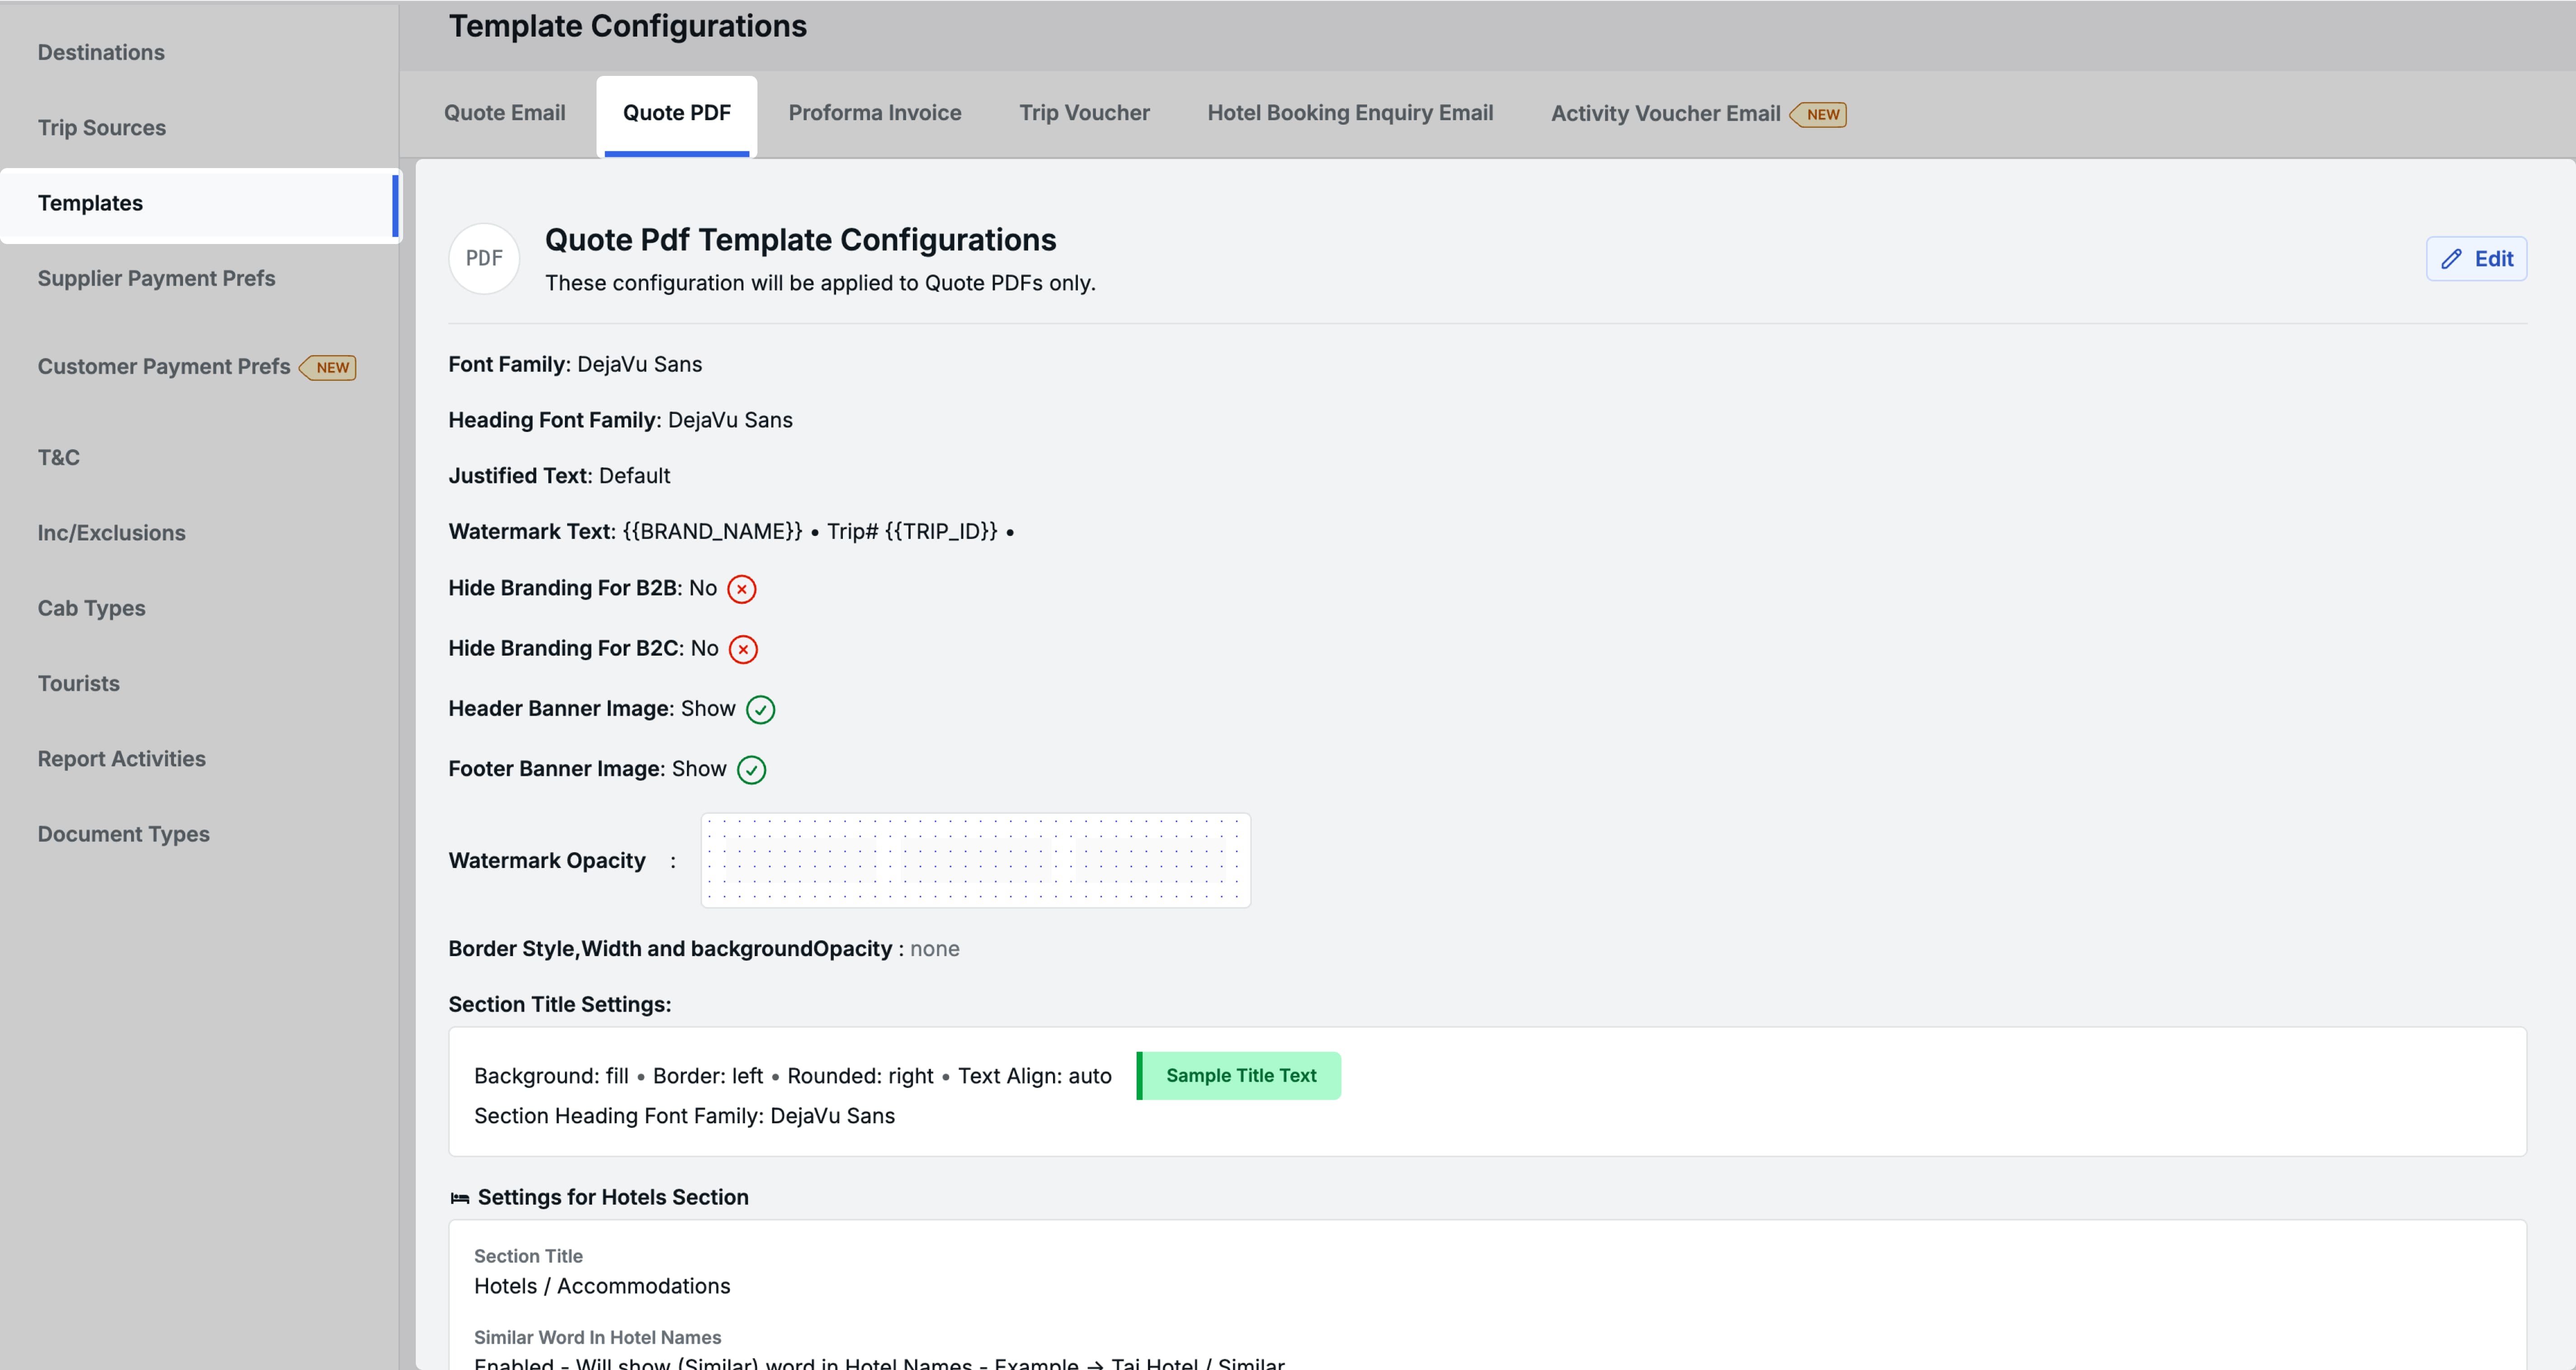
All settings described in this section are available within the Quote PDF Template. Navigate to Profile → Organization → Repository → Templates → Quote PDF Template to get started.
Why this feature matters
Previously, the PDF template offered very limited design flexibility. Font choices were restricted to a single family applied uniformly across the entire document, section layouts were fixed with no variation options, and there was no way to hide sections you did not need. The result was a one-size-fits-all PDF that made it difficult to differentiate your brand or tailor the output for different trips.
With this update, you have full control over how your Quote PDFs are designed — from typography to layout to content visibility.
Font Family Enhancements
We have added multiple new font families and introduced a three-level font selection system so different parts of your PDF can carry their own distinct typographic identity.
New Font Families
Eight new font families are now available for selection across all font settings:
- Playfair Display — Elegant serif, ideal for premium and luxury travel brands
- Work Sans — Clean, modern geometric sans-serif
- Syne — Contemporary display typeface with a distinctive character
- Nunito — Friendly, rounded sans-serif suitable for approachable brands
- Cormorant Garamond — Classic high-contrast serif for a sophisticated feel
- Jost — Geometric sans-serif with a clean, modern look
- Outfit — Simple, versatile sans-serif for everyday use
- Lora — Contemporary serif with calligraphic roots, ideal for editorial-style PDFs
Three-Level Font Control
Font selection is now split into three distinct roles, each controlling a different layer of your PDF’s typography:
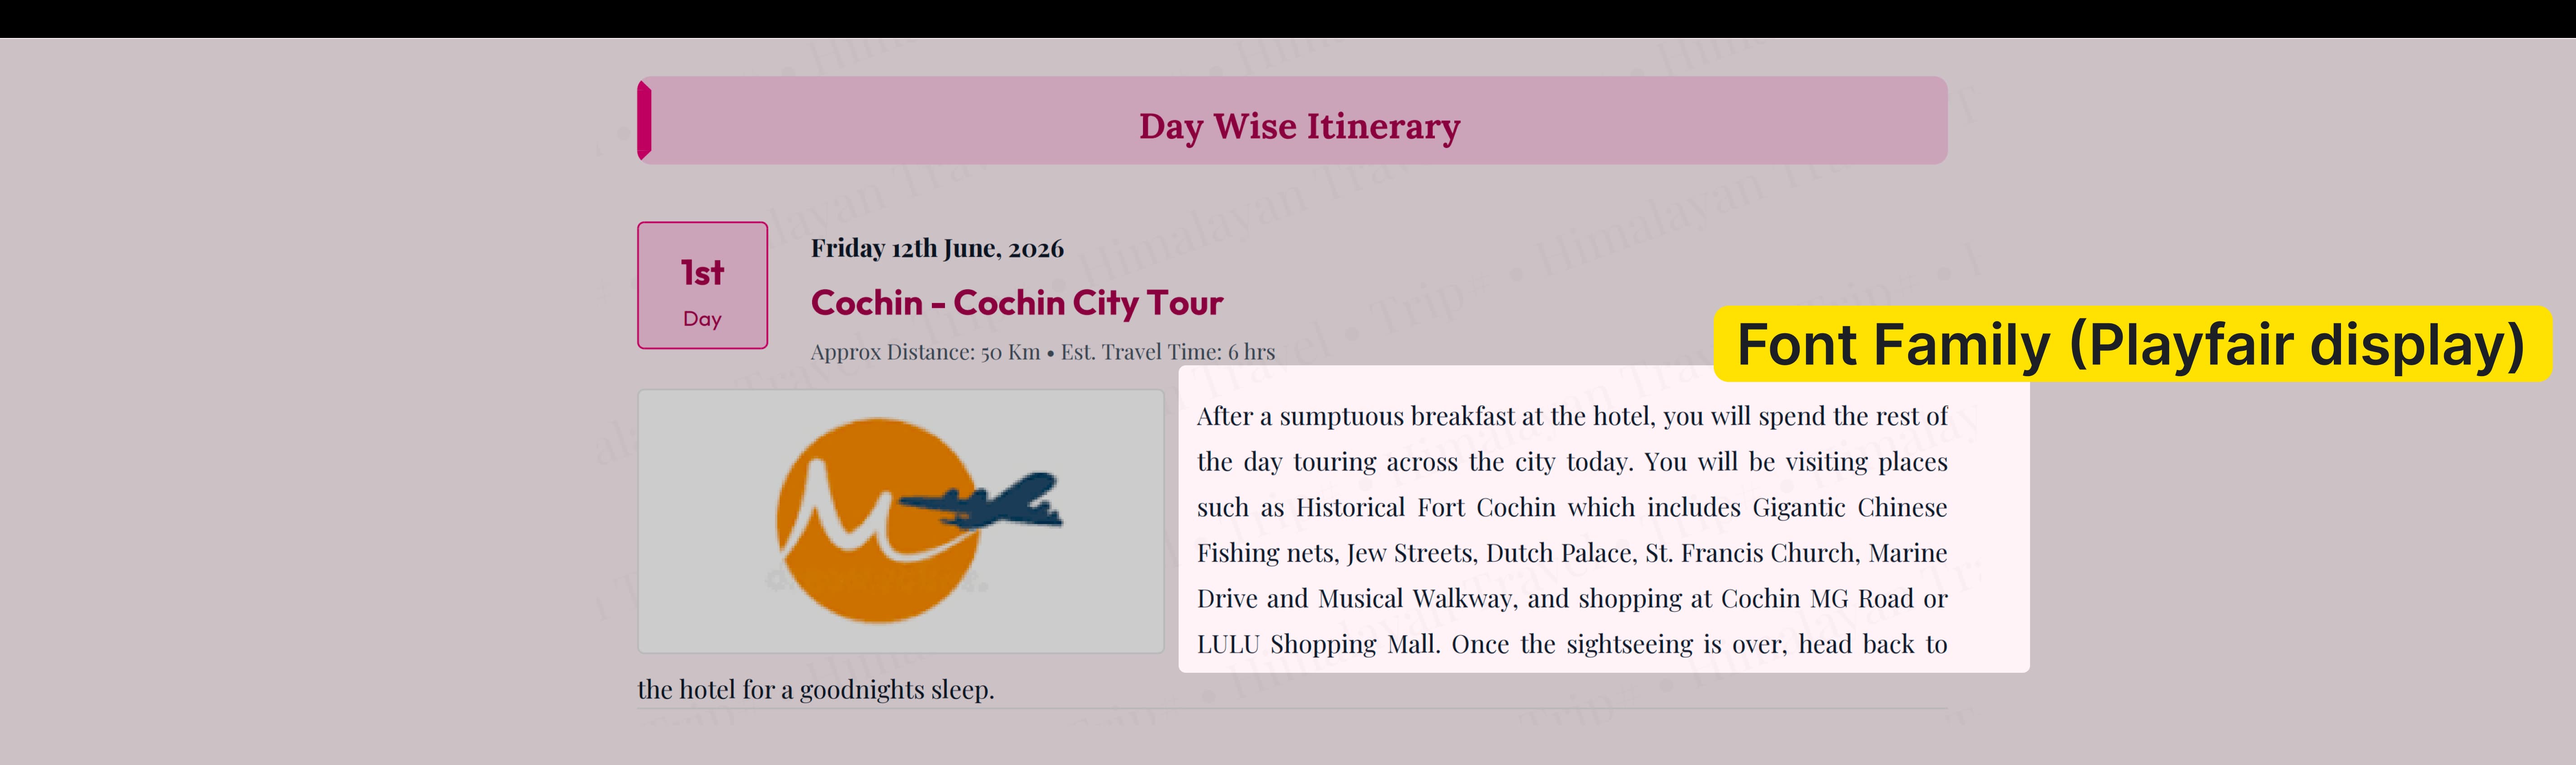
1. Font Family (Body Text)
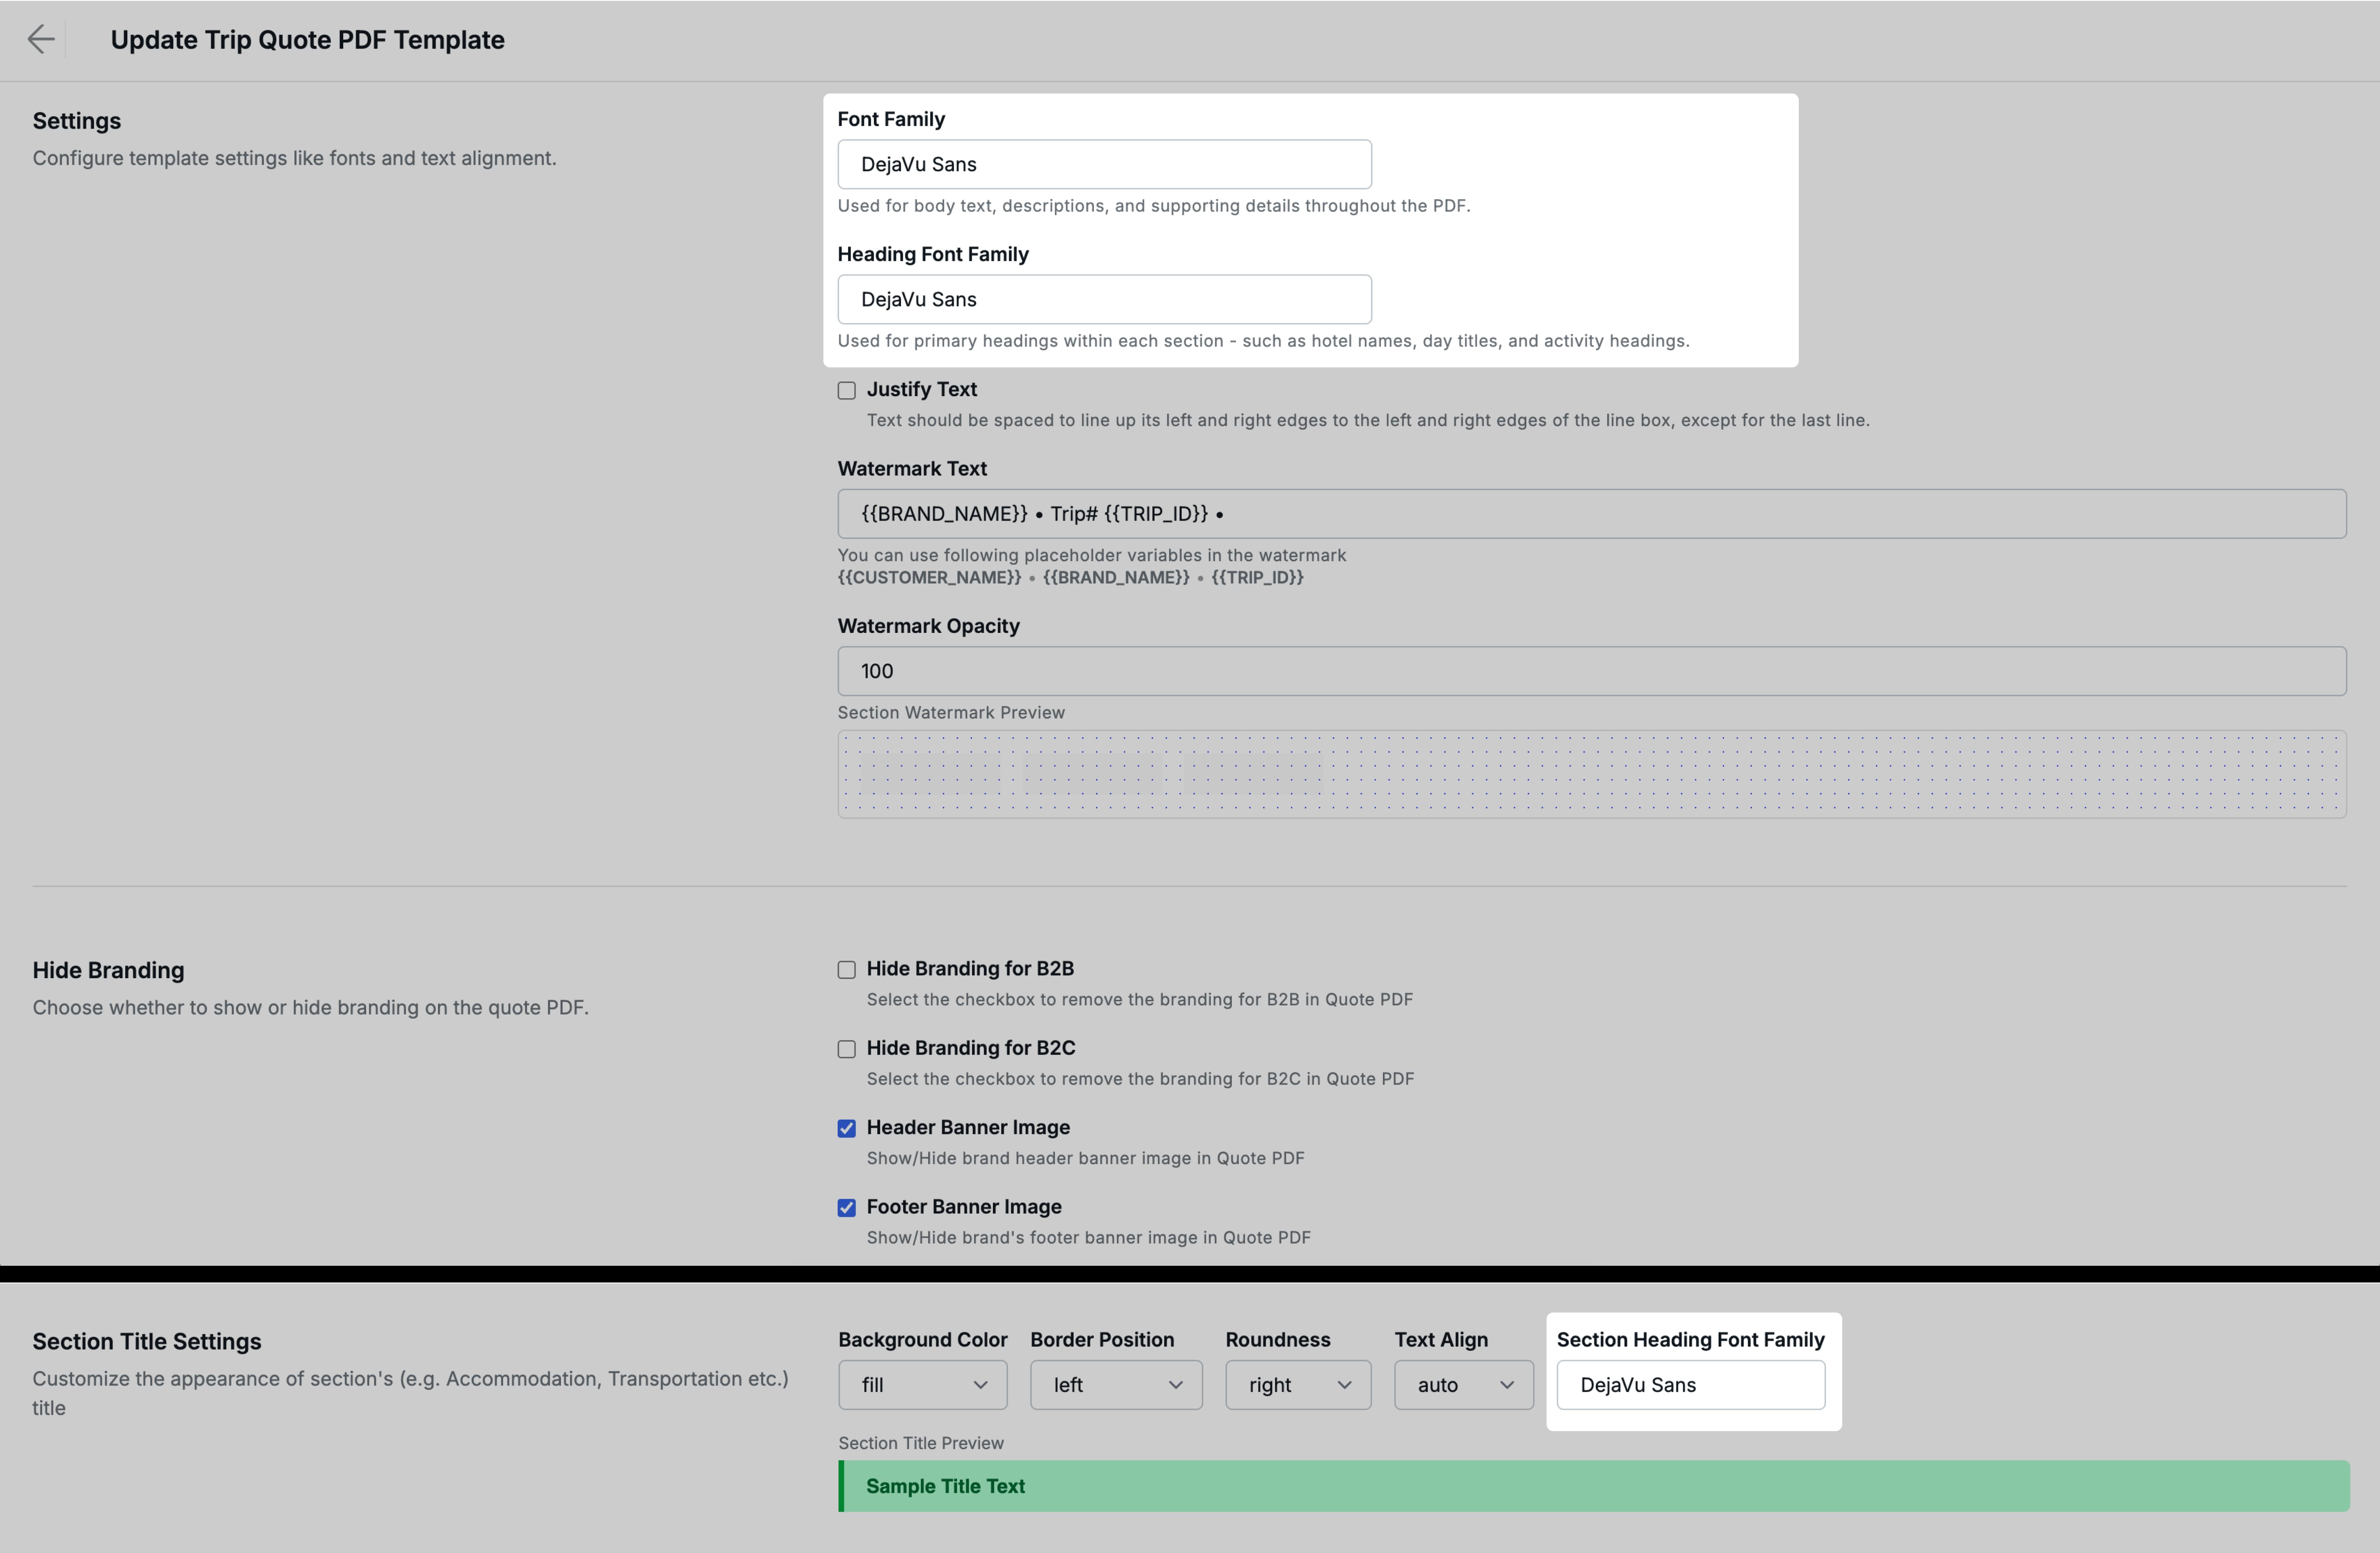
This is the existing font selection, now clearly labelled as controlling the body-level text throughout the PDF — descriptions, narrative paragraphs, and supporting content within each section. You can find this under Settings → Font Family in the template.
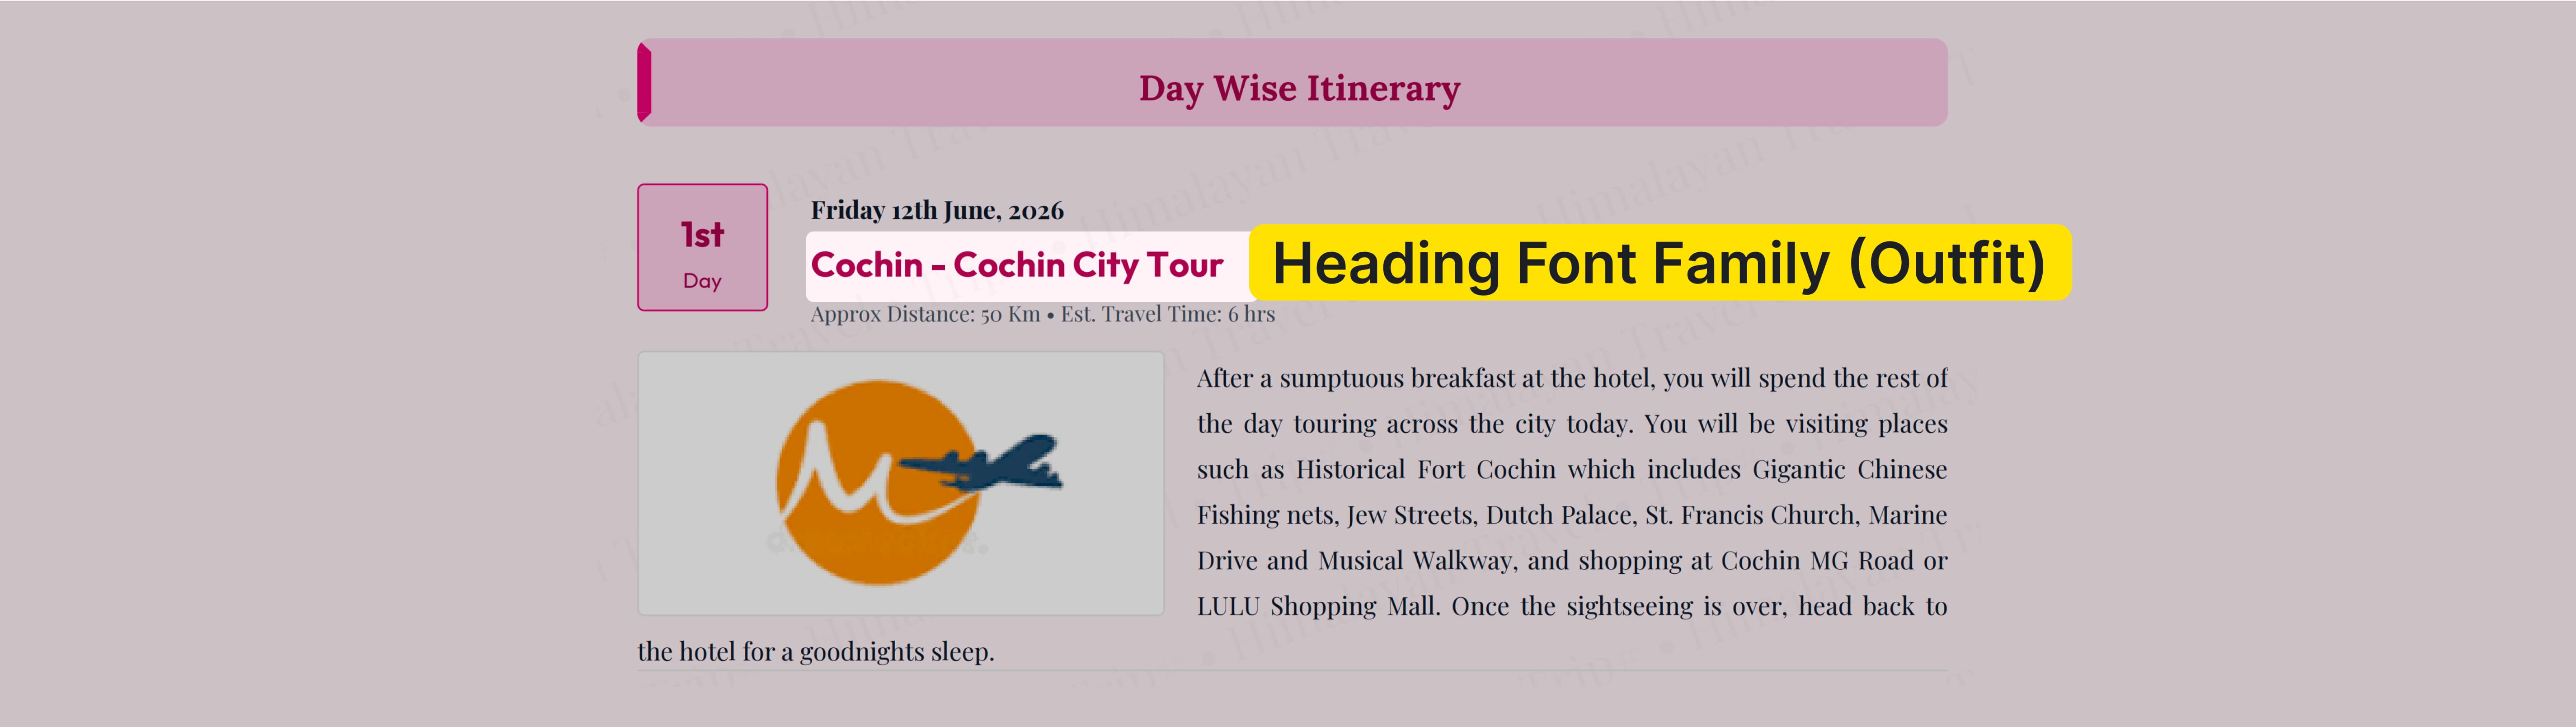
2. Heading Font Family
A new dedicated selection for heading-level text within sections — such as hotel names in the Hotels section, transport and activity names in the Transfer and Activities section, table column headings, day titles in Day Wise Itinerary, and inclusion/exclusion heading labels. Find this under Settings → Heading Font Family in the template.
3. Section Heading Font Family
A separate font selection specifically for section-level headings — the prominent banner-style title that appears at the top of each section block (e.g., “Hotels / Accommodations”, “Day Wise Itinerary”, “Transportation and Activities”).
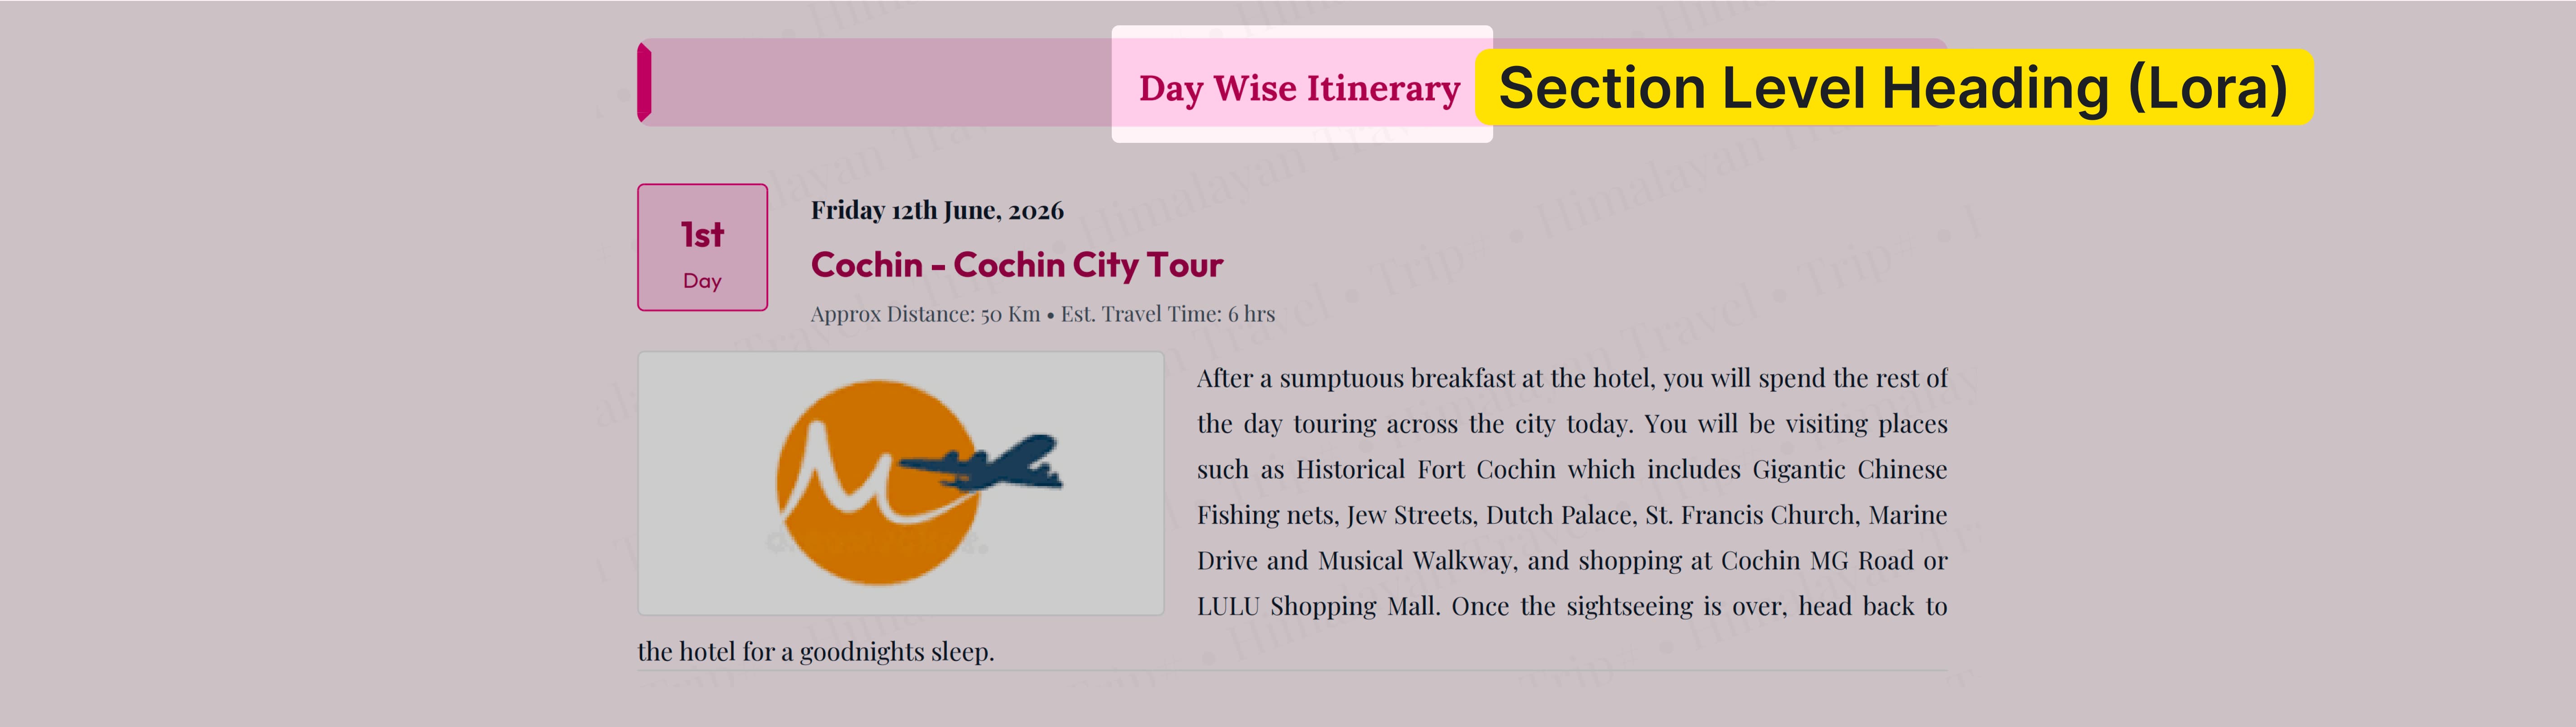
Find this under Settings for Section Title → Section Heading Font Family in the template.
Note: Each of these three selections is independent. You can mix font families across levels to create a typographic hierarchy that matches your brand identity — for example, using a serif heading font paired with a clean sans-serif body font.
Section Layout Variations
We have added style variation options for three core PDF sections — Package Overview, Hotels / Accommodations, and Day Wise Itinerary — so you can customise how information is visually presented in each. A live preview is shown on the right side of the template settings page whenever you change a style selection.
Package Overview Section
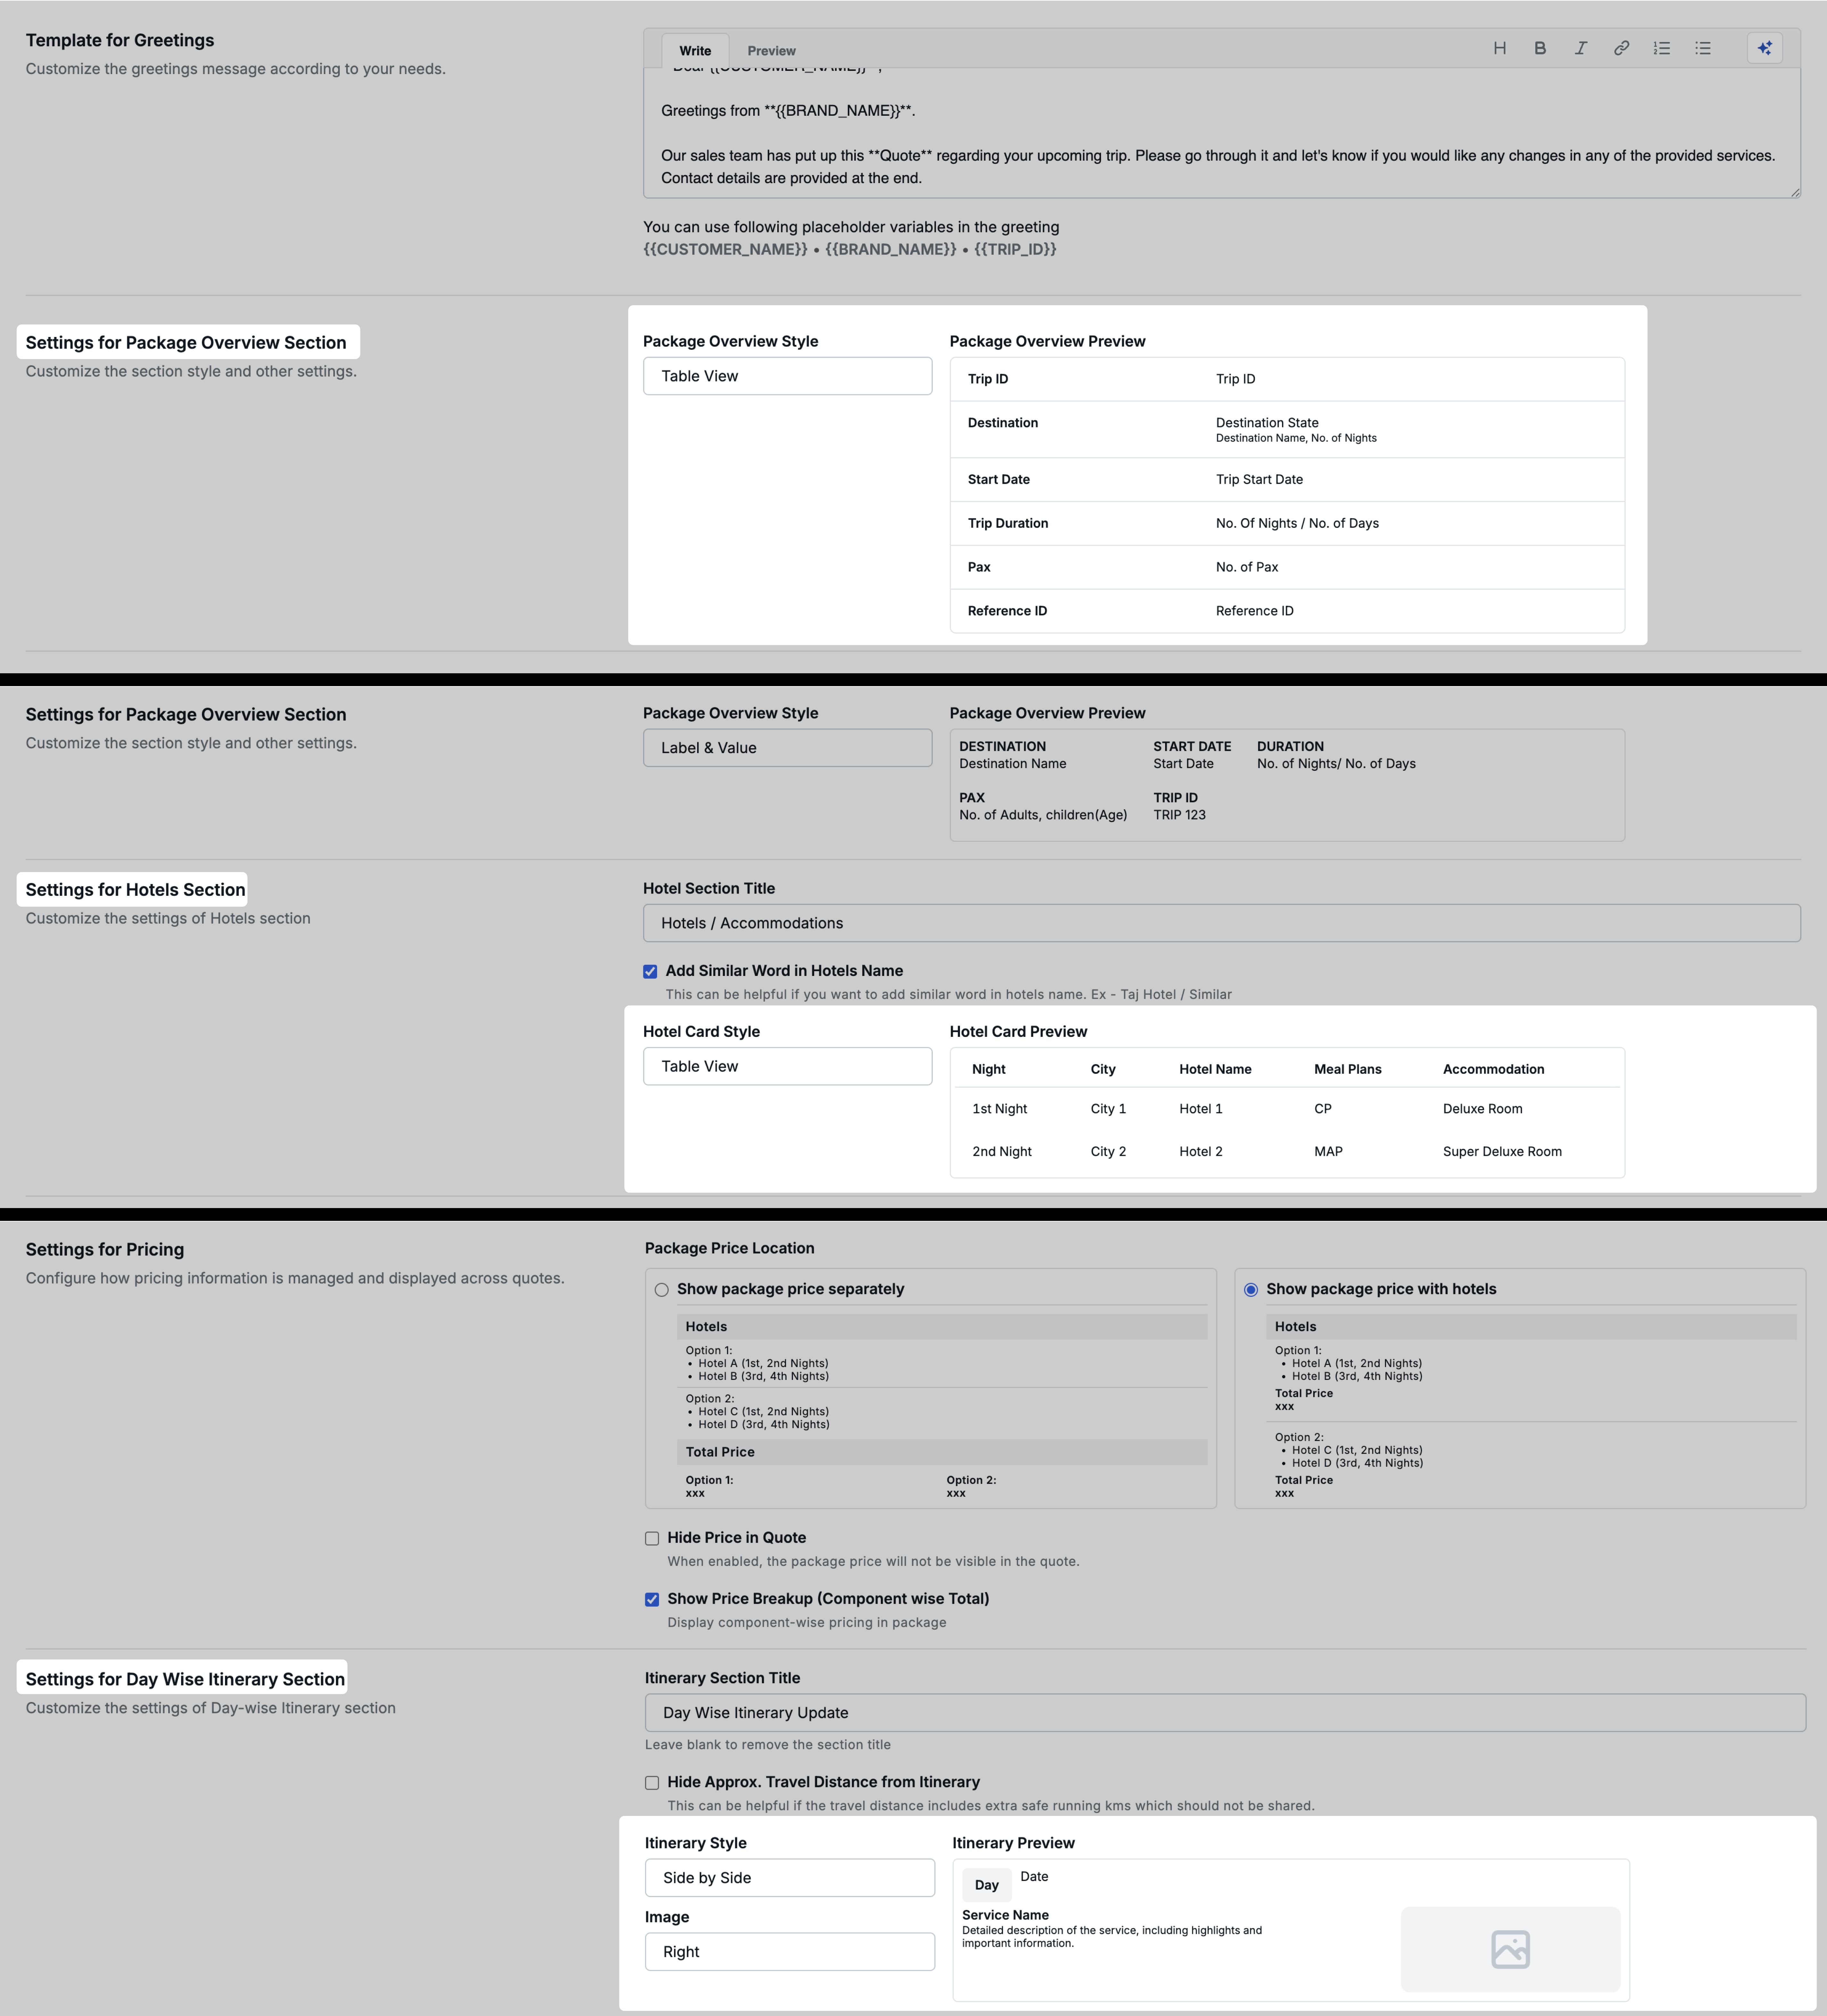
In Settings for Package Overview Section, a new Package Overview Style selection now controls how the overview information is displayed:
Label & Value (existing style, now selectable)
- Displays each overview field as a label-value pair — a tile with a heading and its corresponding value below it
- Familiar layout, suitable for a clean and structured look
Table View (new)
- Displays the same overview information in a compact tabular format
- Ideal for PDFs where you want a more condensed, data-oriented overview at the top
A Package Overview Preview panel on the right side updates in real time as you switch between these options, so you can see exactly how the section will appear in the generated PDF before saving.

Hotels / Accommodations Section
In Settings for Hotels Section, a new Hotel Card Style selection controls how each hotel’s information card is rendered within the PDF:

Day Wise Itinerary Section
In Settings for Day Wise Itinerary Section, a new Itinerary Style selection controls the layout of service-level content (activities, transfers, highlights) within each day:
Stacked (previous behaviour, now explicitly selectable)
-
Presents service name, description, and image stacked vertically
-
Under Stacked, an Image sub-selection controls image width:
Aligned to Service— Image is sized and aligned to match the width of the service name and description blockFull Width— Image expands to the full width of the PDF, giving a more immersive, editorial look
Side by Side (new)
-
Presents service description and image side by side — service name and details on the left, image on the right (or as configured)
-
An Image sub-selection controls image position across services:
Right— Image always on the right for all servicesLeft— Image always on the left for all servicesAlternative— Image alternates between left and right for consecutive services (e.g., 1st service: right, 2nd service: left, 3rd service: right, and so on), creating a dynamic editorial look
An Itinerary Preview panel updates in real time based on your style and image selections.
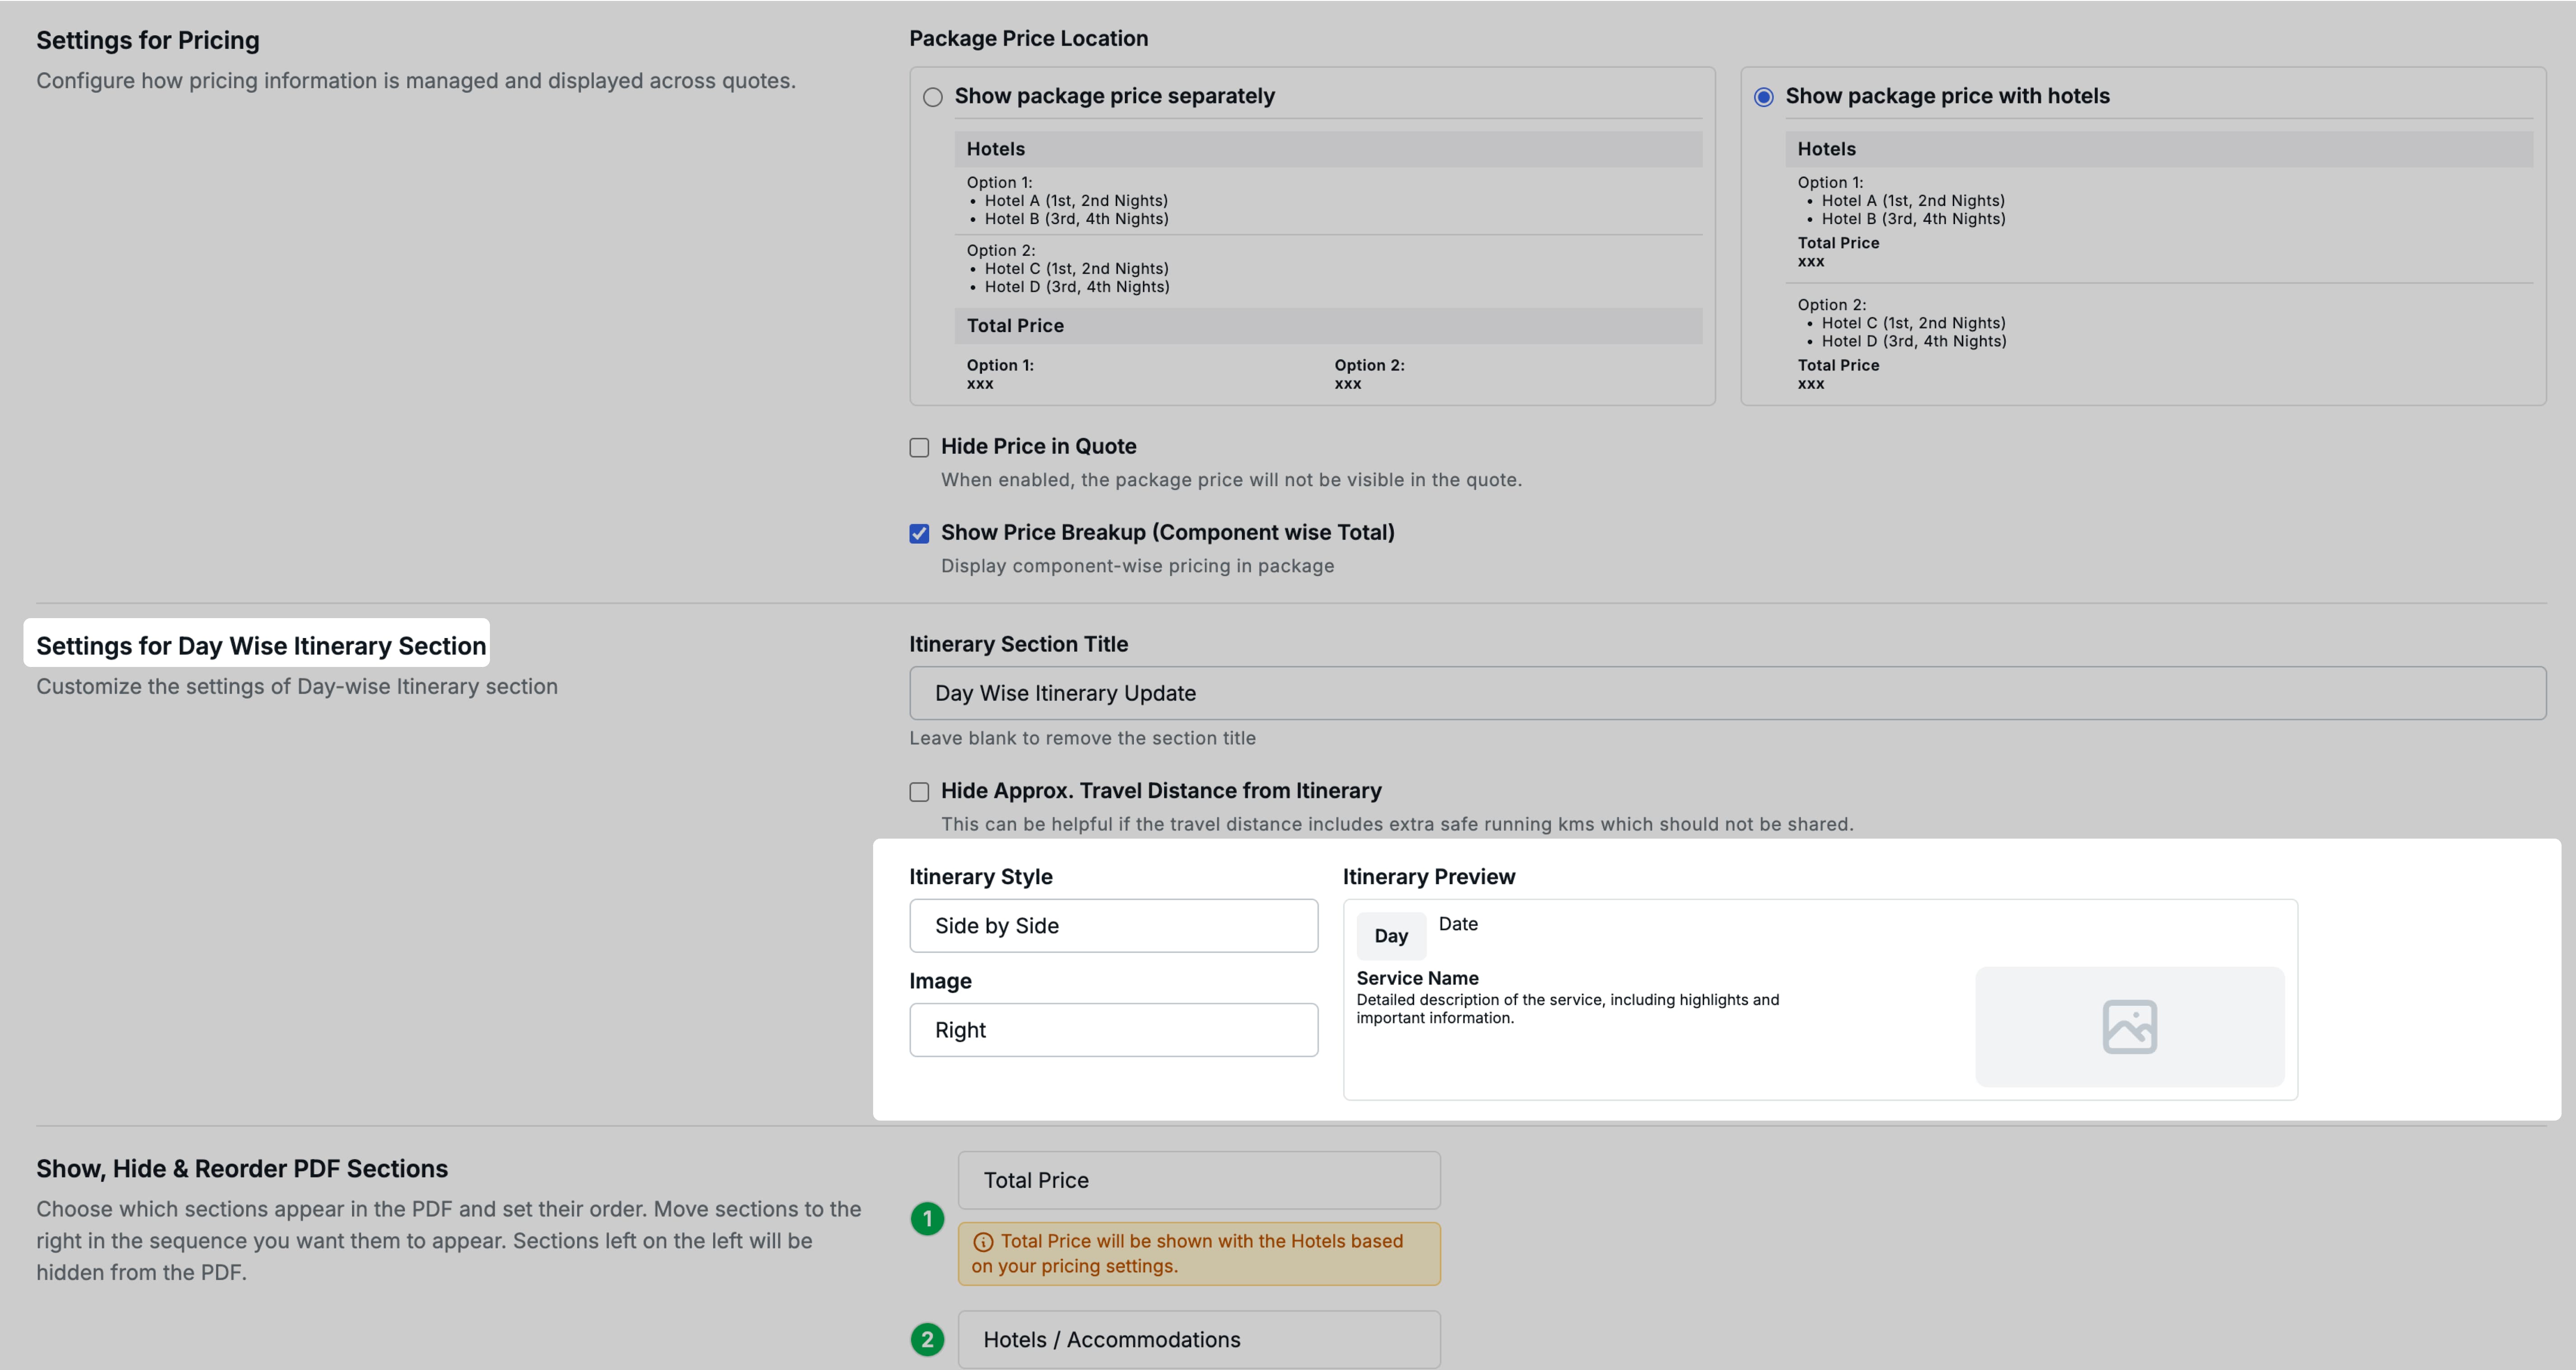
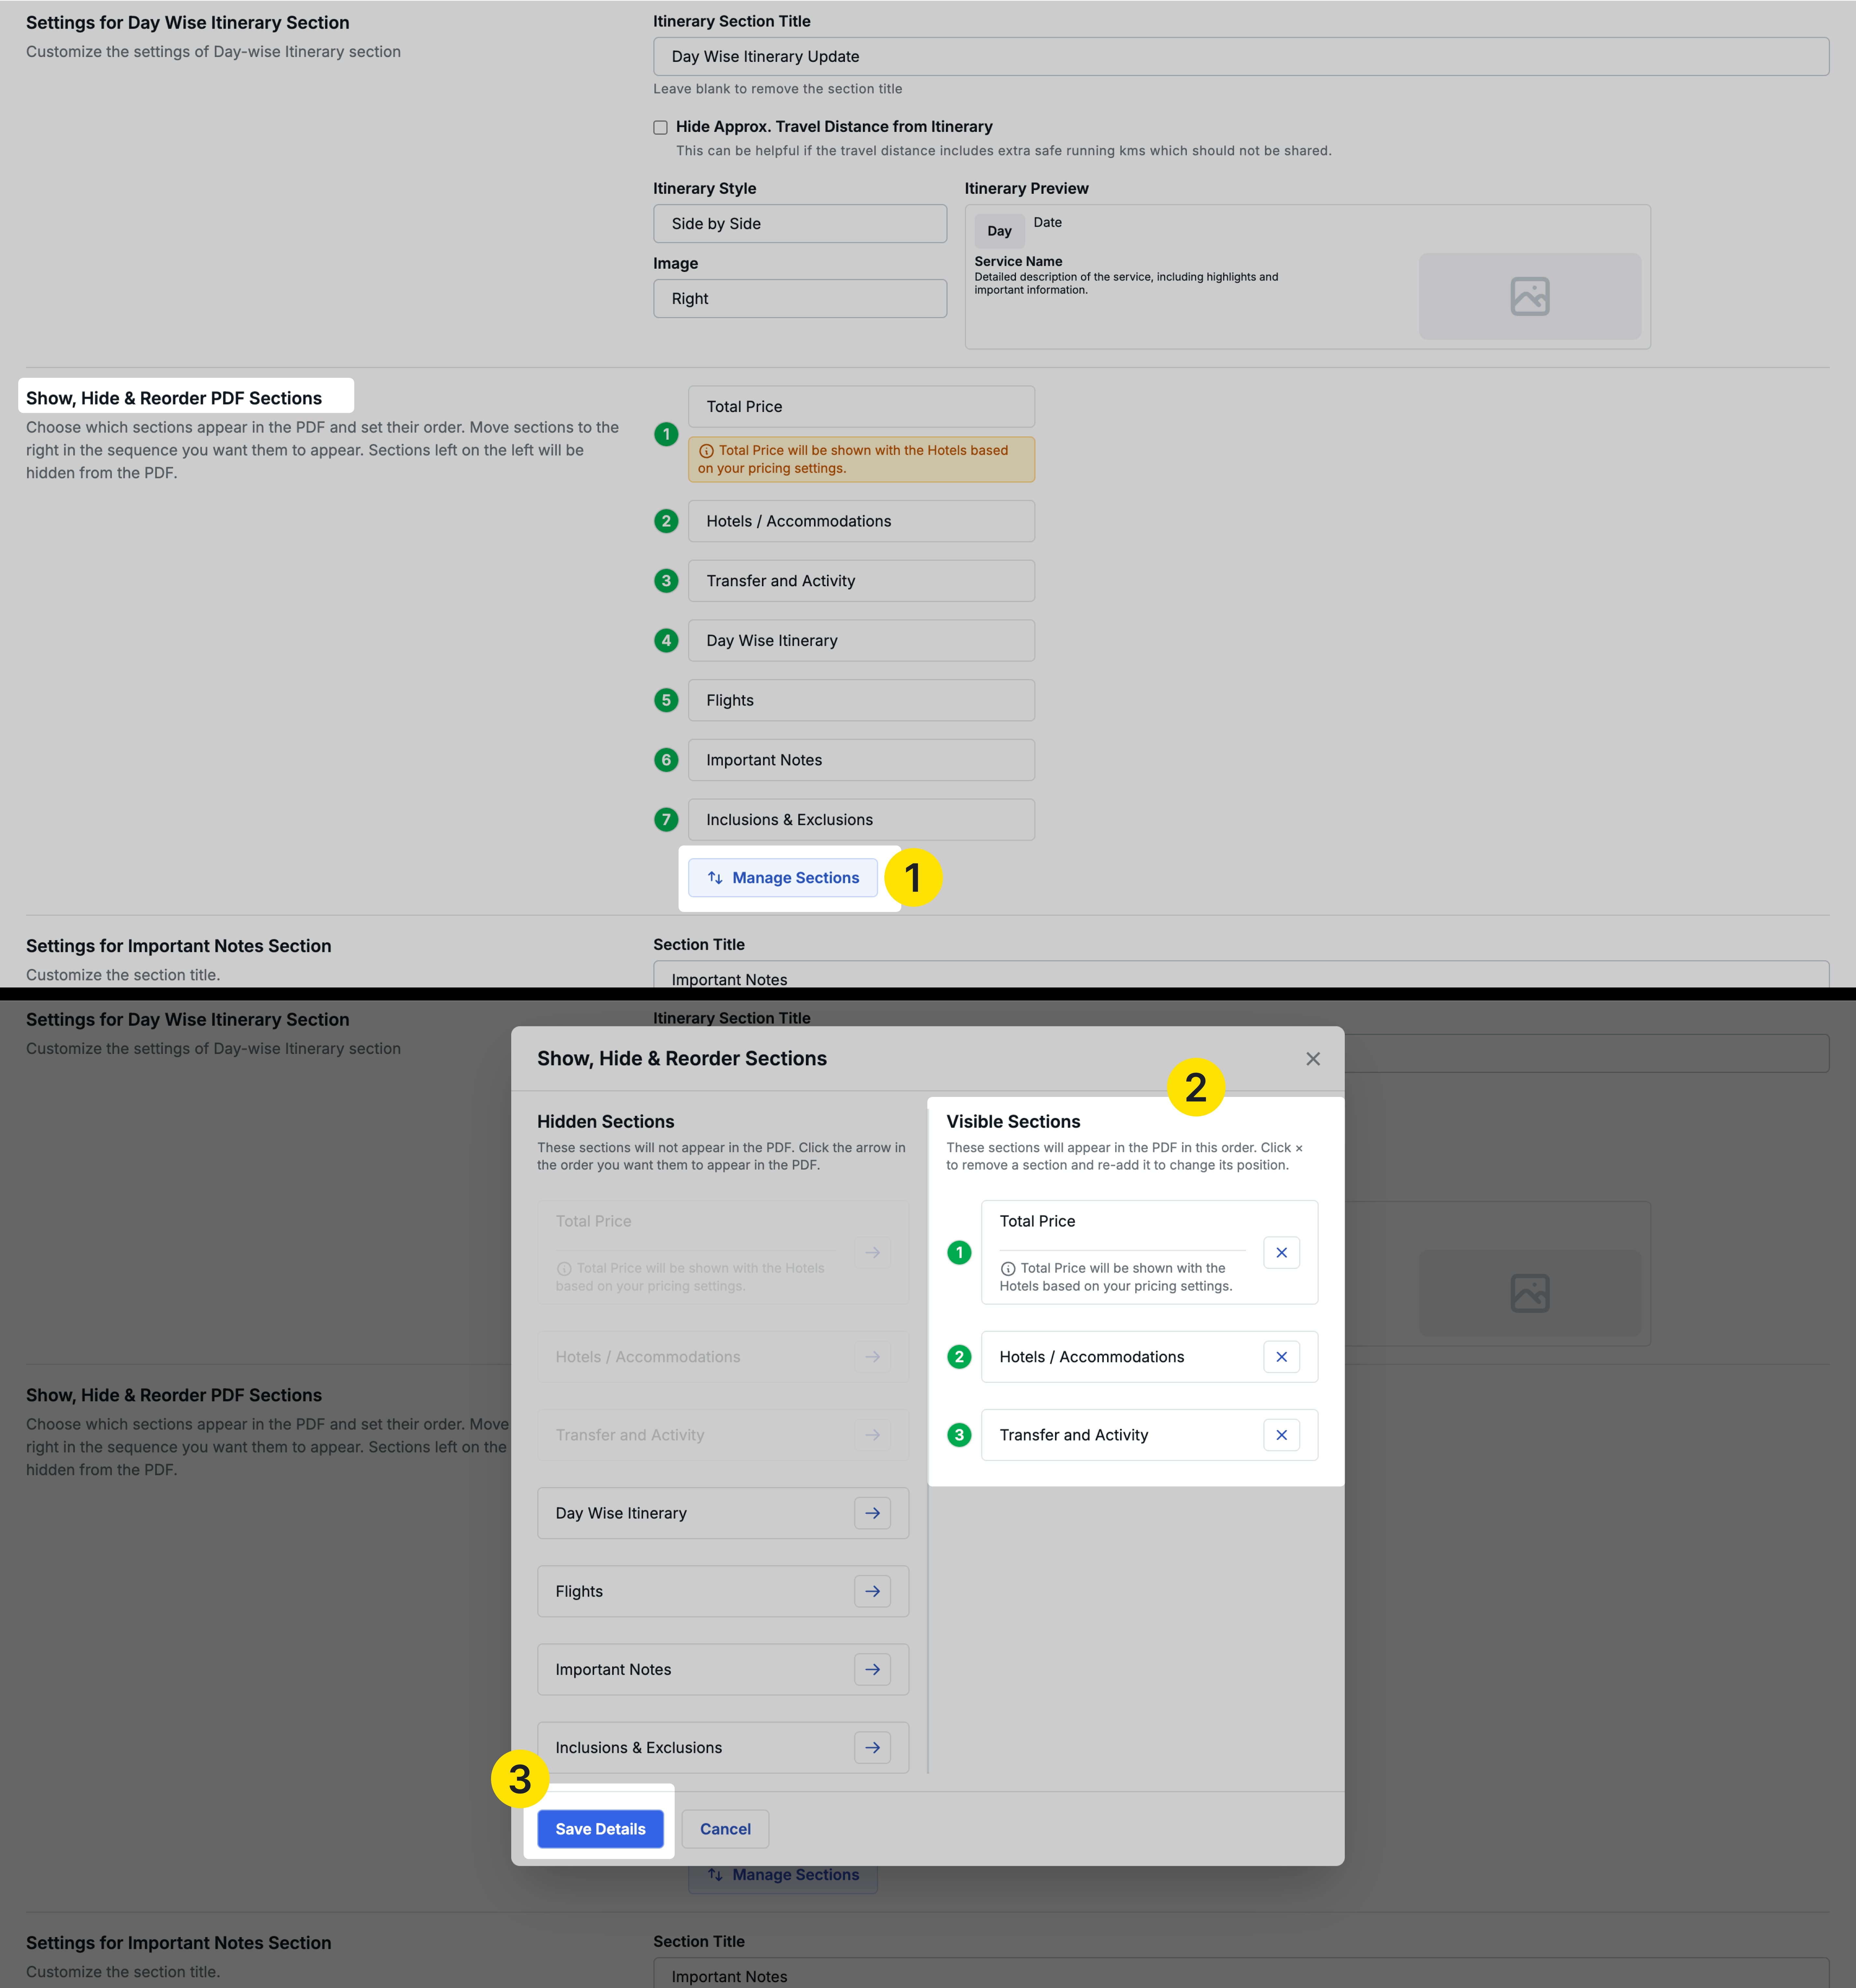
Show, Hide, and Reorder PDF Sections
We have enhanced the existing section reorder functionality to now also allow you to hide specific sections from the generated Quote PDF — giving you full control over which sections appear and in what order.
How it works
The Show, Hide & Reorder PDF Sections panel (previously labelled “Reorder PDF Sections”) now presents two columns:
- Hidden Sections (left side) — Sections listed here will not appear in the PDF
- Visible Sections (right side) — Sections listed here will appear in the PDF in the order shown
To include a section, move it from the left (hidden) to the right (visible) using the arrow control on each section. To hide a section, simply leave it on the left side. The order of sections on the right determines the order they appear in the generated PDF.
Available Sections
The following sections are available to show, hide, and reorder:
- Total Price
- Flights
- Hotels / Accommodations
- Transfer and Activity
- Day Wise Itinerary
- Important Notes
- Inclusions & Exclusions
Example: If you do not want to include the Total Price section in a particular PDF template, simply leave it on the left (hidden) side when configuring the template. All trips using this template will then generate PDFs without the Total Price section.
Note: This setting is applied at the template level — all trips using that particular Quote PDF template will follow the same section visibility configuration.
Benefits
- Full typographic control across body text, element headings, and section headings independently
- Eight new font families to match a wider range of brand identities
- Real-time previews for section layout changes reduce trial-and-error
- Flexible hotel card and itinerary layouts to create more visually engaging PDFs
- Ability to hide irrelevant sections creates cleaner, purpose-fit PDFs for different trip types
2. Branded and Non-Branded PDF Generation
We have introduced a Non-Branded PDF capability that allows DMCs to generate a clean, brand-free version of their Quote PDF directly from within a trip — making it easy to share quotations with B2C customers through B2B agents without exposing the DMC’s brand identity.
Why this feature matters
A common workflow in the travel industry involves DMCs creating quotations in Sembark, which B2B agents (tour operators) then forward to their direct customers (B2C travellers). However, the standard Quote PDF carries the DMC’s branding — including the header, footer, greetings, and salesperson details — which B2B agents cannot share directly with end customers.
Previously, there was no way to generate a stripped-down PDF from within the software. Agents had to manually edit PDFs or create separate documents. This feature solves that friction entirely by giving DMCs the ability to generate a non-branded version of any trip’s PDF on demand.
Setting Up Non-Branded PDF
Step 1: Enable the Setting in Your PDF Template
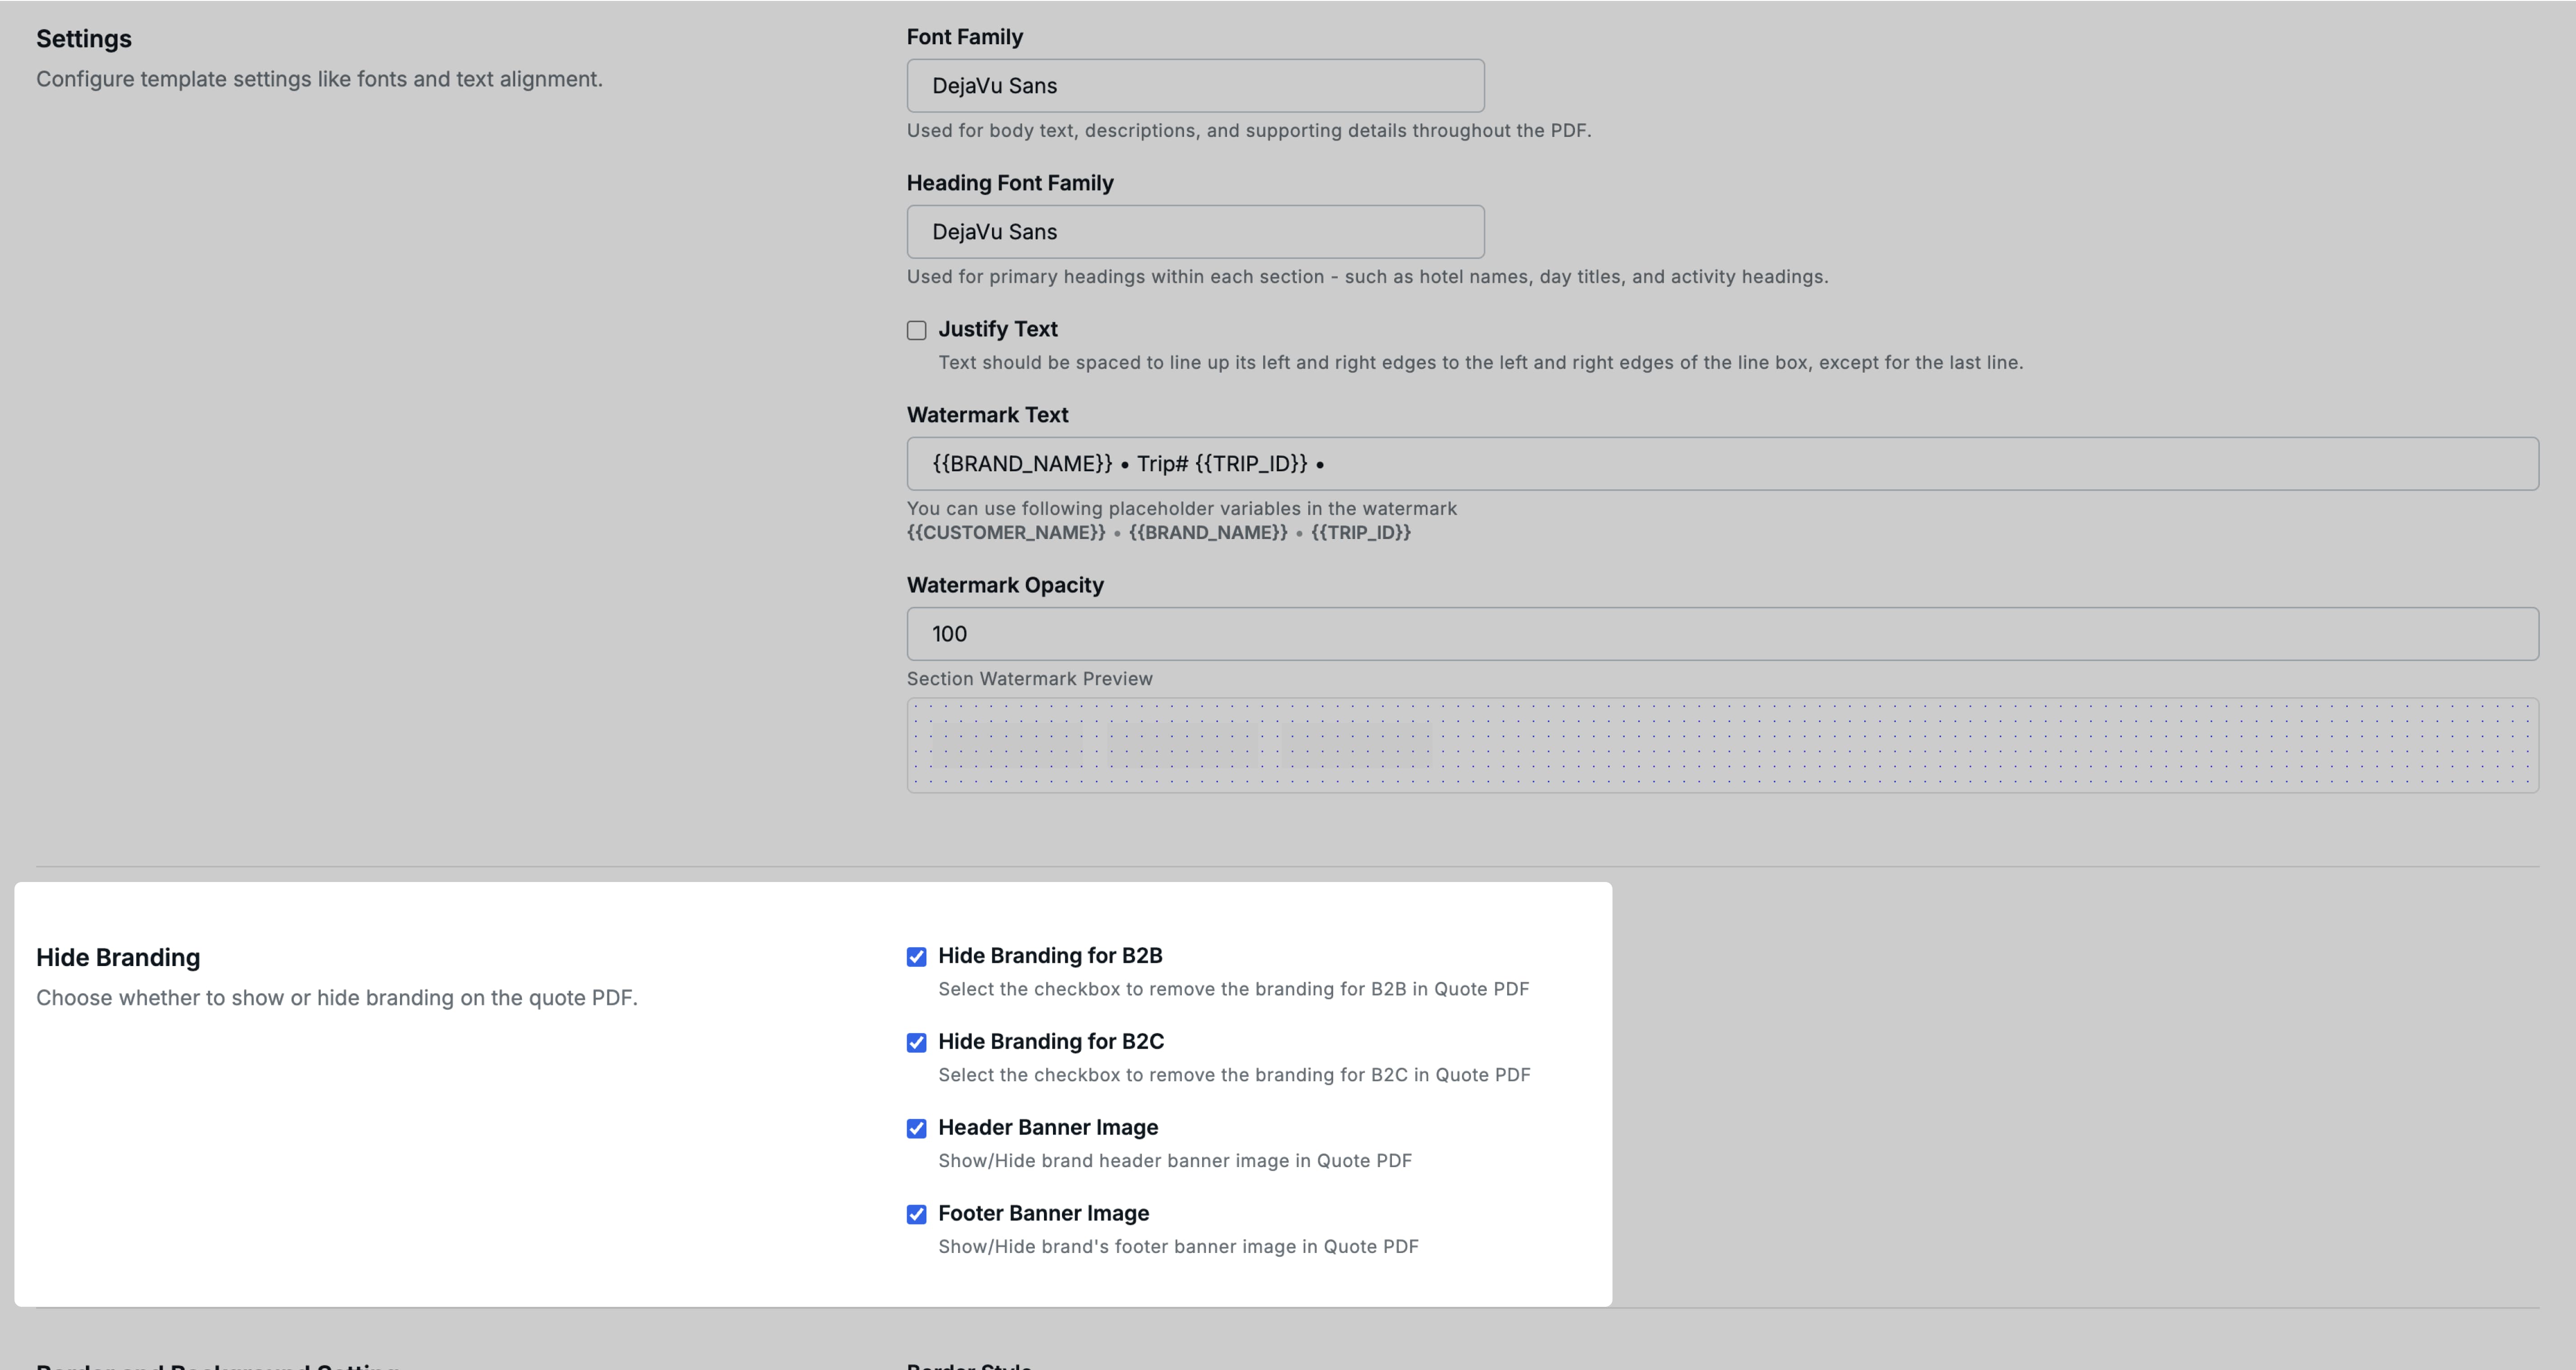
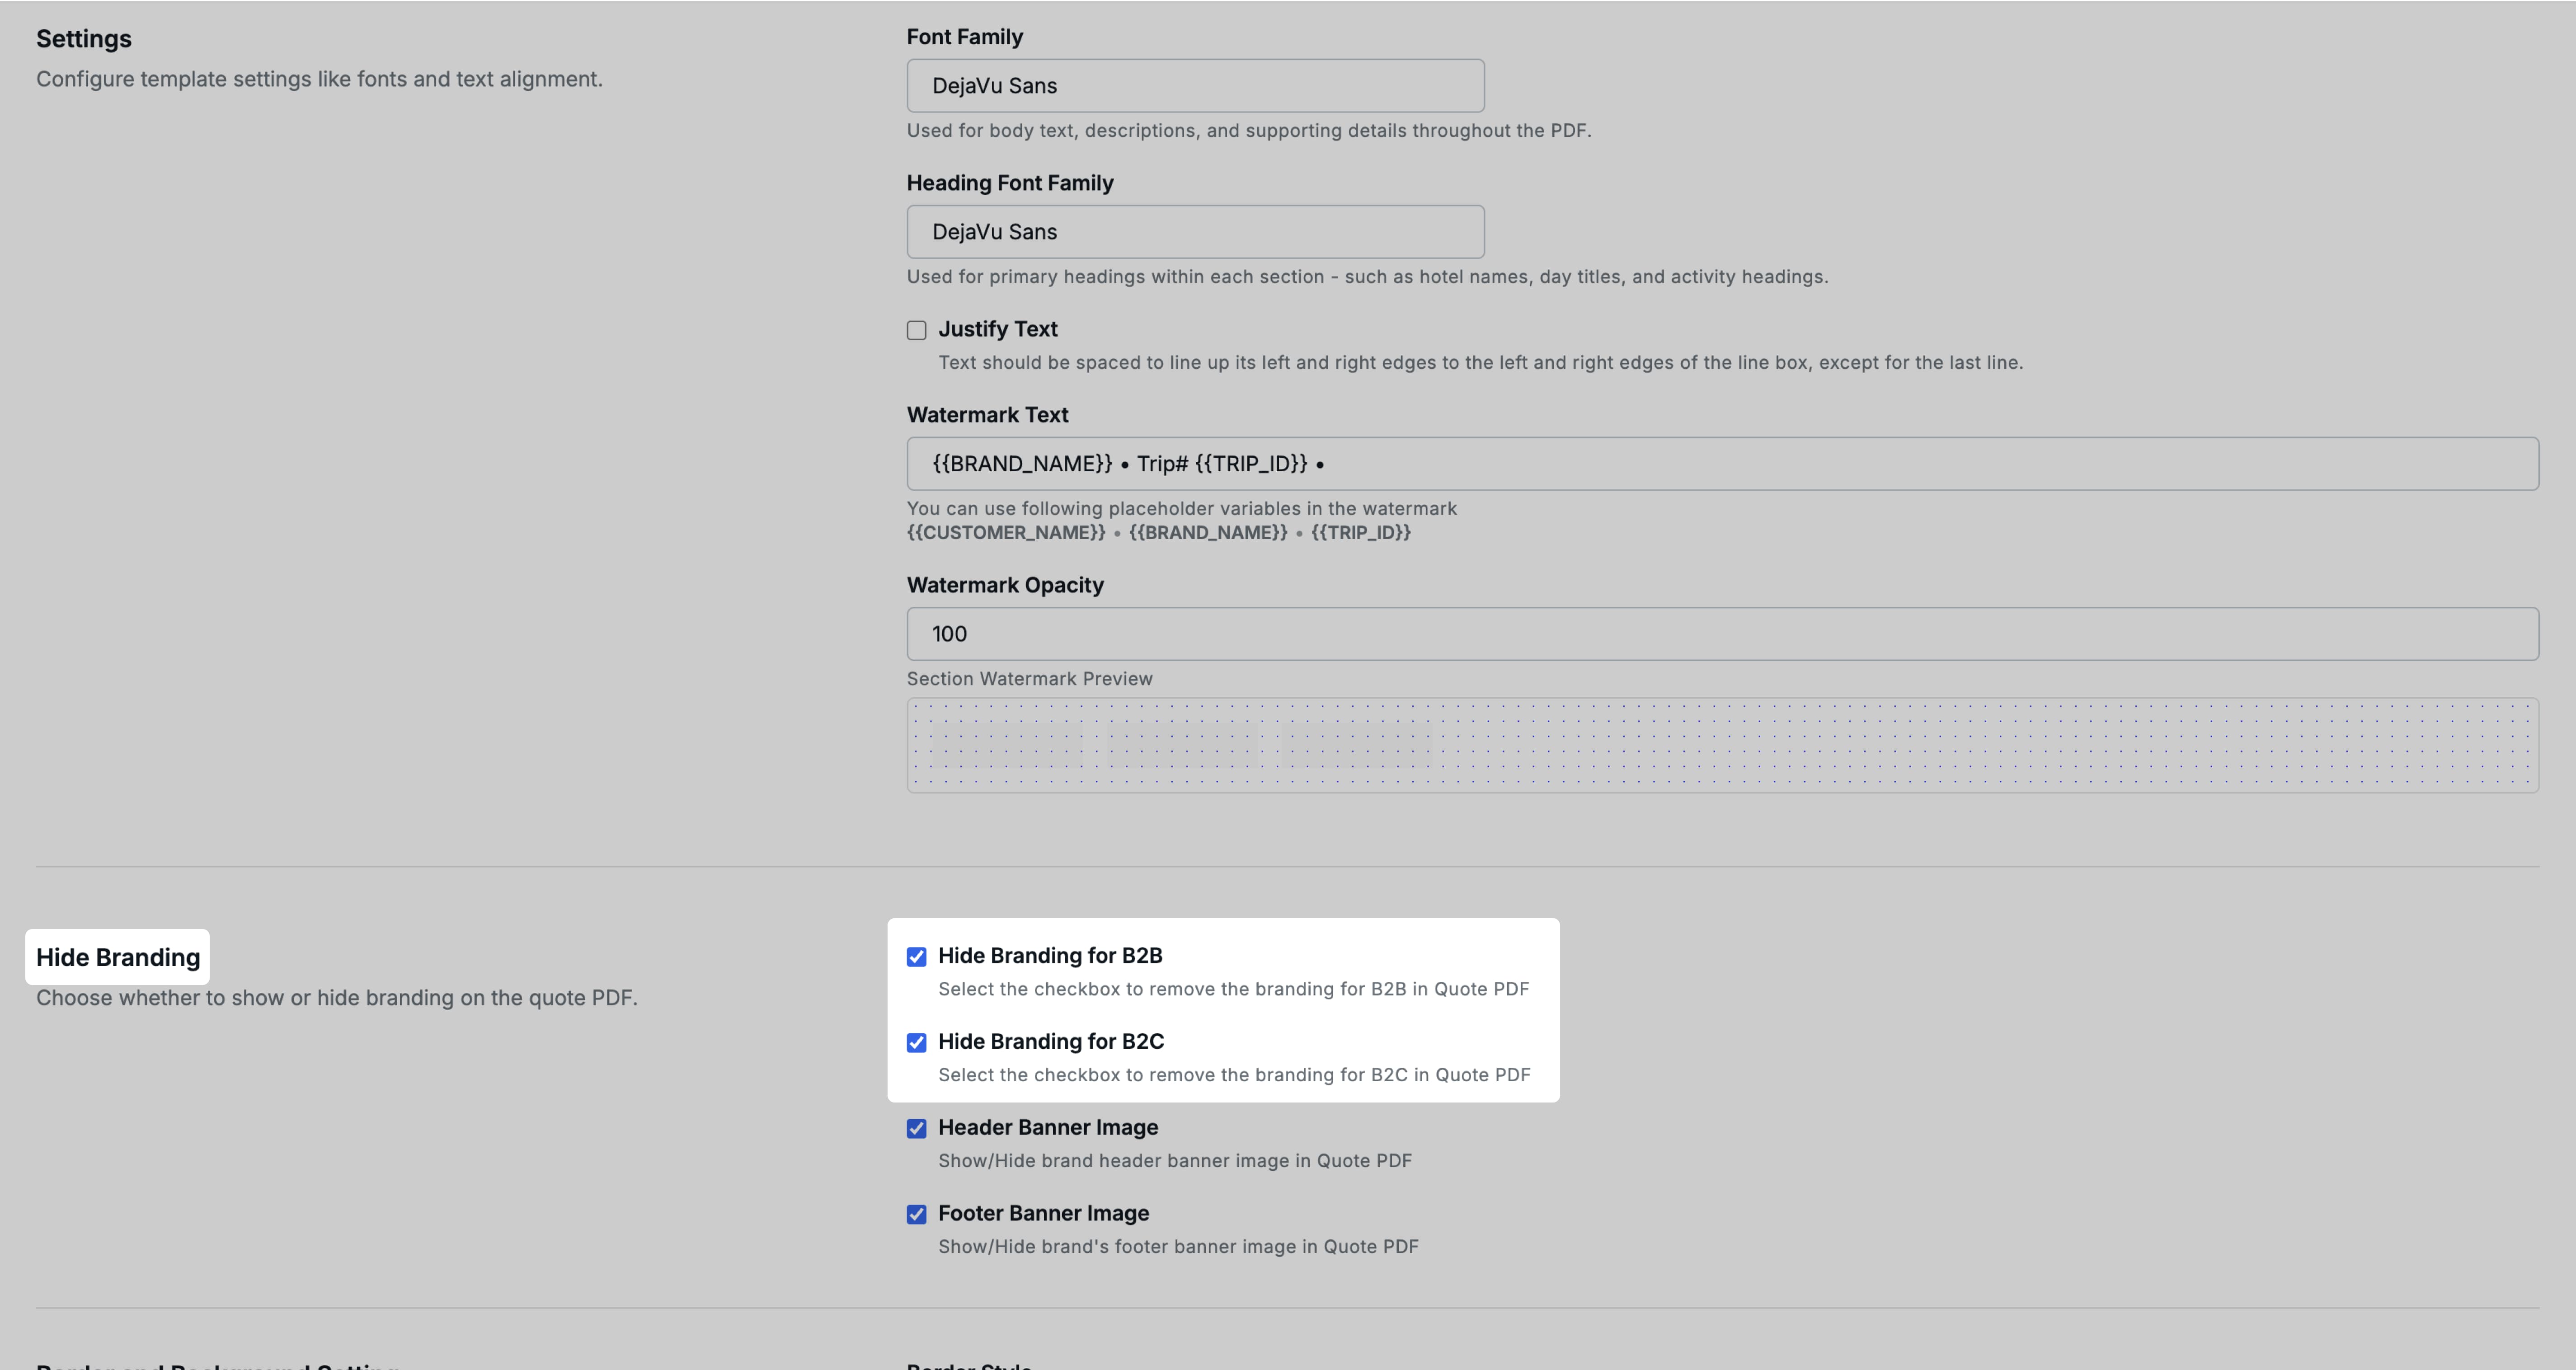
Open the Quote PDF Template (accessible from Profile → Organization → Repository → Templates) and scroll to the Hide Branding section.
You will find two independent toggles:
- Hide Branding for B2B — When enabled, the option to generate a non-branded PDF will appear on trips where the trip source is B2B
- Hide Branding for B2C — When enabled, the option will appear on trips where the trip source is B2C
You can enable one or both depending on your workflow. This gives you control over which trip types the non-branded option is available for.
Step 2: Upload Non-Branded Header and Footer Images
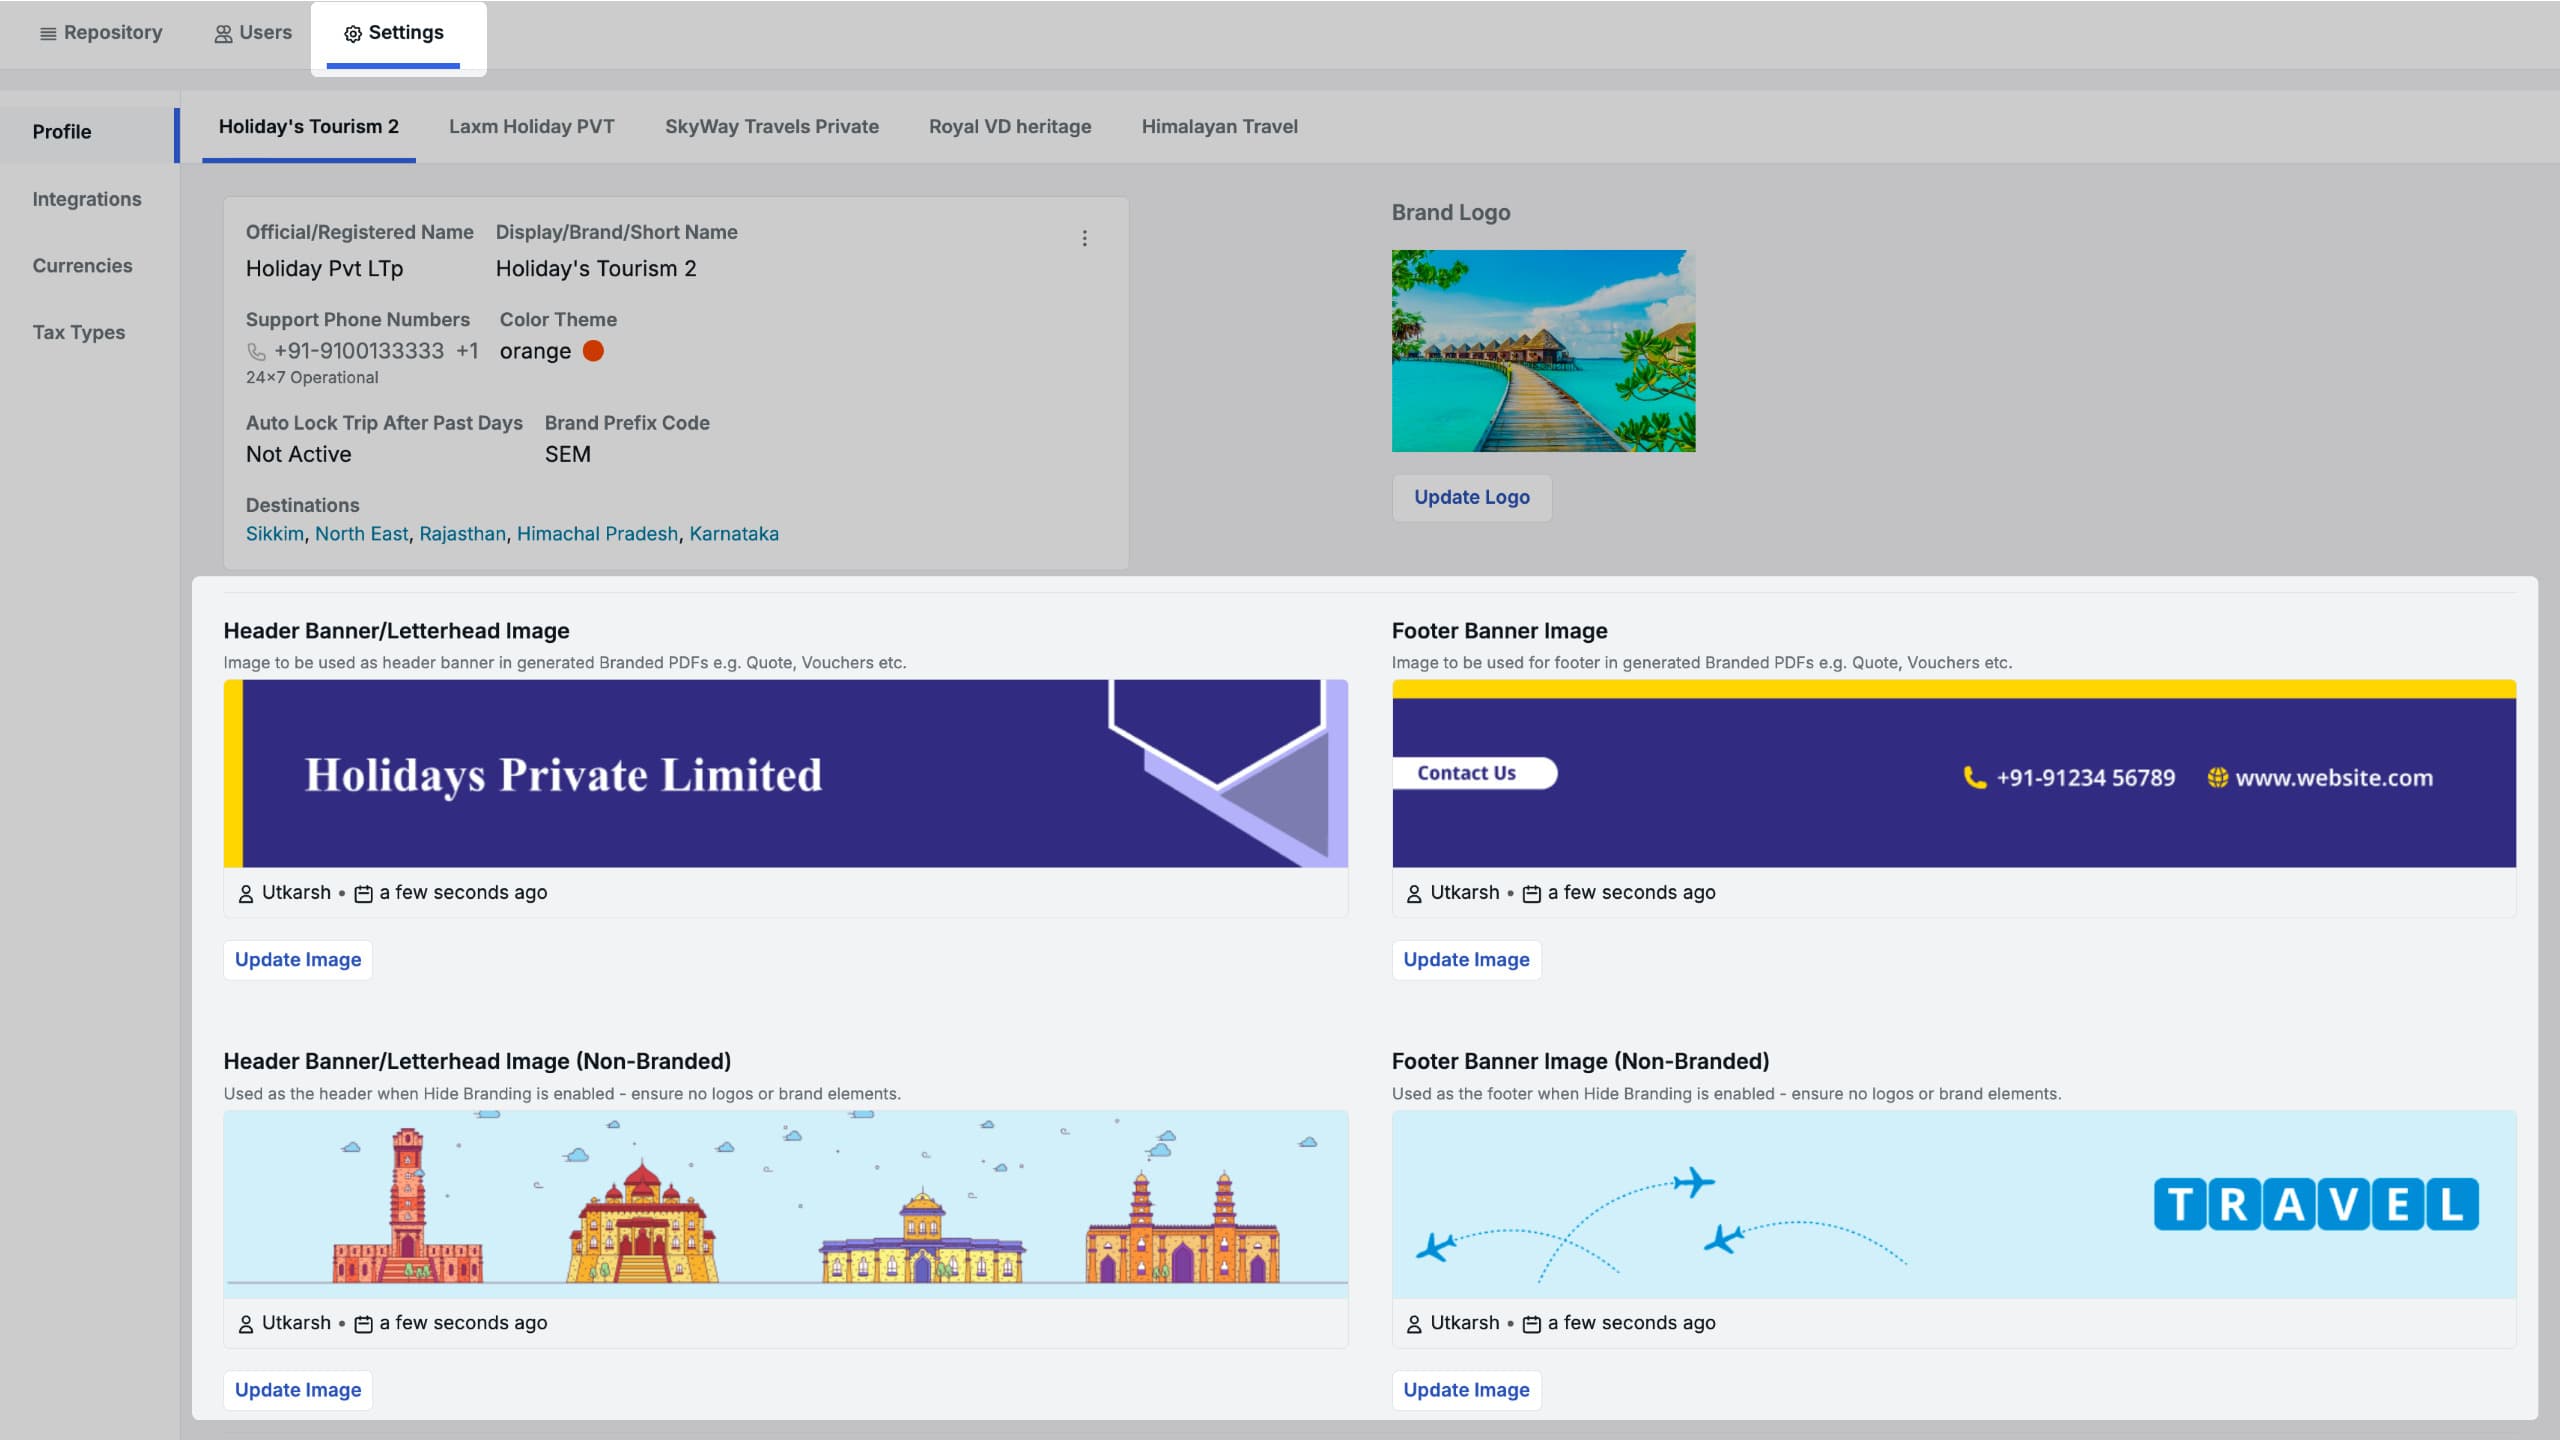
Navigate to Profile → Organization → Brands → [Select your Brand]
Under your brand’s settings, you will now find two sets of header/footer upload fields:
- Branded Header / Footer — Your existing header and footer images (unchanged)
- Non-Branded Header / Footer (new) — Separate header and footer images that contain no brand name, logo, or brand-identifying elements
When a non-branded PDF is generated, the system will use these non-branded header and footer images in place of the standard branded ones.
Step 3: Upload Non-Branded Destination Images
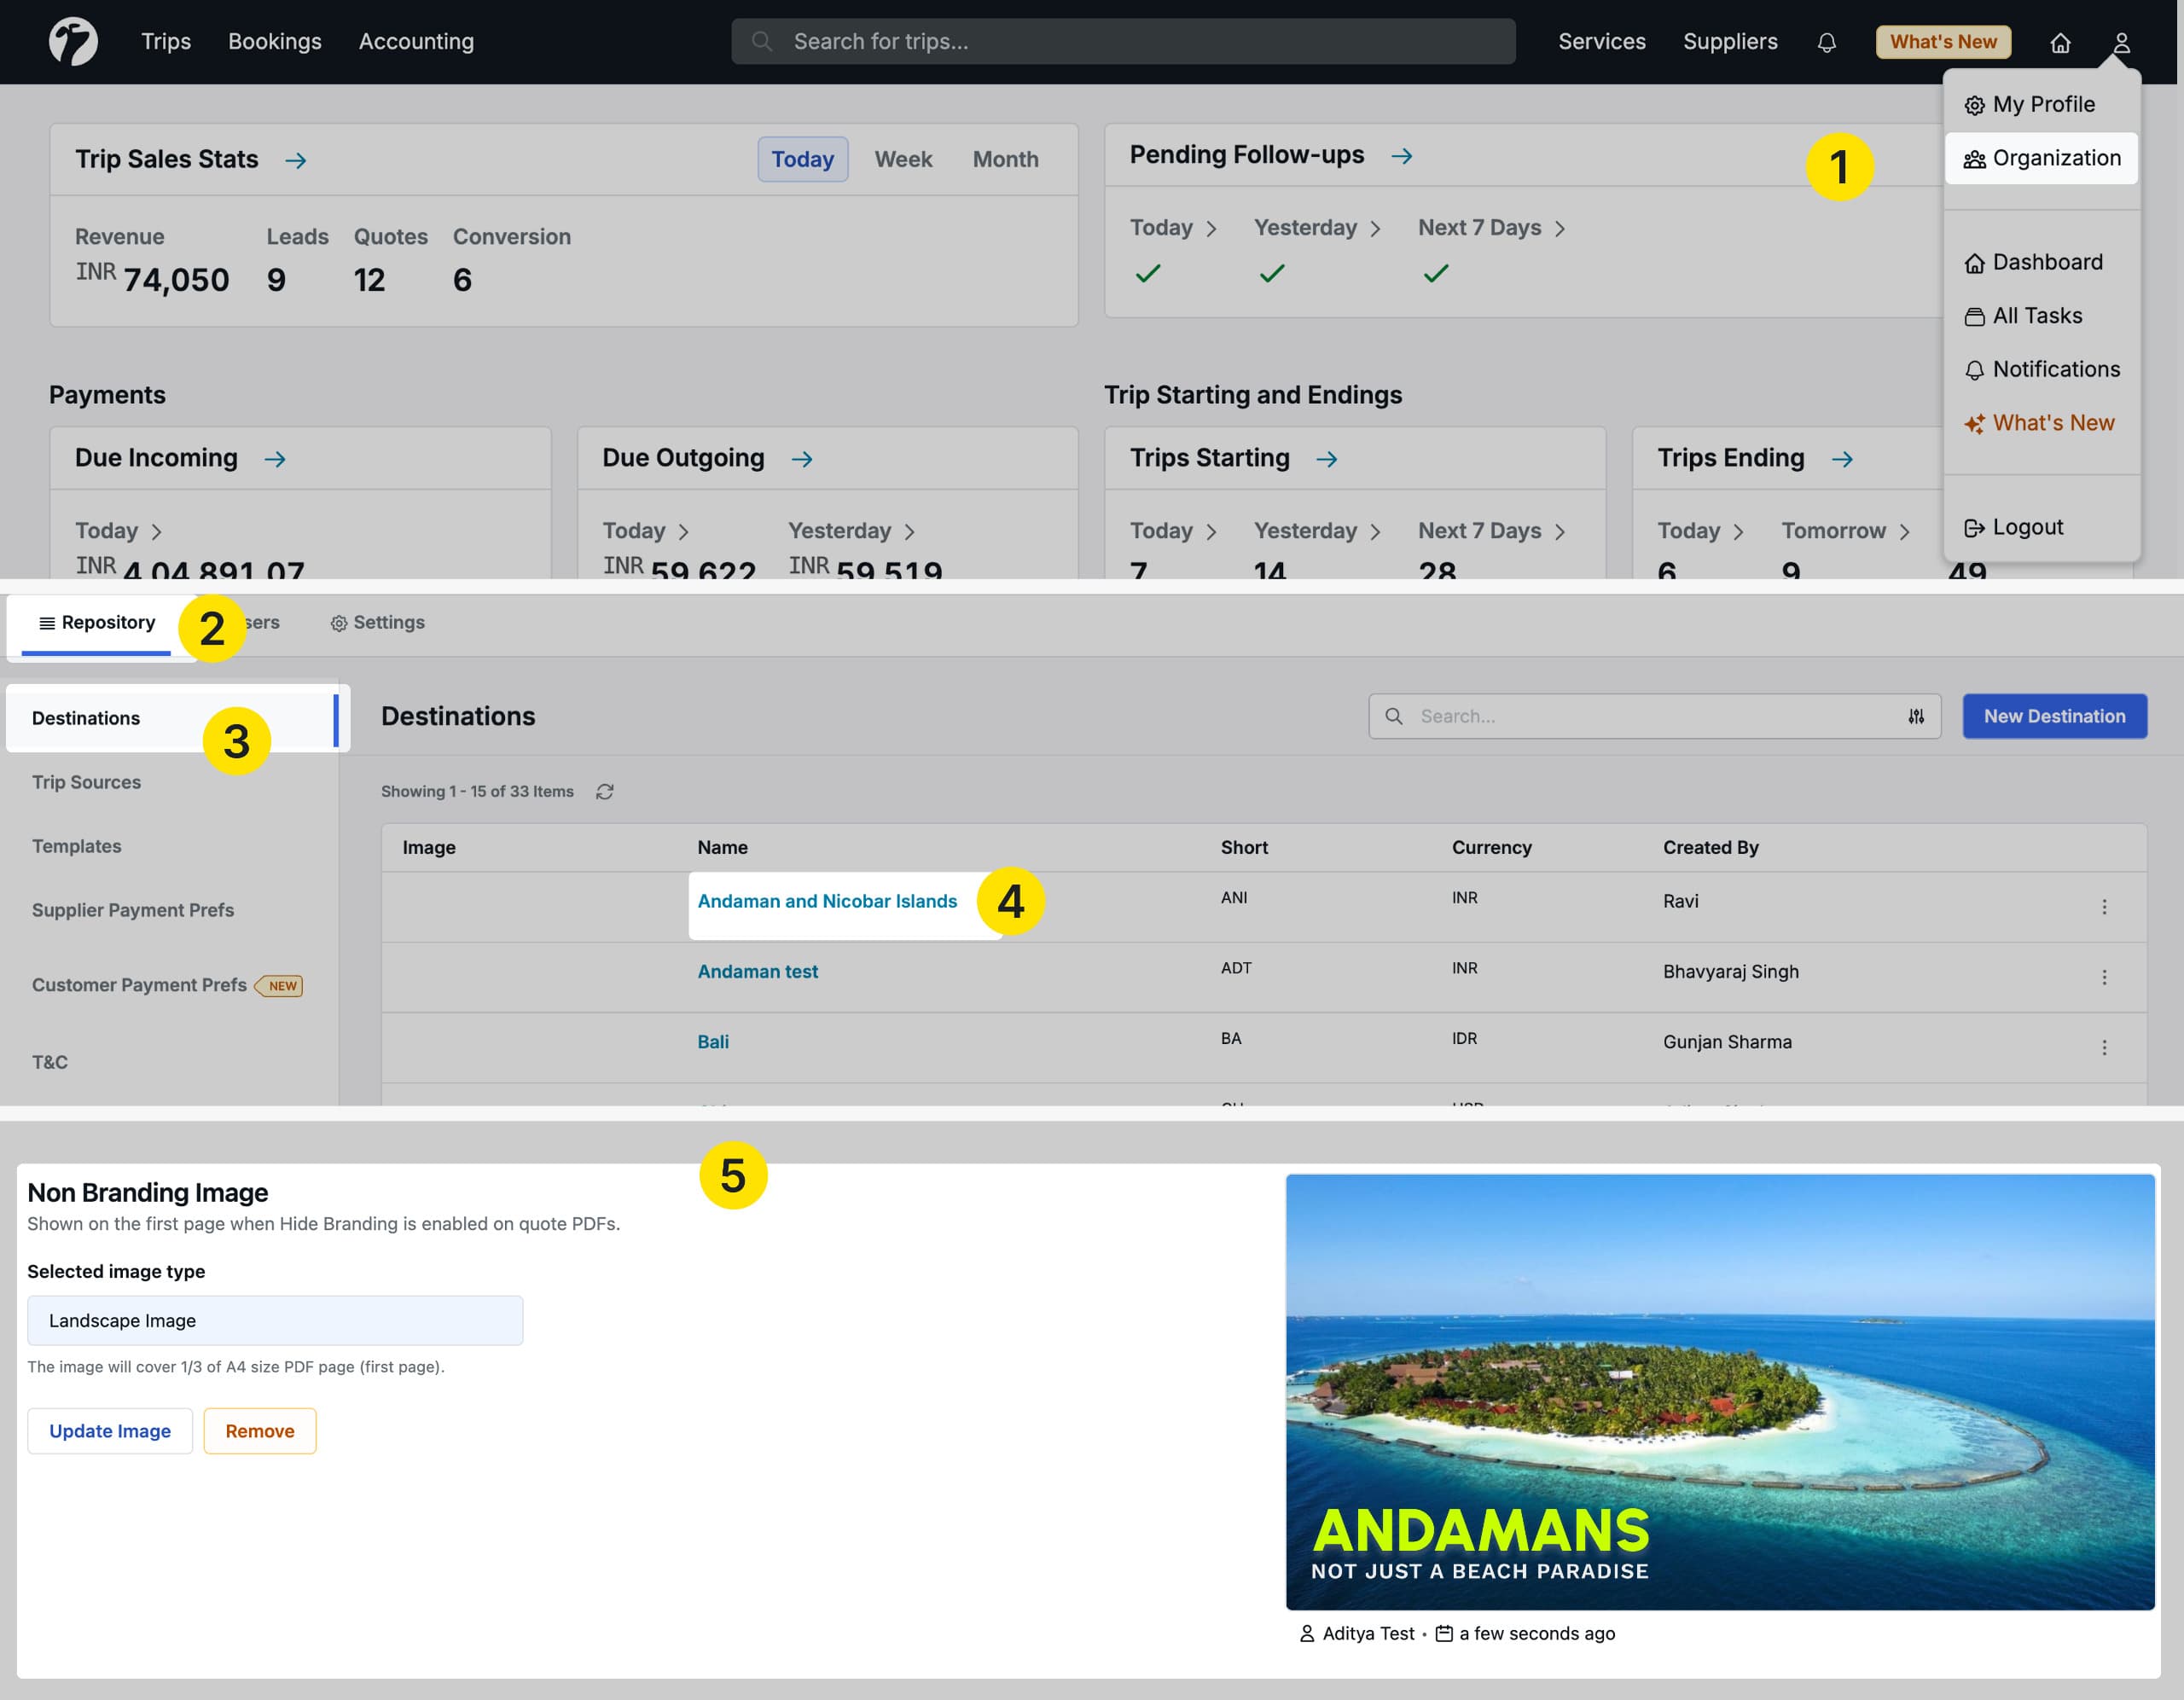
Navigate to Profile → Organization → Repository → Destinations → [Select a Destination]
On the destination detail page, you will now find two image upload fields:
- Branded Image — The existing destination image (used in standard PDFs)
- Non-Branded Image (new) — A separate destination image that does not contain any brand watermark, logo, or overlay
When a non-branded PDF is generated, the non-branded destination image will be used as the cover image for that destination. If no non-branded image has been uploaded for a destination, the destination image will not appear in the non-branded PDF.
Generating a Non-Branded PDF from a Trip
Once the template setting is enabled and your non-branded assets are uploaded, you can generate a non-branded PDF directly from any qualifying trip.
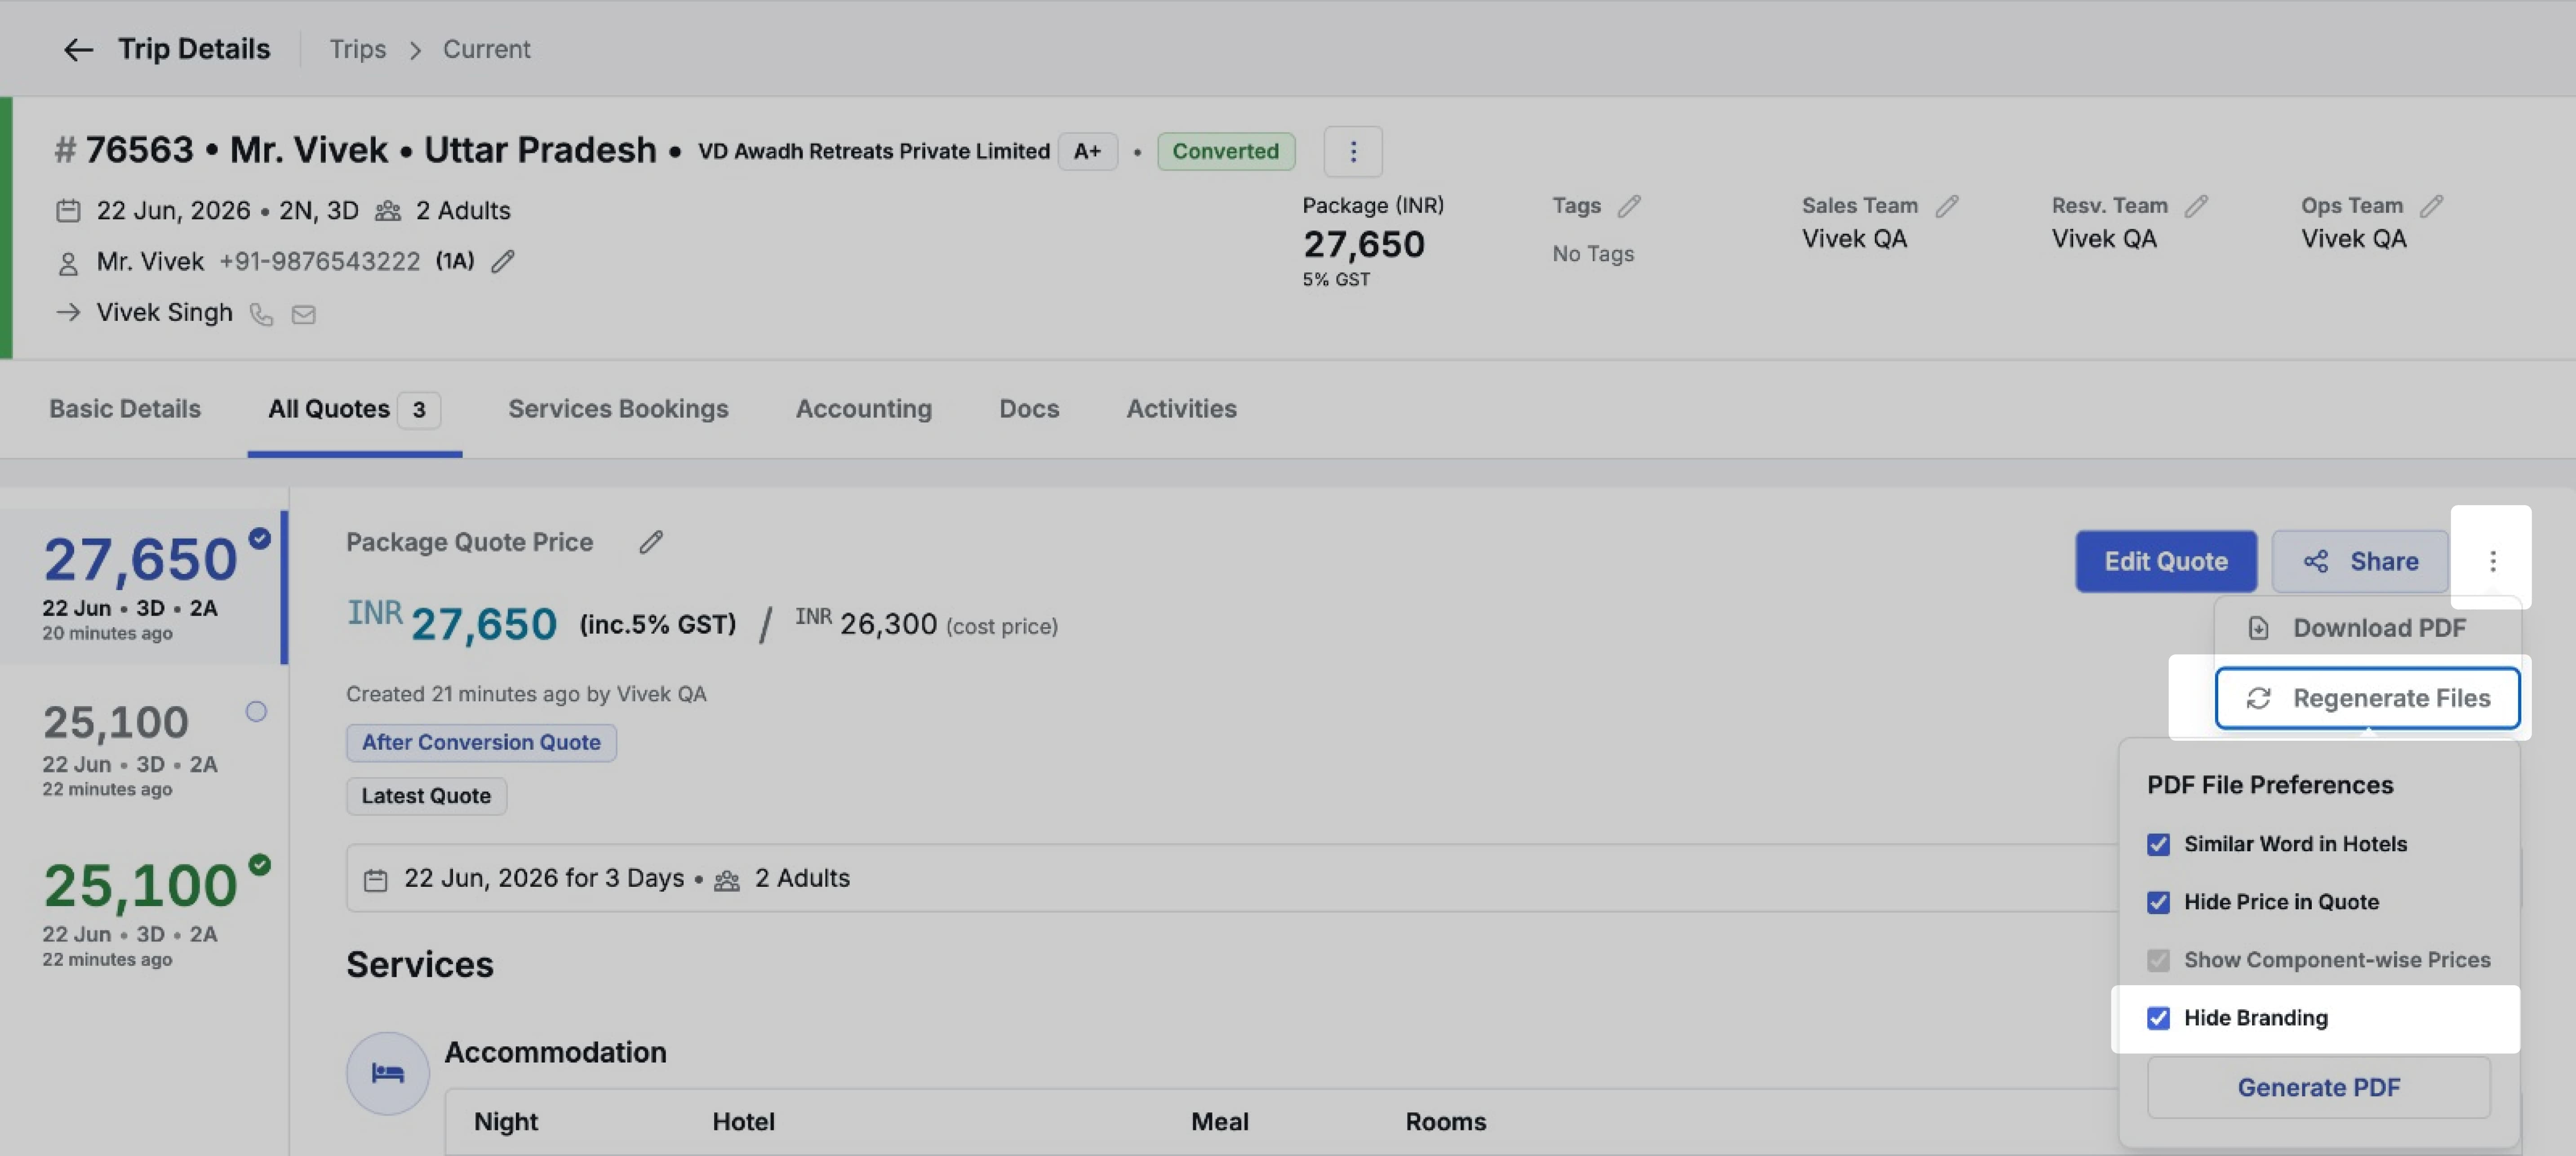
Navigate to the Trip Detail Page → Basic Details tab (or All Quote tab) → find the PDF share/download area → click the ellipse (⋯) menu → Regenerate Files
Inside the Regenerate Files panel, you will now see a Hide Branding checkbox. Check this option and generate the PDF — the output will be a non-branded version of the quotation.
Note: The Hide Branding option will only appear on trips whose trip source matches the setting you enabled in the template (B2B, B2C, or both).
What Gets Hidden in a Non-Branded PDF
When the Hide Branding option is selected during PDF generation, the following elements are removed or replaced:
- Greetings — The opening greeting message (which typically references the brand name) is hidden entirely
- Last Page Footer — The branded footer on the final page of the PDF is hidden
- Salesperson Overview — The salesperson attribution block shown at the end of the PDF is hidden
- Header and Footer Images — Replaced with the non-branded header and footer images you have uploaded under your brand settings
- Destination Cover Image — Replaced with the non-branded destination image uploaded in the destination repository
Important: Hotel images, transport service images, and activity images are not replaced in the non-branded PDF — the same images are used in both branded and non-branded versions. You should ensure that any images uploaded for hotels, transport, and activities do not contain brand logos, watermarks, or other brand-identifying elements, as these will appear as-is in the non-branded output.
Benefits
- DMCs can generate brand-free PDFs for B2B agent distribution without any manual editing
- Separate control for B2B and B2C trip sources gives flexibility for different distribution workflows
- Non-branded assets (header, footer, destination images) can be set up once and reused across all trips
- No separate document creation needed — everything is managed within the existing trip and template workflow
Other Improvements
1. Hotel Voucher — Generated Timestamp: Hotel vouchers now display the date and time the voucher was generated, making it easier to track which version of the voucher was shared with a hotel or supplier.
2. Trip Voucher — Check-in and Check-out Time: Check-in and check-out times are now included in the trip voucher, giving guests and suppliers clear arrival and departure timing without needing a separate communication.
3. Hotel Booking Tag — Sent Via WhatsApp: A new tag Sent Via WhatsApp is now available in the Select Tag option for hotel bookings. This tag is available only when the hotel booking is in the In Progress stage, allowing your team to track which hotels have already been contacted via WhatsApp.
4. Activity Voucher — Upload Status Text Fix and QR Scan Styles: Corrected a typo in the “Uploaded” status label on the Activity Voucher screen, and improved the visual appearance of the QR scan interface for a cleaner, more consistent experience.