


This update introduces comprehensive supplier payment preferences for transport and activities, enhanced quotation controls including flexible transport cost distribution and trip ID prefixing. We’ve improved payment gateway error categorization for better visibility, added category organization for inclusions/exclusions, and expanded trip source management with detailed pages. Account merging capabilities and several workflow improvements are also included.
Let’s dive into more details.
1. Supplier Payment Preference
We have introduced Supplier Payment Preferences for transport and activity suppliers, extending the payment preference functionality that was previously available only for hotels.
Accessing Payment Preferences
Navigate to Profile → Organization → Repository → Supplier Payment Preference
Important change: The previous “Hotel Payment Preference” has been consolidated into this new module.
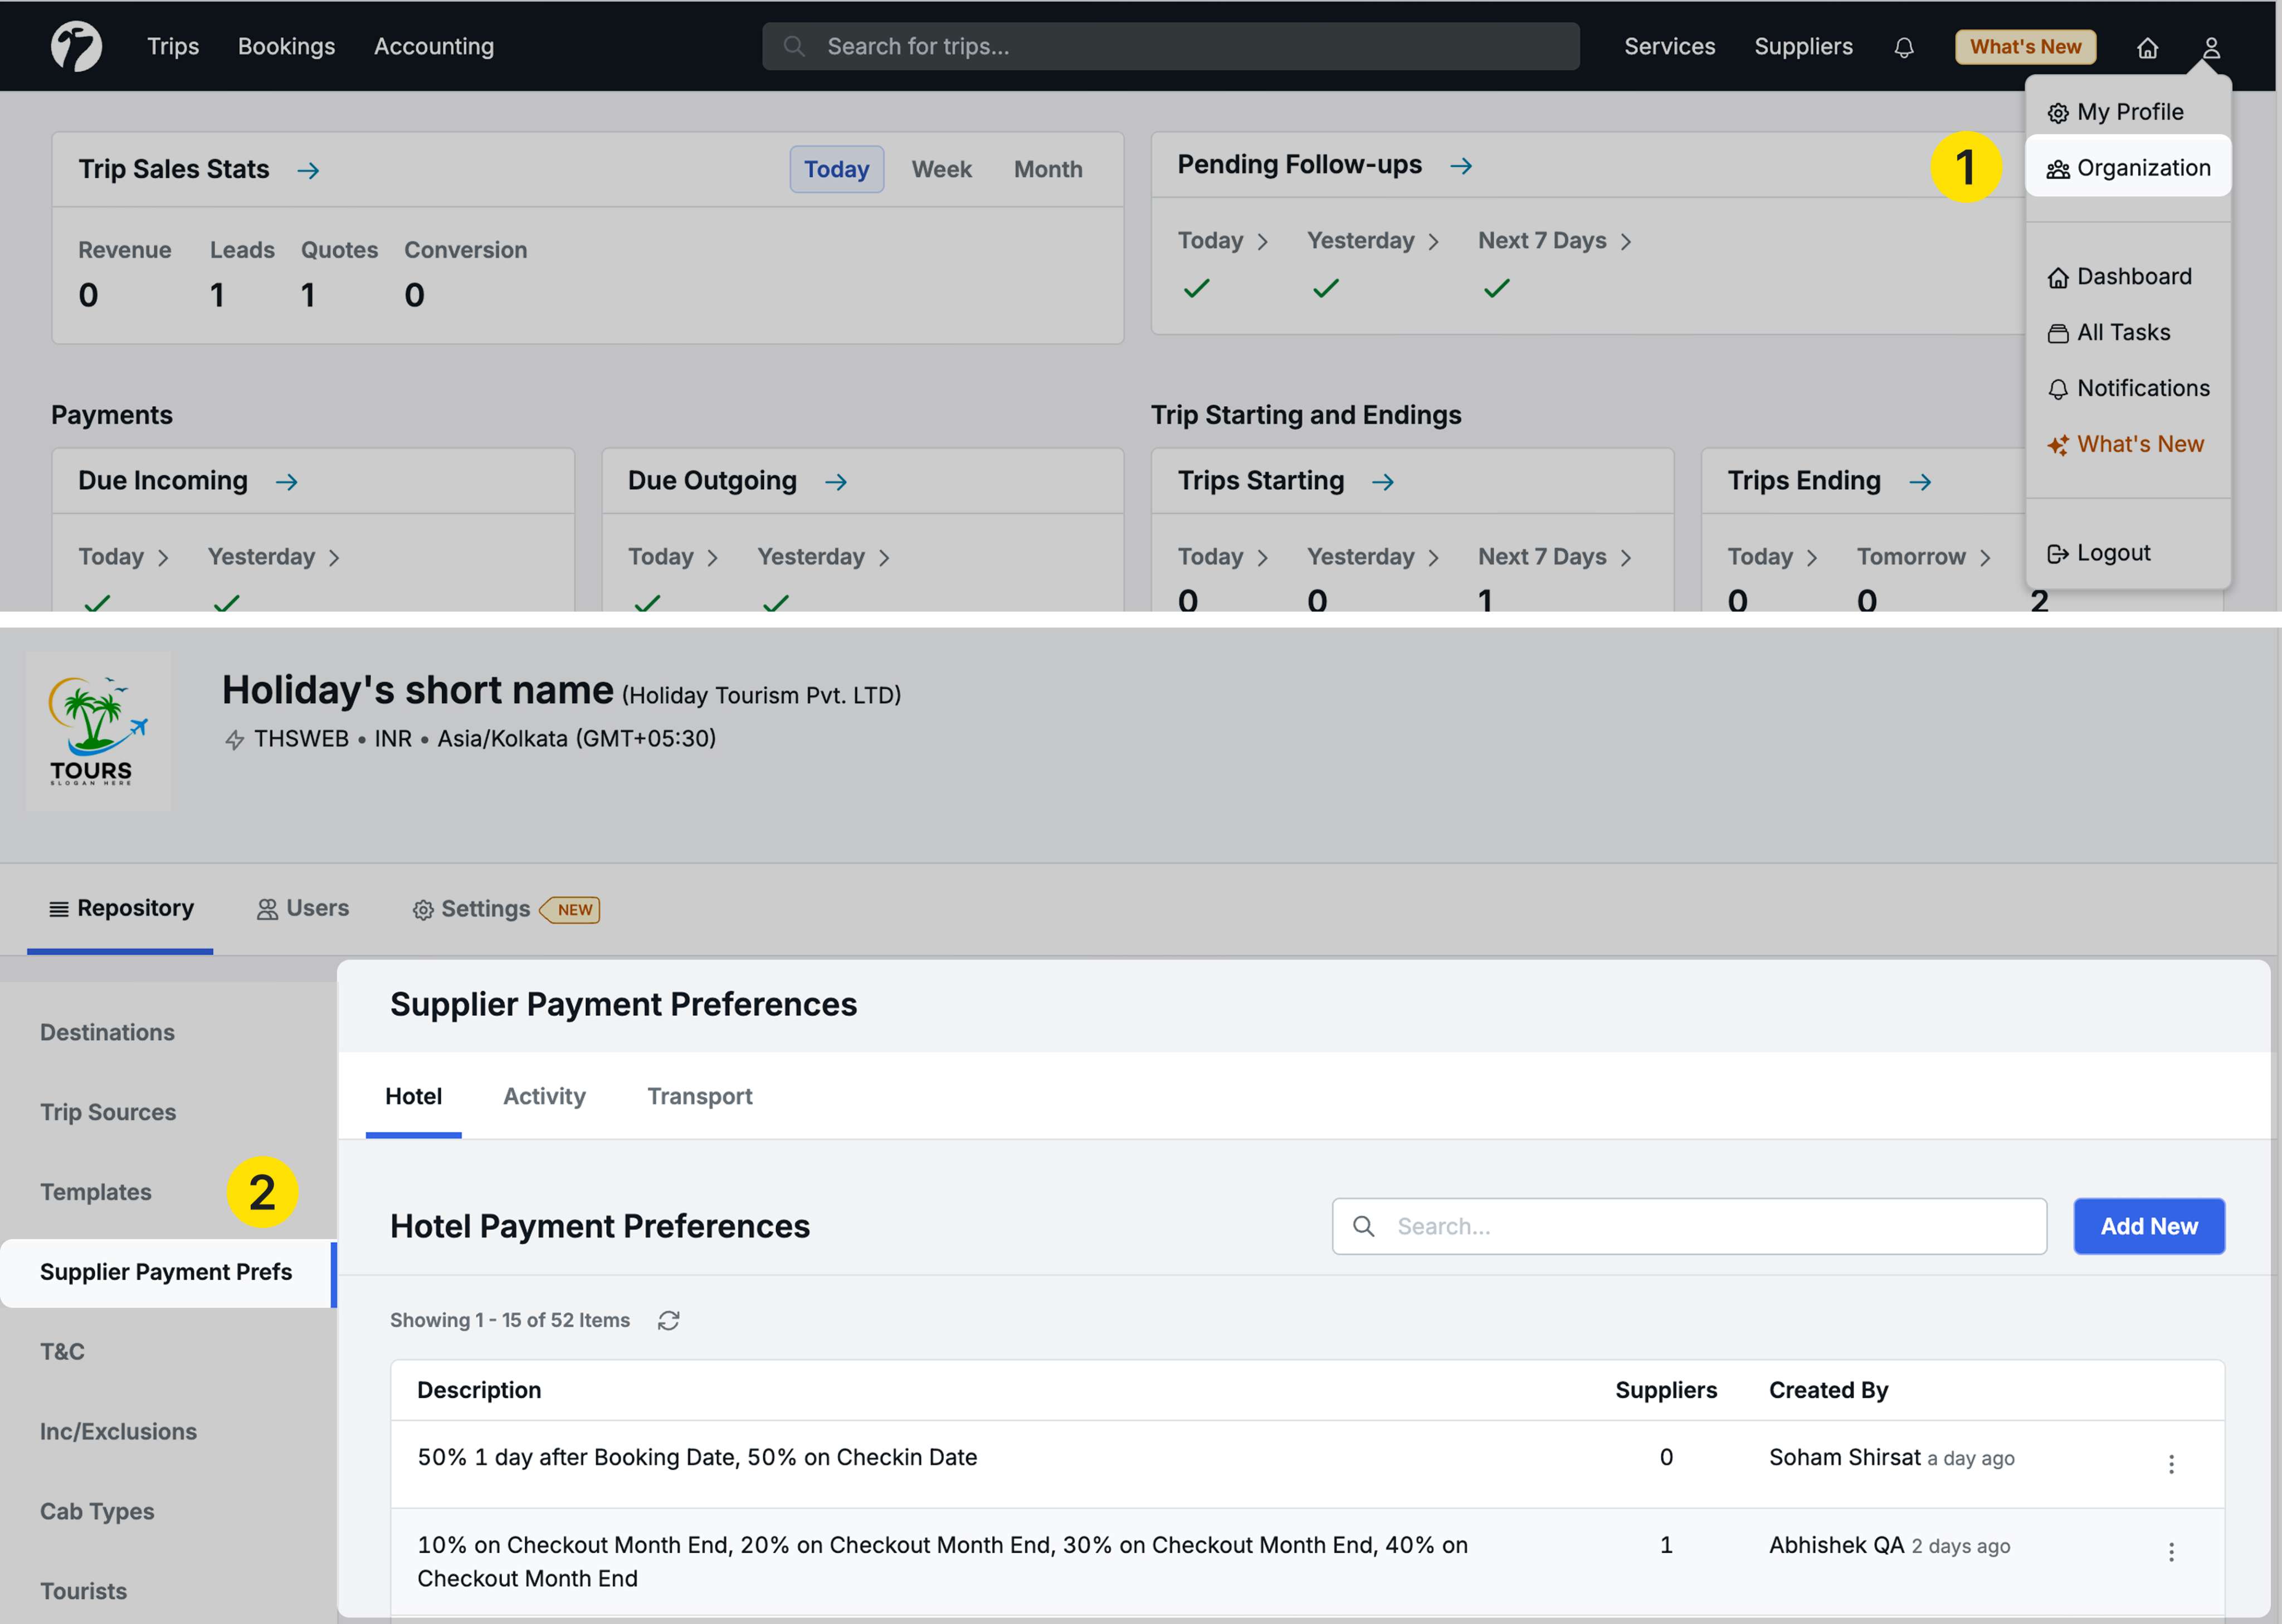
Three-Tab Structure
The Supplier Payment Preference module contains three tabs:
- Hotel: Payment preferences for direct hotels and hotel suppliers
- Activity: Payment preferences for activity suppliers
- Transport: Payment preferences for transport suppliers
Creating Payment Preferences
Click New in any tab to create a payment preference.
Reference Events
Each service type has specific reference events you can use:
For Hotels:
- Booking Date
- Check-In Date
- Check-Out Date
- Booking Month End
- Check-Out Month End
For Activities:
- Booking Date
- Service Date
- Month End of Booking
- Month End of Service
For Transport:
- Booking Date
- Service Date
- Month End of Booking
- Month End of Service
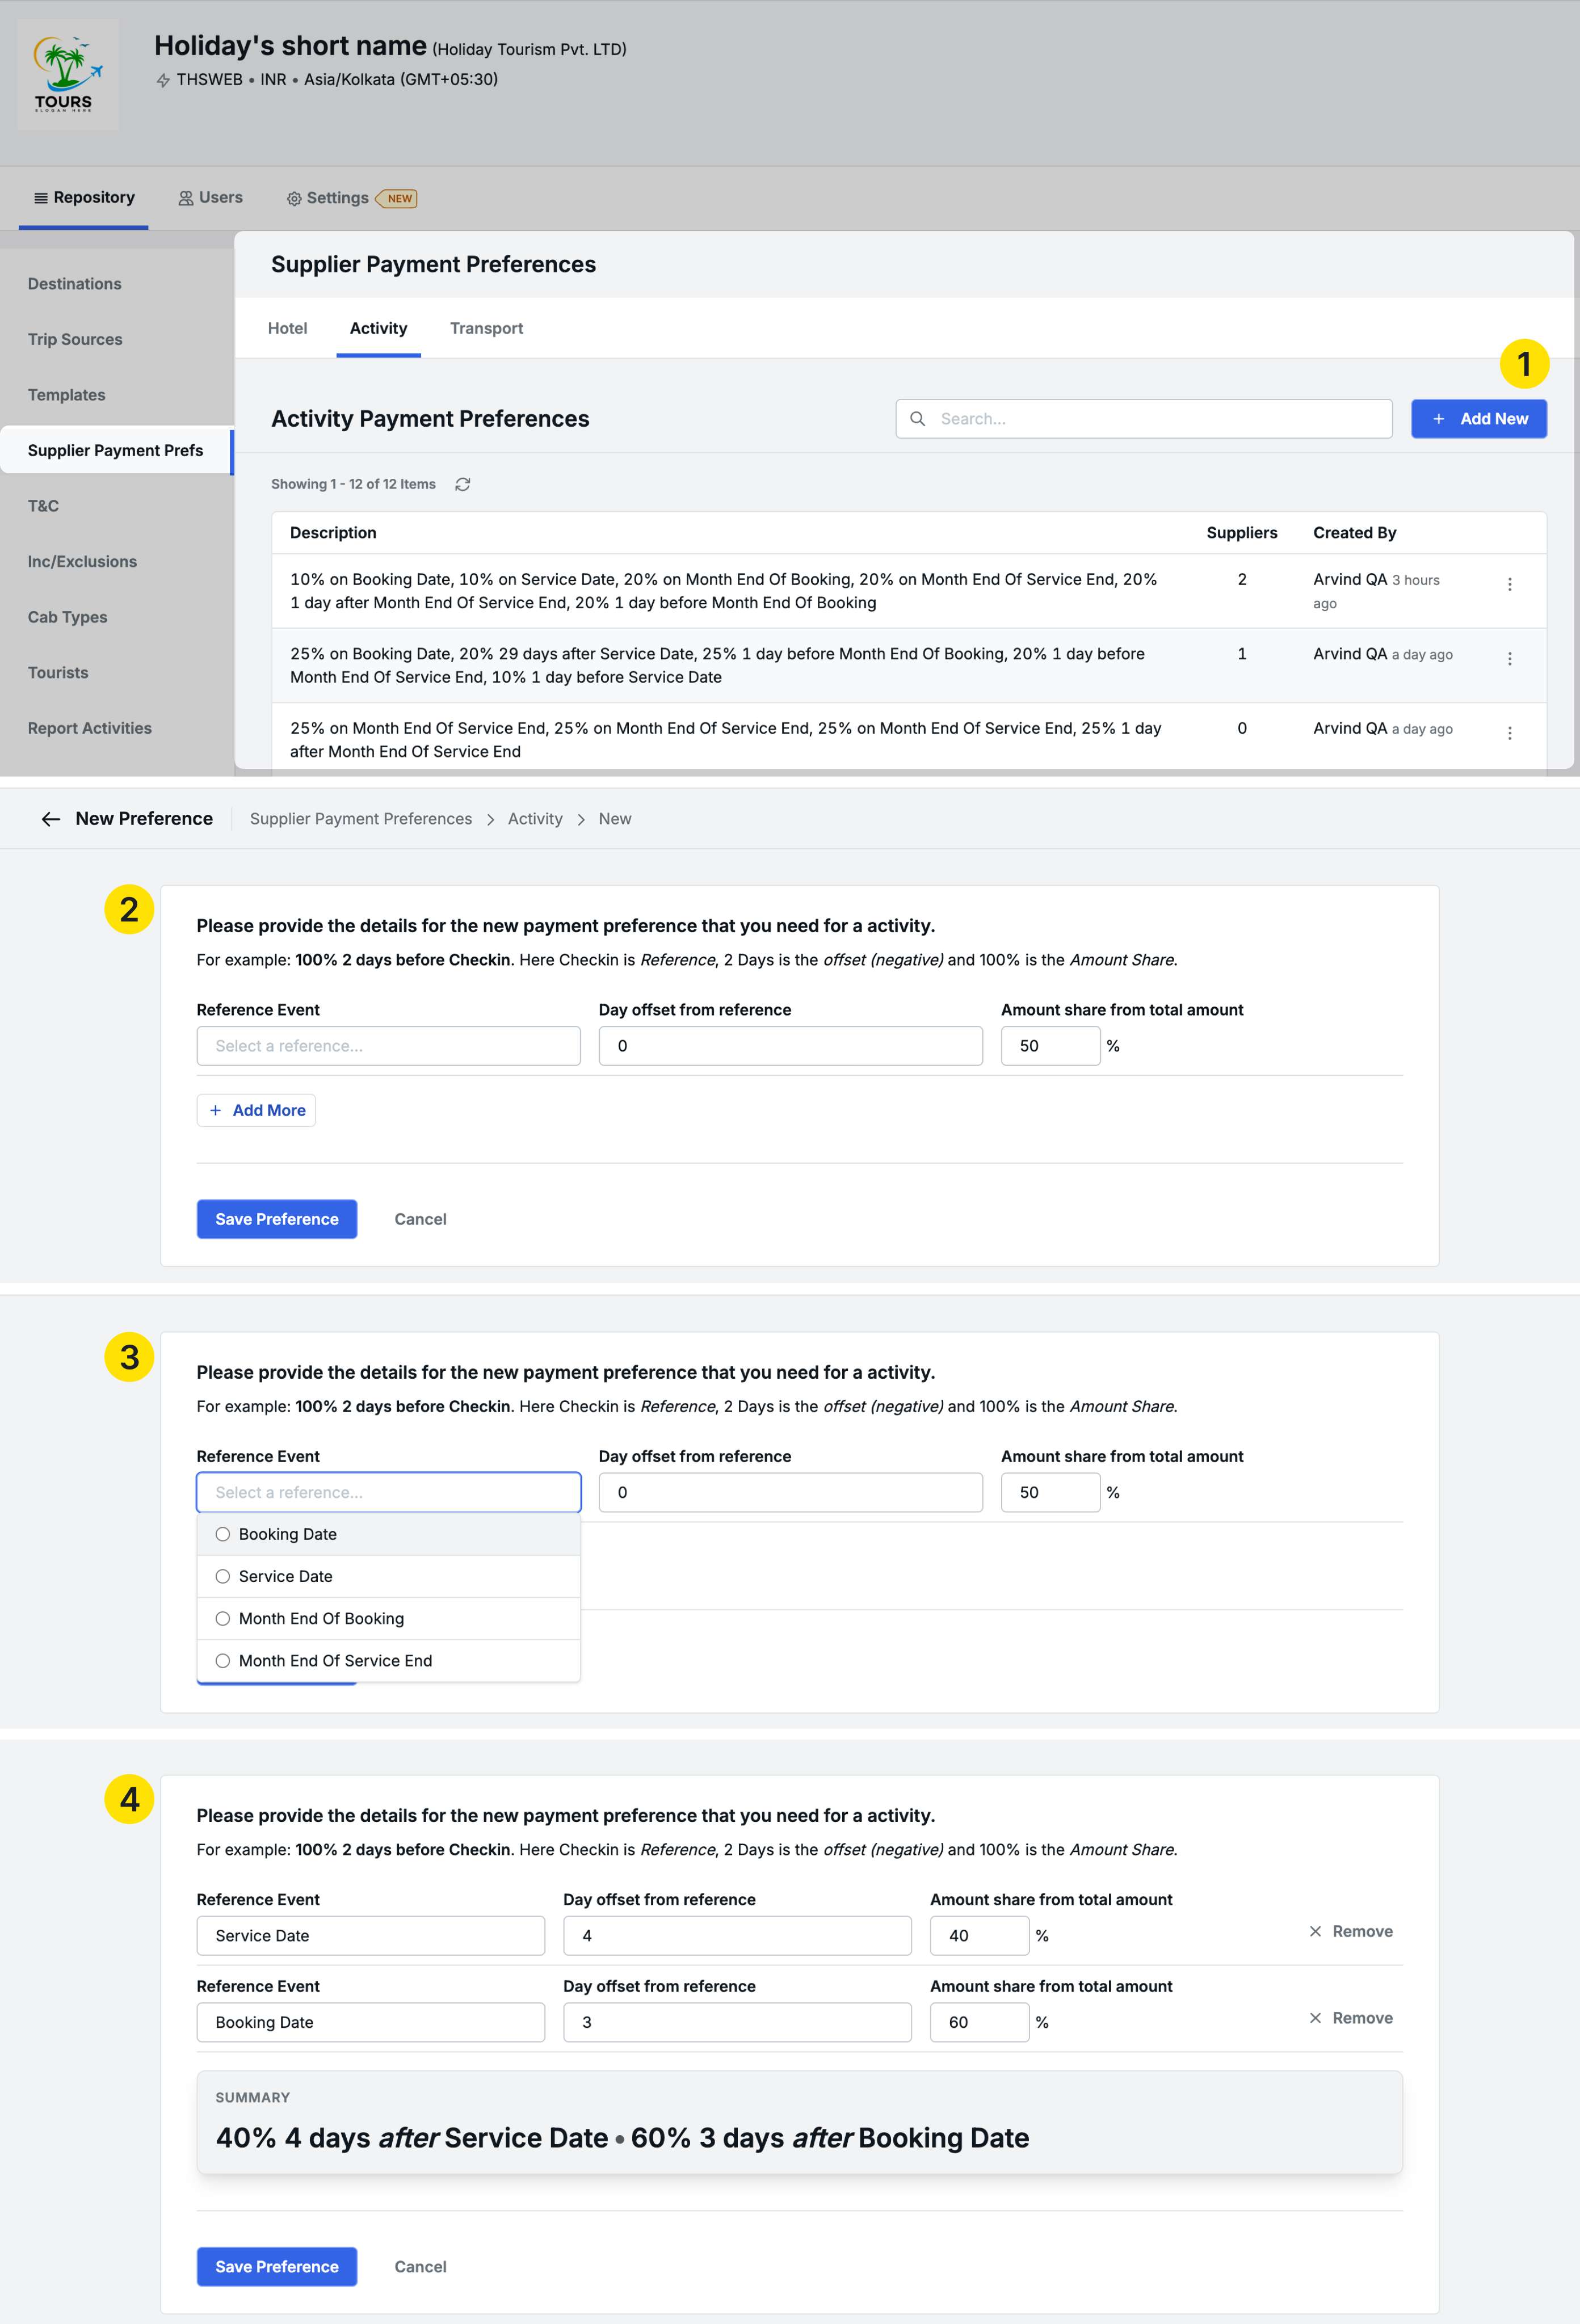
Configuring Payment Terms
For each reference event:
-
Select Reference Event: Choose from the available options (e.g., Booking Date)
-
Day Offset from Reference: Set when payment is due relative to the reference
0= On the reference date+1= One day after the reference date-1= One day before the reference date
-
Amount Share (%): Percentage of total amount due on this date
Example:
- 50% one day after Booking Date
- 50% on Check-In Date
Rules:
- You can add multiple reference events
- Total amount share must equal 100%
- The system shows a summary of your payment terms below the configuration
Setting Payment Preferences on Suppliers
Once payment preferences are created, assign them to specific suppliers:
Navigate to Suppliers → Transport Suppliers / Activity Suppliers / Hotel Suppliers
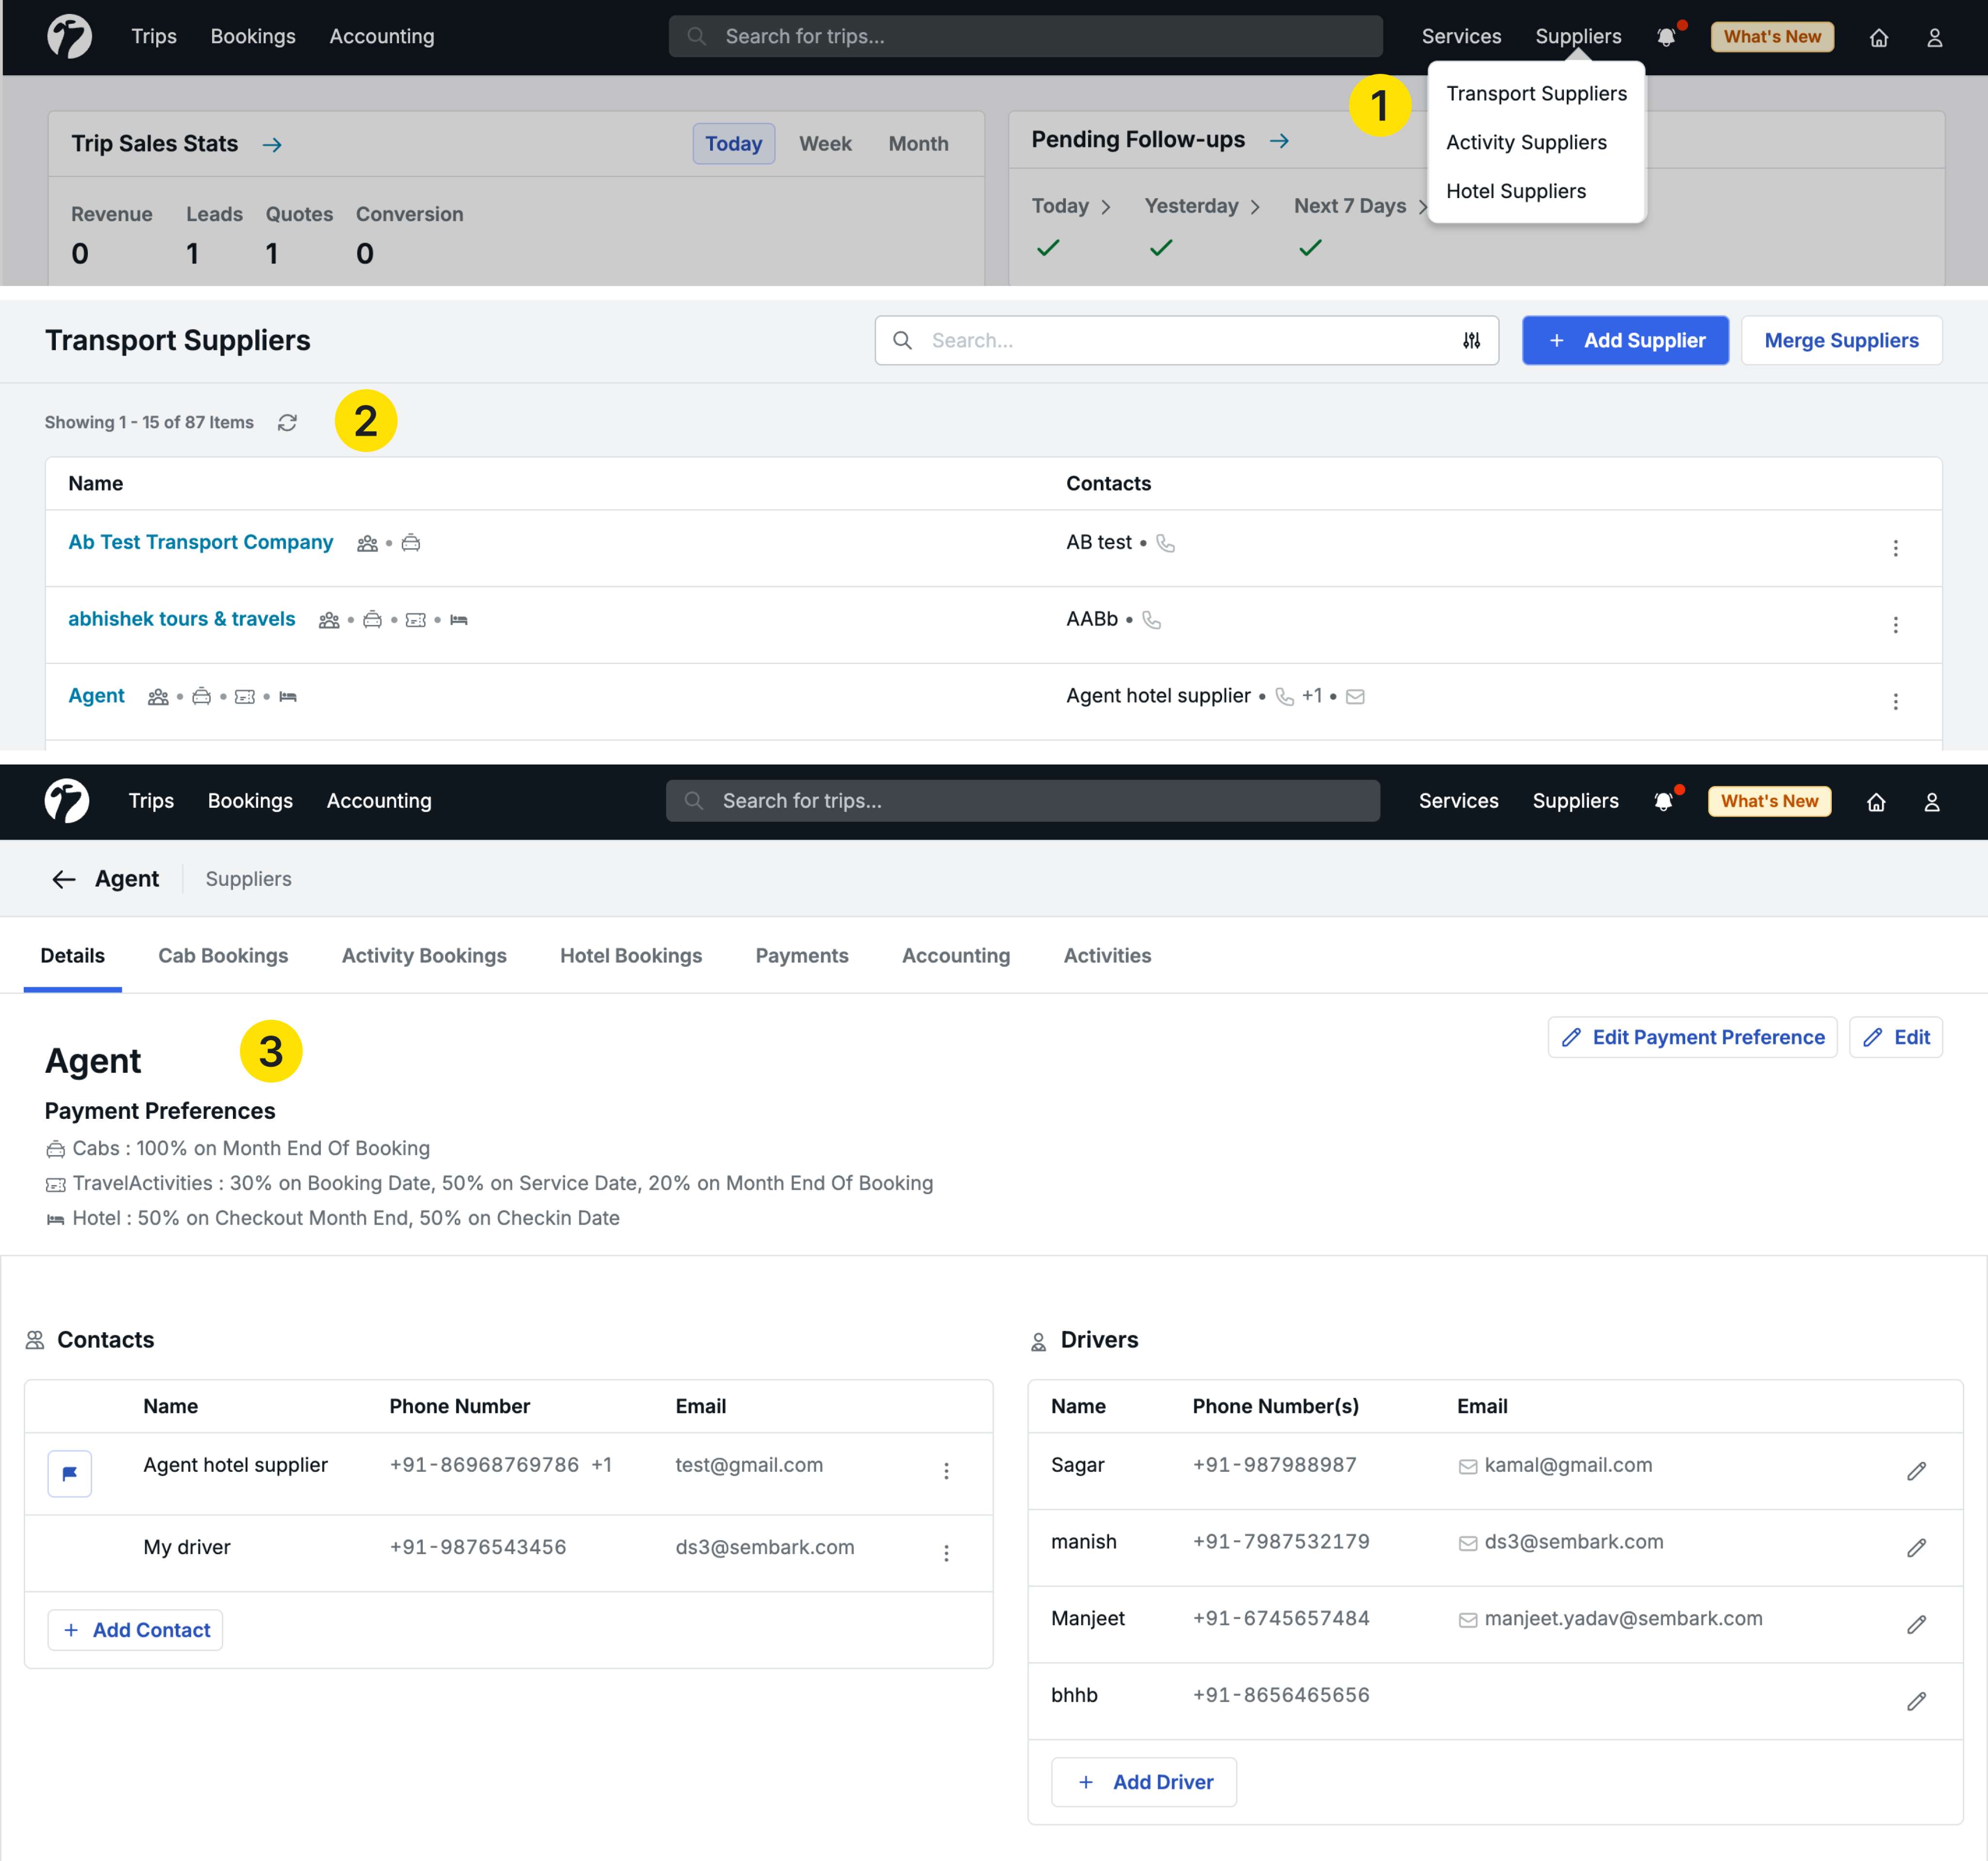
Assigning to Suppliers
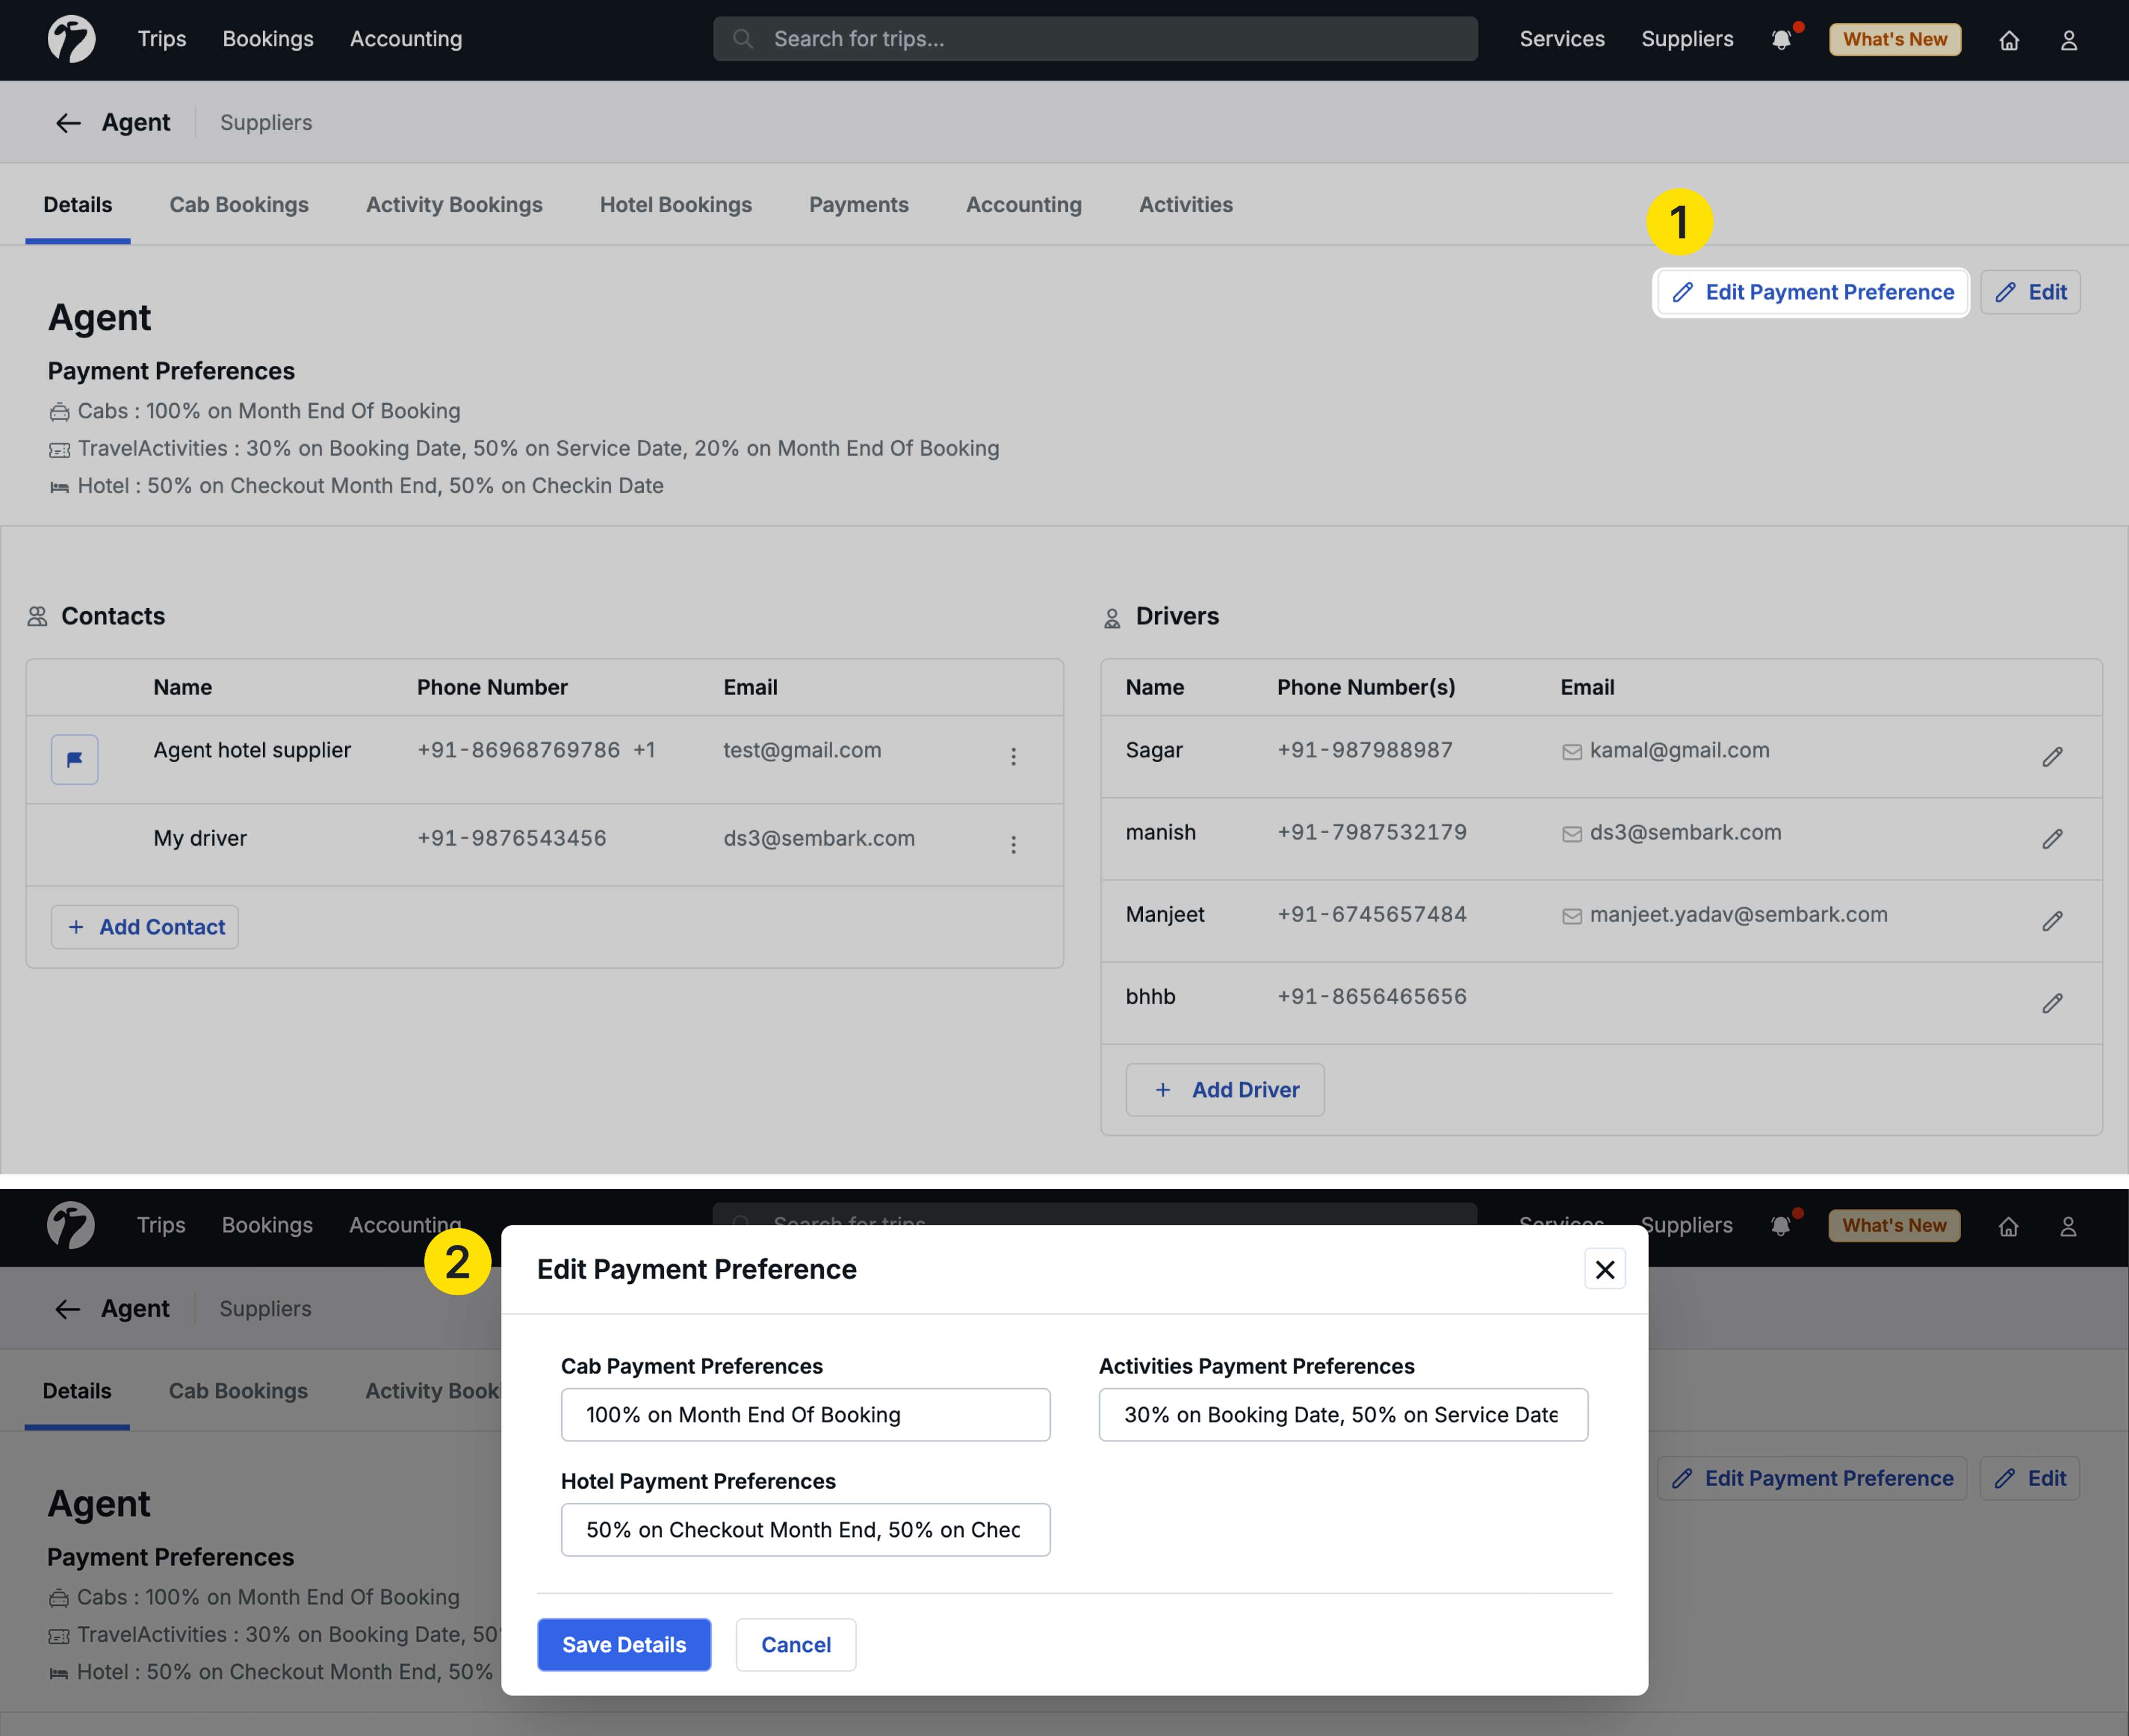
- Select a supplier and go to their detail page
- Click Edit Payment Preference in the top right corner
- A popup opens showing all service types this supplier provides
- For each service type (Transport, Activity, Hotel), select the appropriate payment preference
- Save your changes
If a supplier provides multiple services (e.g., both transport and hotels), you can set different payment preferences for each service type in one step.
Using Payment Preferences During Booking
When you book services with suppliers that have payment preferences configured:
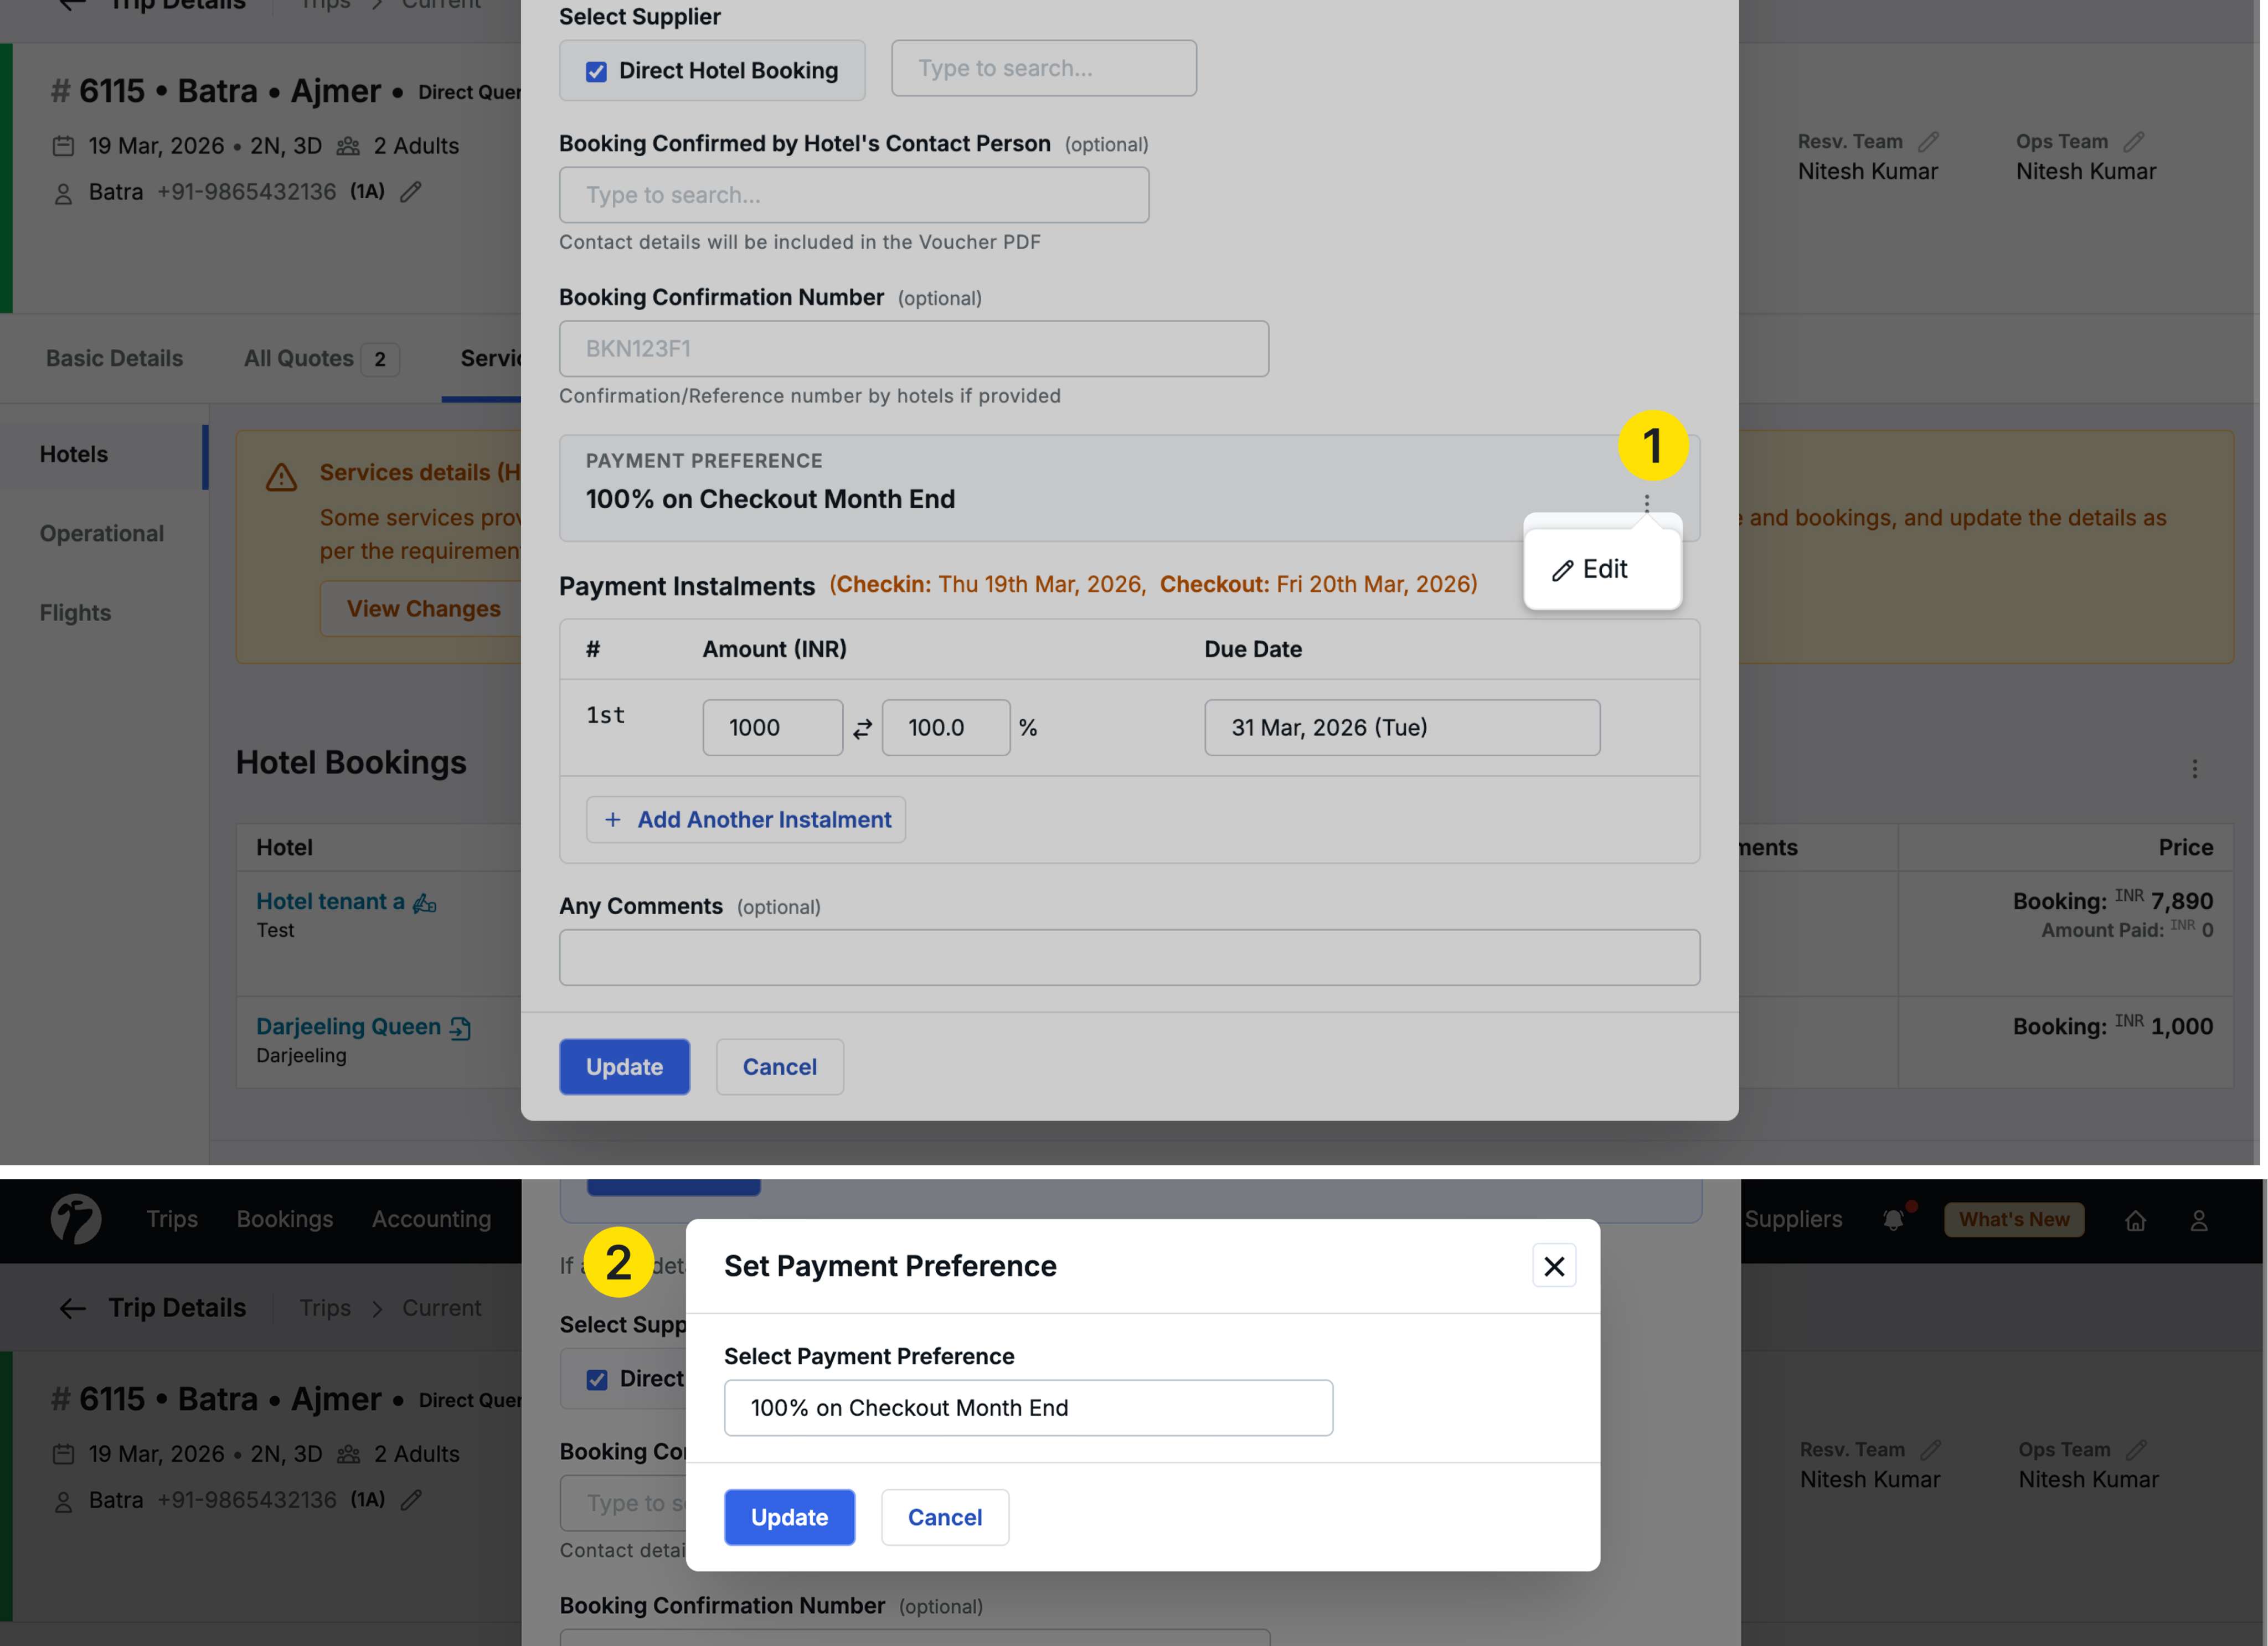
Hotel Bookings:
- Select the supplier during hotel booking
- The configured payment preference appears automatically
- An ellipsis icon (•••) appears beside the preference
- Click the ellipsis and select Edit to modify the payment preference for this specific booking only
Activity and Transport Bookings:
- Payment preferences appear automatically when you select a supplier with configured preferences
- Edit option available for single bookings and multiple service bookings
- Customize the preference for specific bookings as needed
Automatic Payment Creation
Once bookings are confirmed:
- Navigate to Accounting to see payment installments
- Payments are automatically created based on the payment preference distribution
- Payment due dates are calculated according to reference events and day offsets
- Each installment reflects the percentage distribution you configured
Benefits
- Automated Payment Scheduling: No manual calculation of payment due dates
- Supplier-Specific Terms: Different payment terms for different suppliers
- Flexible Configuration: Edit payment preferences per booking when needed
- Consistent Application: Same payment terms applied across all bookings with a supplier
- Better Cash Flow Management: Clear visibility of upcoming payment obligations
2. Transport Cost Distribution for Adults
We have added the ability to exclude specific adults from transport charges when using per-person pricing strategy, giving you more flexibility in how transport costs are distributed.
Why this feature matters
By default, when using per-person pricing strategy, transport charges are distributed equally among all adults. However, there are cases where you may want to exclude certain adults from transport costs—such as when one adults who is not included in transport or receiving complimentary transport.
Accessing the Feature
This feature is available during quotation creation:
Navigate to Quotation → Pricing Strategy → Select Per Person strategy
How to Configure
When the Per Person pricing strategy is selected and transport services are included in the quotation:
- A new checkbox appears: Excluding Transport Charges for [X] Adults
- Check this box to enable the feature
- By default, it sets the value to
1adult - You can increase the number of adults to exclude
Additional Option
When you enable transport exclusion, another checkbox is automatically selected:
- Include Adult with Extra Bed in Transport
This ensures that if you have an “Adult with Extra Bed” in your quotation, that adult is excluded from transport charges first.
![]()
Rules and Limitations
Minimum Distribution Rule:
You cannot exclude all adults from transport charges. At least one adult must bear the transport cost.
Example with 10 adults:
- Maximum you can exclude: 9 adults
- Minimum who must be included: 1 adult
This ensures transport charges are always distributed to at least one person.
Where Changes Reflect
The excluded transport charges appear in:
Quotation Display:
- Right-side segregation panel shows adjusted per-person charges
- Transport cost distribution clearly visible
All Sharing Formats:
- Quotation PDF
- Email quotations
- WhatsApp quotations
Proforma Invoice:
- Per-person breakdown reflects the exclusion
- Generated automatically based on quotation pricing
Profit Reports:
- Per-person pricing calculations show accurate distribution
Use Cases
- Tour Leader: One adult is the tour guide and receives complimentary transport
- Group Bookings: Specific adults in the group have different pricing arrangements
- Special Arrangements: Custom pricing agreements where certain travelers are exempt from transport costs
3. Branded Trip ID with Prefix
We have added the ability to set a custom prefix for Trip IDs at the brand level, allowing you to add company or brand identification to all trip references in shared documents.
Why this feature matters
A branded trip ID prefix helps:
- Identify trips from specific brands in multi-brand operations
- Maintain professional branding across all client-facing documents
- Easily distinguish trips when working with external partners
- Add company identification to all shared materials
Setting Up Trip ID Prefix
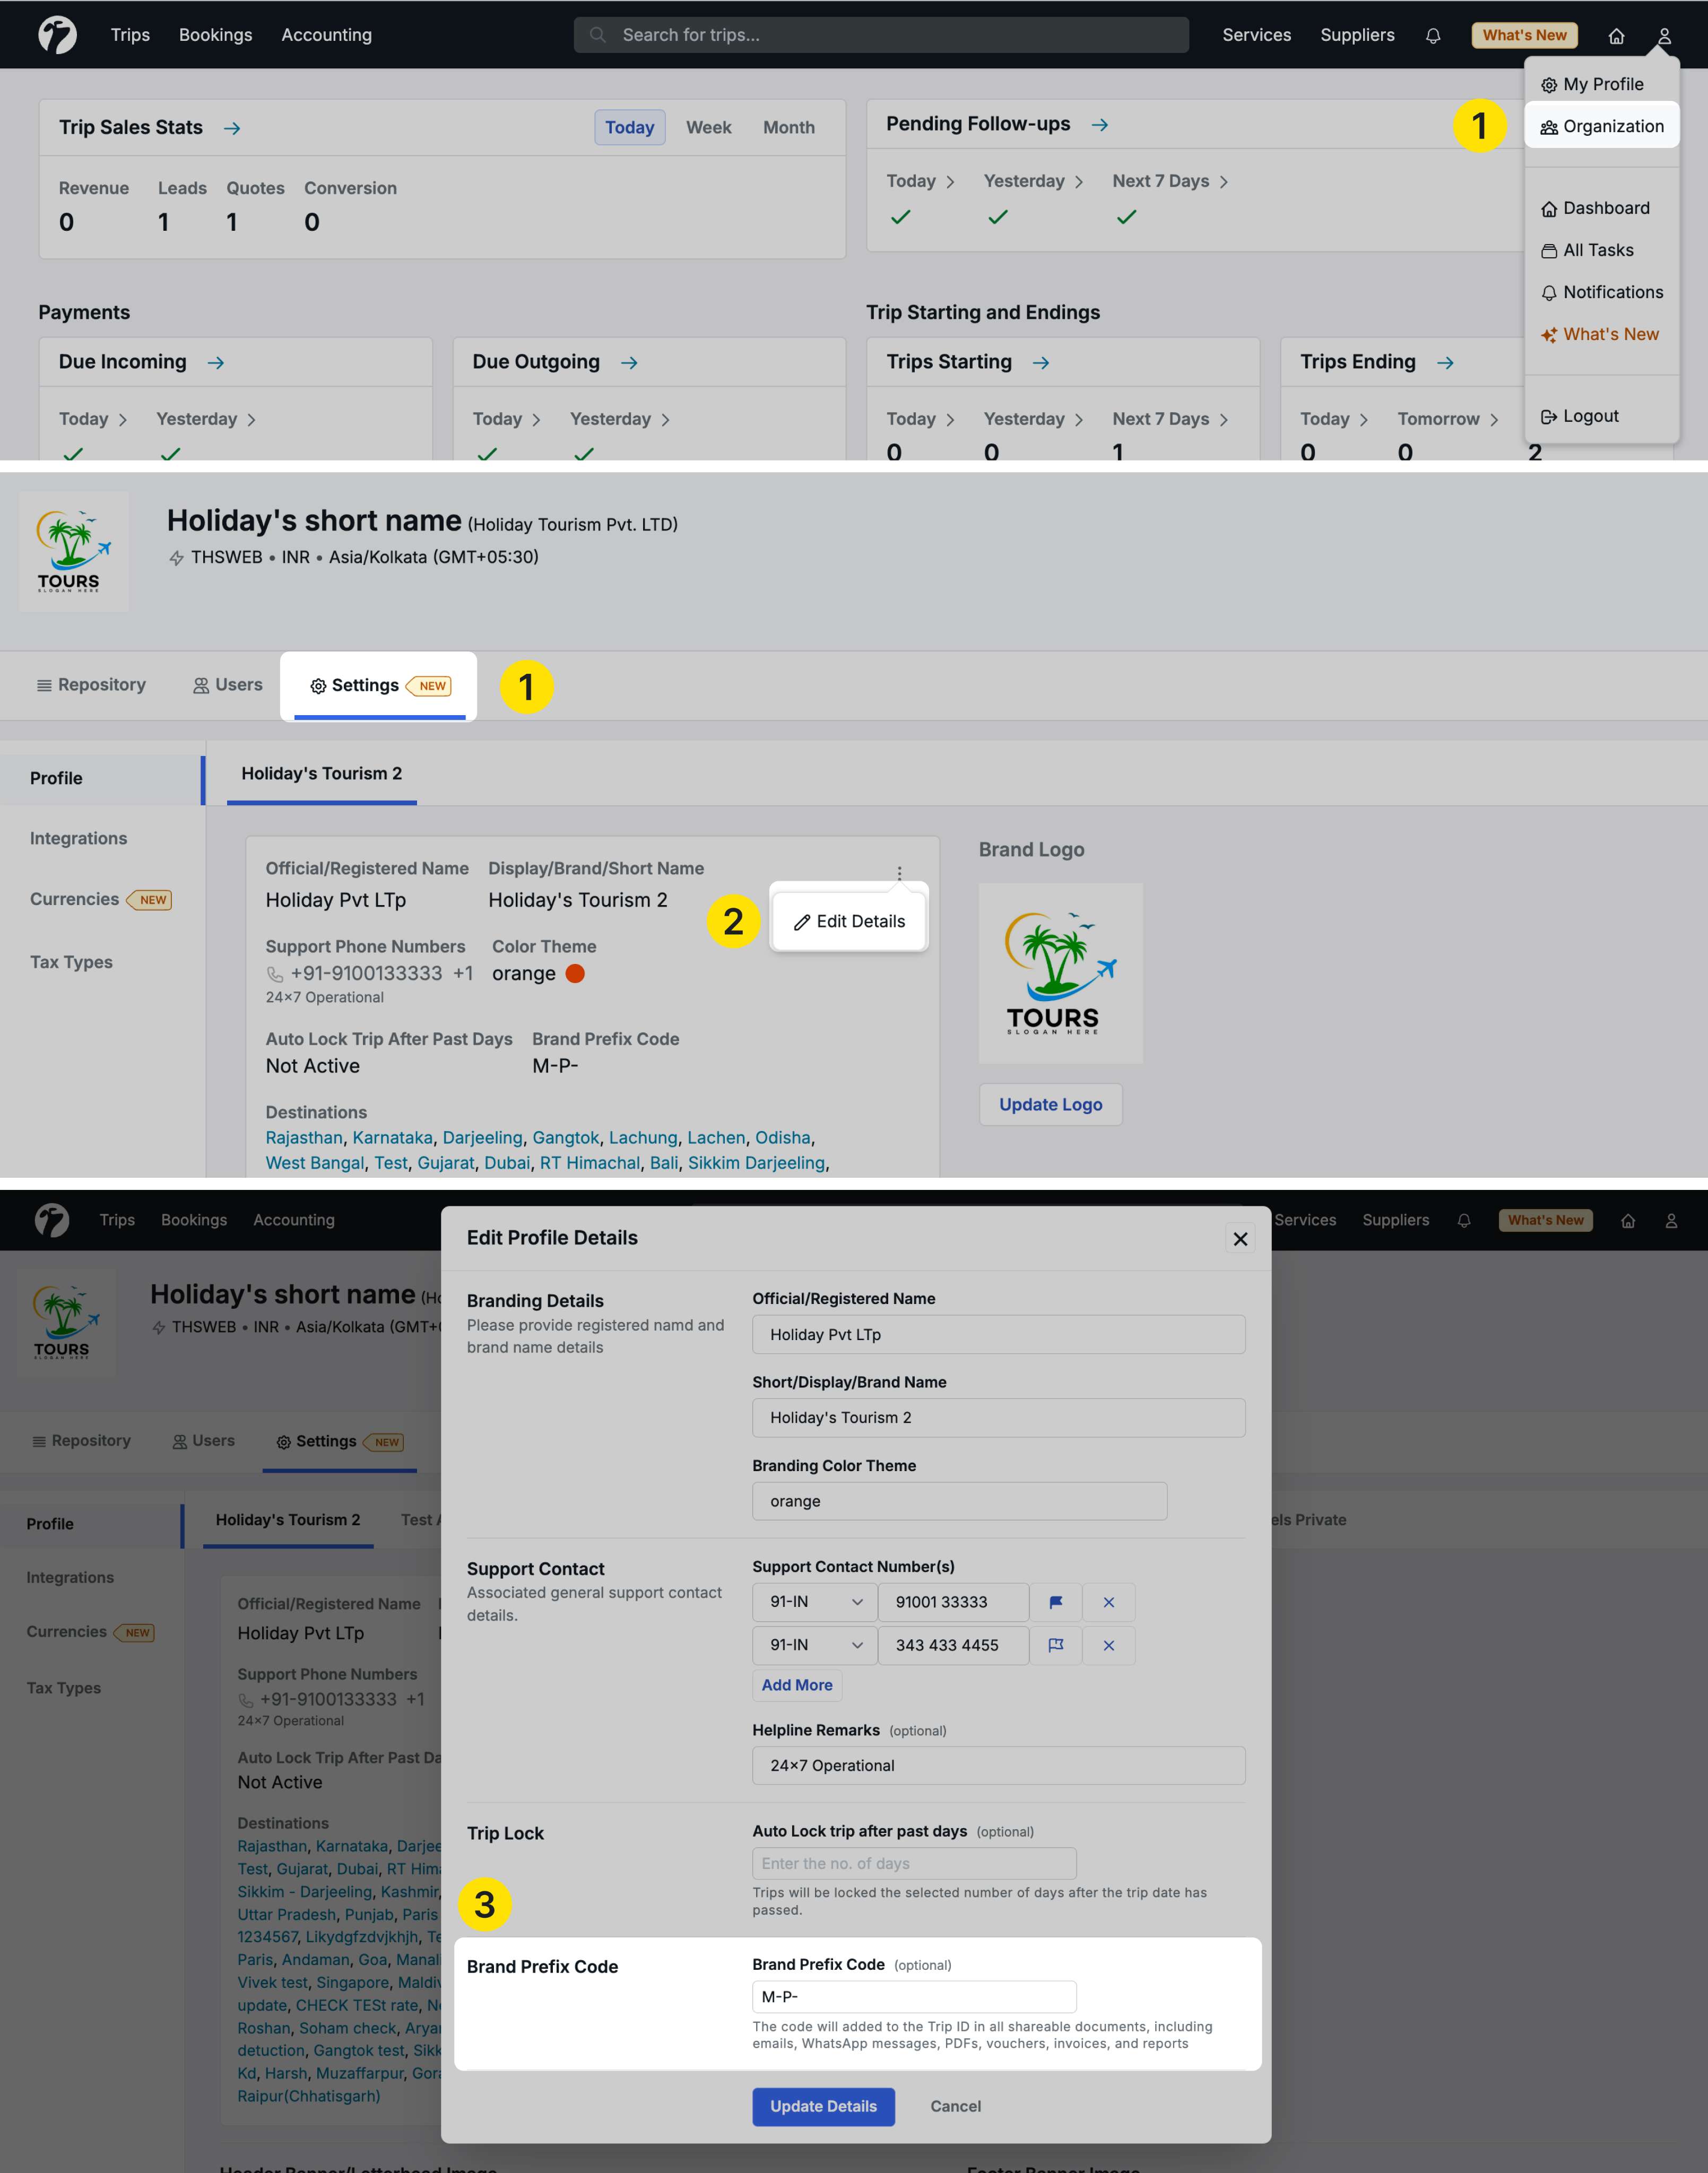
Navigate to Profile → Organization → Settings → Profile tab
Configuring Prefix per Brand
- You’ll see all your brands listed
- Each brand has a Brand Prefix Code field
- Click the ellipsis icon (•••) beside a brand
- Select Edit Details
- Enter your desired Brand Prefix Code
Prefix Rules
Character Requirements:
- Minimum: 3 characters
- Maximum: 6 characters
- Allowed: Letters (A-Z, a-z) and hyphen (-) only
- Not allowed: Numbers, spaces, special characters (except hyphen)
Examples of Valid Prefixes:
ABC-TOUR-DMC-
Examples of Invalid Prefixes:
AB(too short)ABC 123(contains space and numbers)COMPANY_(contains underscore)
How It Works
Once you set a prefix:
-
New Trip IDs: All new trips for that brand will have the prefix
- Example:
ABC-1234,ABC-1235,ABC-1236
- Example:
-
UI Display: Prefix is not shown in the software interface
-
Shared Documents: Prefix appears in all shared materials
Where Prefix Appears
The Trip ID prefix is displayed in the following documents and communications:
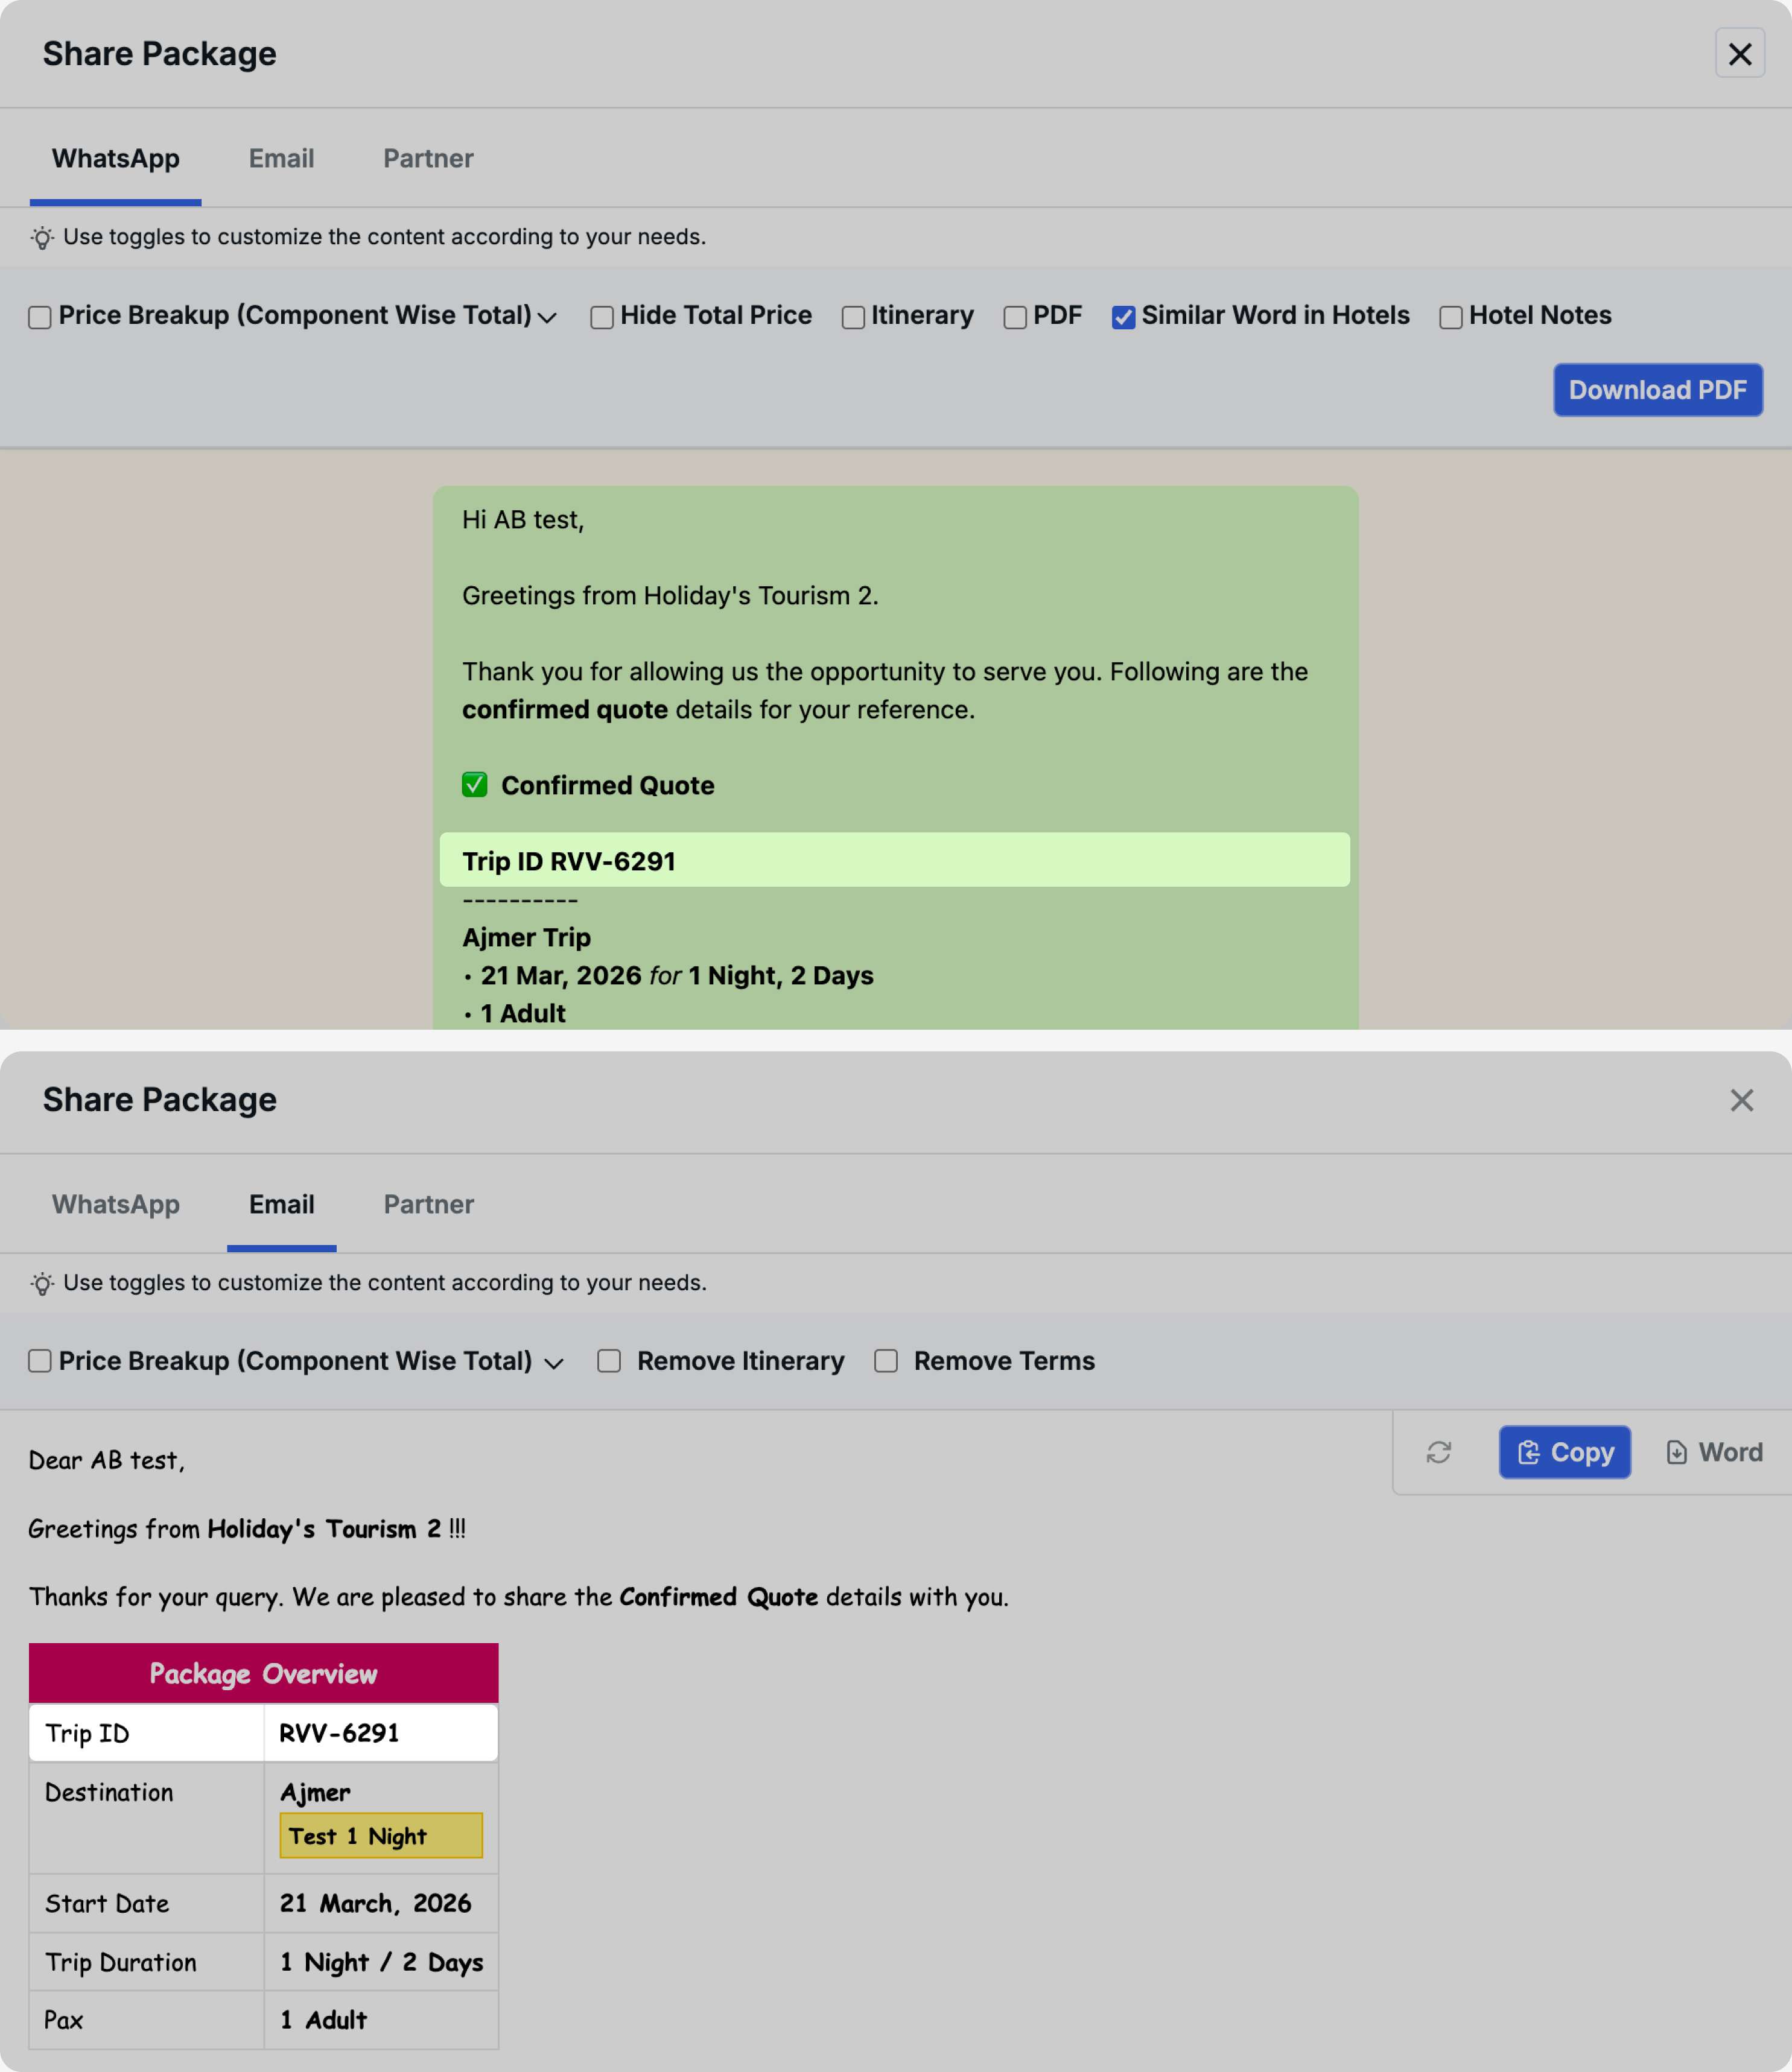
Quotations:
- Quotation PDF
- Quotation Email
- Quotation WhatsApp Message
- Partner Sharing (Email)
Service Bookings:
- Hotel Inquiry Email
- Hotel Inquiry WhatsApp
- Hotel Voucher
- Service Sharing (Transport/Activities) - Email and WhatsApp
- All Services Sharing
Accounting:
- Proforma Invoice
Documents:
- Trip Voucher
- Hotel Voucher (in-system)
Reports:
- Profit Reports
Removing Prefix
If you want to remove a brand prefix:
- Edit the brand details
- Clear the Brand Prefix Code field
- Save changes
- Future trips will not have a prefix
- Existing trips with prefixes retain them in historical documents
Benefits
- Professional Branding: Consistent brand identification across all materials
- Multi-Brand Management: Easily distinguish trips from different brands
- Partner Communication: Clear identification when working with agents and suppliers
- Document Organization: Easier to file and reference trip documents
- Client Recognition: Clients can quickly identify your company from trip IDs
4. Accounting Account Merge
We have introduced an Account Merge feature that allows you to consolidate duplicate manually-created accounts, streamlining your accounting workflows and improving data accuracy.
Why this feature matters
Over time, duplicate accounts can be created manually for the same purpose due to human error or changing requirements. This leads to scattered transactions across multiple accounts, making reconciliation, auditing, and reporting more complex. The Account Merge feature solves this by allowing you to combine duplicate accounts into a single master account.
Which accounts can be merged
You can merge the following types of manually-created accounts:
- Company Accounts: Accounts created for your company entities
- Employee/User Accounts: Accounts created for employees or users
Important: The following automatically-created accounts cannot be merged:
- Supplier accounts (auto-created with suppliers)
- Guest accounts (auto-created with trips)
- Hotel accounts (auto-created with hotels)
- Trip source accounts (auto-created with trip sources)
How to merge accounts
Navigate to Accounting → Accounts and click the ellipsis icon (•••) in the top right corner.
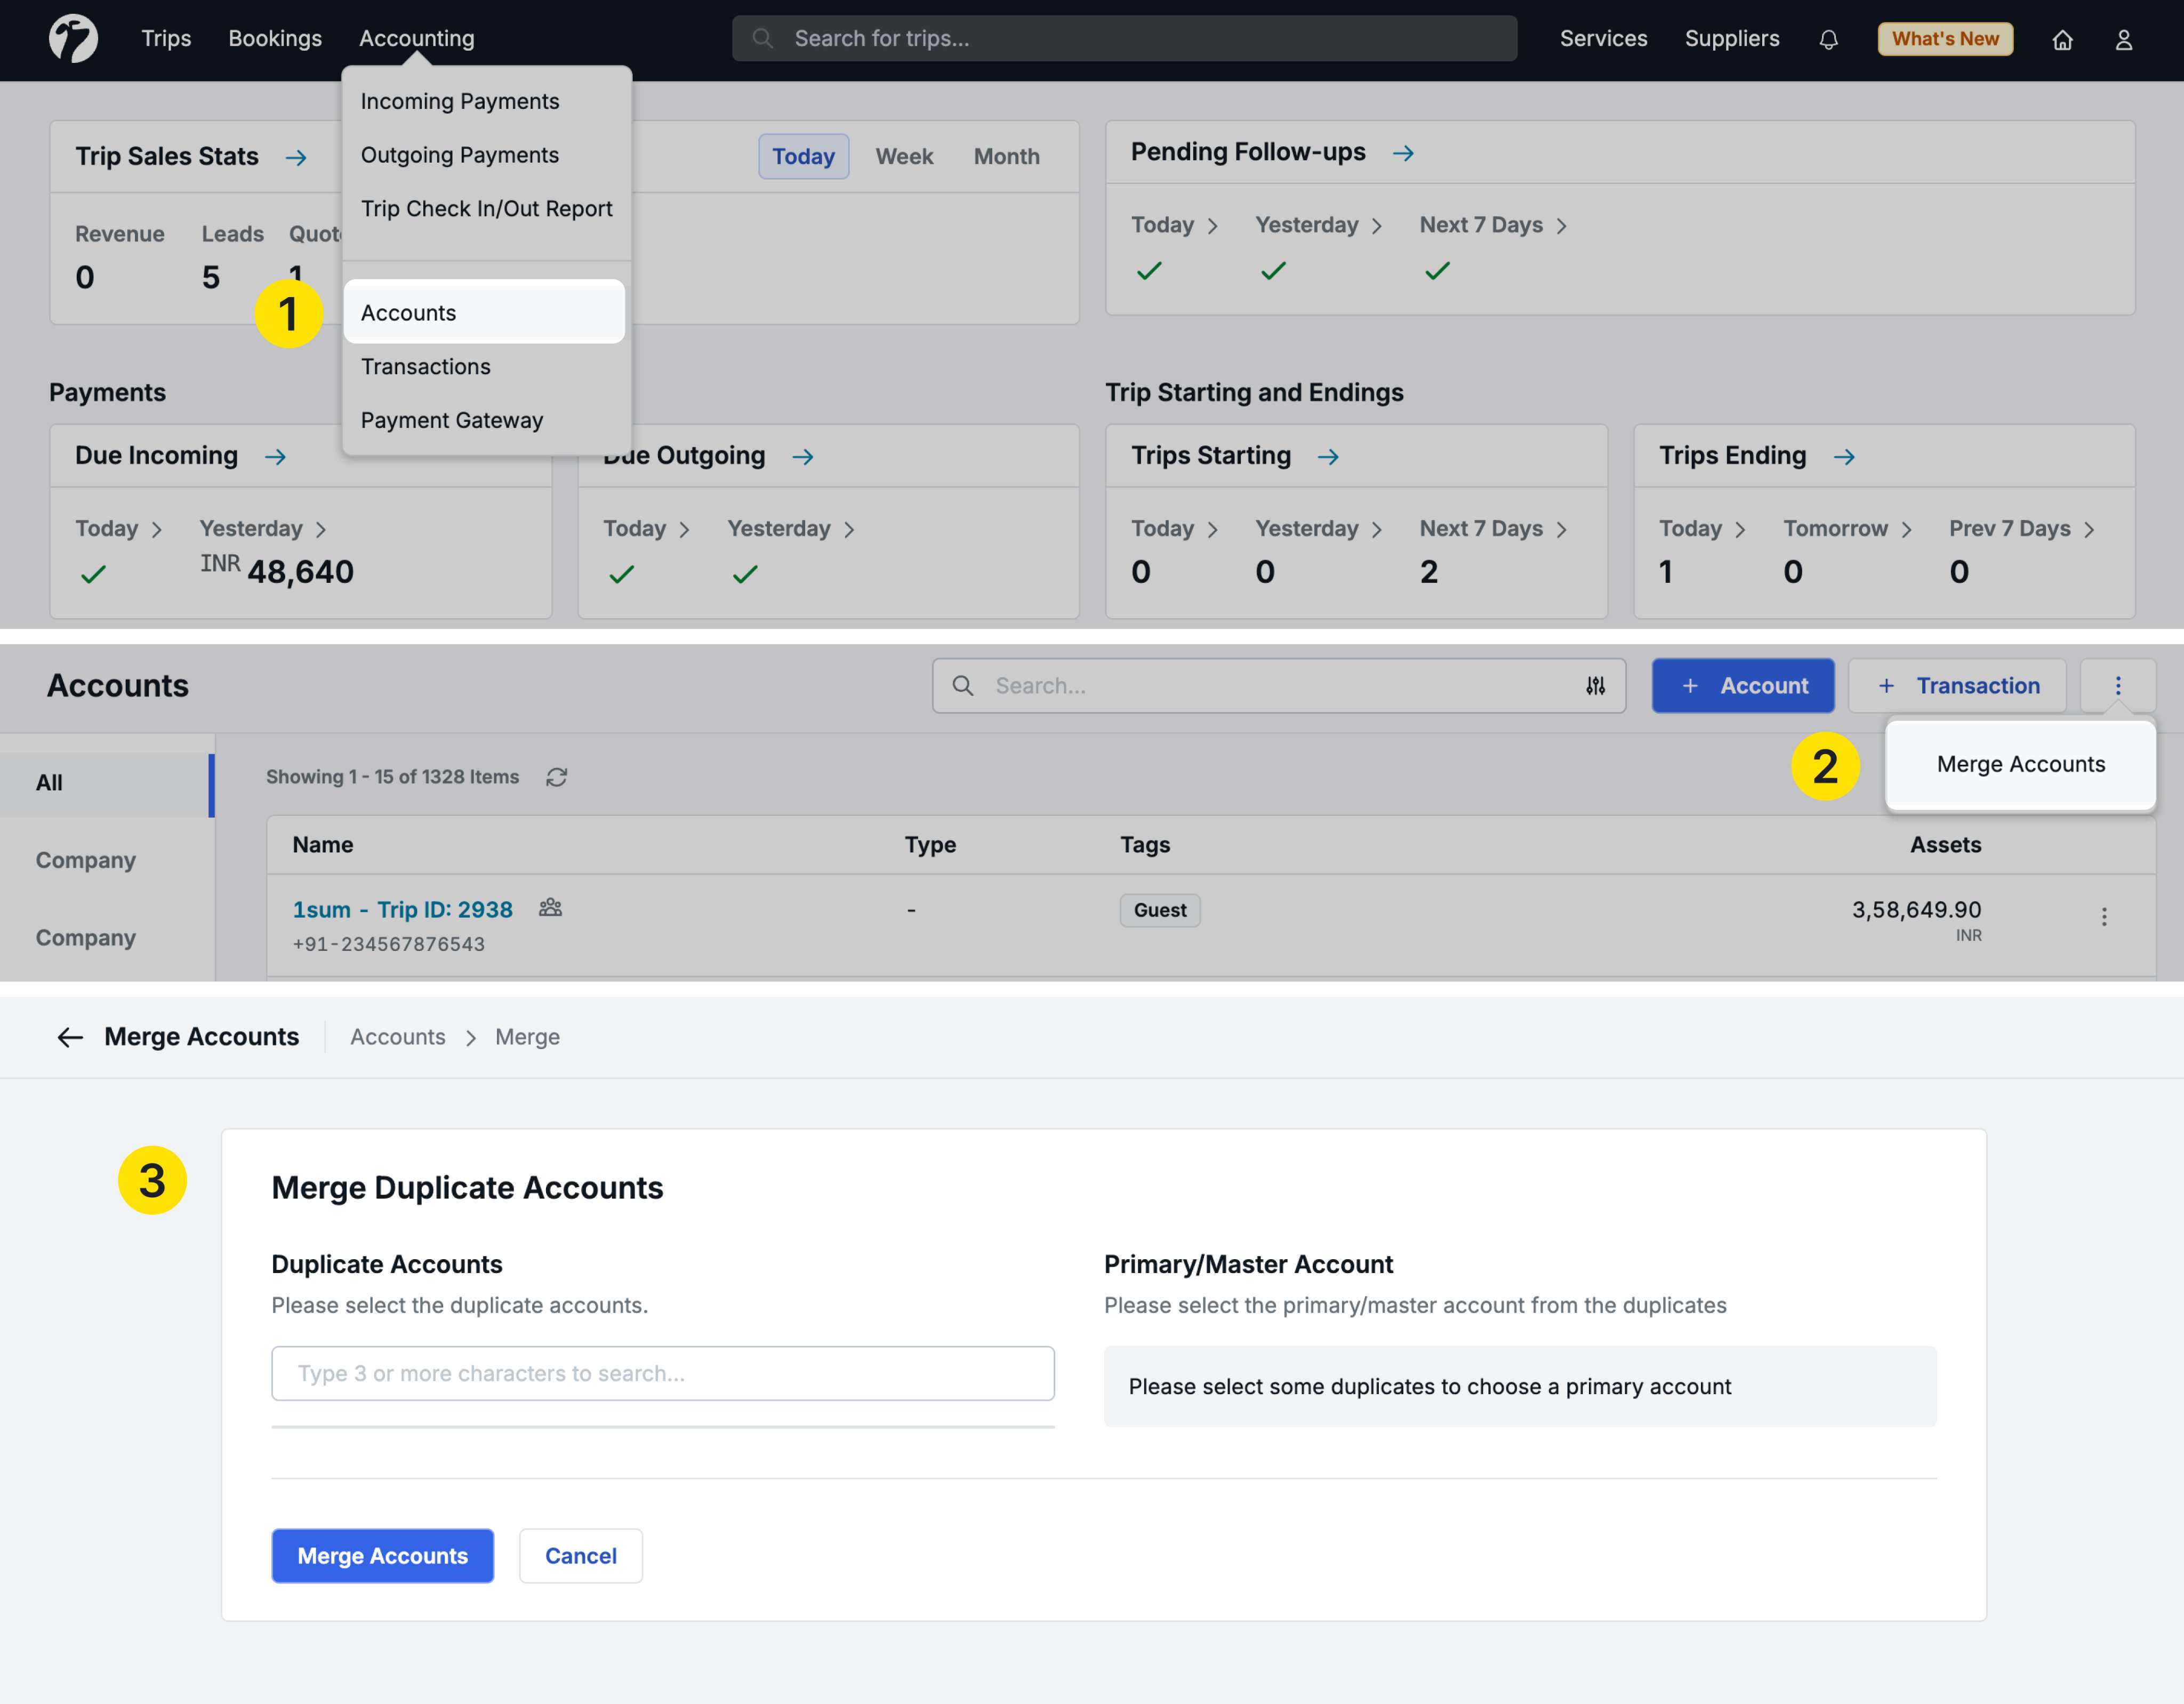
Step 1: Select Duplicate Accounts
- Click Merge Accounts from the menu
- The “Merge Duplicate Accounts” popup opens
- Search for accounts you want to merge by name
- All matching accounts appear in the search results
- Select the duplicate accounts you want to consolidate
- Selected accounts appear on the right side
Step 2: Choose Primary Account
- From your selected accounts, choose one as the Primary (Master) Account
- This account will be retained as the single source going forward
- All other selected accounts become duplicate accounts
Step 3: Complete the merge
Once you confirm:
- All transactions from duplicate accounts are transferred to the primary account
- The primary account becomes the single consolidated account with complete transaction history
- Duplicate accounts are merged and no longer appear as separate entities, and will get disable
- Going forward, all new transactions use the primary account only
Benefits
- Simplified Reconciliation: All transactions in one account instead of scattered across duplicates
- Easier Auditing: Single account to review for all related transactions
- Streamlined Reporting: Download transactions from one consolidated source
- Better Data Quality: Eliminate duplicate accounts and maintain clean accounting records
- Time Savings: No need to check multiple accounts for the same information
5. Payment Gateway Error Categorization
We have enhanced Payment Gateway transaction tracking with detailed error categorization, providing clearer visibility into why payments fail and helping you take appropriate action.
Payment Gateway - Optional Add-On for Seamless Payment Collection
Payment Gateway is an optional add-on feature that enables you to collect payments directly from your customers. Share payment links via email, WhatsApp, or PDF, and get paid faster with multiple payment options, T+1 settlement, automated payment verification, and instant receipt generation—all integrated seamlessly into your travel sales workflow.
If you’re interested in enabling Payment Gateway to streamline your payment collection, please contact our sales team at sales@sembark.com or connect with your support POC to learn more about this feature and pricing.
Why this feature matters
Previously, all unsuccessful payment attempts were grouped together as “Failures.” However, not all failures are actual technical errors—many are customer actions like abandoning the payment page or canceling the transaction. This new categorization helps you:
- Understand the true nature of payment issues
- Identify genuine technical problems vs. customer behavior
- Take appropriate follow-up actions
- Improve payment success rates
Accessing Payment Gateway Transactions
Navigate to Accounting → Payment Gateway → Transactions tab
You’ll see transaction summaries with:
- Amount: Total transaction amount
- Successful: Number of successful transactions
- Failures: Number of failed transactions (now categorized)
![]()
Two Main Categories
Payment failures are now split into:
1. Cancelled Transactions
Customer-initiated actions that stopped the payment process:
Payment Timeout:
- Customer clicked the payment link
- Opened the payment page
- Left the page without completing payment
- Session timed out
Payment Canceled:
- Customer intentionally canceled the payment
- Customer closed the payment window
- Customer choose not to proceed
2. Failed Transactions
Genuine technical or payment processing errors:
Payment Declined:
- Bank declined the transaction
- Insufficient funds
- Card limit exceeded
- Bank-side restrictions
Authentication Failed:
- Incorrect CVV/PIN entered
- Failed OTP verification
- Security authentication issues
- Cardholder verification failed
Technical Errors:
- Payment gateway errors
- Network connectivity issues
- System timeout during processing
- Integration errors
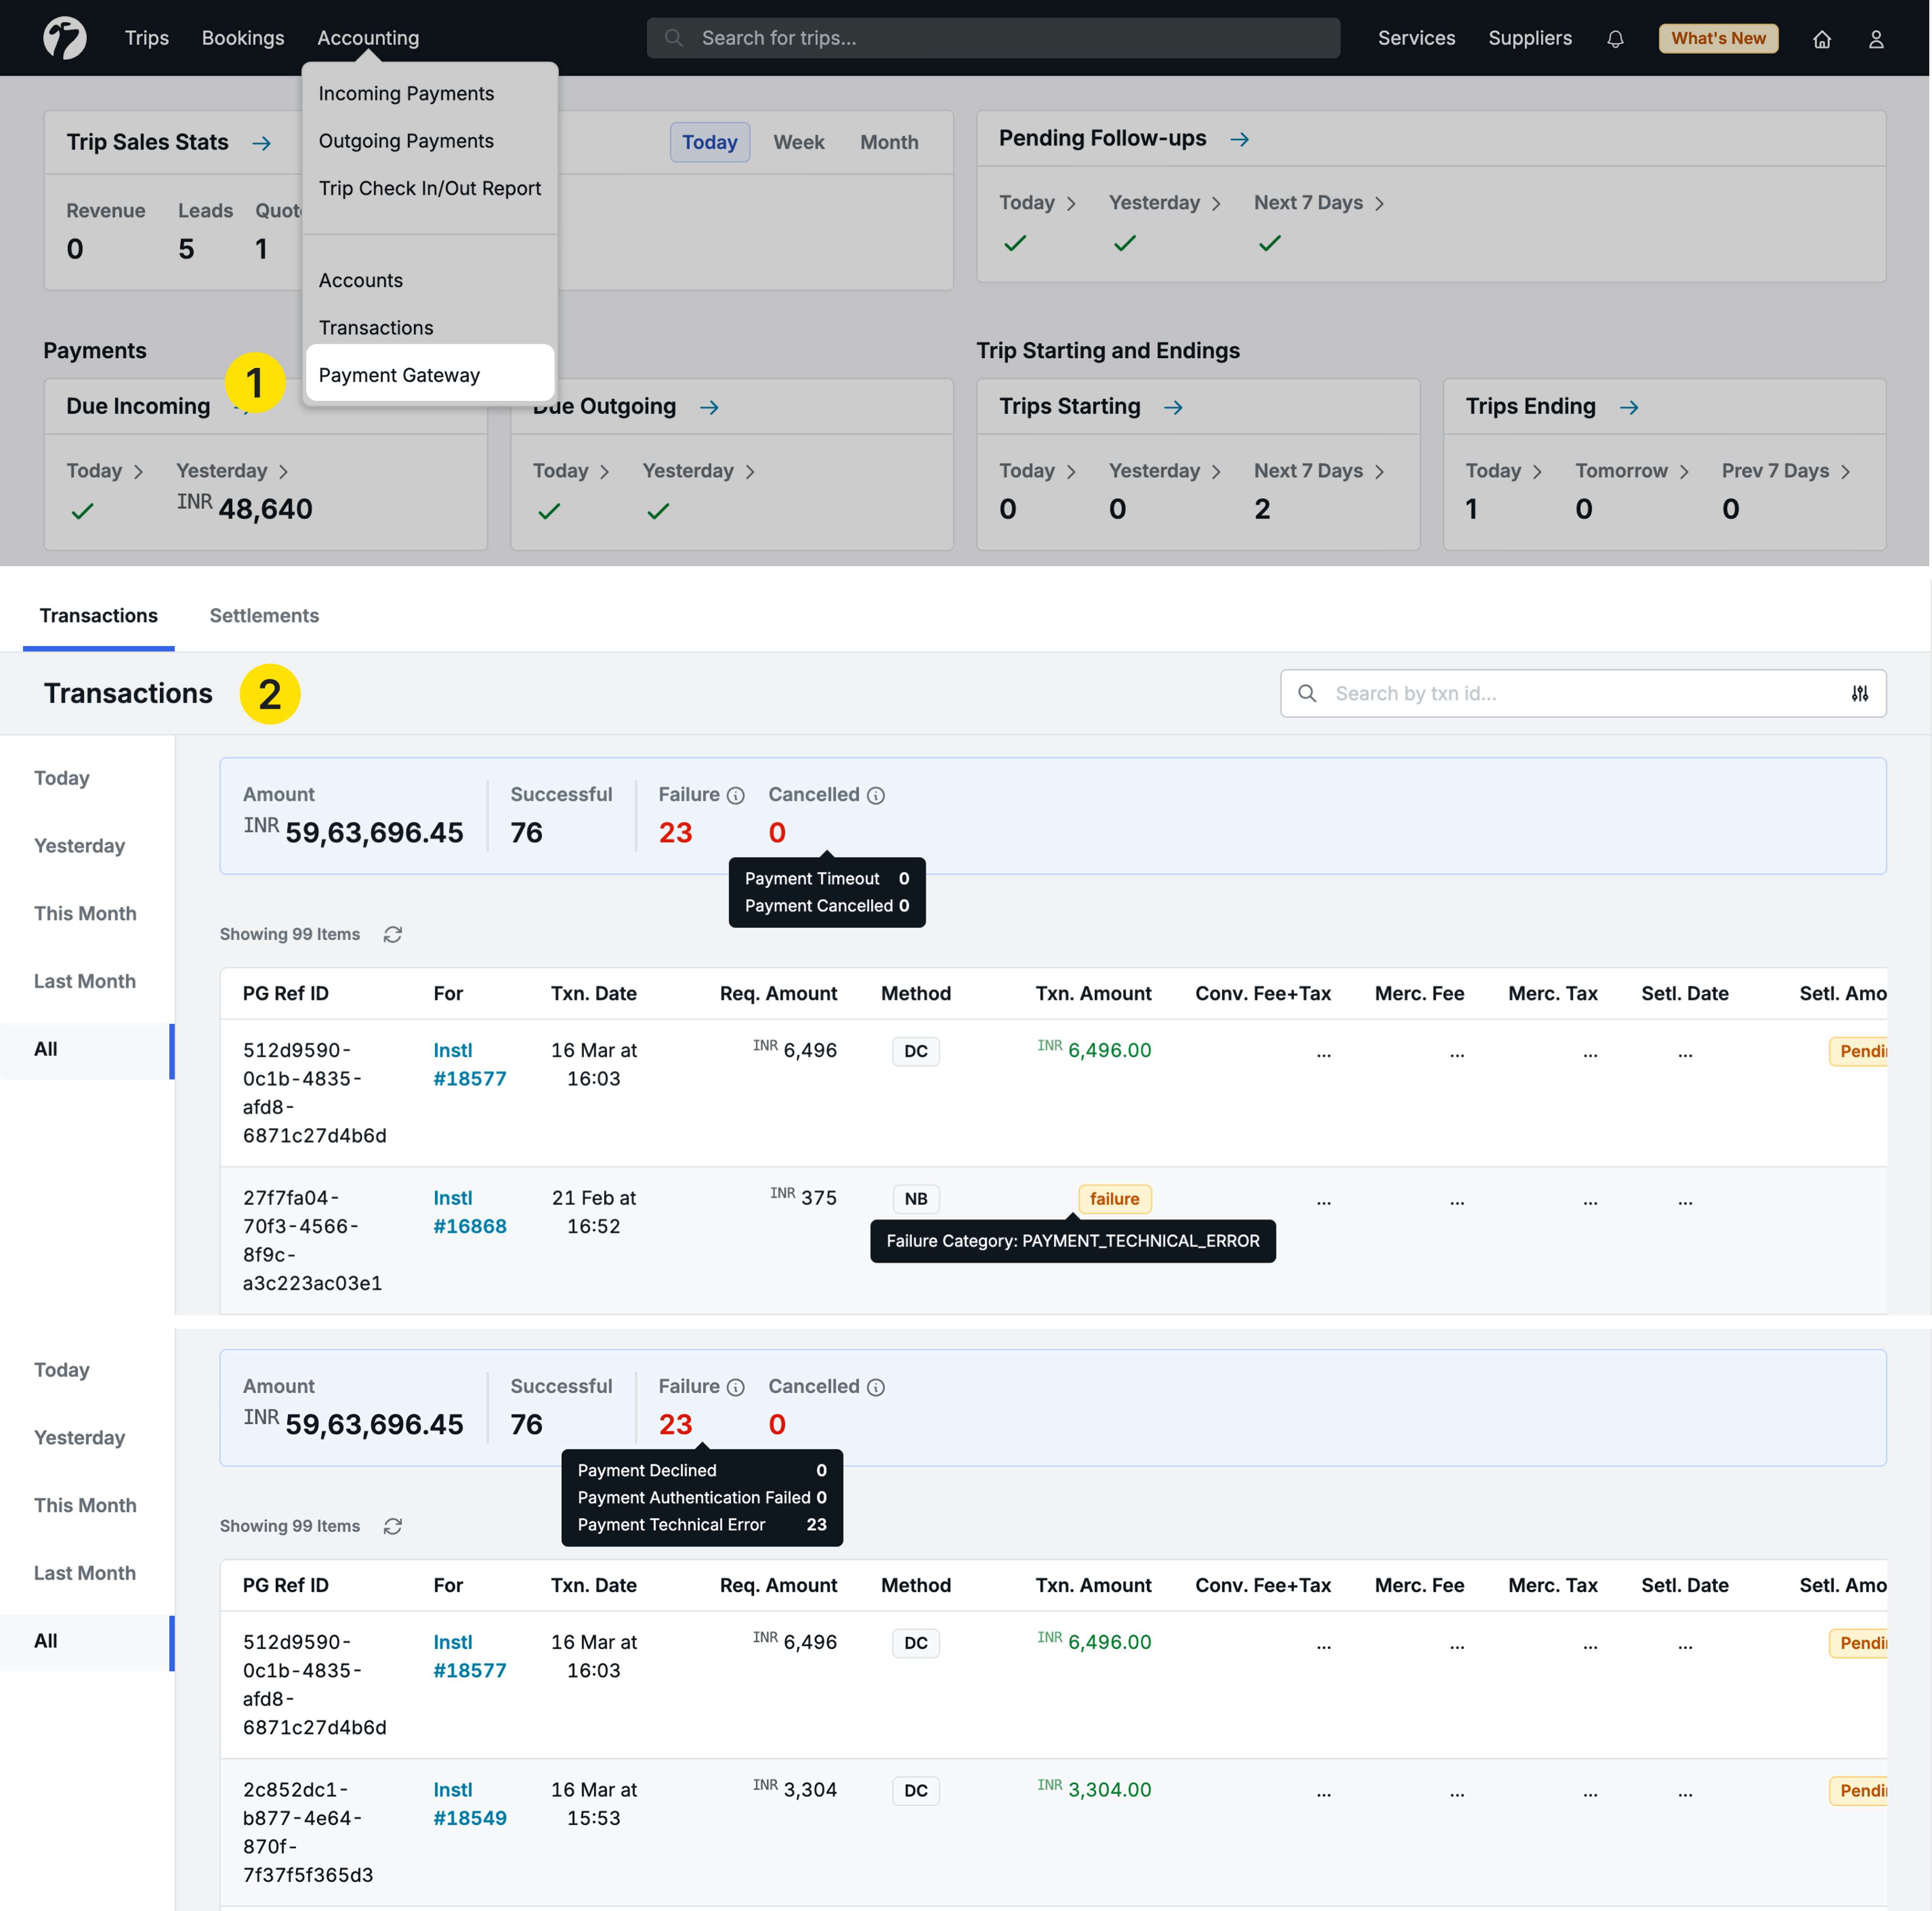
Viewing Detailed Error Information
In the Transactions table:
-
Failed transactions show a Failure Status instead of the amount
-
Hover over the failure status
-
A tooltip appears showing:
- Failure Category (Canceled or Failed)
- Specific Reason (e.g., “Payment Declined”, “Authentication Failed”)
- Detailed Error Message from the payment gateway (when available)
Taking Action
For Canceled Transactions:
- Follow up with customers to understand why they abandoned payment
- Send payment reminders
- Offer assistance with the payment process
For Failed Transactions:
- Contact customers to retry with different payment method
- Check if there are recurring authentication issues
- Verify customer’s payment details are correct
Benefits
- Better Insights: Understand true failure reasons vs. customer abandonment
- Targeted Follow-ups: Different actions for cancellations vs. failures
- Improved Success Rates: Address root causes of payment issues
- Support Efficiency: Quickly identify if issue needs technical support
- Customer Service: Provide better assistance based on error type
6. Inclusion & Exclusion Categories
We have enhanced the Inclusions and Exclusions feature with the ability to add category headings, allowing you to organize inclusion and exclusion items into logical groups.
Why this feature matters
Previously, inclusions and exclusions were simple line items without grouping. Category headings allow you to:
- Organize items into logical sections (e.g., “Accommodation”, “Meals”, “Transport”)
- Create more professional and readable quotations
- Help clients quickly find relevant information
- Maintain consistency across quotations
Accessing Inclusions/Exclusions
Navigate to Profile → Organization → Repository → Inclusions/Exclusions
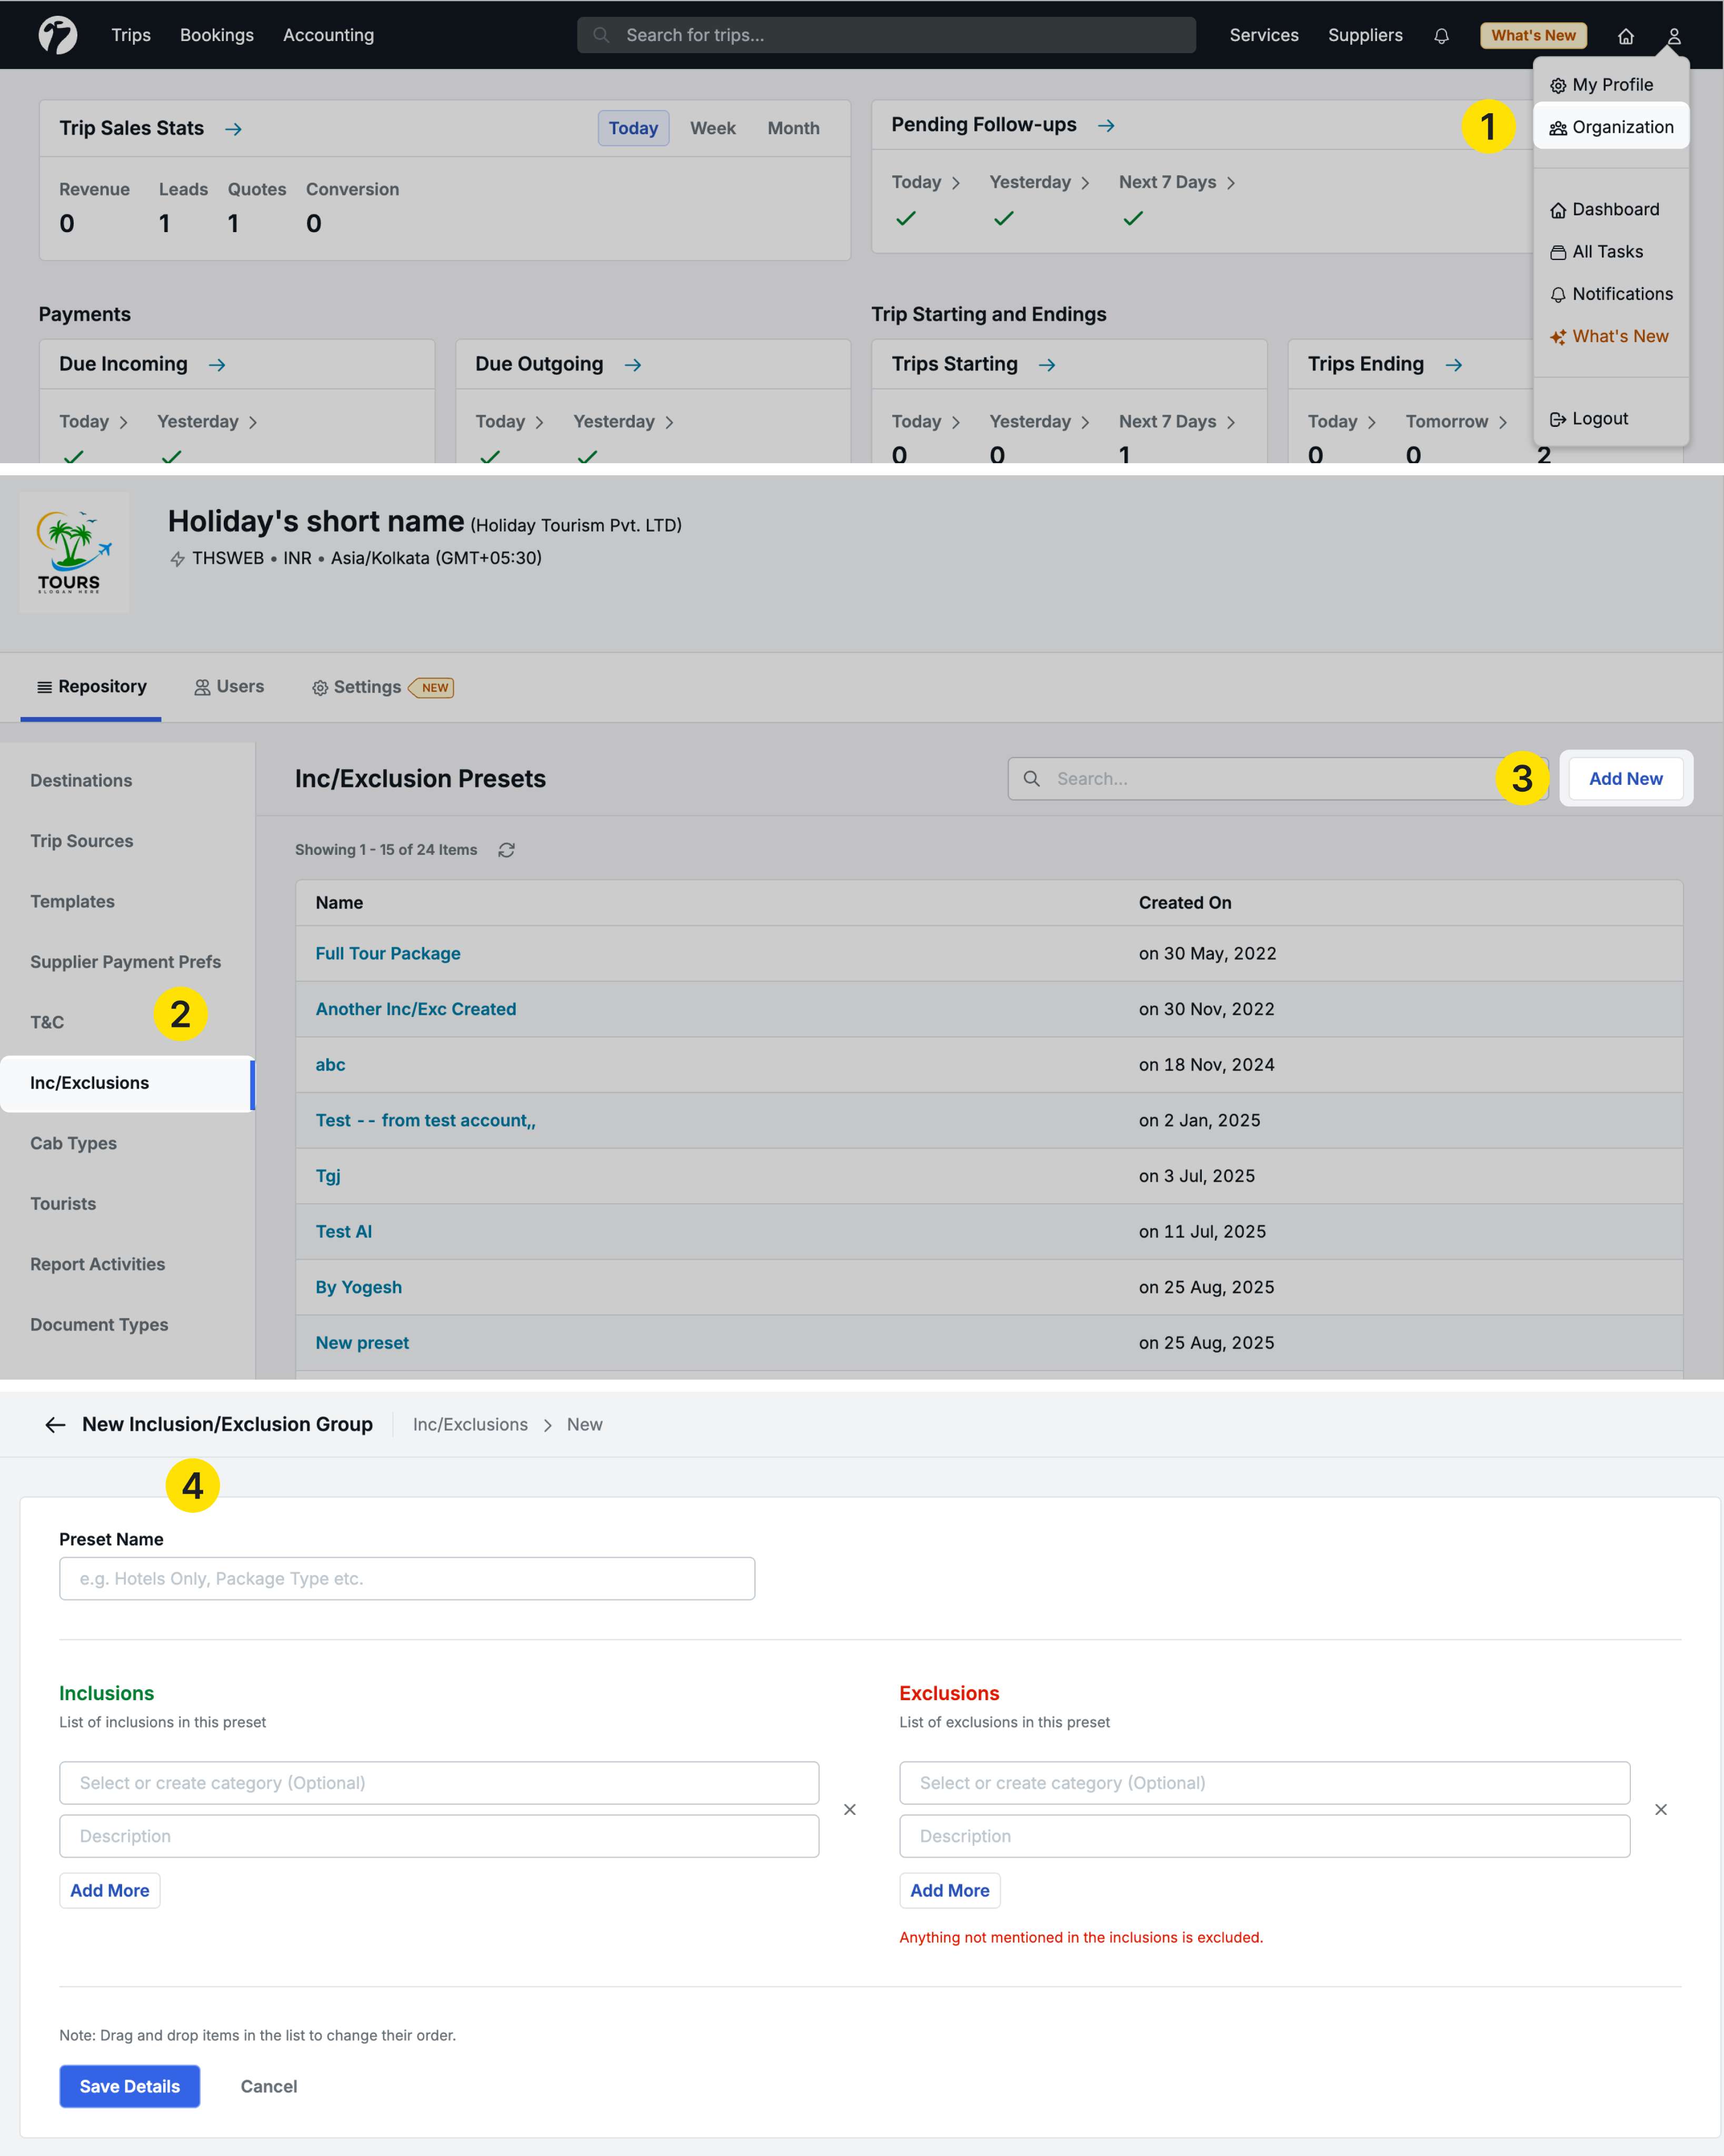
Creating Presets with Categories
Click New to create a preset:
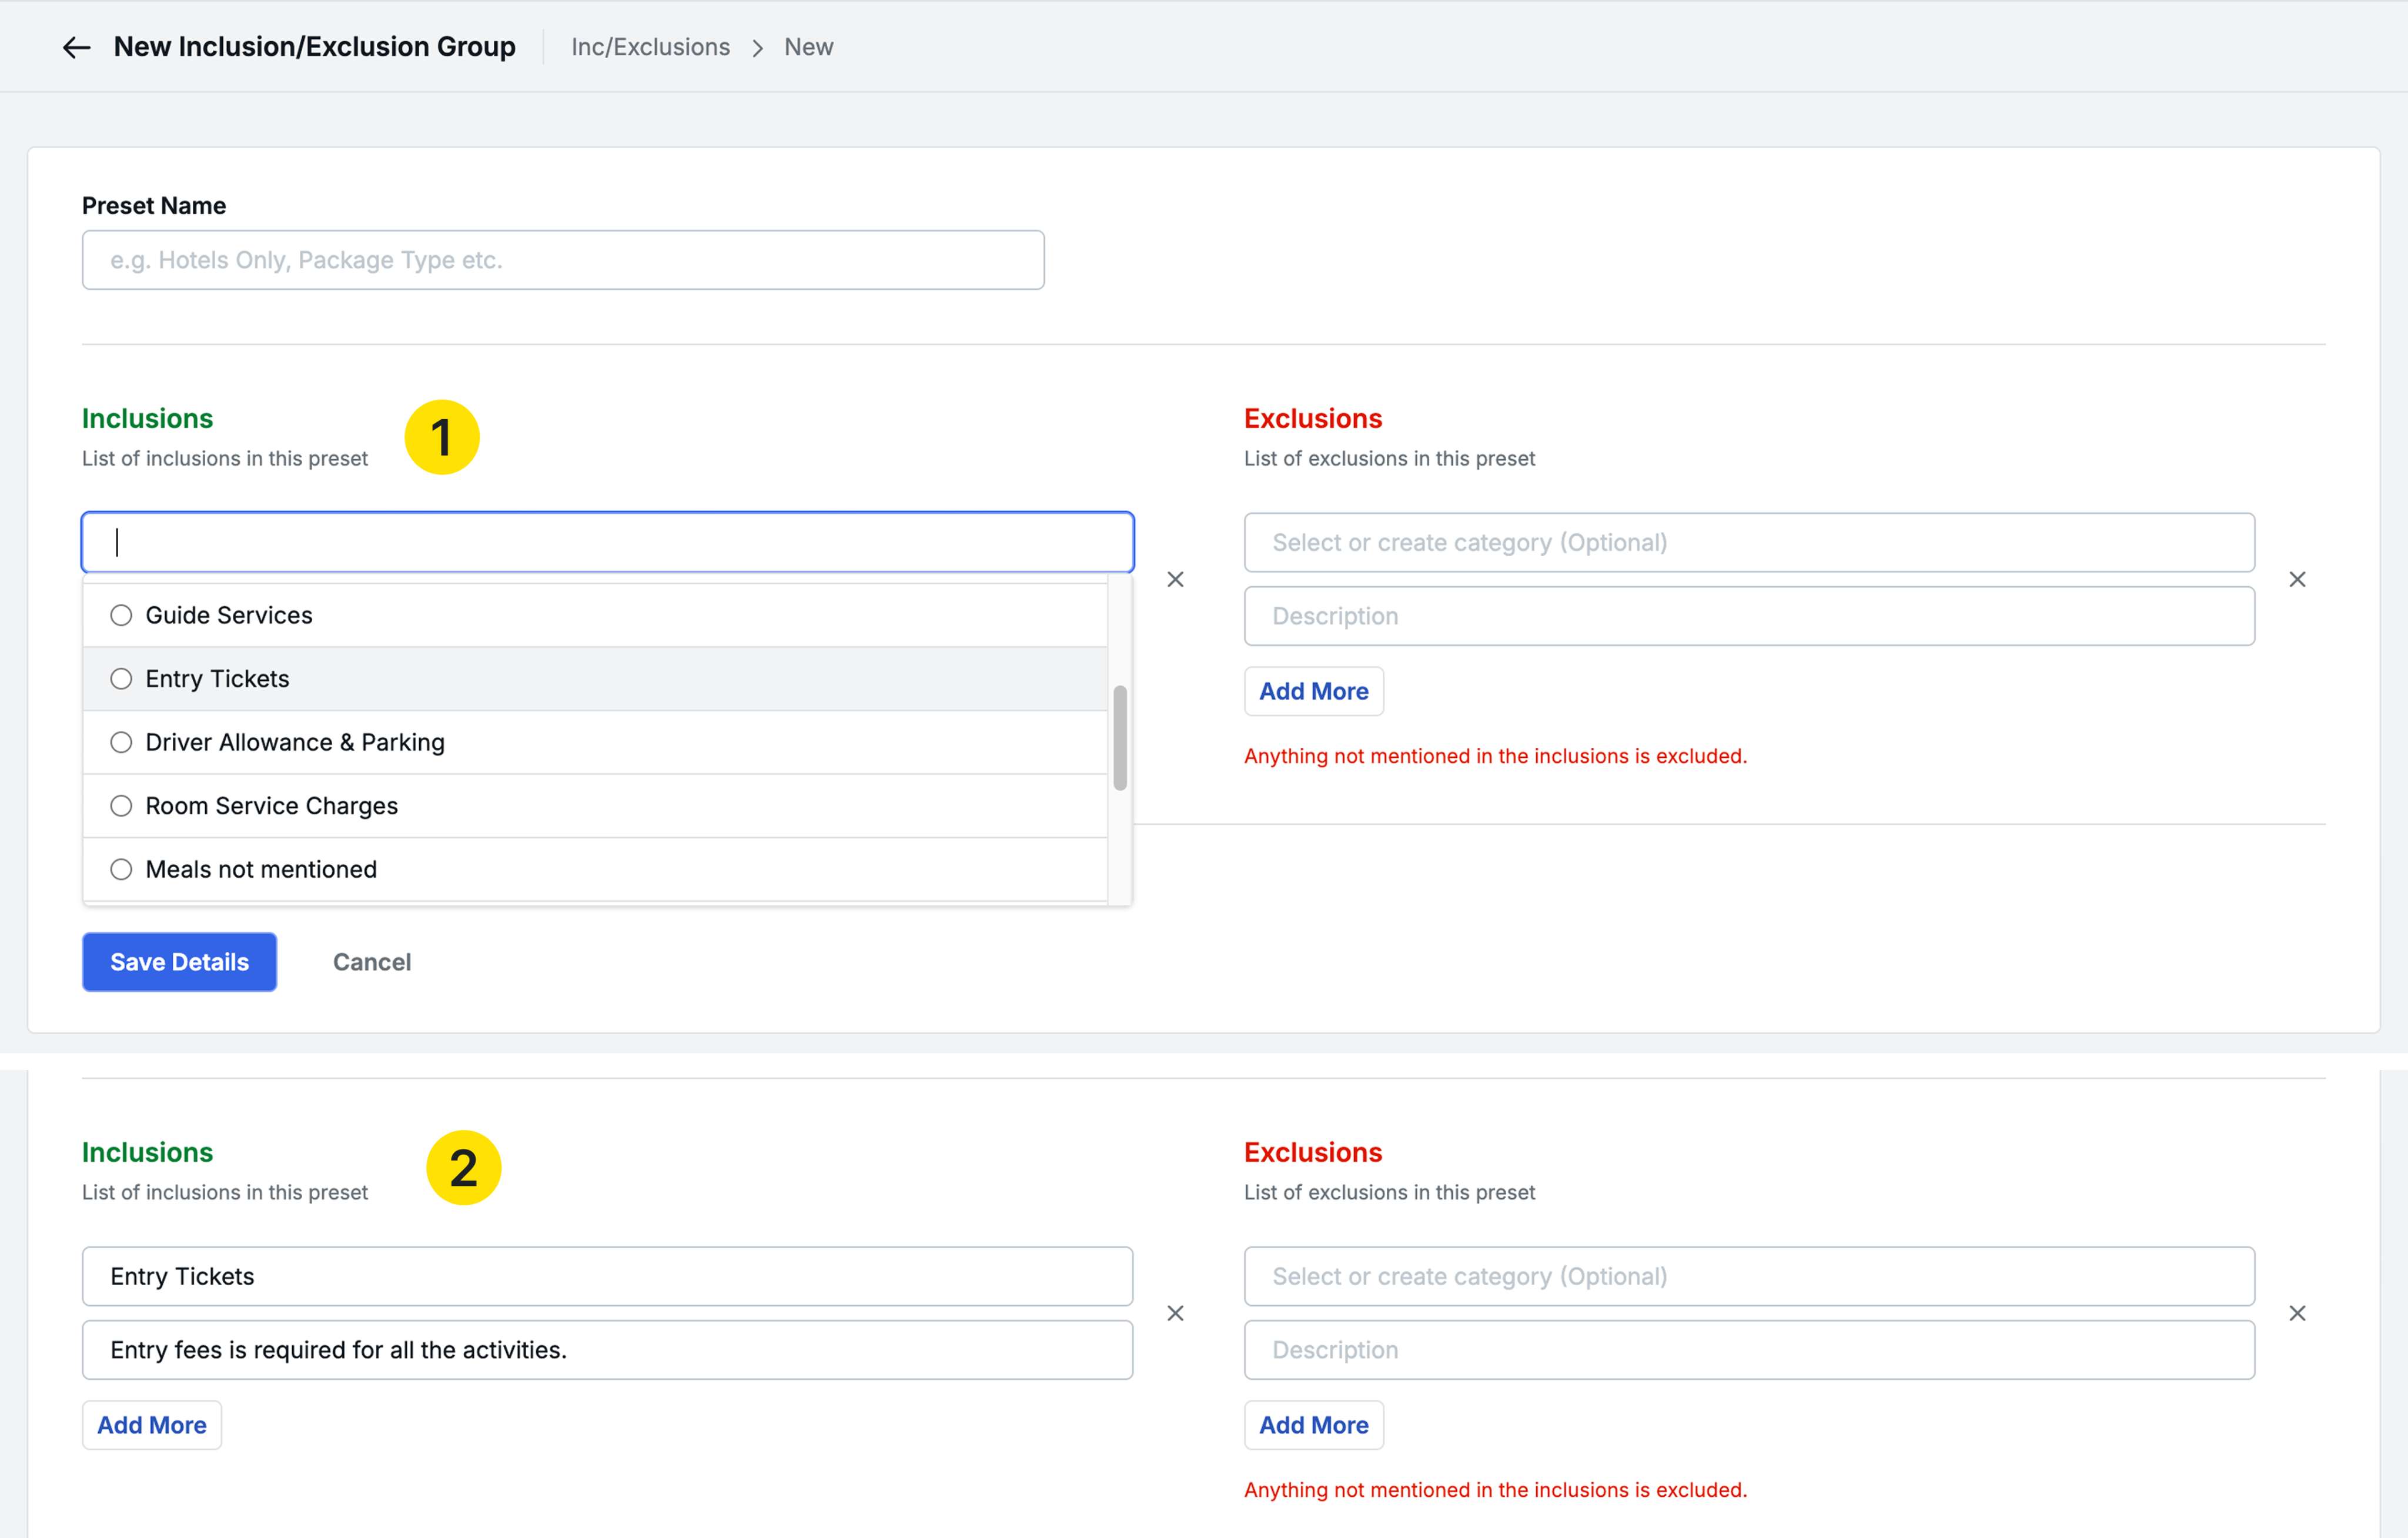
Adding Category Headings
For each line item, you can now add:
-
Category (Optional): A heading to group related items
- Example: “Accommodation”, “Meals”, “Transportation”, “Activities”
-
Description (Required): The actual inclusion or exclusion detail
Flexibility:
- Some items can have both category and description
- Some items can have only description (no category)
- Mix and match as needed within the same preset
Using Category Presets in Quotations
During quotation creation:
- Navigate to the Inclusions/Exclusions section
- Select your preset with categories
- The categories and descriptions populate automatically
- You can edit categories and descriptions for this specific quotation
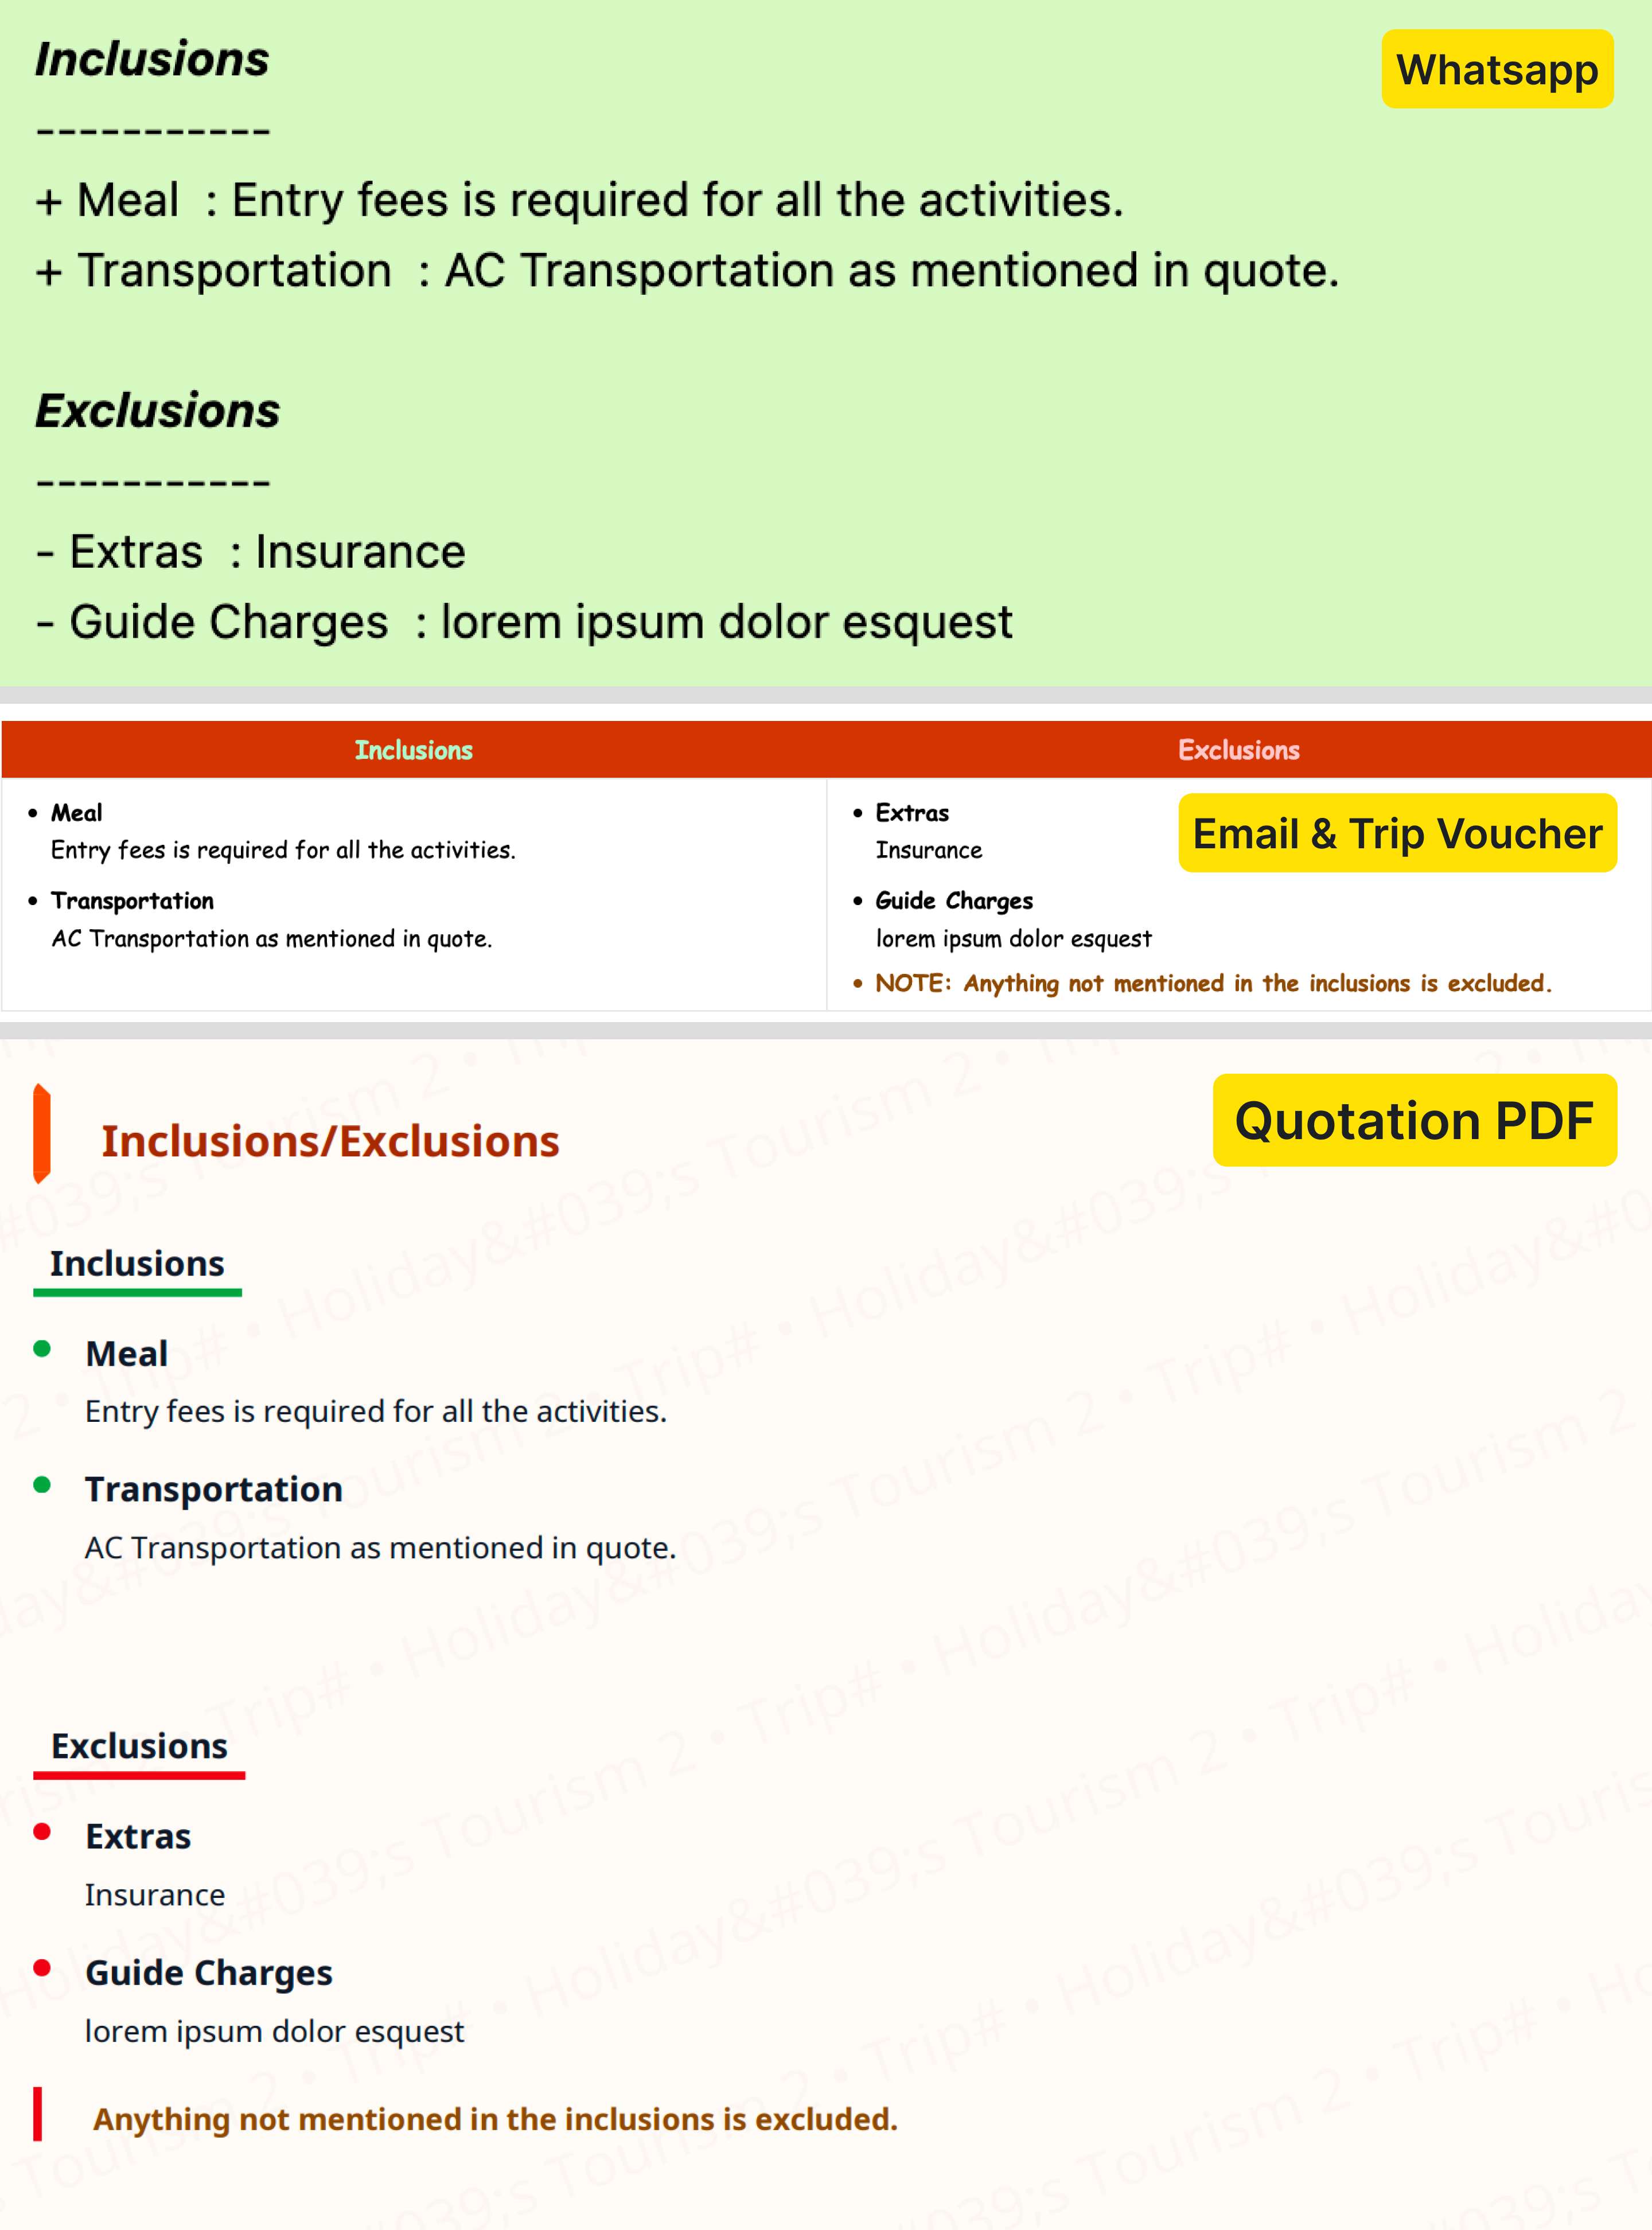
Where Categories Appear
Category headings display in:
- Quotation PDF: Grouped sections with clear category headers
- Quotation Email: Organized sections for better readability
- Quotation WhatsApp: Structured format with category groupings
- Trip Voucher: Grouped sections with clear category headers
Benefits
- Better Organization: Logical grouping of related items
- Professional Appearance: Structured, easy-to-read quotations
- Improved Clarity: Clients can quickly scan by category
- Flexibility: Use categories where helpful, skip where not needed
- Consistency: Reusable presets maintain standard organization
7. Trip Source Detail Page
We have completely redesigned the Trip Source Detail Page with a comprehensive four-tab structure, providing complete visibility into trip sources similar to supplier management.
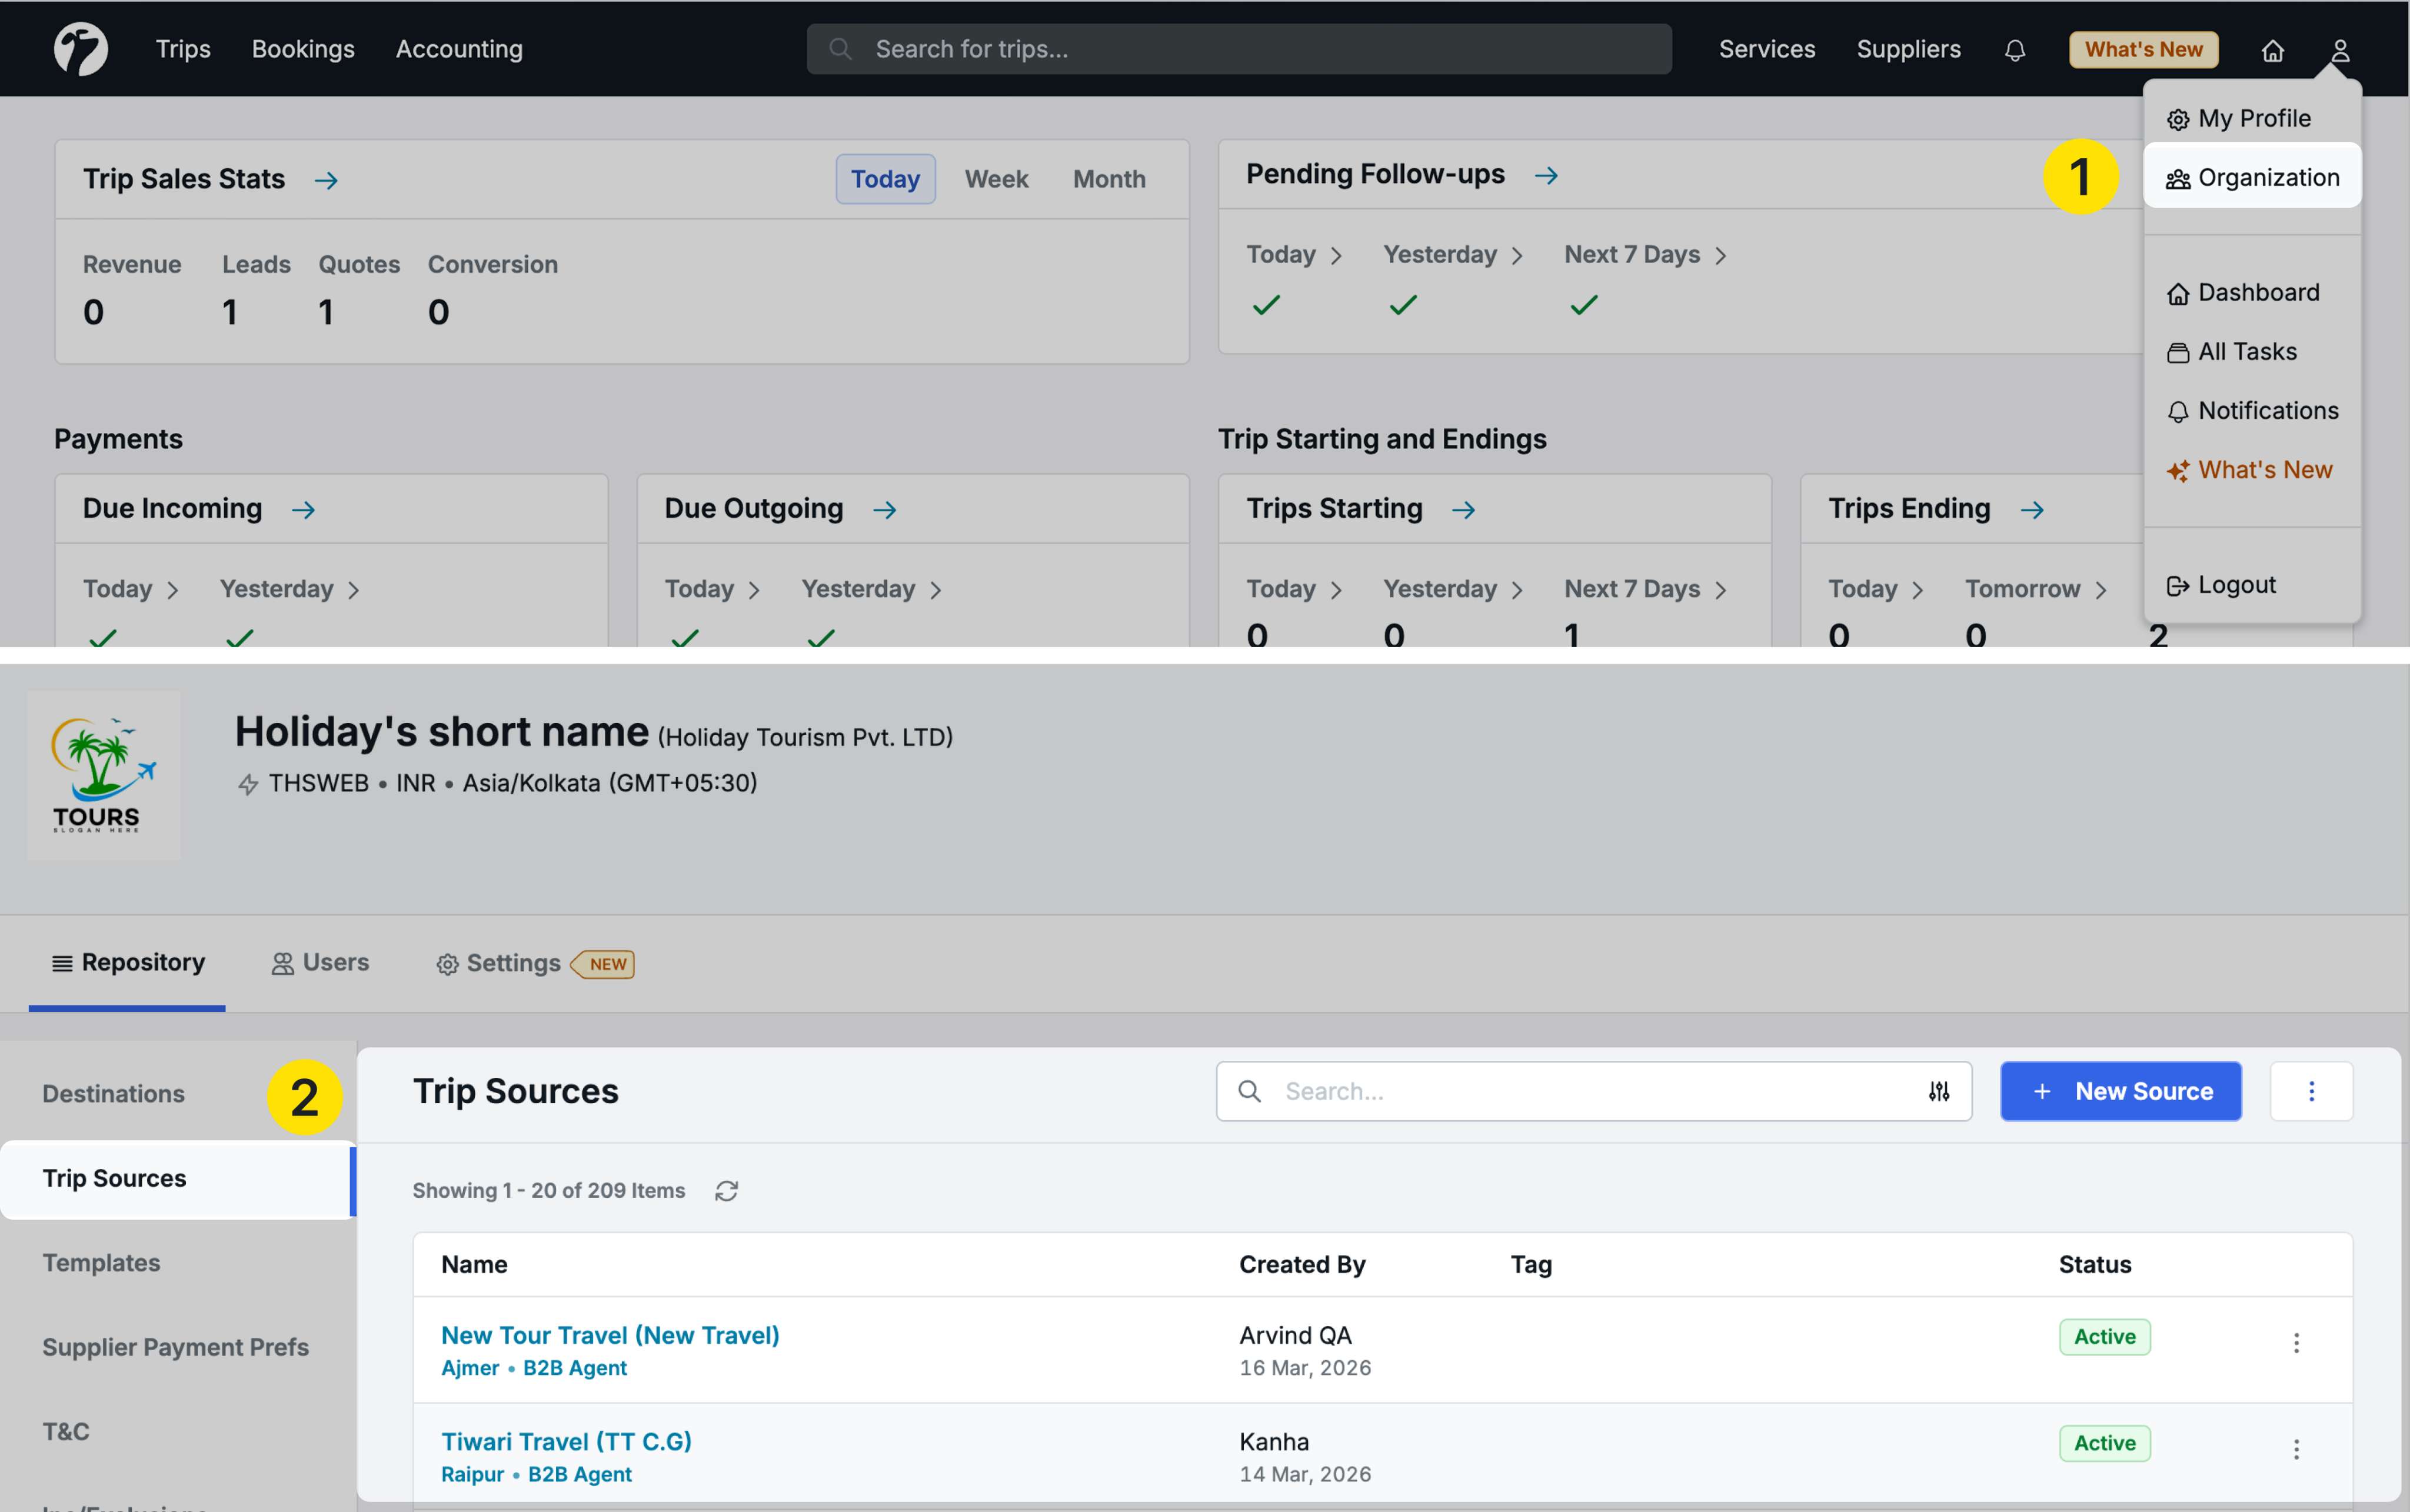
Accessing Trip Source Details
Navigate to Profile → Organization → Repository → Trip Sources
Click on any trip source to open its detail page.
Four-Tab Structure
The new detail page contains four tabs:
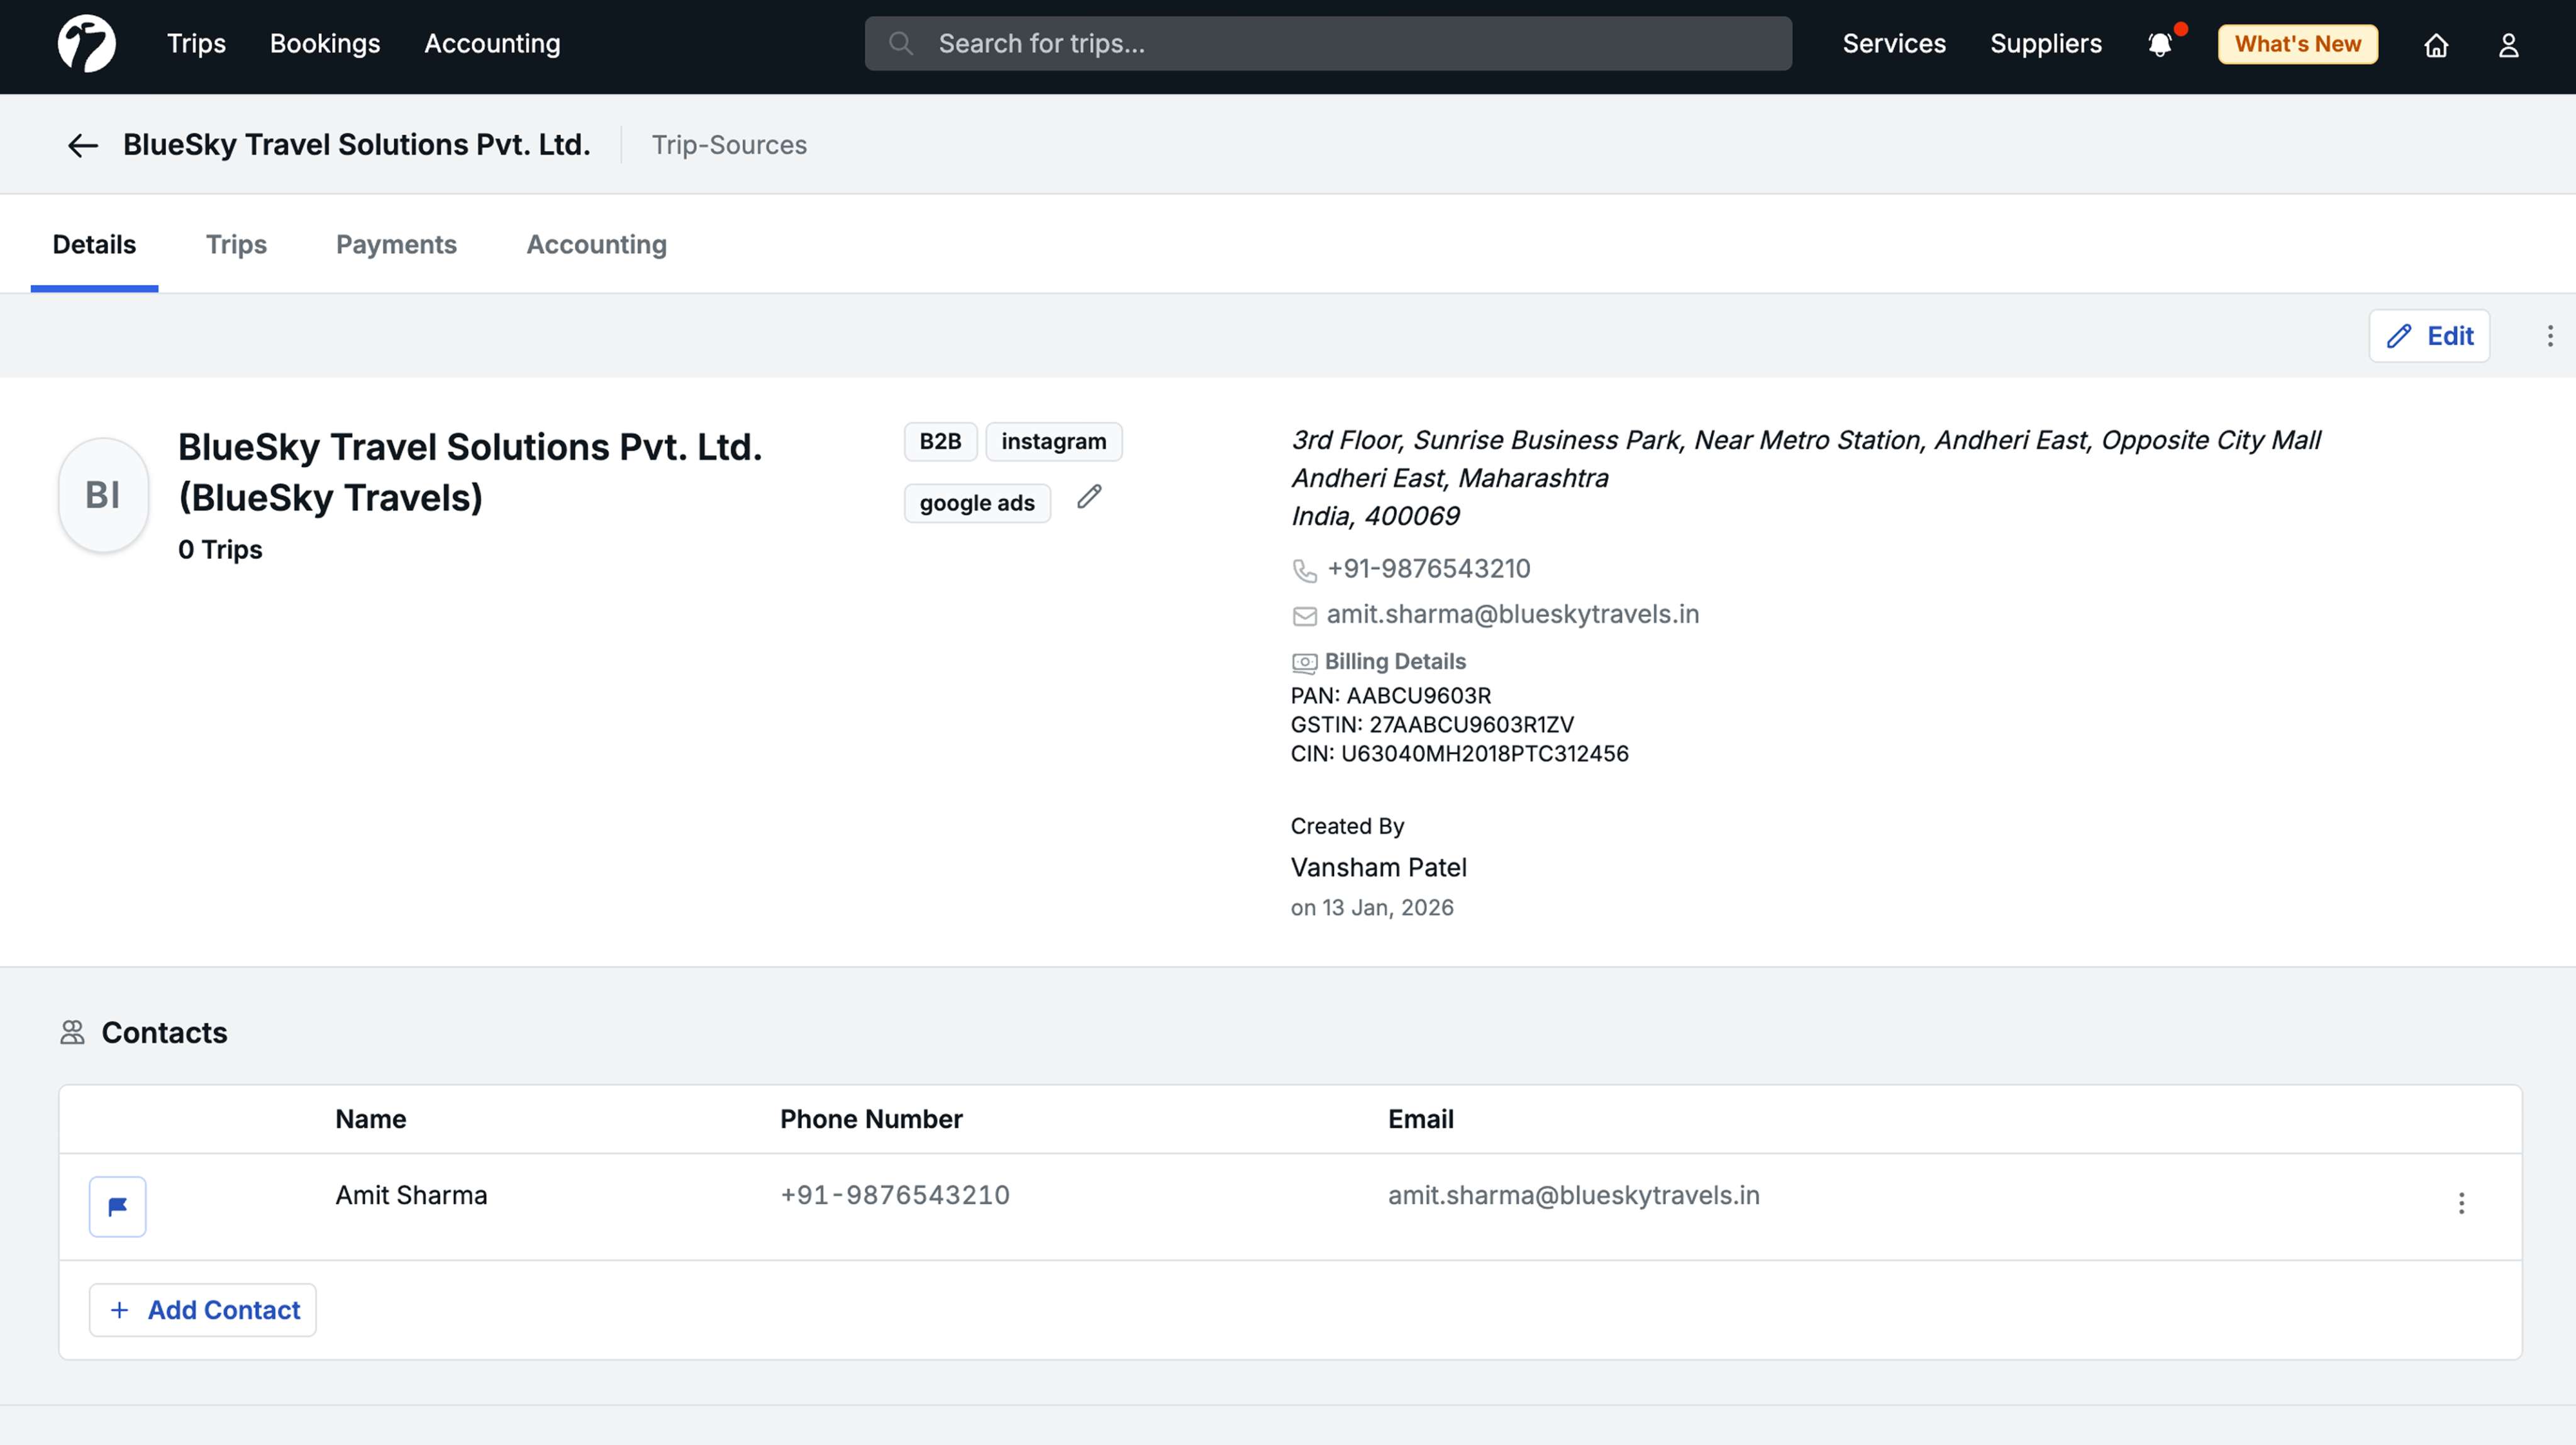
1. Details Tab
View and manage trip source information:
- Trip Source Name
- Address: Primary address
- Billing Address: Separate billing address if different
- Contacts: All contact persons associated with this trip source
- Created By: User who created this trip source
2. Trips Tab
See all trips associated with this trip source.
Left-Side Filters:
- New Inquiry: Trips in initial inquiry stage
- In Progress: Trips being worked on
- On Hold: Trips temporarily on hold
- Converted: Successfully converted trips
- On Trip: Trips currently in progress
- Past Trips: Completed trips
- Canceled: Canceled trips
- Dropped: Dropped opportunities
- All: Complete list of all trips
Use these filters to quickly find trips in specific stages for this trip source.
3. Payments Tab
View all payments related to this trip source:
Two Views:
- Outgoing Payments (default): Payments you need to make to this trip source
- Incoming Payments: Click Refund button to see payments received from this trip source
Similar to the supplier payment view, providing complete payment visibility.
4. Accounts Tab
View the accounting account associated with this trip source:
- Account details
- Transaction history
- Account balance information
Note: This tab only appears for trip sources that have associated accounts. B2C (Business-to-Consumer) trip sources do not have accounts and will not show this tab.
Benefits
- Complete Overview: All trip source information in one place
- Trip Tracking: See all trips from a source across all stages
- Payment Management: Track payments to and from trip sources
- Account Visibility: Access accounting information when needed
- Consistent Interface: Similar structure to supplier management
- Improved Efficiency: No need to navigate to multiple locations for trip source information
8. Hide Hotels Checkbox in Service Sharing
Added a checkbox to hide hotel check-in/check-out details when sharing transport and activity bookings with suppliers.
Where to access
- Trip Detail Page → Service Booking → Click on a transport or activity service → Share
- Operational Bookings → Select services → Share
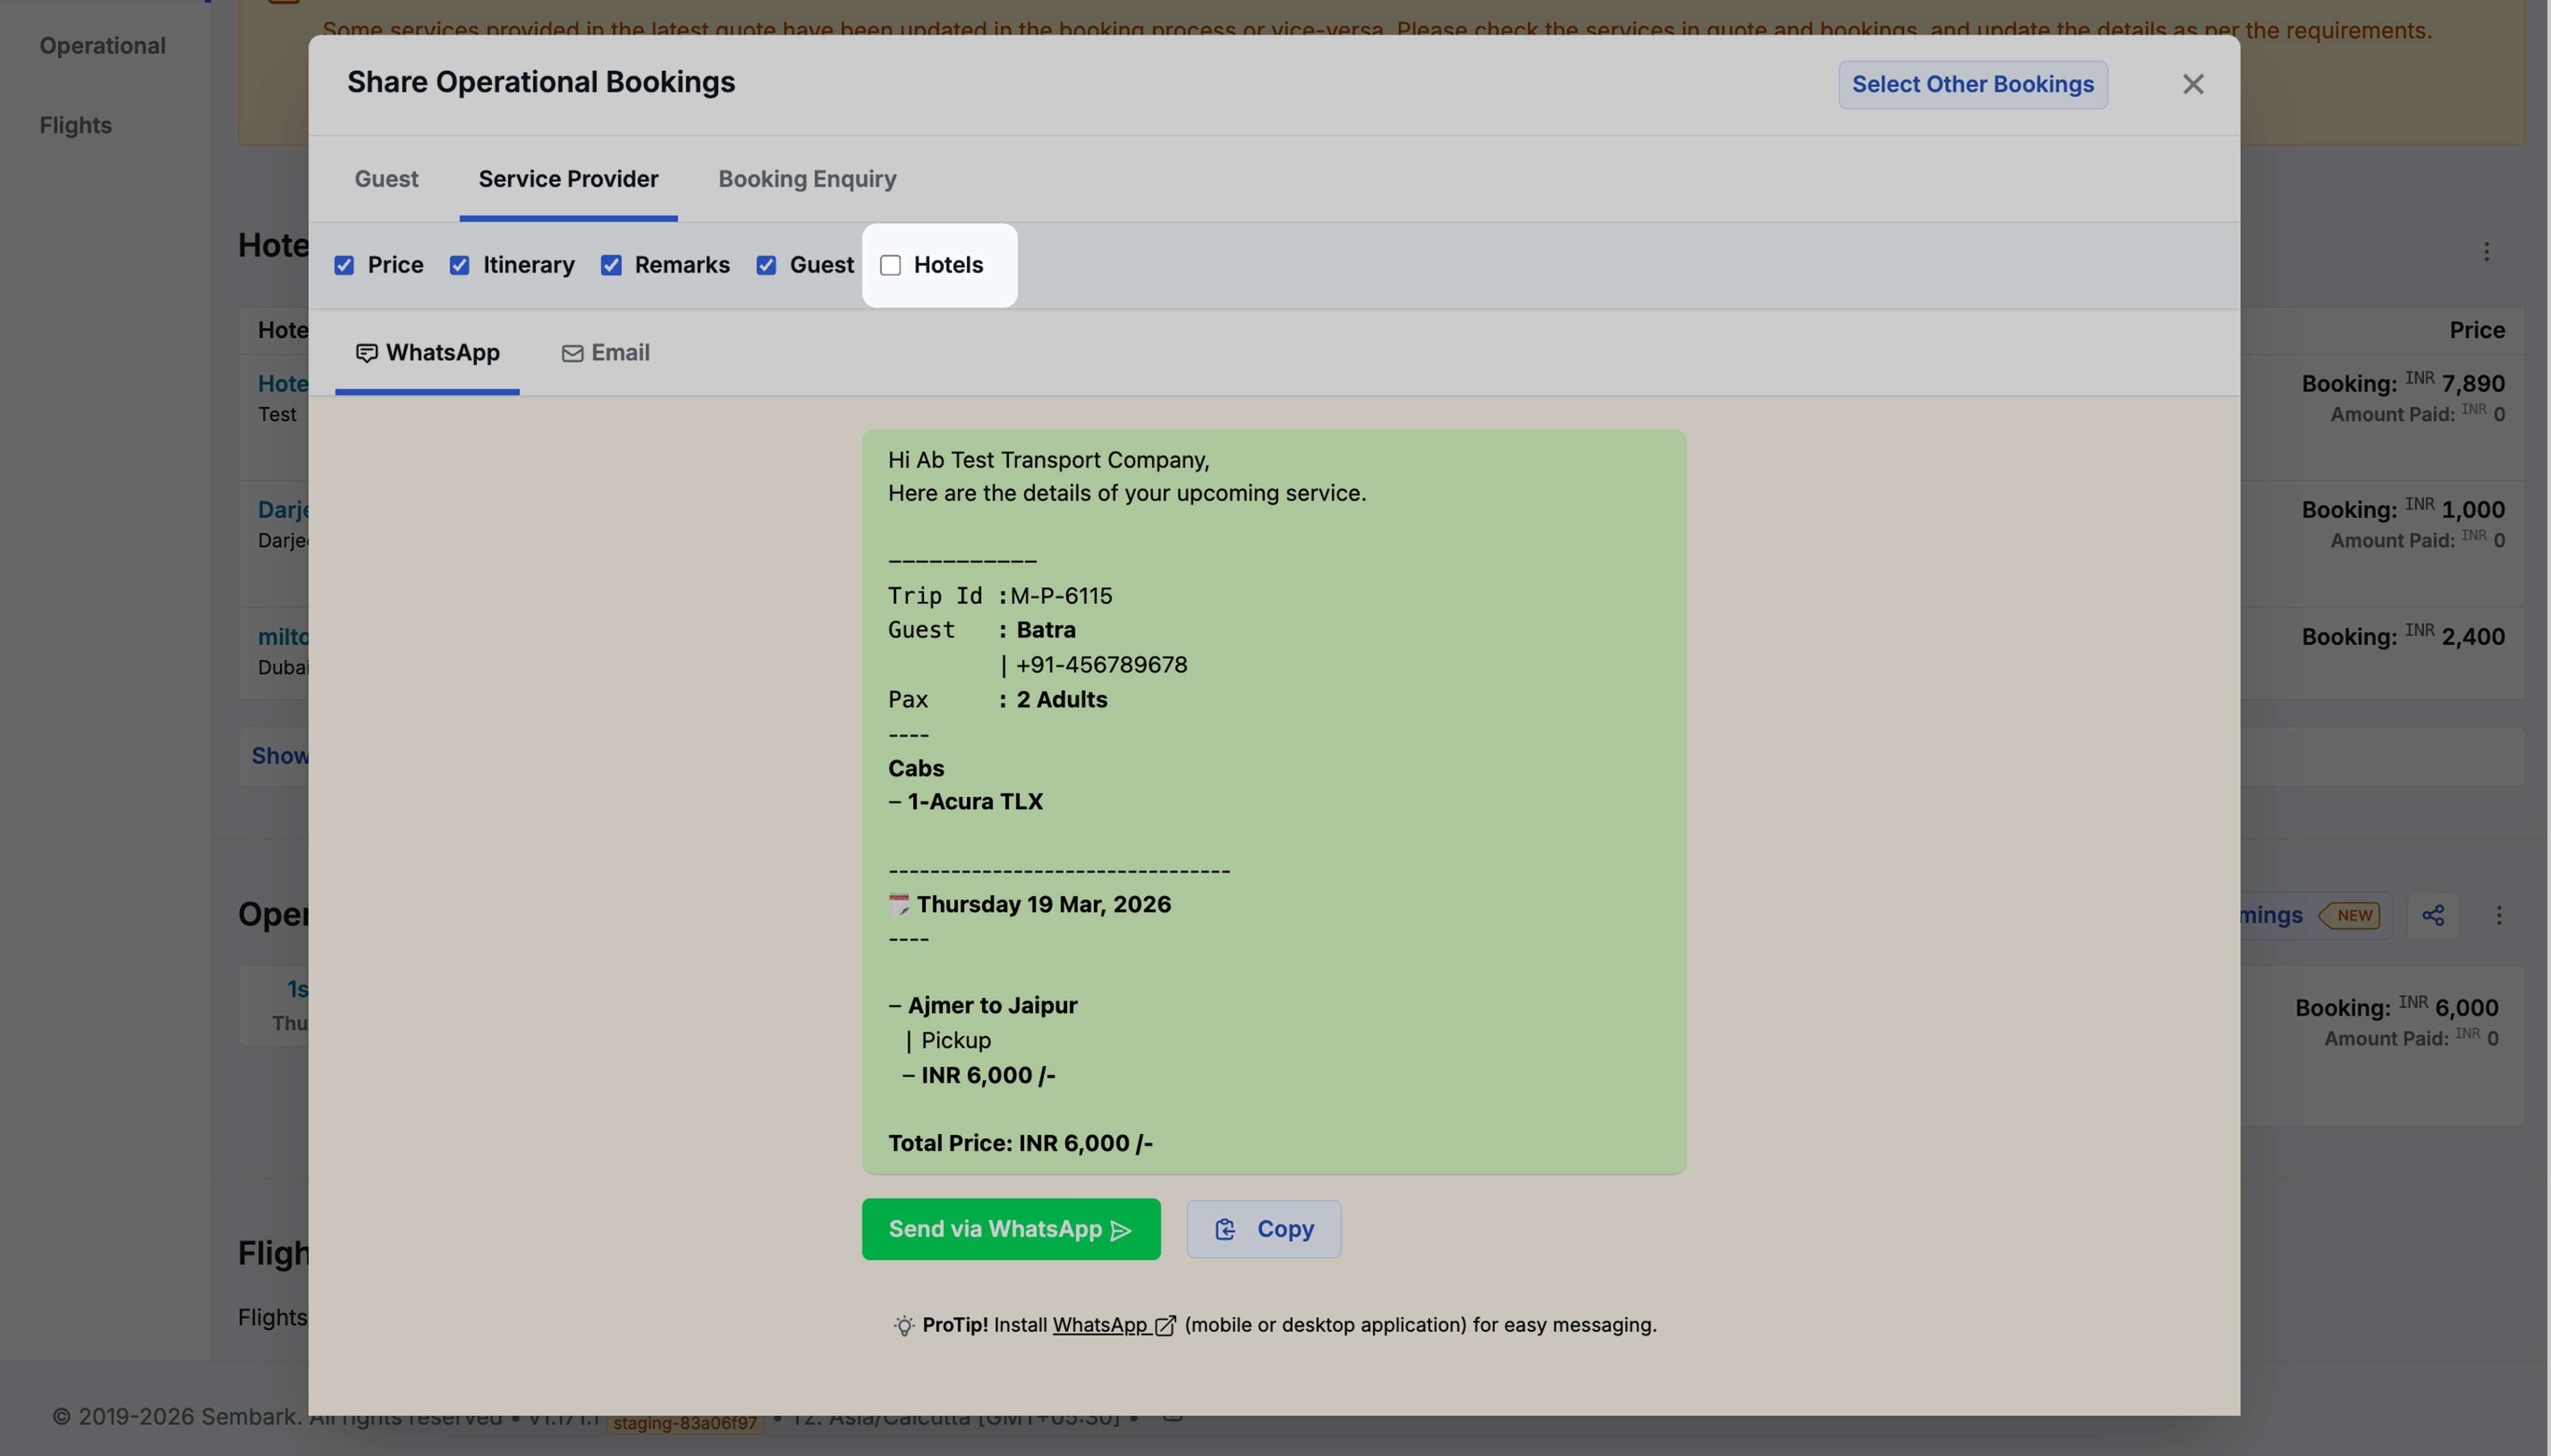
How it works
- Checkbox is unchecked by default (hotel details hidden)
- Check the box to include hotel check-in and check-out details in the supplier communication
Use Case
In some cases, transport or activity suppliers don’t need hotel details (e.g., no pickup/drop from hotel). This gives you control over what information to share with suppliers.
Other Improvements
- Trip Report - Additional Columns: Added Trip Source Country and Trip Source State columns to Trip Lead Report for better geographic tracking and filtering of trip sources
- Reference ID in Hotel Enquiry Email Template: Added {{REFERENCE_ID}} variable to the Hotel Booking Enquiry Email template subject line. Navigate to Profile → Organization → Repository → Templates → Hotel Booking Enquiry Email Template to use this variable. If no reference ID is set for a trip, the variable will not display in the email subject
- Destination Filter in Outgoing & Multi-Payment: Added Destination filter to Outgoing Payments, Incoming Payments, and Log Multiple Payment flow. Filter payments by destination combined with Supplier or Hotel filters to process destination-specific payments efficiently
- Package Currency in Trip Lead Listing: Currency codes now appear beside package amounts in all trip listing tabs for better clarity
- Tags in Trip Plan Request Report: Trip Plan Request Report now includes a Tags column. Multiple tags appear comma-separated in the downloaded CSV report
- Multi-Payment Processing Enhancement: Improved bulk payment processing to prevent conflicts when multiple users attempt to log the same payment simultaneously. Users now see a clear message if a payment is already being processed in a bulk transaction
- Room Night Total in Hotel Booking Report: Corrected room night calculation accuracy in Hotel Booking Report downloaded from hotel detail pages
- Outlook Email Font Compatibility: Fixed font rendering issues across different versions of Outlook email clients to ensure consistent email appearance
- Multi-Guest Group Validation: Tourist groups now require a minimum of 1 tourist before saving. System prevents creation of empty tourist groups
- GST Display Consistency: Fixed GST number display to show the same GST consistently across Proforma Invoices, emails, and WhatsApp communications