






The WhatsApp Integration connects your WhatsApp Business number to Sembark through Meta’s official WhatsApp Cloud API. Once connected, your team can chat with customers from a shared inbox, send quotes and bookings from your business number, create message templates, collect details with WhatsApp forms, and let Automations send messages for you.
Add-On Solution
The WhatsApp Integration is an add-on and needs to be enabled for your organization. Visit the add-on page for details, or reach out to your account manager. For a step-by-step setup walkthrough, follow the WhatsApp integration guide.
Who Can Use It
- Connect WhatsApp and manage templates, forms, quick sends and test mode — users with the Manage Integrations permission.
- See all WhatsApp conversations — users who can manage trip owners (admins and sales heads).
- See their own WhatsApp conversations — everyone else sees conversations they follow and conversations linked to trips they can access.
- Send messages, templates and quick sends — any user who can see the conversation.
- Create a trip from a conversation — users who can create queries.
Connect Your WhatsApp Business Number
- Go to Organization > Settings > Integrations and click New Integration.
- Under Messaging Solutions, pick Whatsapp Cloud API.
- Enter an Integration Name and Description. Optionally tick Start in test mode and enter a Test Number (see Test Mode).
- Click Create Integration.
- On the integration page, click Connect WhatsApp Business and complete Meta’s sign-up in the new tab with a Facebook account that is an admin of your business.
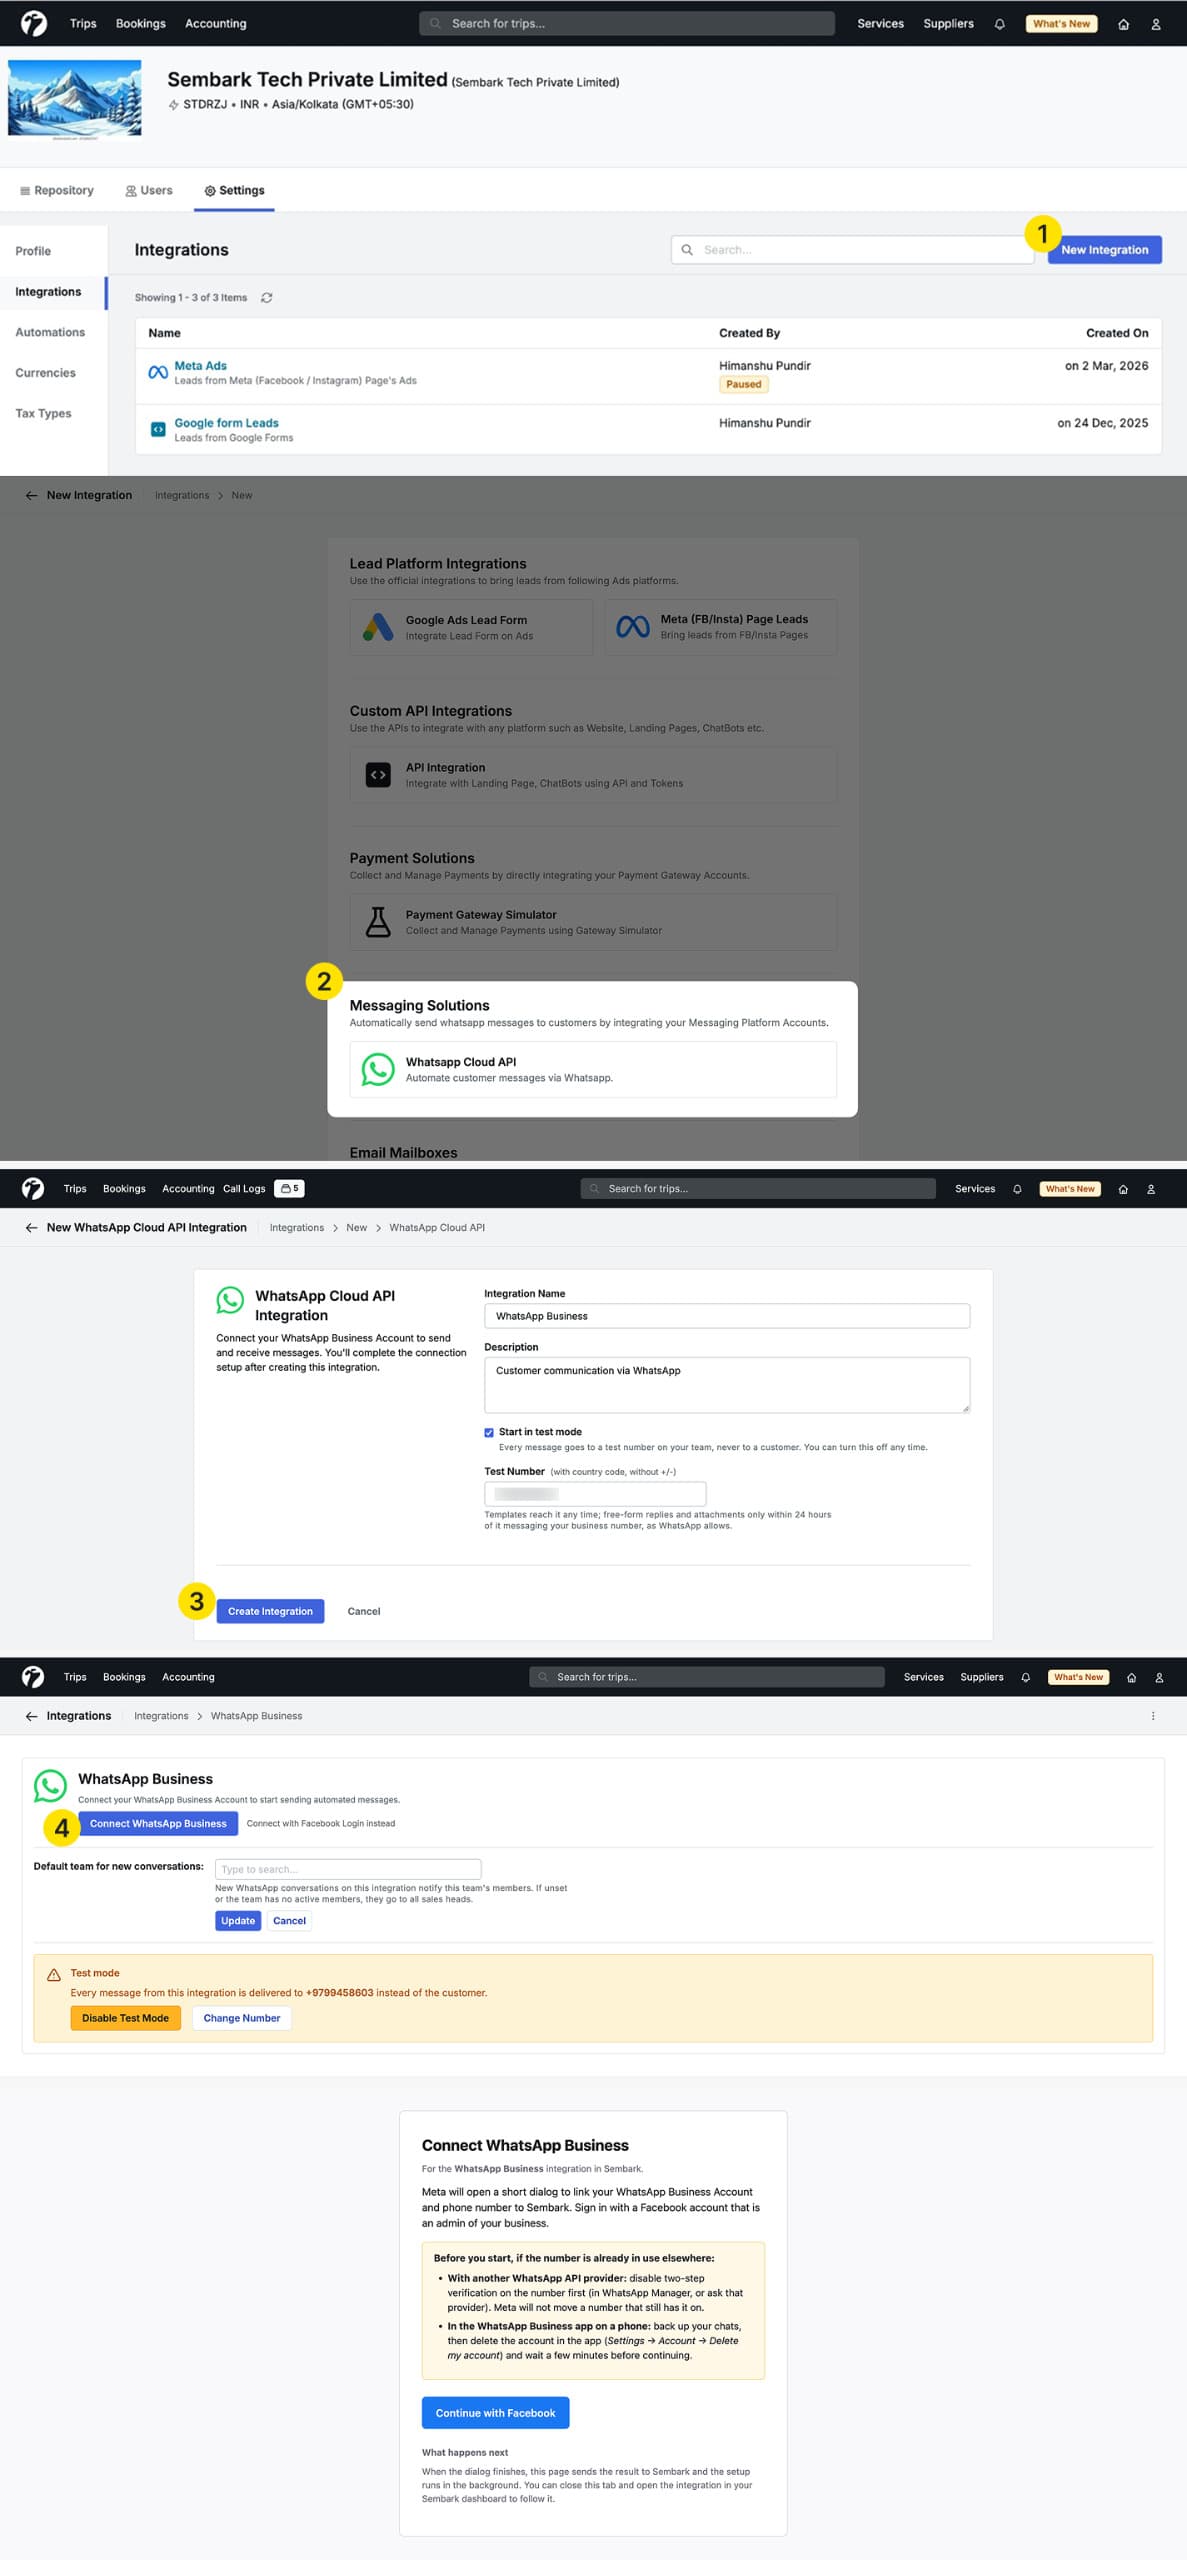
Setup continues in the background. Within a few seconds the page shows Connected, along with your business accounts and phone numbers. Your existing approved templates and forms are synced automatically.
Before you connect a number
If your number is currently used on the WhatsApp Business app, delete the account from the app first. If it is connected to another WhatsApp API provider, turn off two-step verification there first. A number can only be connected to one API provider at a time.
Integration Menu
The ⋮ menu on the integration page offers:
- Reconnect WhatsApp Account — renew the connection, e.g. after a change to your Facebook account.
- Sync with Meta — pull the latest business accounts, phone numbers, templates and forms.
- Check Connection Health — confirm that messages and template updates from WhatsApp are reaching Sembark. Each check shows its status, and anything failing tells you what to fix.
- Enable Test Mode / Disable Test Mode.
- Pause — stops all incoming and outgoing communication for this integration until you Resume it. A paused integration can be deleted. Deleting removes the numbers and their two-step PINs from Sembark; the numbers stay with your business.
Default Team for New Conversations
On the integration page, set the Default team for new conversations. Members of this team are notified of every new WhatsApp conversation on this integration. If no team is set (or the team has no active members), new conversations go to all sales heads and admins.
Accounts Tab
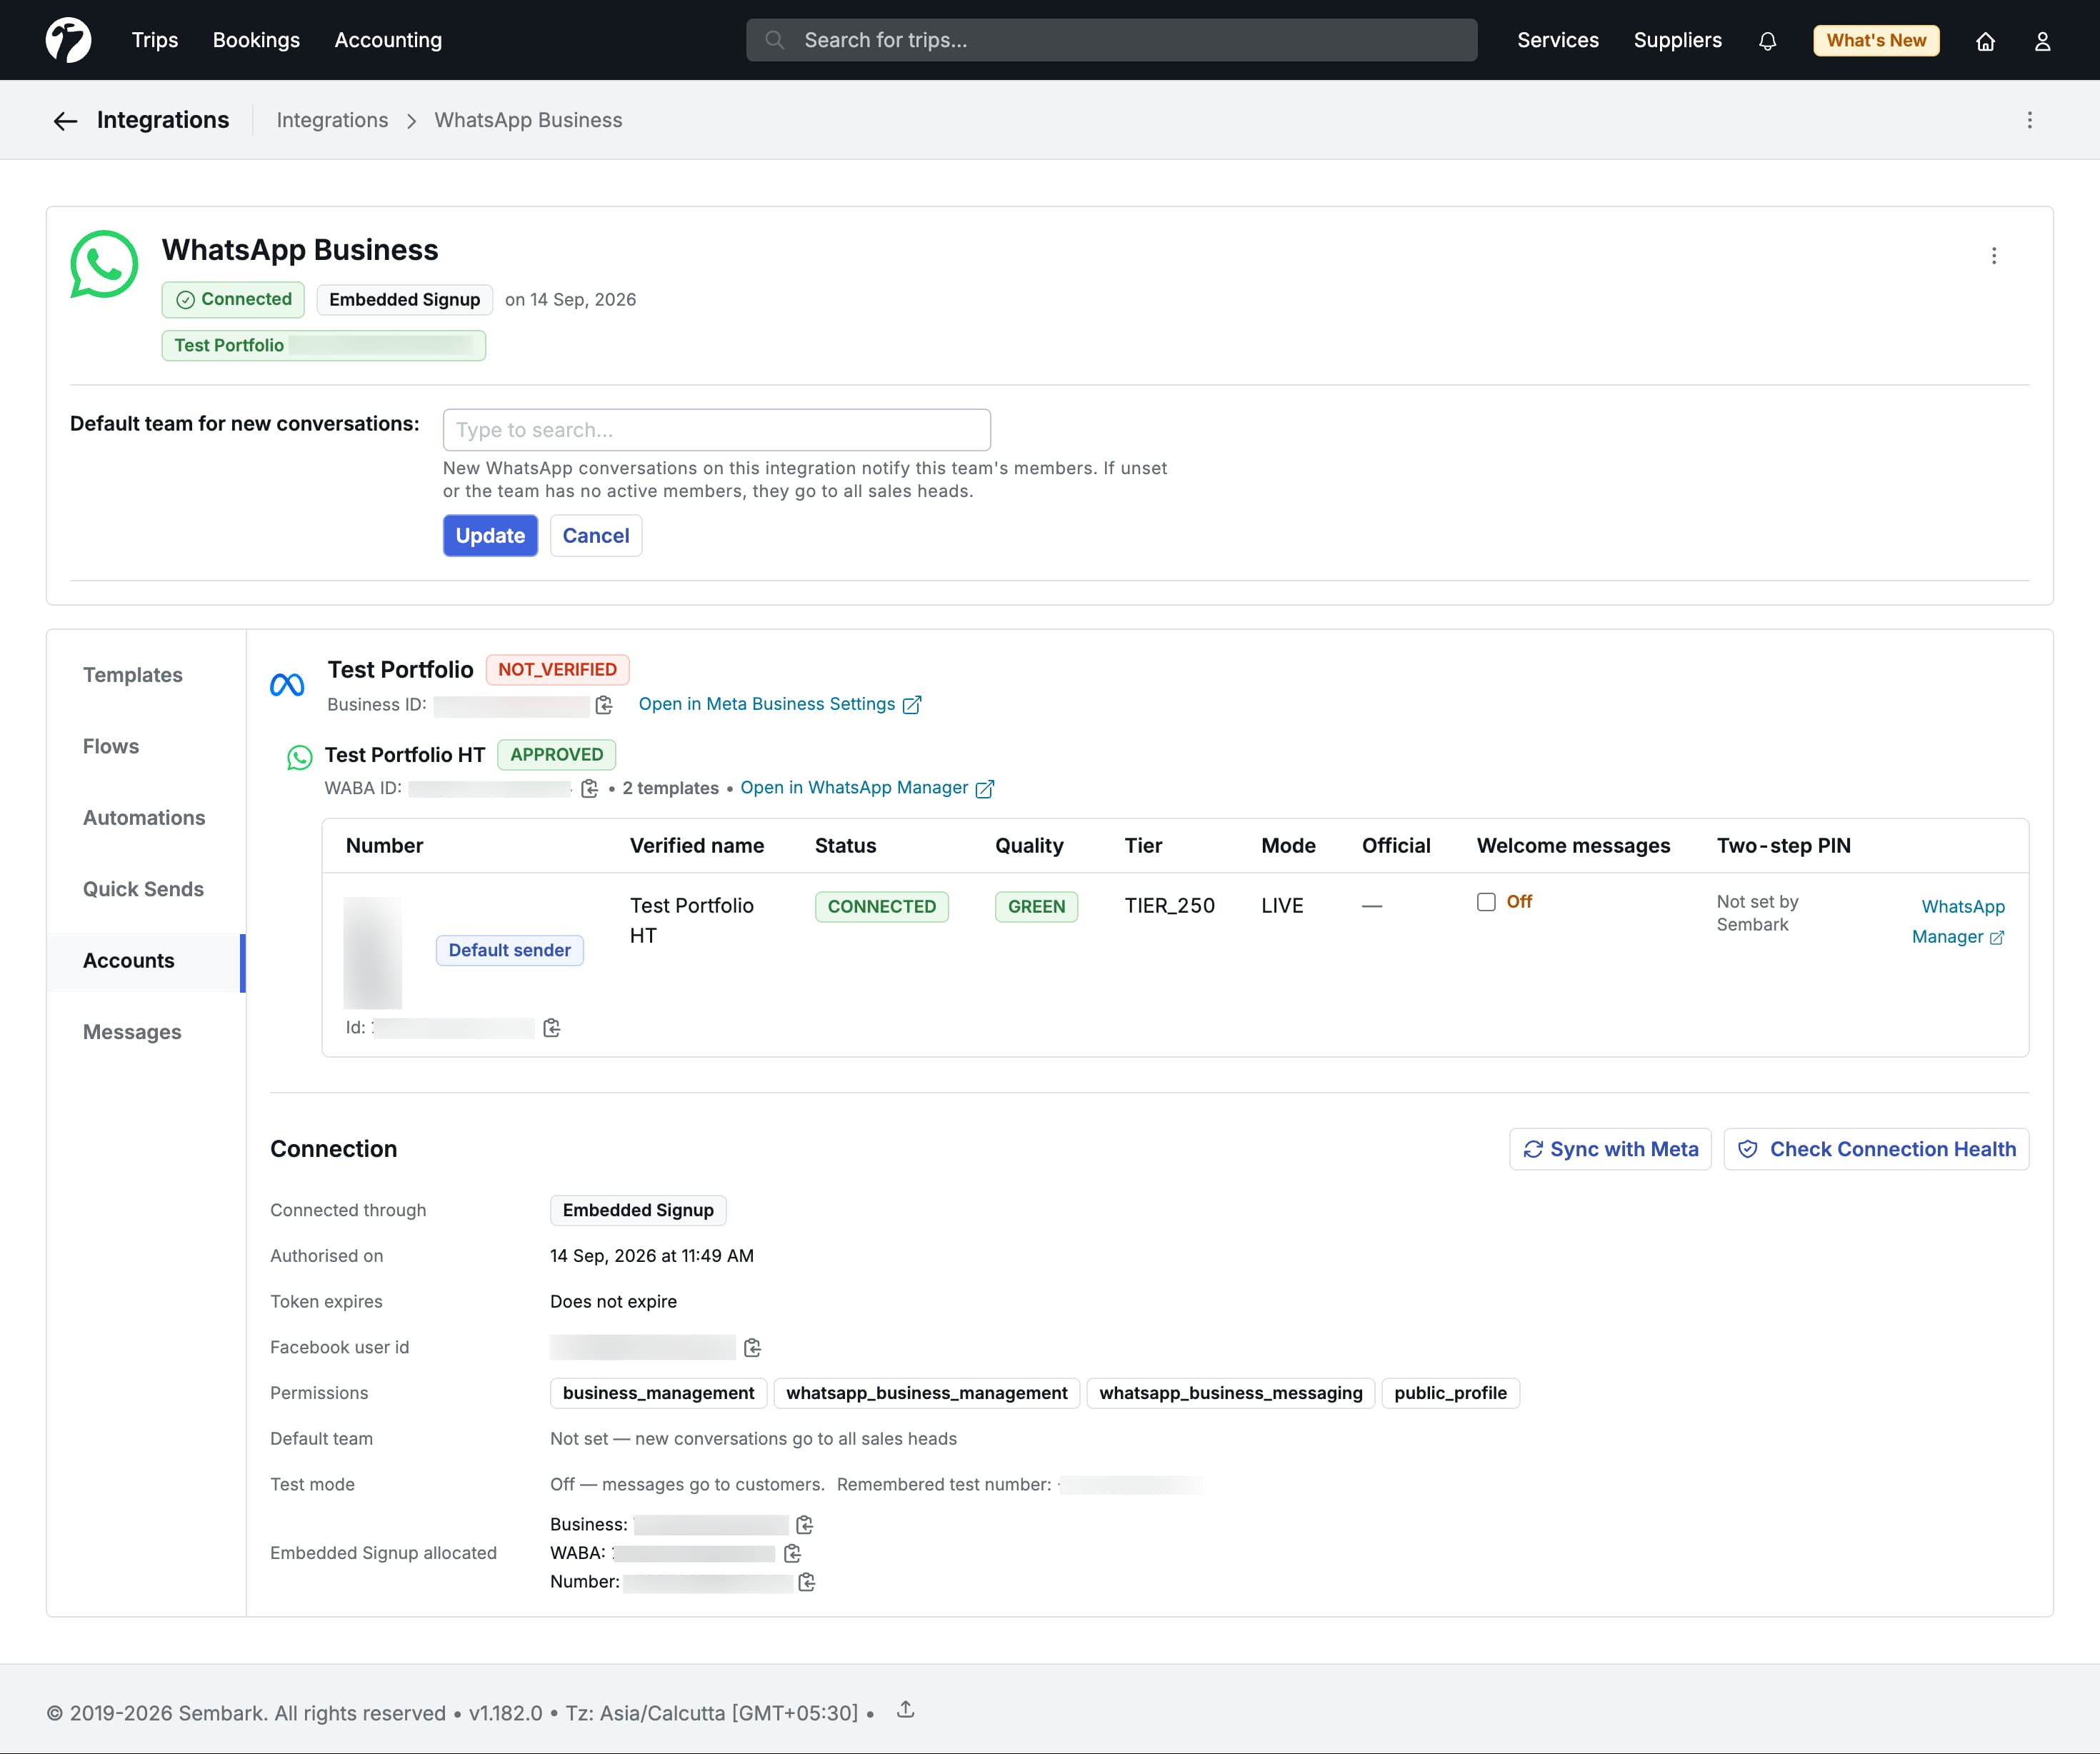
The Accounts tab lists every Meta business, WhatsApp Business Account and phone number connected through this integration — with each number’s verified name, status, quality rating and messaging tier, plus links to open them in Meta’s WhatsApp Manager.
- Default sender marks the number used when a message or automation does not name one.
- Welcome messages can be switched On or Off per number. While on, customers who open your chat from an ad or a link without typing still reach you, so an automation can greet them. It is switched on for newly connected numbers.
- Two-step PIN shows the PIN Sembark set for the number, with reveal and copy buttons.
Test Mode
Test mode lets you try the integration without messaging customers. While it is on, every message from this integration — trip page messages, conversation replies, template test sends and automations — is delivered to your Test Number instead of the customer. The message is still recorded on the customer’s conversation, marked Test mode · sent to +….
- Enter the test number with the country code and without the plus sign, e.g.
919876543210. - Templates reach the test number at any time; plain messages and attachments reach it only within 24 hours of it messaging your business number.
- Test messages are real WhatsApp messages, so Meta’s charges apply.
- A Test Mode badge on the integrations list and a banner on the integration page remind you that test mode is on.
When you disable test mode, customers start receiving messages right away. Automations keep running as they are, so check their conditions and templates before turning test mode off.
WhatsApp Inbox
Open Trips > WhatsApp Inbox to see your WhatsApp conversations.
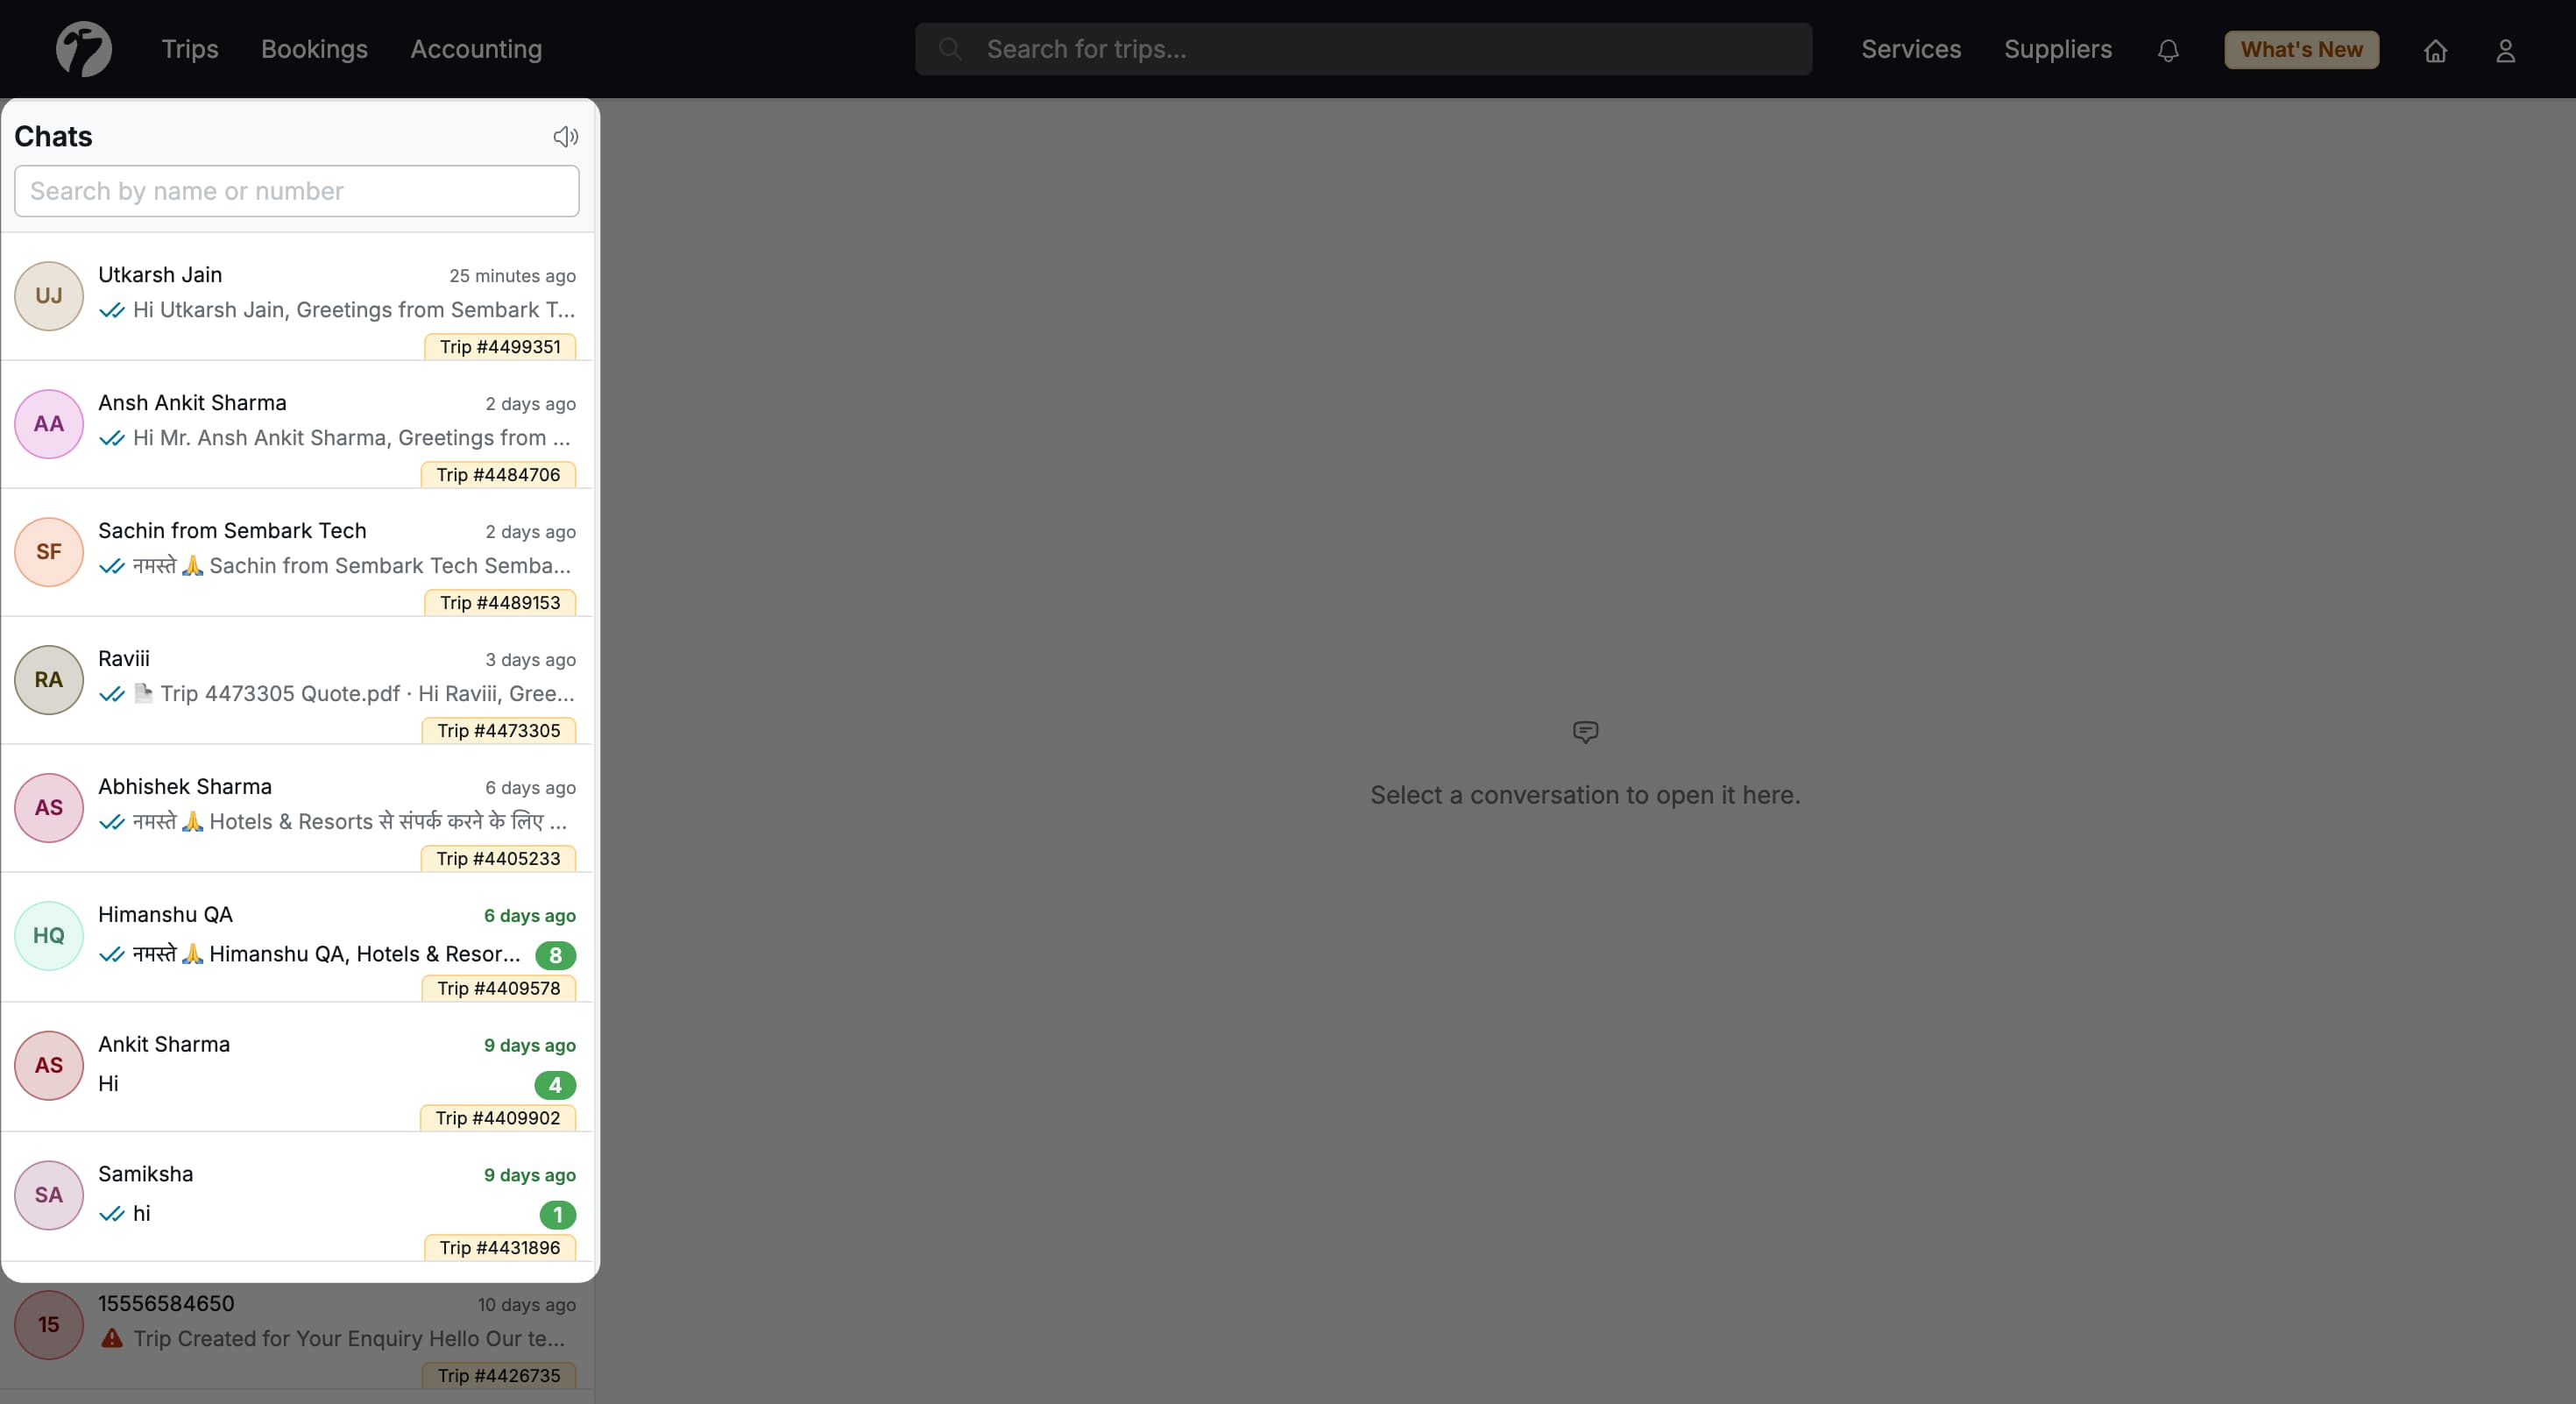
- Chats lists conversations with the latest message, delivery ticks, unread counts and who is typing. Use Search by name or number to find one. The list updates live.
- Conversations linked to a trip or lead show a Trip #id or TPR #id tag.
- A conversation started from a Click-to-WhatsApp ad or post shows a From ad badge with the ad’s headline.
- The bell icon mutes or unmutes the notification sound.
Conversation Details
The right-hand panel of a conversation shows:
- Linked Trips — the trips and leads this conversation belongs to. Click Create New to create a trip with the conversation shown beside the trip form; the new trip is linked to the conversation.
- Members — click Follow to be notified of new messages on the conversation, or Following to mute it.
- Recent activity — when the last message was received and sent.
Sending Messages
Type in the composer and click Send (or press Cmd/Ctrl + Enter). You can also:
- Attach a file with the paperclip — a JPEG or PNG image (up to 5 MB), an MP4 video (up to 16 MB), a document or audio. The text you typed is sent as the caption for images, videos and documents.
- Click Use Template to send an approved template. Fill in the Template Parameters and click Send.
- Click Quick Send to send a saved set of messages (see Quick Sends).
The 24-hour rule
WhatsApp only delivers plain messages and attachments within 24 hours of the customer’s last message. Outside that window, the composer shows Outside the 24 hour window — send an approved template to reopen the conversation.
Delivery Status
Each message you send shows its status: a clock (accepted), a single tick (sent), double ticks (delivered), blue double ticks (read) or a red icon (failed). Click a message’s time to see its full delivery history and, for a failed message, the error returned by WhatsApp.
Notifications
Followers of a conversation are notified of new messages and reactions in the Notifications page and by push notification — unless they already have that conversation open. Turn on push notifications from your notification preferences to receive them on desktop and mobile. See Smart Push Notifications.
WhatsApp on Trips and Leads
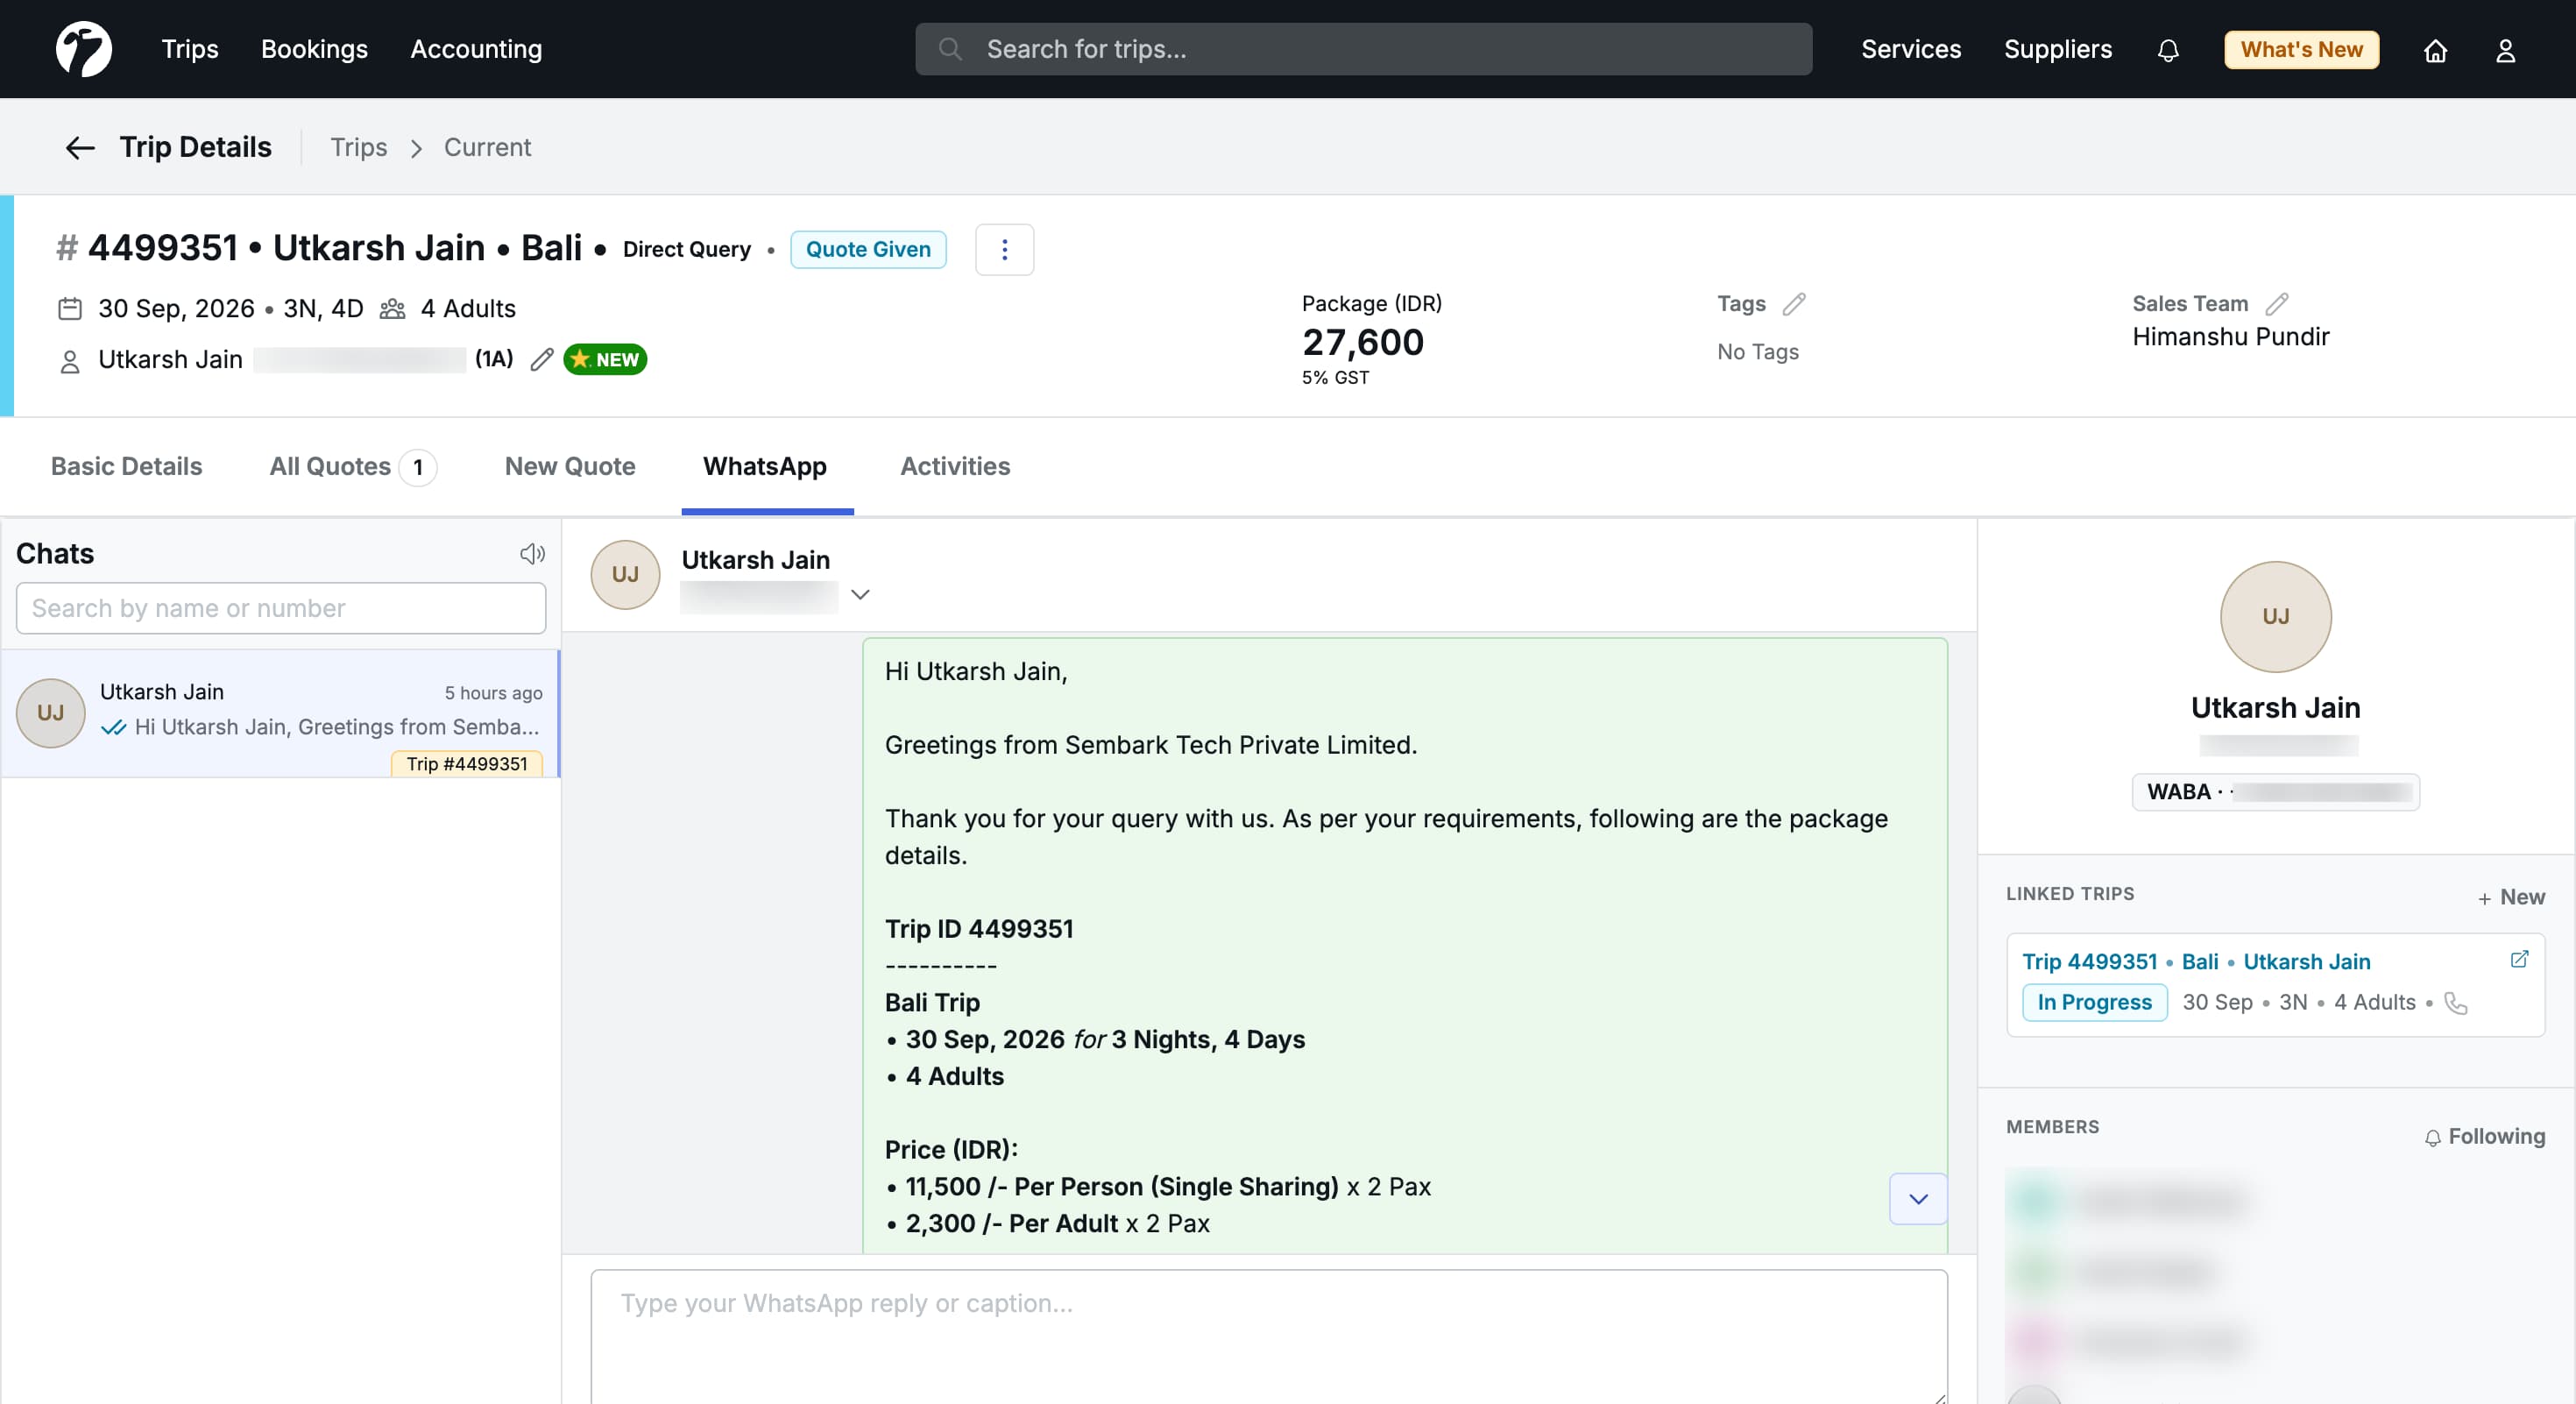
- Trip WhatsApp card — a trip’s details page shows its WhatsApp conversations. With none yet, click Send WhatsApp Message, pick the WhatsApp Phone Number, an optional WhatsApp Template (its parameters are filled from the trip) and an optional Custom Message.
- Trip WhatsApp tab — when a trip has linked conversations, a WhatsApp tab with an unread count shows them in full.
- Leads — a green WhatsApp badge on a lead in the Trip Plan Requests list opens its conversations to chat inline.
Sending from a trip links that conversation to the trip automatically.
Share Quotes and Bookings on WhatsApp
- Quotes — in the quote’s Share dialog, open the WhatsApp tab and click Send via WhatsApp. Edit the message, optionally pick a template and keep Attach Quote PDF on. The template goes first, then the PDF, then your message. See Share Quote.
- Operational bookings — from the share options, click Send via WhatsApp to send the booking details with an optional template. See Share Operational Services.
WhatsApp Messages on Follow-ups
When you add a follow-up or task with a due date, you can attach a WhatsApp template that is sent to the customer when the task falls due. See Follow-ups and Tags.
Message Templates
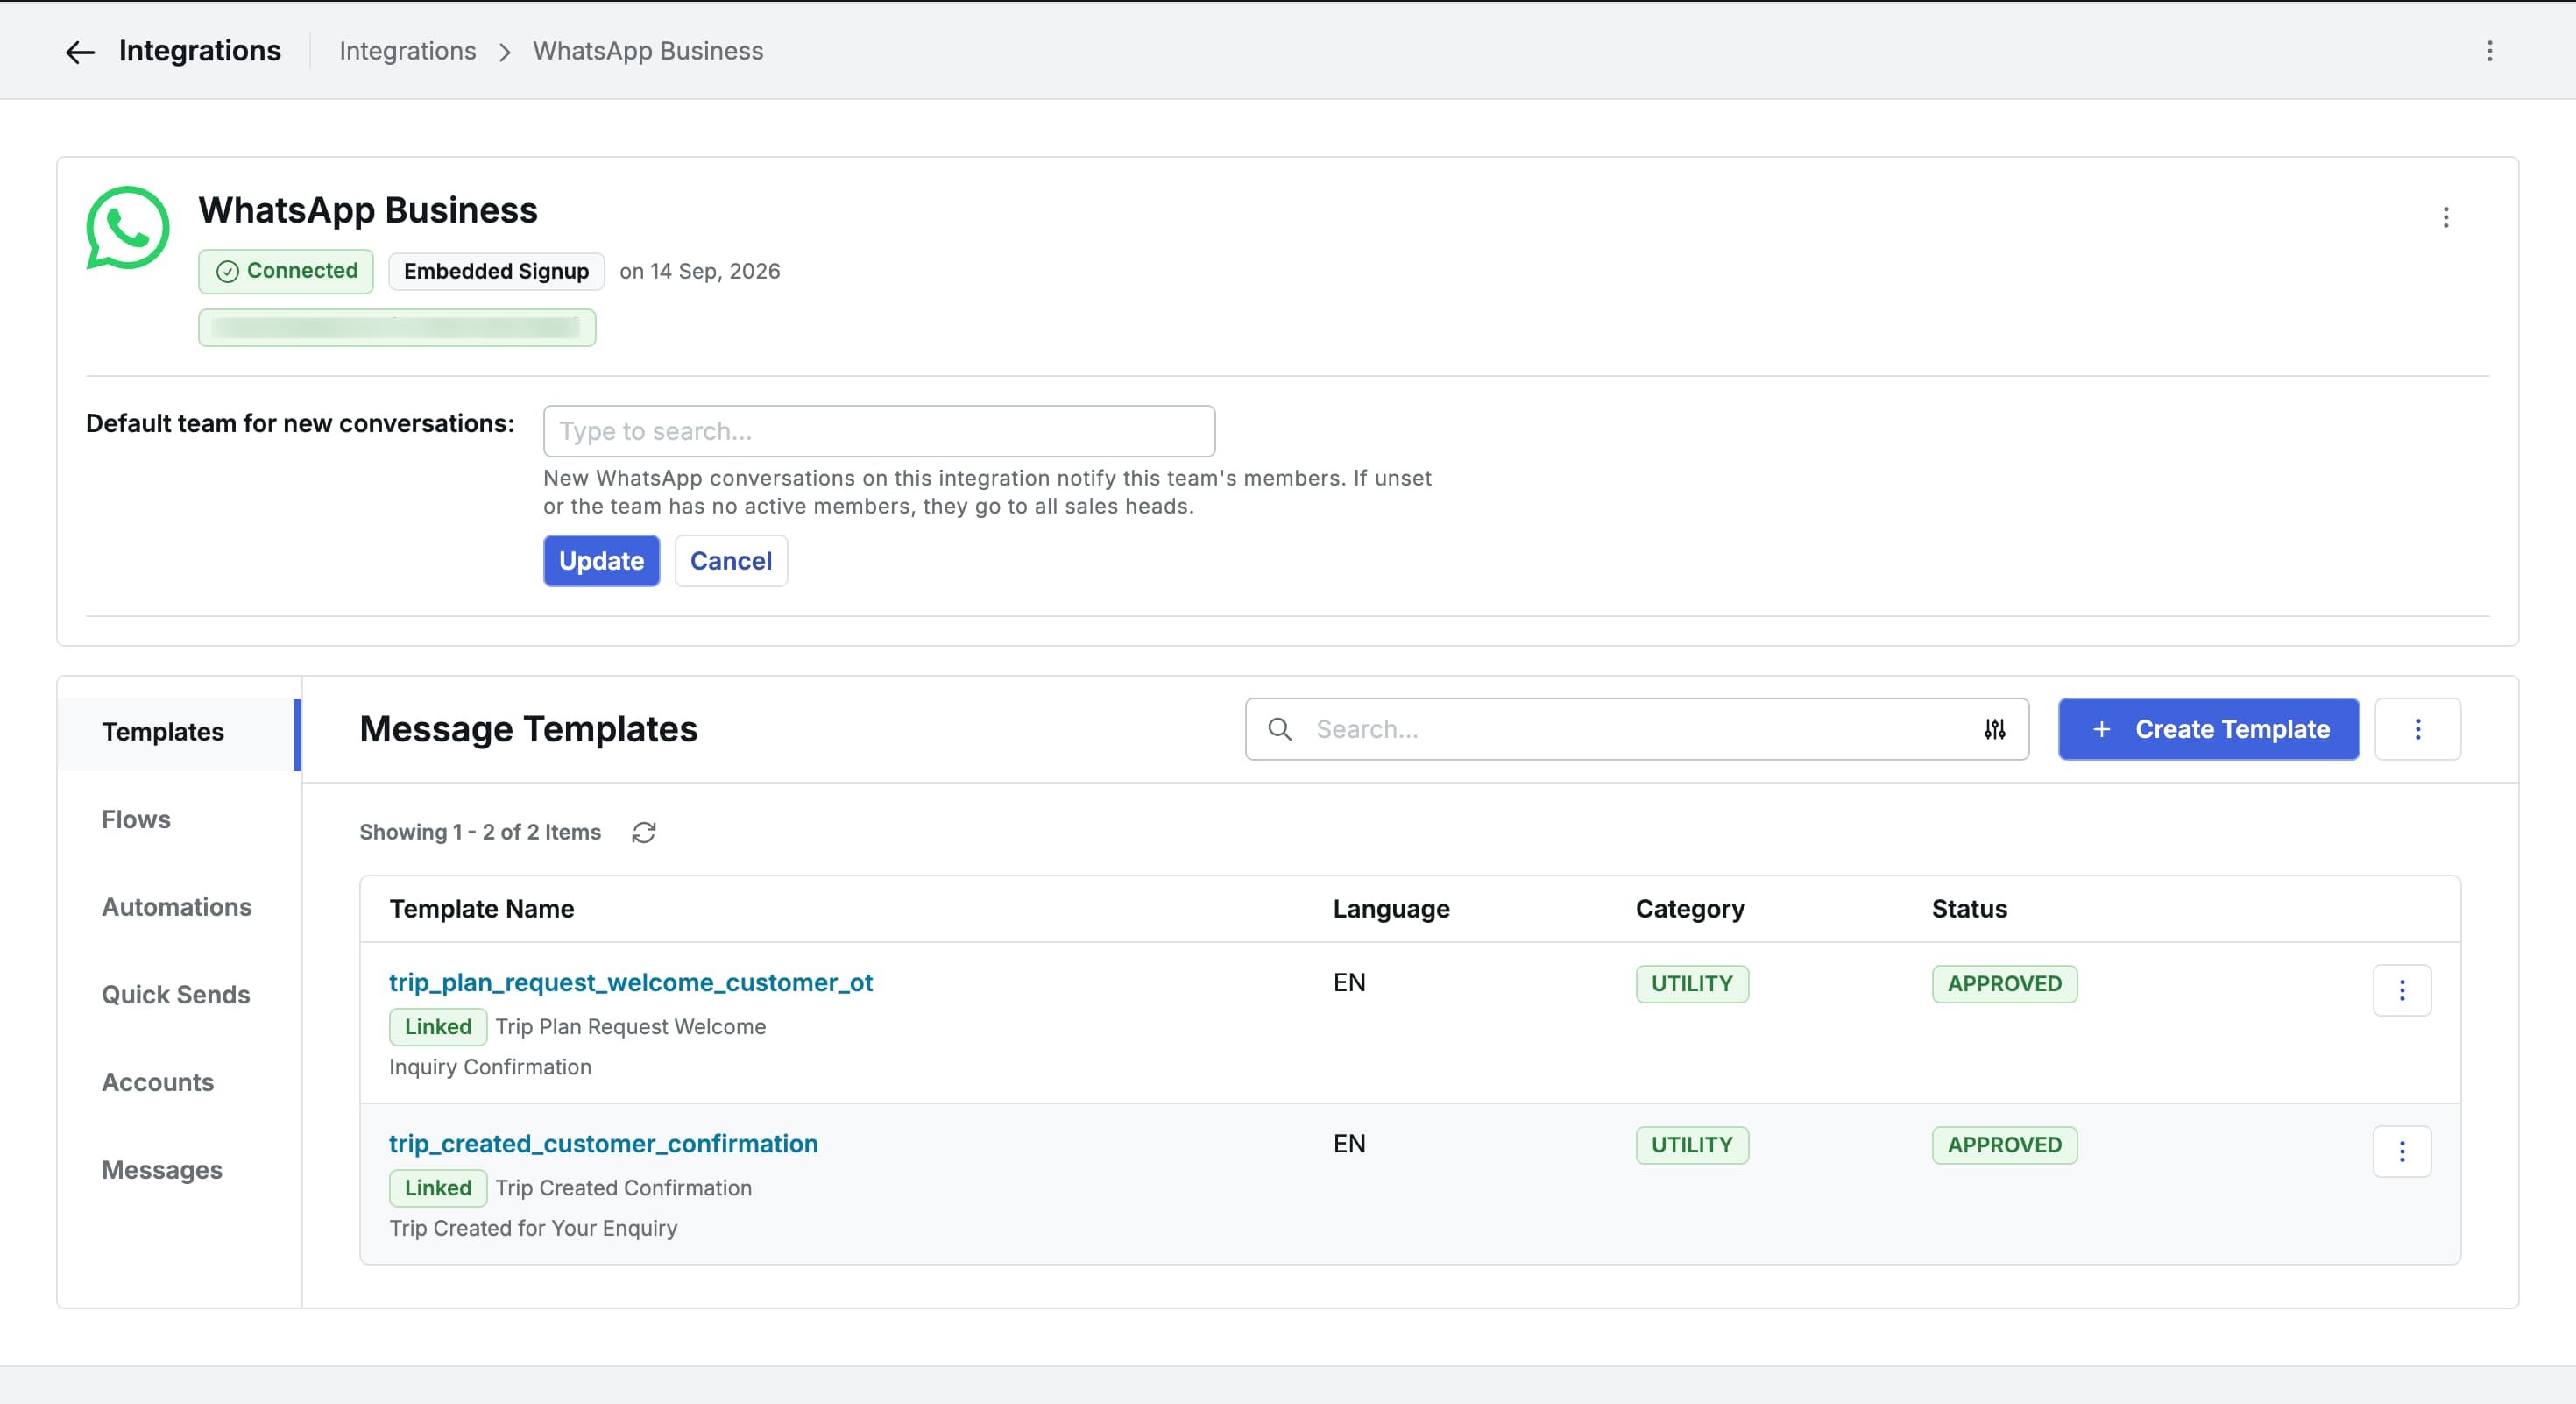
WhatsApp only lets businesses start a conversation with a template approved by Meta. Manage your templates from the integration’s Templates tab.
The list shows each template’s name, language, category and status — APPROVED, PENDING or REJECTED. Filter by Business Account.
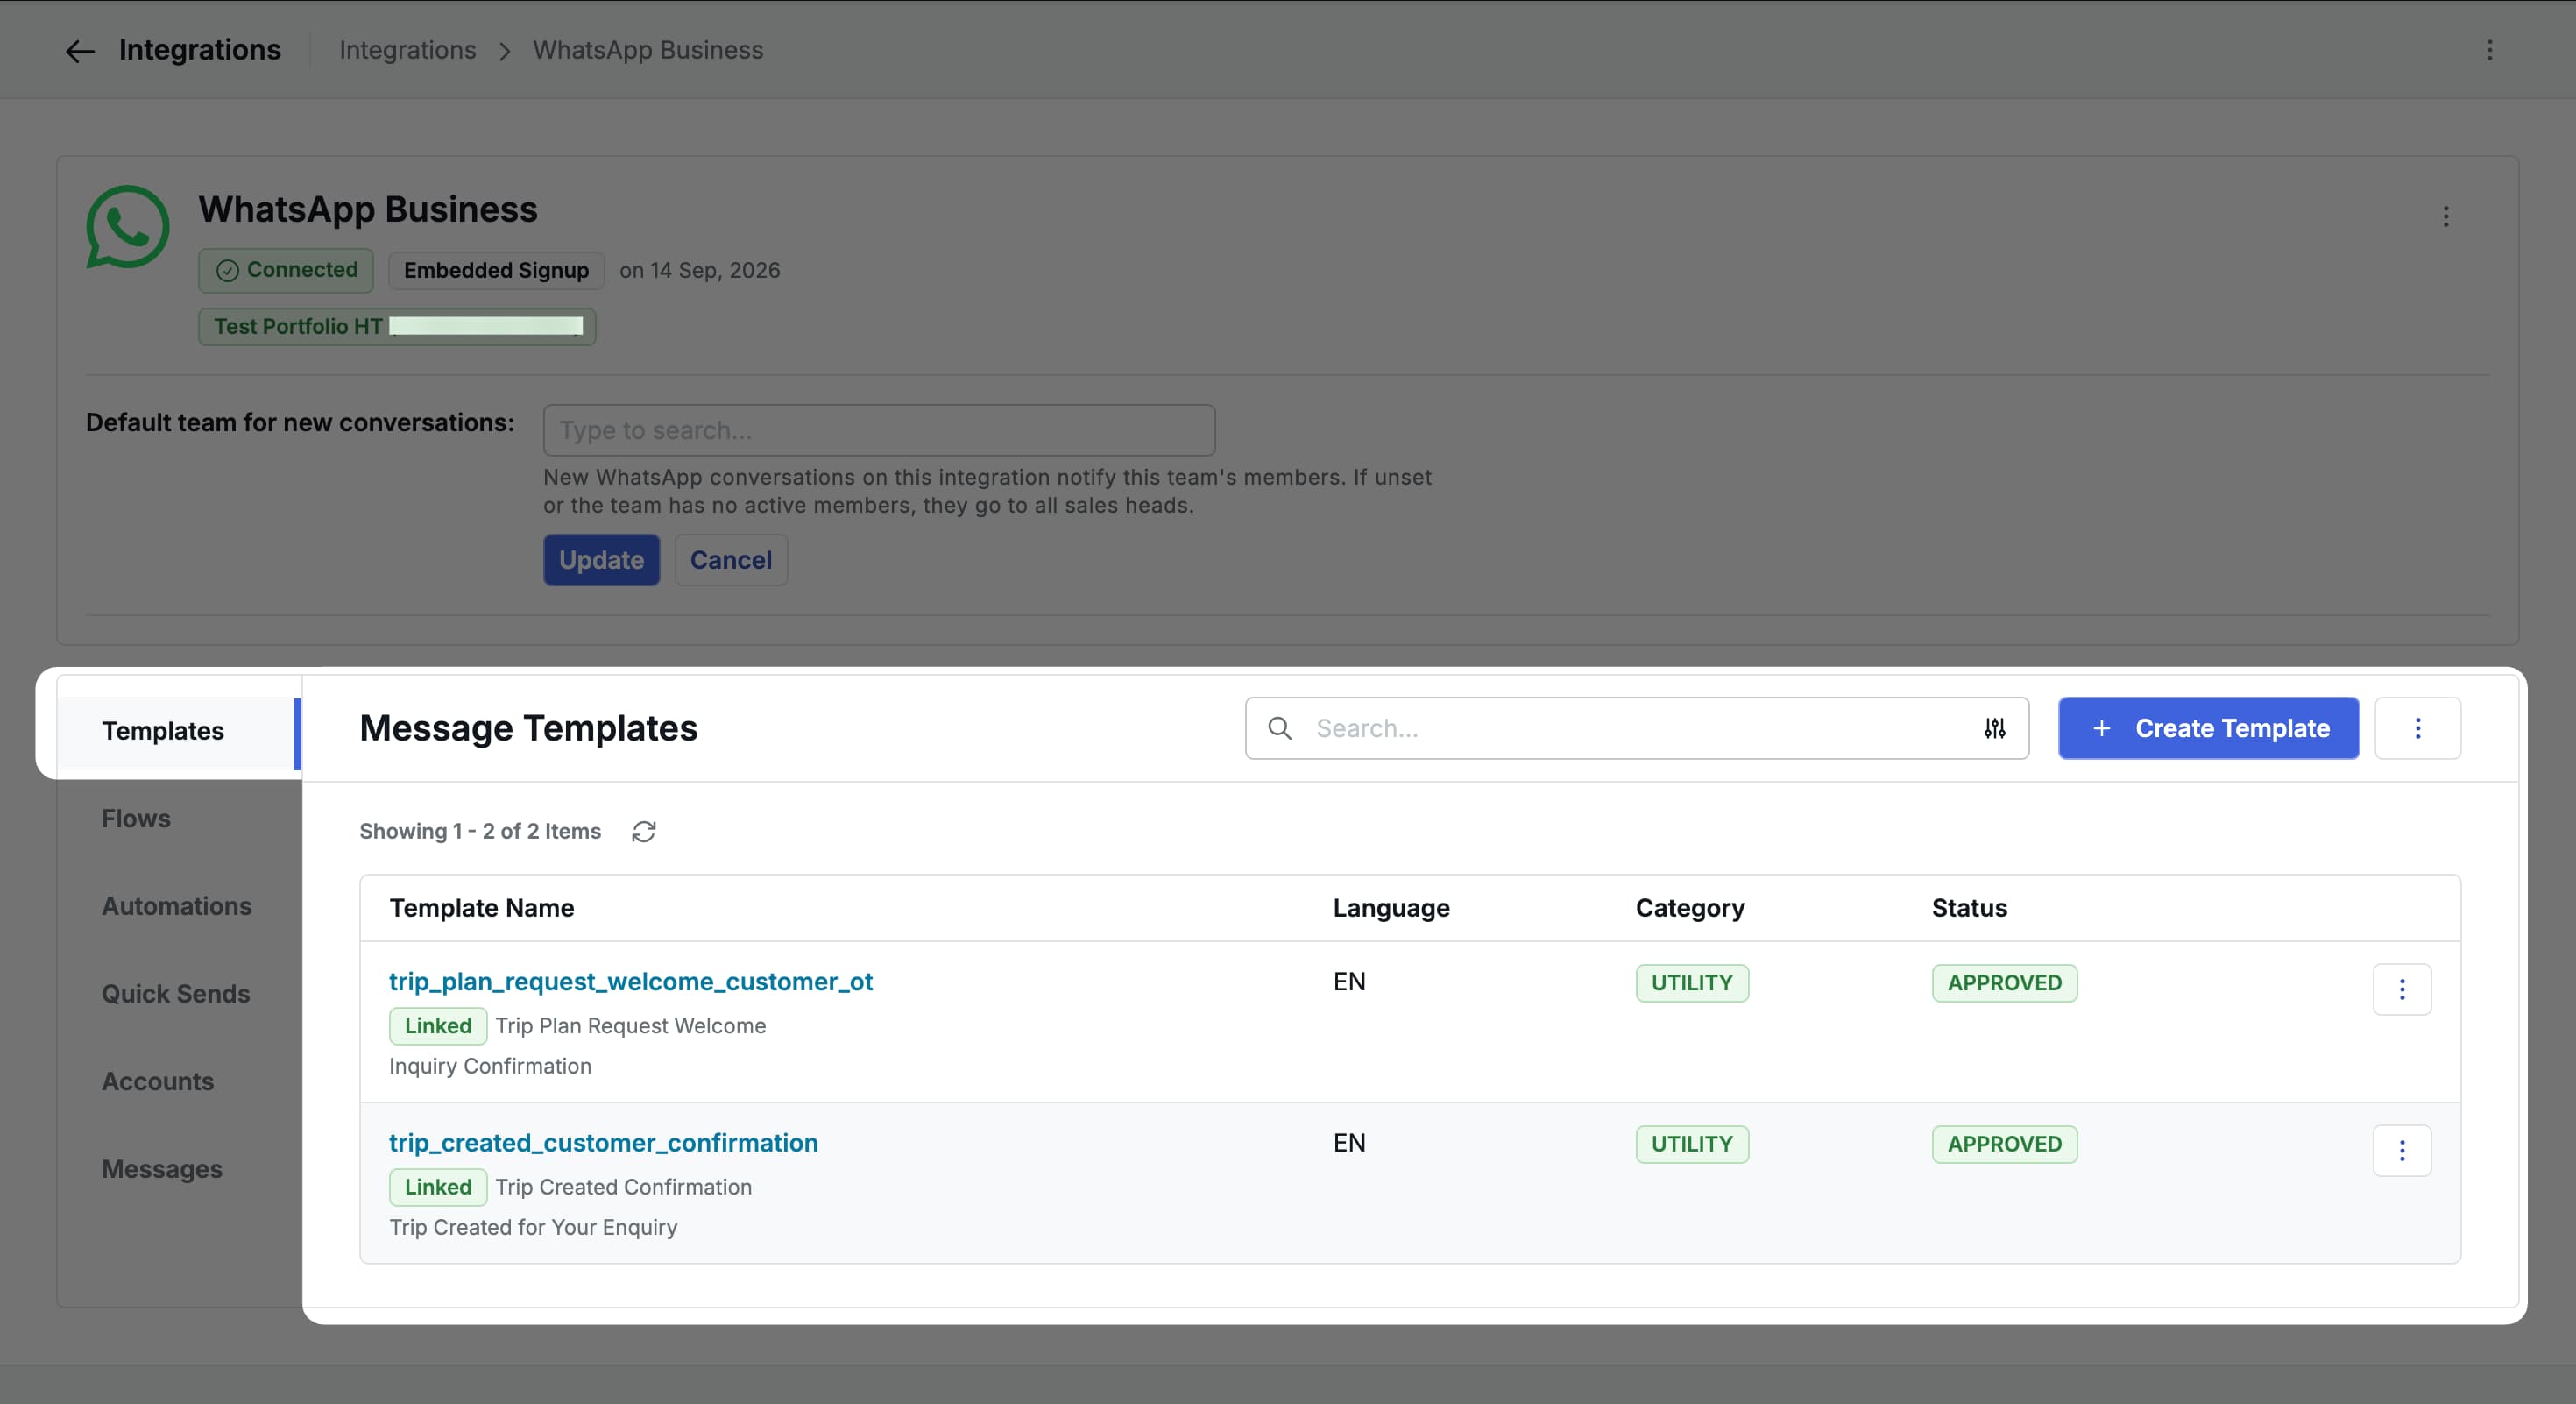
- Click a template’s name to see its details and preview with Variables or Sample values.
- Test Message sends an approved template, filled with example values, to a phone number you enter.
- Link connects a template to an automation template (so its variables fill in from that record type) and sets its default sender number. Links are local to Sembark and do not change the template at Meta.
- ⋮ > Sync Templates pulls the latest templates and statuses from Meta.
Create or Edit a Template
Click + Create Template (or Edit Template on an existing one).
-
Business Account and Templates — pick the WhatsApp Business Account, an optional Default Sender Phone Number, and an optional Automation Template. Choosing an automation template fills in a ready-made message and decides which variables you can use. On an existing linked template, Reset to Default Template replaces the header, body, footer and buttons with the latest defaults.
-
Template Setup — Template Name (lowercase letters, numbers and underscores), Category (Utility or Marketing) and Language.
-
Header Type — None, Text (up to 60 characters), Image, Video or Document. For media headers, upload a sample for Meta’s review and choose:
- Static — the same file is sent every time.
- Dynamic — the file is picked per record, e.g. each customer receives their own Quote PDF or hotel voucher.
-
Message Body — up to 1024 characters. Use Insert Variable to add values such as the customer’s name or trip dates. Provide an example value for each variable; Meta needs them to review the template.
-
Footer — optional, up to 60 characters.
-
Buttons — up to 10:
- Quick Reply — a reply button; a tap can start an automation.
- Call To Action URL — opens a link, which can include a variable (e.g. a payment link).
- Call To Action Phone — calls a number.
- Open a Form (Flow) — opens one of your published WhatsApp forms, with the screen it should open on. One per template.
-
Check the Live Preview and click Save Template.
Saving sends the template to Meta for review. It shows PENDING until Meta approves or rejects it; only approved templates can be sent. Editing an approved template sends it for review again.
NOTE
Authentication templates cannot be created or edited in Sembark. Some templates created outside Sembark may not be editable in the Sembark editor.
WhatsApp Forms (Flows)
A WhatsApp Flow is a form your customer fills in without leaving WhatsApp — for example their destination, travel date and number of travellers. Manage forms from the integration’s Flows tab.
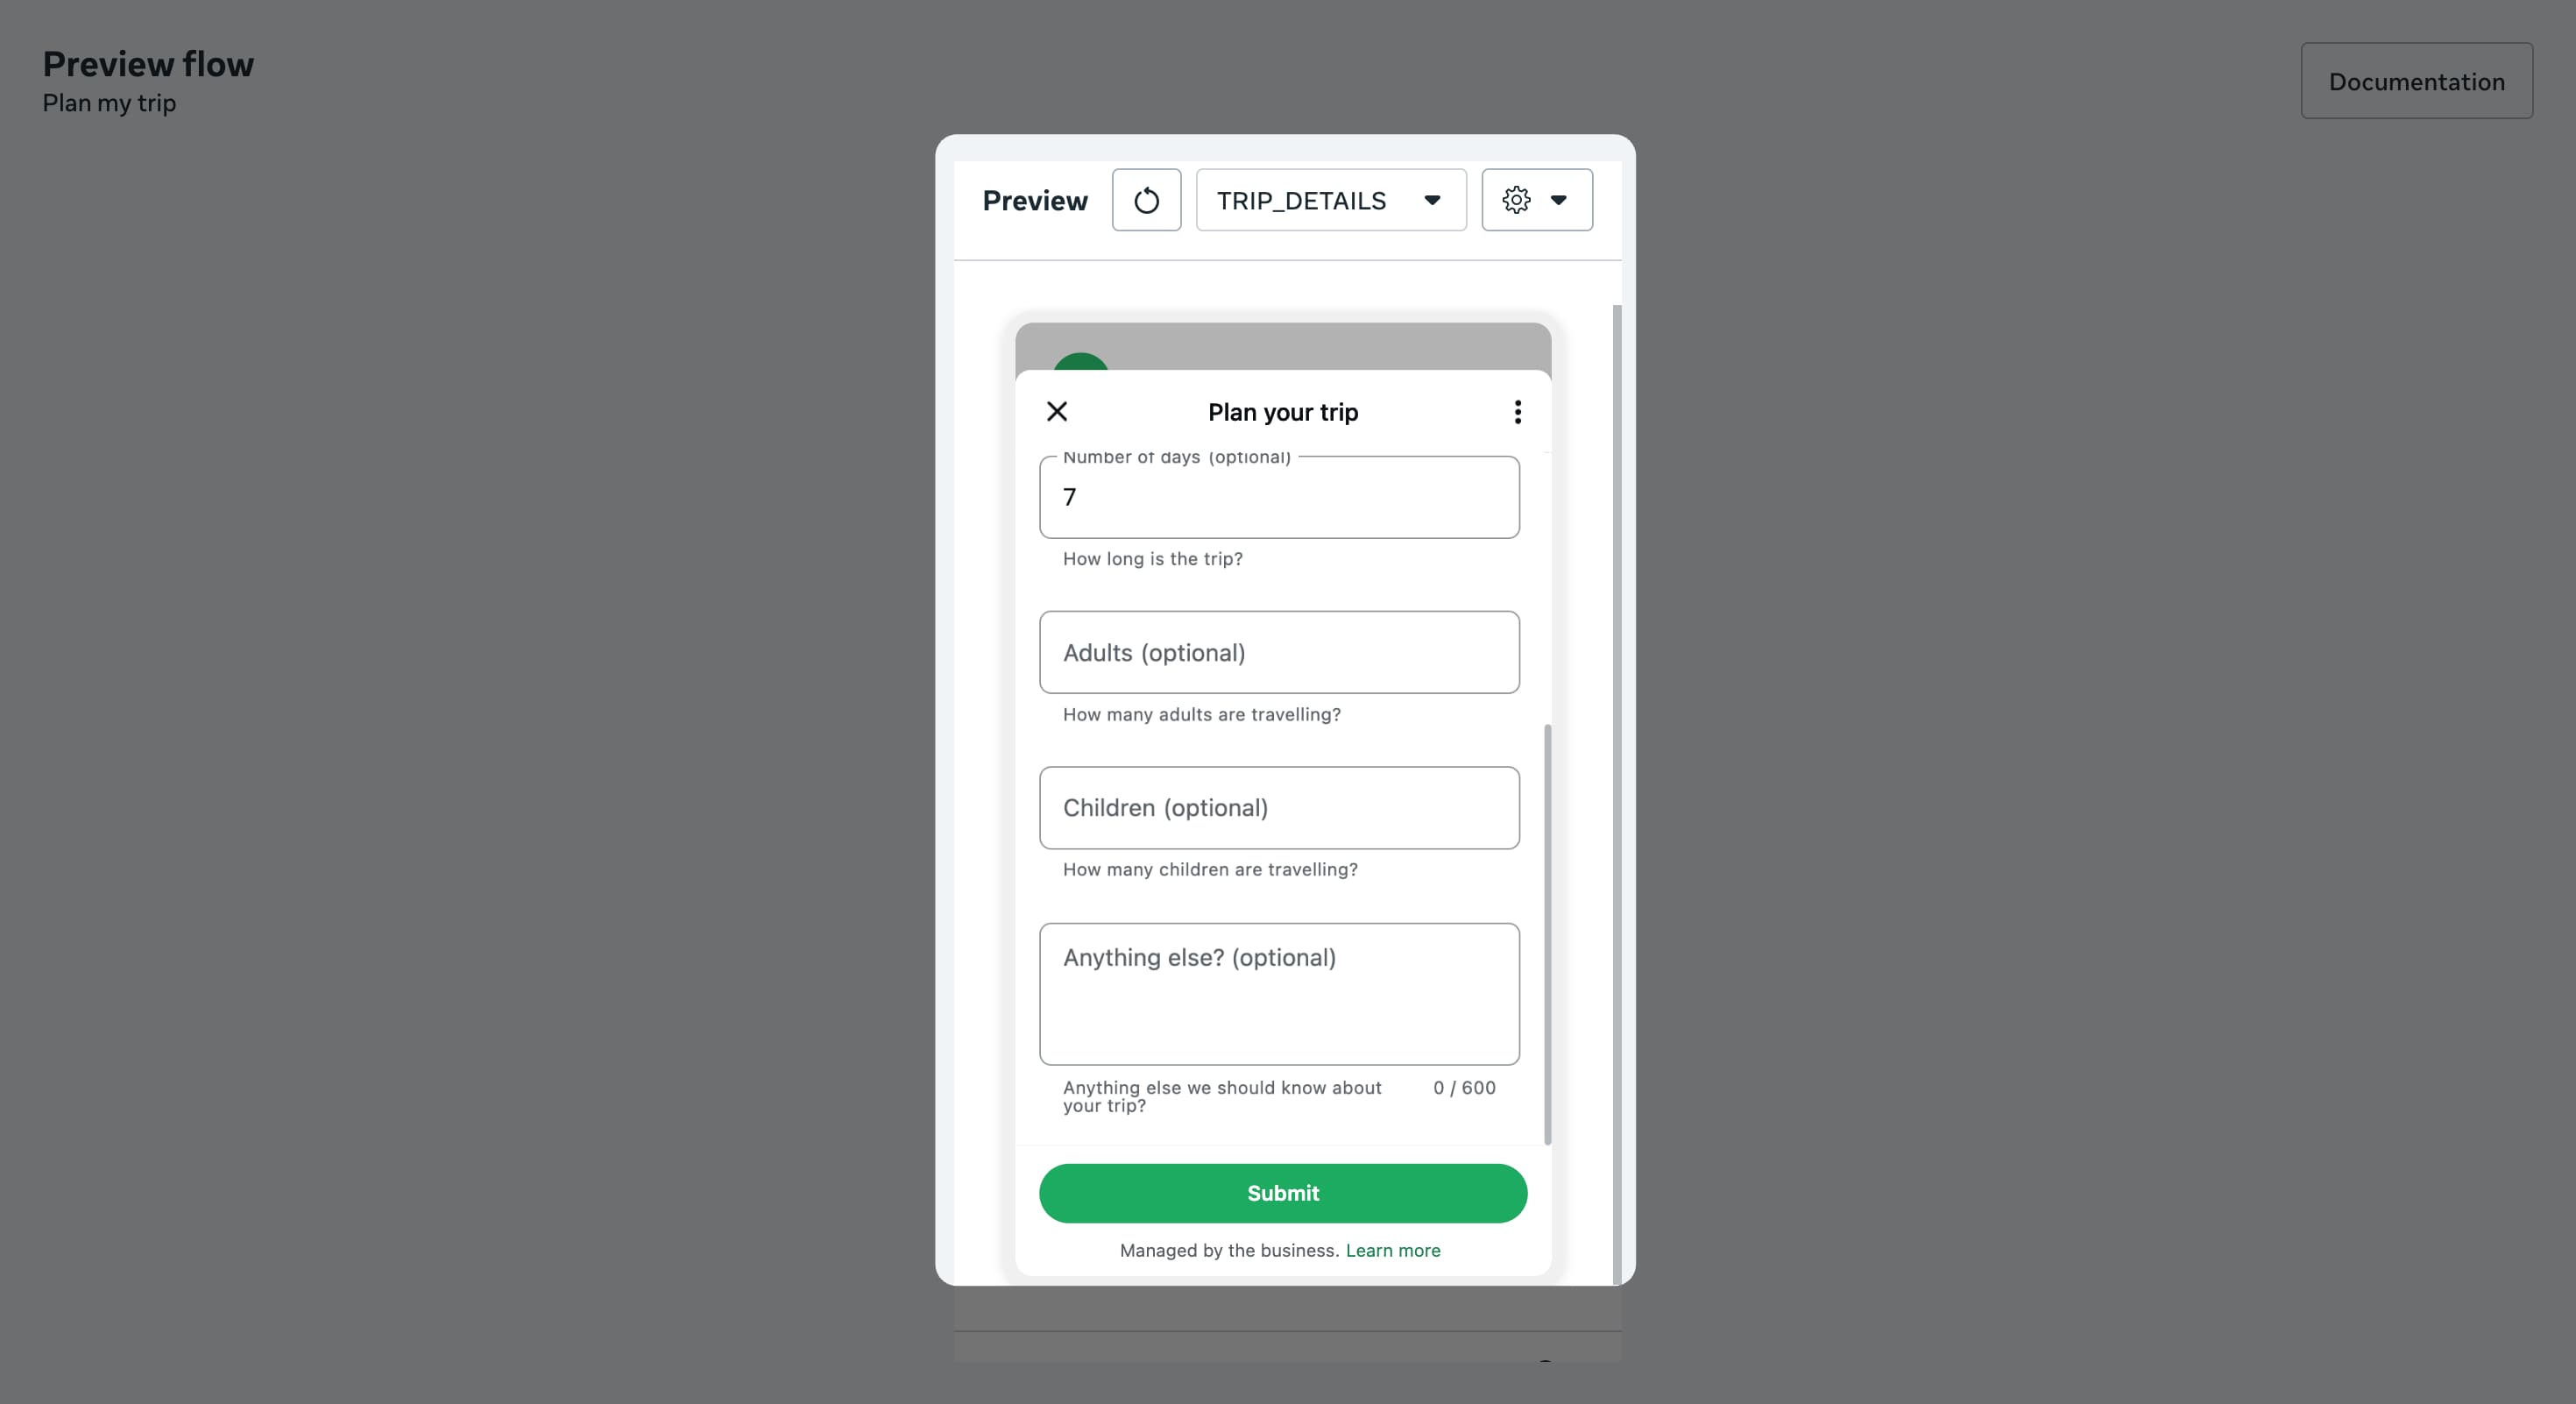
- The list shows each form’s name, categories, status (Draft, Published or Deprecated), business account and when it was last synced. Filter by business account and status.
- Click a form’s name to see its JSON and the Data sent on submit for each screen.
- Preview opens Meta’s preview of the form. The link expires after a while.
- Publish makes a draft available to customers. A published form’s name and categories can no longer be changed.
- ⋮ > Sync Flows pulls forms created in Meta’s Flow Builder.
Create a Form
-
Click + Create Flow.
-
Pick the WhatsApp Business Account, enter a Flow Name and pick at least one Category.
-
Under Start from a Preset, choose a preset, tick the Fields you want and click Fill Flow JSON:
- Trip Plan Request — Destination (required), Travel date, Number of days, Adults, Children, Hotel preference, Your name, Email and Anything else?
- Trip Feedback — Rate your trip (required, 1–5), What you liked, What to improve, Would you recommend us? and Other comments.
-
Review the Flow JSON (or paste your own) and click Create Draft Flow.
-
Preview the draft, then Publish it.
To create trip plan requests from a form, pair the Trip Plan Request preset with the WhatsApp Form to Trip Plan Request automation. If you write your own form, name its fields destination, start_date, no_of_days, no_of_adults, no_of_children and comments so answers fill the lead; other fields are kept as extra details.
Editing a published form
You can change a published form’s JSON. It keeps the same form, so automations and template buttons still use it, but it goes back to Draft until you publish it again. Forms already sent keep the old version, and Meta resets the form’s metrics.
Forms are offered to customers through a template’s Open a Form (Flow) button (at any time) or an automation’s Offer WhatsApp Form step (within the 24-hour window).
Quick Sends
A quick send is a saved set of messages — text and files — that an agent sends into any WhatsApp conversation in one go. Typical uses are bank details, visa checklists, or a destination brochure with a note. You can create as many quick sends as you need.
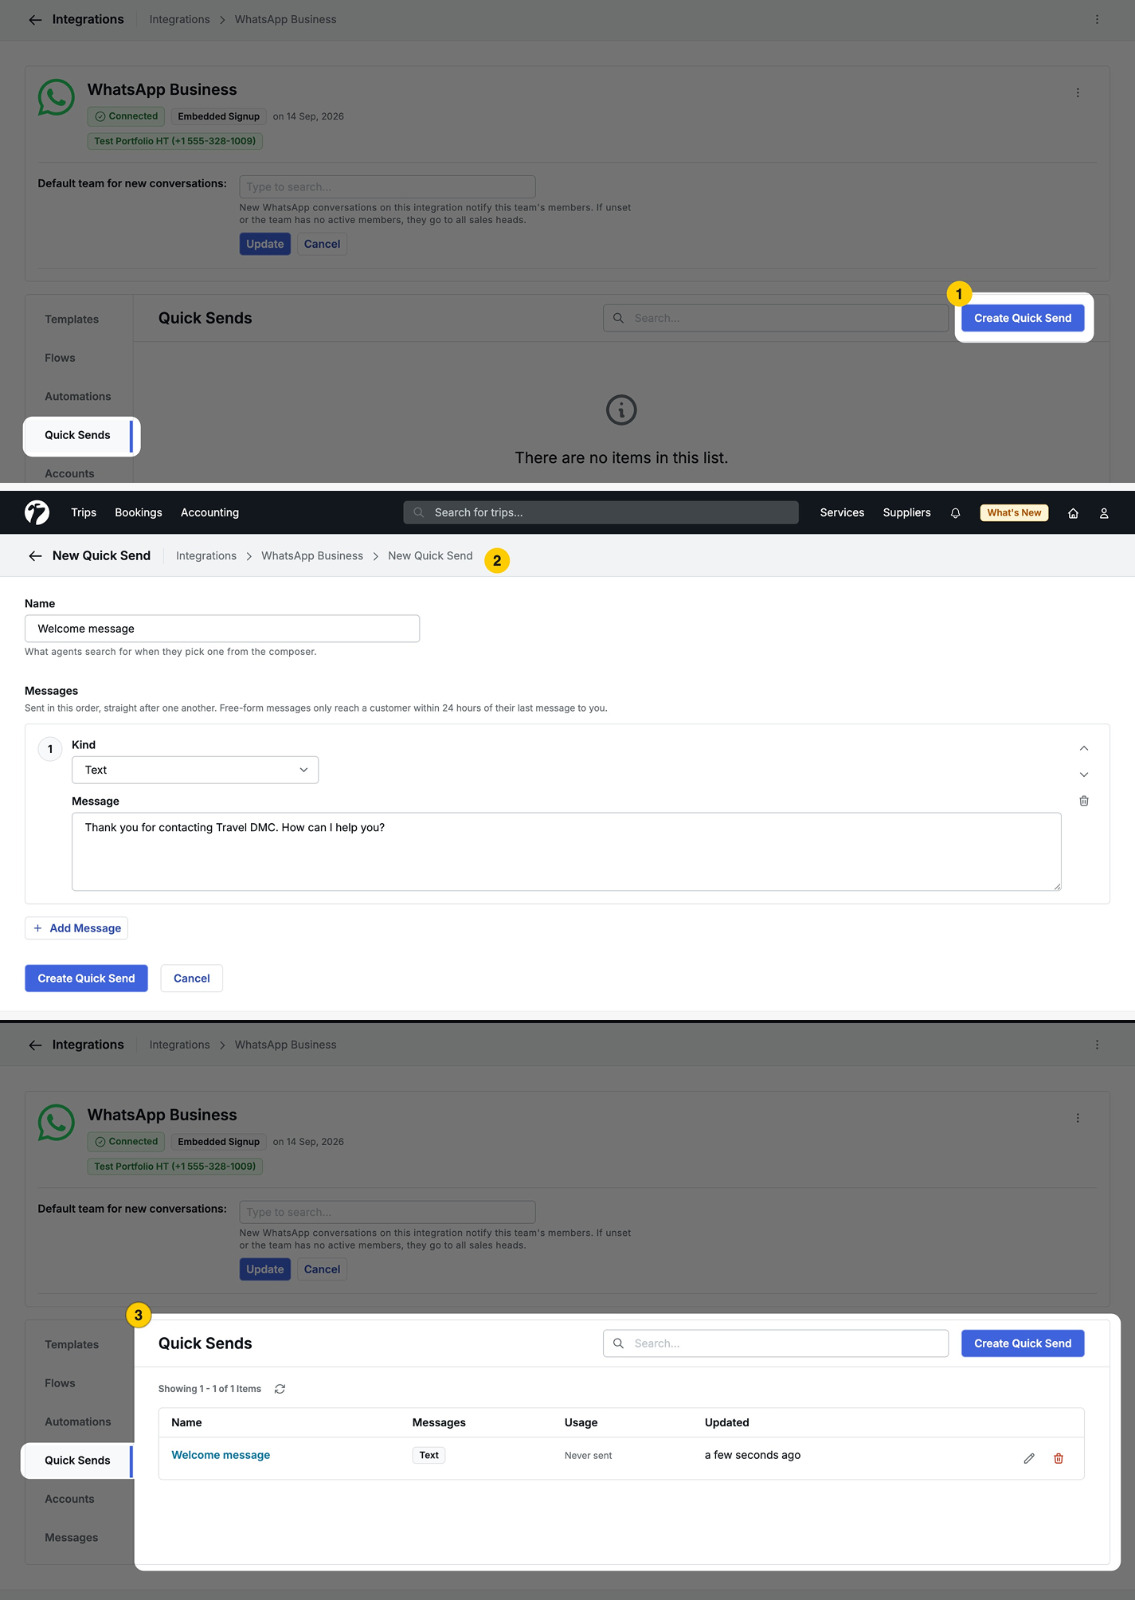
Create a Quick Send
- Open the integration’s Quick Sends tab and click Create Quick Send.
- Enter a Name — agents search by this name in the composer.
- Add the messages to send — up to 10 in one quick send. Each is a Text (up to 4096 characters), Image (JPEG or PNG, up to 5 MB), Video (MP4 or 3GP, up to 16 MB) or Document (PDF, Word, Excel, PowerPoint or text file) with an optional caption. Reorder them with the arrows.
- Click Create Quick Send.
Quick sends belong to your whole organization and can be sent from any of your numbers. The list shows how often each one has been sent.
Send a Quick Send
In a conversation’s composer, click Quick Send, search and pick one, check the preview and click Send. Messages go out in order, each after WhatsApp confirms the one before. You can close the dialog; the rest keep going. Like plain messages, quick sends only reach a customer within 24 hours of their last message.
Automated Messages
Use Automations to send WhatsApp templates, replies and forms automatically — lead welcomes, quotation follow-ups, payment reminders, vouchers, trip check-ins and replies to new conversations.
Messages Tab
The integration’s Messages tab lists every message sent and received through the integration with its sender, recipient, date and status. Hover a status to see its history; a failed message shows the reason.